Star news


Artificial tree variety of Christmas tree craft school. Creative DIY Christmas trees - step-by-step master class
Right after autumn holidays V kindergarten and school, we begin to actively prepare for the main holiday of the year. You can create original New Year's crafts for kindergarten with your own hands, even with the smallest children, from scrap materials. It's simple, fast and cheap. Active mom offers a selection of ideas for joint creativity with preschoolers on New Year's Eve.
| The content of the article: 1. 2. 3. 4. |
Christmas trees made of paper
The constant main symbol of the New Year will certainly take special place among the many crafts you will create with your baby.
You can make a simple but effective Christmas tree by cutting circles out of paper different shades green and gluing them onto a foam cone blank. Even a three-year-old child can cope with this task.


To create your next paper Christmas tree, you will need the same foam cone and cut strips of colored scrapbooking paper of the same length and width. By folding the strips in half, you can stick them on the Christmas tree in rows, but it’s easier to attach each strip with a decorative pin. Decorate the Christmas tree with small plastic snowflakes. Bright, positive, made by a child’s hands, this paper Christmas tree will become a real decoration game room in kindergarten.


Alternatively, a similar Christmas tree can be made from ribbons:

The next New Year's tree is quite simple to make. To make it you will need cardboard blank in the shape of the same cone and small round napkins with lace pattern around the edges. Cover the cone with napkins in rows, starting from the very bottom. The stylish, delicate, dazzling snow-white Christmas tree is ready.

Another very simplest option manufacturing paper Christmas tree with your own hands. Cut out a triangle from colored scrap paper, fold it like an accordion and “stick” the Christmas tree onto the trunk using a wooden skewer. Place on base and decorate with foil star. Simple and tasteful!

New Year's crafts for kindergarten for the Christmas tree
Christmas tree decorations are the very first thing that comes to mind when we're talking about about crafts for the New Year.
Easy to make and fun New Year's ones. To turn an ordinary light bulb into a snowman, Santa Claus, penguin or gnome, you need to prime it (with a special primer or PVA glue), apply a layer of base paint and a drawing (use acrylic paint or gouache - the latter will have to be varnished). For decoration, use felt, lace, eyes for toys, decorative flowers, etc.

From scrap materials: leftover yarn and felt, wire, beads - you can make such a funny snowman for the Christmas tree. The whole process is shown in detail in the illustrations:


You can hang bright white and red Christmas “candies” on the branches of a spruce tree. Making them is not at all difficult: you need to alternately string white and red beads onto the chenille and bend it.

As preparations for New Year's crafts Do it yourself in kindergarten are very popular foam balls. Buy such a ball - and the basis for your future Christmas tree decoration is ready. You can use pins to attach beads, sequins, buttons, and flowers to such a ball.


If you cut a triangle out of cardboard and wrap it with acrylic threads, you will get bright Christmas tree, which can be hung on the Christmas tree. You can make stars and balls in the same way.

Quite easy to do Christmas tree toy in the shape of a Christmas tree made from popsicle sticks. Glue the sticks into a triangle, decorate it, glue the stem-leg, decorate bright decor and attach the pendant. What could be simpler?

Christmas tree for decoration New Year's tree can be cut out of thick felt and decorated with buttons.

It’s quite easy to make a Christmas tree from colored cord (or ribbon) and large beads:

Balls and figures based on them made from threads treated with PVA glue are always popular. Woolen threads need to be rolled in glue, wrapped around the inflated balloon, and after the glue hardens and the threads harden, lower the ball. The resulting ball can be decorated with sparkles, sequins, beads and hung on the Christmas tree.


Is it possible to do something like this? funny snowman for room decor.

New Year's crafts for kindergarten from pine cones
Cones - popular natural material for making crafts, including for the New Year.
Just paint the pine cone and place it on a stand - and now a small Christmas tree is ready to decorate a table or shelf.


The cone can be decorated with small pompoms and hung on the Christmas tree - it will be a wonderful alternative to traditional balls.

And, of course, you can make all kinds of figurines of animals and fairy-tale creatures from pine cones. For example, gnomes:


New Year's wreaths
Wreath on the door or on the wall - traditional decoration for many holidays. Natural New Year's door wreaths look gorgeous spruce branches, decorated with gold cones. And with preschoolers, you can make a simpler New Year’s craft for kindergarten.
For example, take a sheet of double-sided colored paper, fold it in half and make cuts, not reaching the end by about 2 cm. Roll the sheet first into a tube and then into a ring, securing the ends with a stapler. Decorate with a paper bow.

A bright and simple wreath can be made from disposable plastic plate and pom-poms. Cut out the bottom of the plate, paint the plate with acrylic or gouache paint, decorate with pom-poms and bows.

About Active Mom already wrote, you can make a wreath on the door in the same way.

An original, stylish and simplest wreath can be made from clothespins. You can buy plastic green clothespins or paint them green color wooden clothespins. Alternately string clothespins and large red beads onto the wire, form a circle from the wire, and decorate with a ribbon bow.

An analogue to a door or wall wreath can be a homemade clock made from disposable plates. Numbers and arrows can be cut out of cardboard, paper or felt, or molded from hardening plasticine. Decorate the watch with ribbons, chenille, and a star indicating the coming year.


Preparations for the New Year and Christmas holidays are in full swing. You need to choose gifts for family and friends, think over the menu and, of course, decorate the house! We have collected options for making small Christmas trees with your own hands from various materials. Such Christmas trees will be a wonderful decoration for your home, and can also become original addition for a New Year's gift.
Bright Christmas tree made of Christmas balls
- To make this Christmas tree we need one spool of tape (or any other material), Christmas balls different colors and diameters, beautiful pencil(“trunk” of our Christmas tree), a sheet of colored paper, an asterisk or a bow as a top.
- We decorate our stand (in in this case- a spool of tape), wrapping it with a piece of colored paper.

- If the hole is large enough, you can put a piece of cotton wool in the center of the coil and stick a pencil into it. The main thing is that nothing wobbles; the base for the tree must be stable.

- We begin to string the balls onto a pencil. You can go from large to smaller ones, you can string them in a chaotic order.

- We string our top onto the sharp end of a pencil. IN in this example used a star, you can tie a bow using a matching ribbon.

- Our bright Christmas tree made of Christmas balls is ready! Looks very elegant!

"Natural" Christmas tree
- This Christmas tree in finished form looks like the real thing! It can be done most various sizes- it all depends on the amount of time and patience you have. To make it you will need corrugated paper, scissors, soft wire, ribbons and beads for decoration and a stand (you can use a cork if the size of the tree is not large).
- Let's cut it first corrugated paper into strips (the longer the better). Let's make a fringe on these strips (cuts on the paper not reaching its edges on one edge). Twist each strip of fringe tightly with your fingers. You should get a ribbon with needles, as in the photo.

- We take a piece of soft wire and twist our ribbon onto it in a spiral.

- If you twist it tightly, then additional fixation of the tape will not even be needed. It turns out this is such a beautiful Christmas tree “tassel”.

- Make several of these tassels different sizes and attach to each other by twisting the ends of the wire. You should end up with several beautiful Christmas tree branches. Now all that’s left to do is decide on the size and get creative!

- Do required amount twigs for your Christmas tree and fasten them to each other. The basis for your design can be cork, a piece of wood or an ordinary jar filled with newspapers or cotton wool for fixation. Decorate it to your liking: with beads, rain, ribbons and the Christmas tree is ready!

Christmas tree made of yarn
- You can make this Christmas tree in just a few minutes! To make it you will need polystyrene foam (we cut out the base for the spruce from it). You can also make a regular cone from thick cardboard, yarn, beads, glue.

- We cover our cone (regardless of what it is made of) with glue. From the base of the spruce we begin to twist the thread to the very top.

- Decorate a Christmas tree made of yarn with beads.

- The top can be anything: a New Year's ball, a bow, a ball of thread. In this example we made a star out of wire.

- Experiment with Christmas tree decorations, their sizes and create compositions!

If you liked this particular Christmas tree, then similar ones can be found in the article
Coffee Christmas tree
- For this original Christmas tree you will need coffee beans, a cone made of any material (cork, polystyrene foam, thick cardboard), glue and decorations of your choice. First, let's make a cone for the spruce.

- Coat the cone with glue (you can apply it pointwise for each grain using a syringe) and secure the grains.

- You can glue beads between the grains; with them the Christmas tree will look more elegant.

- After you cover the entire cone with grains, you can additionally decorate the spruce with bows, ribbons, and beads.

- This is what the finished ones look like coffee trees! By the way, you can use beans instead of coffee beans.

Ribbon Christmas tree
- Another proof of the phrase that “everything ingenious is simple”! This original Christmas tree can be made in just a few minutes from the most basic materials. To make it, you will need a cone made of any material (maybe ordinary thick cardboard), thin ribbons, scissors, pins (possibly with beads at the ends), glue.

- Let's cut our ribbons into identical strips, as in the photo.

- We fold each strip in half and secure it with a pin (you can alternate regular pins with those with beads at the ends).

- We secure the resulting blanks to the very top.

- The top can be decorated with anything. In this case, a paper gift bow was used. The Christmas tree is ready!

Christmas tree made of tulle
- To make this Christmas tree you will need tulle, thread and needle, and a couple of beads for decoration. First, let's twist our wire from one end in any shape (this will be our top).


- We take several pieces of tulle and thread a thread through one edge, thereby creating folds like on a skirt.


- We fasten the skirt along the wire. The wire, in turn, can be further decorated by wrapping it with ribbon in a spiral, as in this example. Make as many of these “skirts” as possible, this will only make the Christmas tree more magnificent. You can use tulle of different sizes and colors.

- Decorate the Christmas tree with ribbons, beads and a beautiful delicate Christmas tree is ready!

Christmas tree made of polymer clay

Volumetric Christmas tree made of paper
- To create such a Christmas tree you need plain paper, soft wire, scissors and a pencil. First you need to make a base from wire. We will twist one of the ends in the form of a spiral for the stability of the future structure.

- Let's draw a circle on a piece of paper with marked lines, like on a template.

- We make cuts on the resulting circle without touching the area of the second circle (inside).

- We form “sharp corners” by gluing the ends of the resulting pieces.

- This turned out to be the first tier for the Christmas tree. Now we make a puncture in the middle and string it onto our wire.

- We make several such tiers, gradually reducing the radius of the initial template circle.

- Cover the top with a cone made of the same paper and volumetric herringbone paper is ready!

Children's Christmas trees made of paper

Summary: How to do christmas tree with your own hands. Original Christmas trees made of pine cones and tinsel. Photos and templates of paper Christmas trees. Homemade origami Christmas tree. Christmas tree made of candies.
Even kids can take part in preparing for the New Year and making New Year's crafts with their own hands. For example, Christmas tree Even a two-year-old can make one out of an ordinary cone and plasticine. You just need to teach him to roll plasticine balls of different colors and attach them to the pine cone. The base of the Christmas tree is a spool of thread wrapped in foil.
Here's more complex options Christmas trees made from pine cones. In the first case, the bump was painted acrylic paint


in green and white colors. In the second version, the pine cone was decorated with beads. You can make a Christmas tree like this with your own hands from a large number of cones. The basis for the Christmas tree is a cone made of thick paper or cardboard, which is then covered with cones on all sides using a glue gun.

Finished Christmas tree

decorate with beads and large beads.

Another very simple homemade Christmas tree made from tinsel. You can make it in literally five minutes.
To do this, you need to make a cone out of cardboard and stick tinsel on it in a spiral. Christmas tree made of candies. DIY candy tree. How to make a Christmas tree out of candy If before wrapping cardboard cone tinsel, using tape, attach candies to the future Christmas tree, you will get a sweet Christmas tree made of candies. Detailed


New Year's master For a class on how to make a Christmas tree out of candy, see the photo below or follow the link.
When creating a Christmas tree from candies, it is convenient to use double-sided tape.
A large number of

You can make Christmas trees with your own hands from paper. Let's start with the simplest New Year's crafts. DIY paper Christmas trees DIY Christmas tree made of paper (option 1) Print on thick paper

or cardboard and cut out the blanks with scissors >>>> Bend each Christmas tree in half and glue them together. This Christmas tree is made according to the same principle as Christmas ball from our previous article. See link >>>>

Epson's Singapore website offers ready-made templates your Christmas trees:


DIY Christmas tree toy (option 2)
If you have unnecessary cardboard box, then you can use the same technology to make a Christmas tree like this.

DIY Christmas tree toy (option 4)

Or you can make a curly Christmas tree by gluing a cardboard cone base with strips of rolled paper.


DIY Christmas trees made of paper (option 10)
To make such a Christmas tree, you must first cut out circles of different diameters from paper. You will also need wire and a stand, which can be successfully replaced by half of a large Kinder Surprise.


The Christmas tree is easily assembled with wire, and, most importantly, it is easily disassembled.
See link >>>>

Origami Christmas tree from a magazine
This origami Christmas tree is very easy to make with your own hands. Small format magazines that can be found in any home are suitable materials.
Work plan:

The procedure described below must be done with each page in the magazine.

If the cover is thick, you can simply detach it (tear it off).
1. Fold the page, upper right corner, at an angle of 45 degrees towards you.

2. Once again fold the sheet in half diagonally.

3. We go through all fold lines with a fingernail or other object so that they do not open, especially thick pages. 4. Fold the bottom corner that extends beyond the borders of the magazine upward. In this way we add up all the pages in the advertising magazine.

The result will be cute
New Year's origami

Christmas tree.

Origami Christmas tree from a magazine
Another origami Christmas tree model for the New Year. Unlike the previous origami Christmas tree from the magazine, the pages here are not folded, but figuratively cut out according to a template. The manufacturing principle is very simple. You need to prepare a template for half of the Christmas tree, circle it on one page and cut it out. Further, the cut out page will itself serve as a template for other pages. You can cut out several pages at once, but you shouldn’t cut a lot at once, as the cut line will turn out uneven (crushed) and the tree will not open well. The tree itself turns out to be more one-sided; to achieve volume, you can fold and glue 2-3 magazines together. But believe me, she looks good anyway.
Origami Christmas tree made of modules. Modular origami Origami Christmas tree is not at all difficult. It consists of individual branches, so you can make Christmas trees of a wide variety of shapes and sizes. In addition, from such branches you can make New Year's compositions, make toys, snowflakes, and stars. See the New Year's master class at the link >>>>

Christmas tree coloring on the wall
Big Christmas tree coloring book on the wall. The individual parts of this New Year's beauty must be printed on 22 A4 sheets and pasted on the wall in the correct sequence. The advantage of this New Year's paper craft is that the Christmas tree is made in black and white version, so the printer's ink consumption is low. In addition, this New Year coloring book with many small parts will captivate the child for a long time. Link >>>>

DIY napkin tree
Master class on making very beautiful, unusual Christmas tree from napkins can be found at the link >>>>

How to make Christmas trees from corrugated paper
The Country of Masters website invites you to make two Christmas trees with your own hands from corrugated paper.
Option 1. The candles and the Christmas tree itself are made of corrugated tubes. Link >>>>

Preparations for the New Year continue! You and I have already made garlands. Would you like to know how to make a Christmas tree with your own hands from scrap materials? This craft will be useful for decorating your home, and as work for a kindergarten or school.
And this section will consist of 2 topics:
- Desktop options;
- Big sizes.
The first ones are suitable for our children as crafts for school or kindergarten. The second ones are more for decorating the room. For home or office.
Children's crafts for school or kindergarten
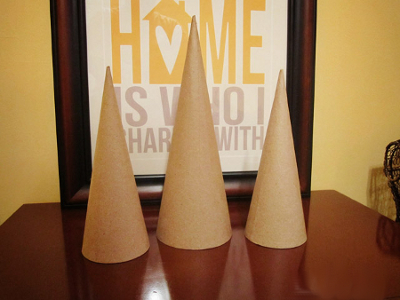
For most robots, you need to make a base. And it will be a cardboard cone. Here I will tell you how to prepare it.
Cone
You can simply draw a circle and glue a cone out of it. 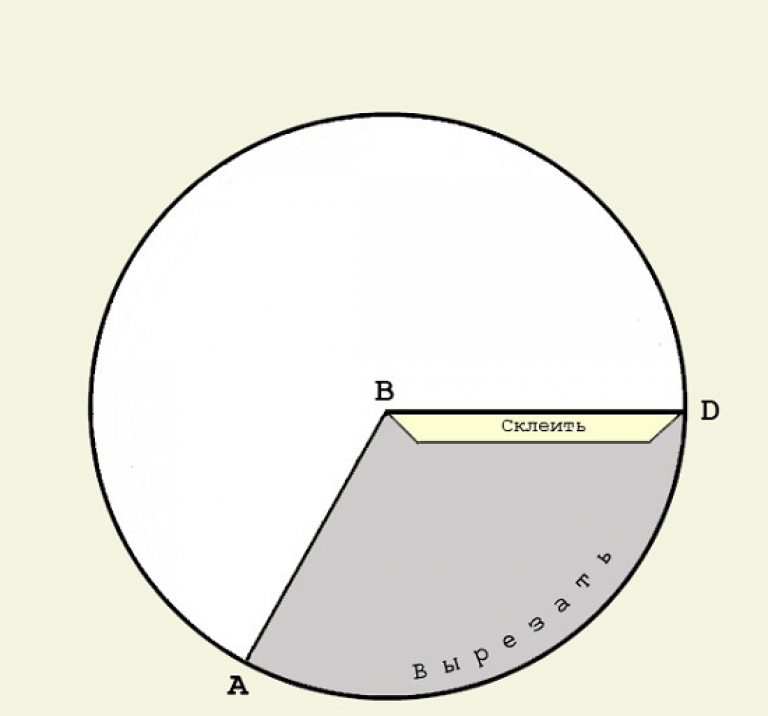 But there is also another variant.
- We measure the width of the sheet.
- We measure this distance from the upper corner of the sheet using a compass, ruler or just a thread. And make dots on the sheet with a pencil.
- Let's connect the dots.
- Cut it out.
- Glue it together.
Third option- Roll up a paper bag. Fold the edges.
Now we use this blank.
Our crafts
I’ll start with the Christmas trees that my son and I made from twine and the second from decorative Christmas tree beads:
Another Christmas tree that I hung on the wall and it made me happy until the summer. Looks very nice as decoration. Made from twine and twigs. And toys made from salt dough.
Like it! We will be pleased.
Tinsel

- On bottom row We glue the bases with tinsel.
- The next row is candy.
- And so on to the top. And instead of a star there are lollipops.
The photo shows candy. But you can decorate with anything instead of candy. True, a Christmas tree with candy canes looks especially elegant. She herself is like a gift.
Threads

You may have seen it more than once openwork balls, which are made in this way. The Christmas tree turns out no less lacy!

Do not wind the yarn too tightly, otherwise the delicacy will be lost. This original craft is “knitted” from white threads. But you can use both green and blue.
The second option is to make a base of threads, as in the previous master class.
Crafts for home
I will display 2 models separately. They are definitely not suitable for school. However, the houses will look beautiful.
Traffic jams

Sometimes it's a shame to throw away corks. And there are a lot of ideas for decor from them. So we use this material.
- Let's draw a triangle.
- Following the template, we will make row by row, connecting the corks with glue.
- Some corks can be painted.
- Let's form a bow on top.
- Another plug will serve as the “trunk” of the tree.
If you wish, you can come up with a pattern for the spruce.
Boards

This design looks powerful. But it won’t be possible to do it quickly.
We will also need small boards. They will be at the top of the tree. And the big ones are below.
Between them you will need to nail several small wooden squares, like a tree trunk.
As an option, a Christmas tree made of stairs and a bunch of balls. Really unusual!? I think guests and neighbors will also be surprised. If you’re tired of regular spruce, then this is the idea to add: 
You can make a miniature from coffee or ice cream sticks or small boards. 
From cardboard

You can make a Christmas tree of any height. Moreover, cardboard sticks can be twisted and changed the shape of the Christmas tree!
Cut the cardboard into equal strips using stationery knife and rulers (watch your hands). We put it on the knitting needle. You can spray paint it or leave it like that.
Wall installations
Wrapping

Such work will look like a colorful picture. And it completely matches the festive mood.
- Roll the paper into tubes.
- Glue it onto the base in the shape of a triangle.
- Decorate with buttons.
Simple and interesting!
Branches on the wall

There are many ways to decorate this simple Christmas tree model.
You can use the following as a design:

- Toys;
- Fairy lights:
- Children's crafts;
- Houseware.
Or you can tightly connect the branches, without gaps, and paint them in light snowy tones.
Glowing garland

I'll tell you step by step about this model:
- Choose a suitable location.
- Drive 3 nails into the wall (triangle shape).
- Tie the garland to the nails, like the edging of a triangle.
- Tie several branches to a rope.
- Secure the rope itself to the top nail.
- Decorate the interior space by gluing photographs, snowflakes, and toys to the branches.
More options: 
All work is filled with warmth and pleasant emotions.
What material will you choose? I tried to fill the collection very different ideas and options. If you have anything to add to this collection, please tell us! And don’t forget that we have a continuation of the New Year’s theme ahead. Subscribe to learn how to make your own star!
A small Christmas tree made from improvised materials is great for decorating a home, classroom at school or kindergarten. Simple and cool crafts can be made from any materials. For example, a Christmas tree made from cotton pads and cones. Such a craft made from sheets of notes or ordinary table napkins will look original. You just need to choose the appropriate instructions that will help you determine what is easier to make holiday trees from, and how difficult such work can be. Among the proposed master classes with photos and videos, you can learn how to make a Christmas tree with your own hands from any materials. Such lessons are suitable for both teenagers and children: they describe all the steps of work step by step. At the same time, you can make Christmas trees using them not only in labor lessons, but also at home.
How to make a Christmas tree with your own hands at home for school - master class with photos

A small Christmas tree craft can be made from different materials. At the same time, it can be assembled on a frame or without using it. The most convenient way to make cute Christmas trees is a foam cone. It can be covered with paper, fabric, and thread. But in order to give the craft being made original look, it is recommended to replace the commonly used materials. In the next master class you can learn how to make beautiful Christmas tree do it yourself at home for school from old sheets of music.
Materials for making a DIY Christmas tree at school and at home
- sheets of music;
- scissors;
- foam cone;
- silicone glue.
Photo instructions for a master class on how to make Christmas trees yourself at home and at school
- Cut sheets of music into long strips.

- Cut each strip into a fringe and twist the whole part of the leaf.

- Prepare all strips for use.

- Apply silicone glue to the foam cone.

- Glue the first row of fringe.

- Repeat similar work for the next rows.

- Cover the foam cone completely with paper fringe.

How to make a Christmas tree out of paper in a kindergarten, at home with your own hands - photo instructions

Using plain paper And shiny ribbons or tinsel, you can make a very beautiful and cool New Year tree. This craft can be used to decorate a home or garden. At the same time, even kids from the primary group will be able to make cool decor. Learn how to make it yourself original Christmas tree from paper at home for kindergarten, the master class below will help.
Materials for making your own paper Christmas tree in kindergarten and at home
- green, blue, red paper;
- sheet of cardboard;
- glue;
- pencil;
- floral ribbons;
- scissors.
Photos from a master class on how to make a paper Christmas tree yourself in kindergarten and at home
- From green and blue paper, cut out many palms according to the blank, or simply by tracing your hand.

- Cut a pyramid out of cardboard and glue a couple of paper palms to it.

- Glue the first row of paper palms.

- Completely cover one side of the pyramid with green and blue palms.

- Paste over back side pyramids with palms.

- Cut out a couple more palms from red paper. Make a small hole at the top of the pyramid.

- Thread a ribbon through the hole made.

- Glue a pair of red palms at the top of the pyramid. Additionally, decorate the Christmas tree with tinsel or ribbons.

How to make a Christmas tree with your own hands at home for a school competition - photo tutorial

To win in school competition New Year's crafts, the child needs to make a cool and unusual Christmas tree. At the same time, the work on its production should not be particularly difficult or long. For example, using following instructions You can learn how to make your own Christmas tree for a school competition at home from foam sheets for crafts and bright sparkles.
Materials for home-made DIY competition Christmas tree for school
- green and yellow craft foam sheets;
- glue in a can;
- glitter;
- beads;
- glass beaker;
- scissors;
- skewer.
Photo master class of schoolchildren making a Christmas tree at home for a competition
- Prepare materials for work: cut out shaped squares of different sizes from green foam sheets.

- Thread the foam squares onto a skewer, forming a layered Christmas tree.

- Rotate each square to different sides so that they really look like Christmas tree branches. Cut out a small star from a yellow sheet.

- Apply glue to the prepared Christmas tree.

- Sprinkle the Christmas tree with glitter and wait for the glue to dry.

- Pour beads into a glass glass and place a Christmas tree in it. Glue a star to its top.

How to make a Christmas tree from cotton pads with your own hands at home - master class with video

Even from ordinary cotton pads you can make a real Christmas tree, which is suitable for decorating a room or classroom. This task can be done by both children in kindergarten and school students. You just need to know the rules step-by-step assembly crafts. The following video tutorial will help you learn about this, telling you how to make a Christmas tree from cotton pads at home easily and simply.
Video tutorial on how to make a cotton Christmas tree at home with your own hands
The following master class describes step by step how easy it is to make a cotton Christmas tree. Optional ready-made craft You can decorate it as in the video example or use other materials for decoration.
How to make a Christmas tree with your own hands at home from threads - photo from the master class

Both from ordinary and from wool threads you can make a cool Christmas tree that will look beautiful in the children's or living room. Moreover, all the work on making such a craft at home will take no more than half an hour. Simple instructions, listed below, will help you make such decor easily and simply. You just need to study in detail how to make a Christmas tree with your own hands from threads and beads at home. Using the prepositional pattern, you can also make a Christmas tree from ribbons: to do this, replace the threads satin ribbons or organza stripes.
List of materials for making your own Christmas tree from wool threads at home
- foam cone;
- wool threads;
- scissors;
- glue;
- red beads and other decor.
Photo from a master class for making a Christmas tree from threads at home

How to make a tinsel Christmas tree with your own hands at school - step-by-step video tutorial

New Year's tinsel in itself can create a festive atmosphere: that is why many parents use it to decorate living rooms, children's rooms and their bedrooms. But such materials are also suitable for making cool bright crafts. For example, the following master class with photos describes how to make a tinsel Christmas tree with your own hands at home, step by step. Specified instruction Suitable for both preschoolers and teenagers.
Video on a master class on how schoolchildren make a Christmas tree from tinsel with their own hands
Using the following instructions, you can easily make a beautiful shiny Christmas tree from tinsel. If desired, it can also be made from ribbons or fabric strips. You just need to pick best option decorate the frame and repeat the work described in the video tutorial.
How to make a Christmas tree with your own hands from available materials - master class with photos for kindergarten

Bright patterned napkins are great for making simple and very cute Christmas trees. For the base, which will be covered with pieces of paper, you can use foam cones of any size. You can also further decorate the craft using ribbons, tinsel or shiny beads and chains. Make one like this colorful decor at home it will be quite easy. The following master class with photos will tell you more about how to make a Christmas tree with your own hands using improvised materials step by step.
List of materials for gluing a DIY Christmas tree from scrap materials
- foam cone;
- multi-colored napkins;
- glue;
- scissors.
Photo instructions for gluing a Christmas tree from scrap materials yourself

What to make a Christmas tree from with your own hands - a master class on making decorations from pine cones

Using pine cones, you can make a Christmas tree of any size. This can be either a full-fledged figurine or a small craft that will decorate the table. At the same time, such simple material is optimal for quickly and easily preparing Christmas trees for the holiday. Therefore, when choosing what to make your own Christmas tree from, you should choose pine cones. They can easily be collected in the required quantity, and both a teenager and a child can work with such material.
List of materials for making a Christmas tree from pine cones with your own hands
- cones of different sizes and shapes;
- red beads;
- spruce branches;
- cardboard cone (ready-made or made yourself);
- glue gun;
- glitter glue.
Master class with photos on making a pine cone Christmas tree with your own hands

Video tutorial on making a Christmas tree craft from pine cones
The instructions below are great for creating another festive Christmas tree for decorating your home, kindergarten and school classrooms. A simple master class will help you do original craft which will have amazing appearance. It will help create a real festive atmosphere and therefore can be used as a gift for the New Year 2018 for your loved ones and friends.
What to make a Christmas tree from for crafts for the New Year 2018 - a step-by-step master class with photos

Since you can make any New Year’s crafts at home, you shouldn’t limit your imagination. It is better to invite children to create a unique Christmas tree. First you need to find out what you can make such a craft from easily and quickly. For example, it can be assembled from beads and balls. But the simplest and most entertaining can be considered assembling a Christmas tree from felt and felt toys. To do this, you just need to glue the blank to the wall and make a very cool one out of it. New Year's decor. In the next master class with photos you can find out what to make a Christmas tree for such unusual crafts for the New Year 2018, and how best to decorate it.
Materials for making a cool Christmas tree for the New Year 2018
- felt of different colors;
- scissors;
- double sided tape;
- chalk;
- glue.
Master class with step-by-step photos of making Christmas tree crafts for the New Year 2018

How to make a Christmas tree from plastic bottles with your own hands - step-by-step master classes with photos and videos

Assembling a plastic Christmas tree for home and classroom decoration is quite easy and simple, even for a child. Therefore, when choosing the most simple materials To make New Year's crafts, you should choose containers with different volumes: this will help you make figurines of different types. Find out how from plastic bottles To make a Christmas tree with your own hands quickly and easily, the following master classes with photos and videos will help.
List of materials for making plastic Christmas trees from bottles with your own hands
- acrylic paints;
- plastic bottle;
- sequins of different colors;
- glue;
- White paper;
- brush;
- scissors.
Photo instructions for making your own Christmas tree from a plastic bottle
- Paint the bottle with white acrylic paint and wait for it to dry.

- Trim bottom part bottles.

- Cut fringe at the bottom of the bottle and carefully lift these pieces up.

- Round off the end of each fringe by trimming them with scissors.

- Place the prepared top part of the bottle onto the previously cut bottom.

- Prepare multi-colored acrylic paints.

- Paint the bottle with dark green paint and leave until completely dry.

- Use white paper to make a cone for the top of the Christmas tree.

- Carefully cut off the bottom paper cone and then cut it into fringe.

- Using a sponge or toothbrush, apply green paint to the paper top of the tree.

- Fold long strips of paper in half and cut into fringes.

- Glue paper strips with fringe to the bottle in a spiral.

- Paint strips of paper with green paint.

- Spray the prepared Christmas tree with white paint to imitate snow on its “branches.”

- Paint the bottom part of the stand red.

- Reassemble the Christmas tree and put spots-circles on it with paint of different colors.

- Cover the Christmas tree with light green glitter.

- Additionally, glue multi-colored sequins onto the bottle.

Video on a master class for making a plastic Christmas tree with your own hands
Another cool Christmas tree from plastic bottles can be made in another master class. The instructions with video below will allow you to assemble simple craft with children at home is easy and simple. You just need to carefully study the proposed lesson and repeat the work done.
Cool crafts in the form of Christmas trees can be made from any available materials. For example, assembly unusual decor can be carried out from plastic bottles. Or you can use a foam cone as a base and cover it with paper, ribbons or tinsel. The craft will turn out to be quite unusual when using cotton pads. They can be covered with multi-colored paint and glitter. You just need to choose what to make a craft from and study the master classes offered above with photos and videos. They will help you learn how to make a Christmas tree with your own hands at home, school or kindergarten. The described instructions are suitable for children of any age: preschoolers and primary and secondary school students.

