Star news


Master class “Snowflakes from plastic bottles.
Master class for parents .
"Snowflakes from plastic bottles with your own hands »
Participants: parents.
Tasks:
1. To develop in parents the ability to organize joint creative activity with kids preschool age through working with waste material
2. Develop intra-family connections, emotional positive family communication, ability to find common interests and classes.
3. Test new ones non-traditional forms working with family as a positive factor emotional development child.
Equipment:
Materials for creativity: plastic bottles, ribbon, beads, multi-colored glue-gel.
Tools: stationery knife, scissors, awl.
Progress of the event:
Introductory part:
Outside the window they are circling in winter dance snowflakes, giving everything beautiful Christmas mood. Since childhood, we have all carefully cut out beautiful snowflakes from paper and happily glued them to our windows. They made garlands from them and decorated the Christmas tree. Let's plunge into a carefree and joyful childhood and remember the time when we were children.
As part of our “Water Keepers” project, we decided to invite you to use not quite paper instead of paper. ordinary material- plastic bottles. Crafts made from plastic bottles in the shape of snowflakes can be used as Christmas decorations, make a garland out of them or use them as candlesticks, believe me, everyone will find their own use.
Waste materials (bottles) are always available and accessible, the technique for making snowflakes is simple, the motifs for painting are chosen at will and do not require special drawing skills. Such DIY snowflakes are not afraid of changes in temperature and moisture, which means they are ideal for festive outdoor decorations. Information for those who live in a private house or decide to spend a holiday in the country.

We take a clean plastic bottle and use a breadboard knife to cut off the bottom. (The edges are very sharp, work carefully, slowly, do not trust children with this work!)
This is the look of the workpiece at this stage snowflakes from plastic bottles.

Use an awl to make a hole in the snowflake. We fold the ribbon in half, in this position we thread it through the hole, string two beads and reverse side snowflakes tie a knot. As a result, we got this loop made from a ribbon with beads.


Using different glue gels (patterns can be drawn acrylic paints), draw any pattern you like. We apply the drawing to front side. Each snowflake is individual.
Our snowflakes are ready.

After finishing making crafts, parents consider finished goods and everyone takes pictures together.
The teacher conducts reflection with parents: asks about feelings, impressions of the work done, gives a task to do New Year's craft at home with your child (preferably from waste material) and bring it to kindergarten. We hope for further cooperation and wish you success in the coming New Year.
Volumetric snowflakes for outdoor use
Plastic bottles can be easily turned into decorative items. Although I don’t really like decor, for the New Year I’m itching to create something appropriate for the holiday, most often snowflakes. And not just snowflakes, but voluminous snowflakes, although such snowflakes do not exist in nature. Creating designs from many bottles is difficult, first of all, because it is difficult to collect such a number of ingredients and there are many connection points for the bottles. All the voluminous snowflakes made from plastic bottles presented here are the fruits of many years of trial and error. The designs are united by the fact that to make them you only need plastic bottles and plastic rivets, as well as the desire to create a holiday for yourself.
Idea
Snow is white, which means it’s better to create snowflakes from plastic bottles white, most often from dairy products in such plastic packaging. It is better to form a volumetric structure in the form of a very aesthetic (spectacular) regular polyhedron - a dodecahedron, which has 12 faces and 30 edges. Polyhedra with fewer edges do not create such a positive aesthetic effect, and with a large number they are difficult to manufacture. The technology for manufacturing and assembling the presented snowflakes is similar.
Materials and tools
1. Plastic bottles milky volume from 0.5 liters or more (depending on the size of the required snowflake). How more bottles Moreover, you can create a voluminous snowflake from them. For the number of bottles is greater than or equal to the number of faces.
3. Scissors, tweezers.
Job
Historically, the first in a series of such volumetric snowflakes was the “Langolier” snowflake (), on which the technology of connecting conical parts into a dodecahedron was developed.
To make Langolier (), the part of a 1-liter bottle adjacent to the neck (conical part) is used. All parts must be same shape(the height and diameters of the bases of the cones are identical), so you need to cut it carefully, using the first cut piece as a template; after cutting, it is better to immediately cut the sharp rays.

The main difficulty in this voluminous snowflake is to mark the installation points for the plastic rivets. For an assembly diagram in the form of a dodecahedron, each workpiece must be carefully marked using a template, for example, from 13 necks. Five points on the surface of the workpiece for joining into a dodecahedron should be located on a circle at the vertices of a regular inscribed pentagon (at equal distances from each other) along the smaller neck of the workpiece cone at a distance of about 1 cm from the edge. Holes for plastic rivets are formed by a burner, and beads from melted plastic is removed with a shoe knife.

The connection of 12 parts of the dodecahedron into a single structure of this and similar snowflakes is done using plastic rivets, the installation technology of which is based on this moment perfectly done. Thus, all parts of the snowflake are plastic. If such a snowflake has become dusty since last year, it can be easily rinsed in soapy water.
The next snowflake “Sea Urchin”() was an attempt to enhance the effect of volume and variety of shapes of the rays by increasing the number of bottles involved. In addition, I wanted to cover the rivet installation points by collecting the cut rays into a bunch and securing them with a rivet. The choice of the shape of the rays can be varied, I used wedge-shaped ones, but you can also make them rounded or even in the shape of crosses, and you can also cut fringe into the rays. However, it turned out to be too complex and, so to speak, too voluminous, which is why it was made in the singular.

After the rather unsuccessful (in my opinion) first two options (Fig. 1,2) of super voluminous snowflakes from plastic bottles, the third option turned out to be successful (), for which it deserves a separate detailed article( in which they were used. In in this case To create the “Transparent Star” snowflake (), transparent plastic half-liter bottles (bottoms) of a bluish color and star caps of milky white color were used. White stars on a transparent background sharply enhanced the three-dimensional effect, and this, in turn, led to the creation next option super volumetric snowflakes “ ” ().


After assembling the structure of 12 glasses, you should prepare as many as 60, cutting them out from the curvilinear conical parts of milk plastic bottles - waste from the production of other super-voluminous snowflakes. So many stars are needed because the stars are installed on the edges (the main feature of Starry Night). The stars are installed in pairs (Fig. 5b), to two petals of adjacent bottoms from plastic bottles. In this case, the outer petals of adjacent plastic glasses should be bent outward and aligned with the holes made earlier. The sprockets are used as nuts, and the fastening screw has a plastic rivet. Although it took quite a long time to cut out the stars for this one from transparent plastic bottles, it turned out to be a rather amusing, lush star brotherhood (), which personally appeals to me the most.
The next version of a three-dimensional snowflake (), although not made from plastic bottles, is assembled using a similar technology of connecting parts into a dodecahedron from white kinder containers; it turns out that there are such containers (I saw them only this year).


After forming such peculiar rings from plastic bottles with rays (similar to a cactus ball -), we insert one blank into the other (carefully) at a right angle. Then we level (unbend in different sides) rays and fluff up the fringe. At the intersection of the rings, for reliability, I installed a plastic rivet (2 pieces), but you can do without them. All that remains is to attach a thread to the “Two Rings” snowflake and hang it on the Christmas tree or under a light bulb ().
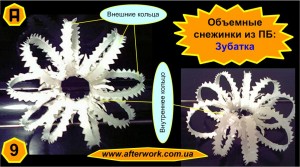
If you are not tired of cutting rings, then you are welcome to make “Catchfish” (). The internal (corrugated) parts from kefir (milk) plastic bottles are used here. The corrugated rings of the bottle are not completely cut and are bent along the generatrix of the bottle. Each ring is cut into teeth along the circumference. A ring insert made from the same kefir plastic bottles is inserted inside the rings, only the ring is cut. Catfish rings can also be equipped with fringe and connected to the insert with plastic rivets.
Notes
1. All plastic bottle snowflakes are designed for both indoor and outdoor use. The rigidity is sufficient to withstand wind, snow, rain, the bottle does not get wet and loses color over time.
By the New Year, their hands simply don’t find room for themselves, they just want to make something New Year’s, unusual in anticipation of the holiday. Including decorations for the Christmas tree or for the home. And plastic bottles are a material that can easily be transformed into any decorative items. Take snowflakes for example. Create snowflakes from plastic bottles not difficult. And besides, I want to make things that don’t even exist in nature - wonderful ones. You can do it by trial and error various options and views, bring to life some ideas of your imagination, thereby creating a holiday around you.
Because snow is snow-white, it is better to make crafts from bottles for kids from plastic material of a snow-white or transparent color, so that they can be painted in the future, and no unnecessary background will show through the layer of paint. In the latter case, bottles are suitable blue color.
“Snowflakes from plastic bottles” master class
The more unnecessary plastic bottles you have in stock, the wider the field for creative work and so large quantity In the end you will get snowflakes. From all bottles, the bottoms are cut off with scissors or a stationery knife as low as possible to the base, leaving only the corrugated part. Well, then you need to awaken the artist within yourself and come up with intricate patterns and shapes of snowflakes. It is better to sketch all the curls and ornaments that can be applied to the bottom of the bottles in advance with a pencil on a piece of paper.
Plastic blanks for snowflakes can be covered in advance with a plain background of snow-white or blue (blue) color. And apply patterns to the dried background with a narrow brush, painting the snowflakes slowly and carefully. For painting, blue, gold or silver color. Snowflakes can be painted with anything: dashes, dots, squiggles, hearts and other geometric and imaginary shapes.
Plastic rivets or wire rings are attached to the finished snowflakes with pliers, by which they can be hung on a Christmas tree, on a chandelier, or using curtain clips.
Like snowflakes from napkins or paper, snowflakes from plastic bottles can be made using other methods. For example, from a snow-white plastic yogurt bottle. The neck of the bottle is cut off, and the side surface is cut into long narrow strips right down to the bottom. Then, on these stripes, the contours of the rays and curls of the future craft are drawn in pencil. A snowflake is cut out using scissors along these contours.
There are still a huge number of methods " How to make snowflakes from plastic bottles" Snowflakes made from this material can be either flat or large. Big crafts much more difficult to manufacture. And first, because of the number of components and the number of points of contact. You can quickly make the same type of components for a large snowflake, but you have to try to combine them into one structure. To do this, the plastic is connected with staples using a stapler, plastic rivets, superglue and other materials.
Outside the window, snowflakes are spinning in a winter dance, giving everyone a wonderful New Year's mood. We have all been beautiful since childhood, once carefully cut out of paper and happily glued to the windows. They made garlands from them and decorated the Christmas tree. Every person carefully keeps such memories from childhood in his heart.
Let's plunge into a carefree and joyful childhood and remember the time when we were children, but instead of paper we will use an unusual material - plastic bottles. in the form of snowflakes can be used as Christmas tree decorations, made into a garland or used as candlesticks; believe me, everyone will find their own use.
This master class is dedicated to making jewelry. Note: waste materials(bottles) are always in stock and available, the technique for making snowflakes is simple, the motifs for painting are chosen at will and do not require special drawing skills.
Such DIY snowflakes They are not afraid of changes in temperature and moisture, which means they are ideal for festive street decorations, information for those who live in a private house or decide to spend a holiday in the country.
Materials for making and painting snowflakes:
Transparent plastic bottle 2 l
Blue acrylic paint
White acrylic paint
Gold acrylic paint
Decorative powder glitter “white pearl”
Nail polish transparent
Brushes fine and medium
Model knife
Thin decorative tape
Iron rod
Water glass
Now let's see for ourselves master class - snowflakes from plastic bottles. The stages of work are recorded as much as possible in photographs, so look at the photos. We take a clean plastic bottle and use a breadboard knife to cut off the bottom. The edges are very sharp, work carefully, slowly, do not trust children with this work!

Here is the initial workpiece for work

Moving in a circle, in places where the bottom is indented, we make cuts with scissors, two for each indentation.


We complete this process with a breadboard knife.

We shape the remaining protruding parts of the workpiece using scissors. Making rounds


This is what the workpiece looks like at this stage.

On inner surface apply snowflakes clear nail polish for nails (or any other varnish suitable for plastic)

Dip a dry soft brush into decorative powder and sprinkle a thin layer all over the varnish

We wait for it to dry for a few minutes. Blow off excess powder and you can start coloring.


Instead of a paint mixing palette, I use a simple plastic lid.

I use mixing white paint with blue to get a blue color of varying intensities.

We draw any motif you like. I made three snowflakes and each one was individual. We apply the drawing to the front side. When the paint dries, coat the snowflake on all sides with two layers of varnish. Heat an iron rod (or a knitting needle) over a fire and make a hole in the snowflake.

Fold the ribbon in half

In this position, we pass it through the hole and tie it with two knots from the inside.

As a result, we have such a ribbon loop

DIY snowflake from a plastic bottle ready!

And after her, the others rushed to take photos for a group photo.


