Star news


 My life and soul in Latin")


Paper applique flowers three-dimensional templates. Paper flowers applique
Applications are always exciting and interesting, so many children are happy to take on the creation of such crafts. Most often on children's applications flowers are depicted: Both in kindergarten and at school they often make cards for Mother’s Day with images of flowers, and also invite children to decorate flower meadows or spring landscapes.
Floral appliqués amaze with their diversity; in different paintings the design is made in the most variety of styles: from a simple flat cardboard flower to a lush fabric bud. It is this variety of types of floral appliqués that gives already familiar paintings and postcards a little originality, and different level complexity for crafts makes them accessible not only to small children, but also to adults interested in creativity and handicrafts. To do interesting application using voluminous fabric flowers, use the master classes given in this article.
One of the classic children's applications, familiar to everyone since kindergarten, is a vase of flowers. Such crafts are usually made specifically for mothers, sisters, grandmothers, or simply to add to children’s albums, room decorations. To make such an applique you simply need cardboard, colored paper, scissors and glue (pencil or PVA). The next master class will tell you how to properly make a painting with your own hands.
- Draw a vase on a piece of colored paper or use a pre-prepared stencil. Cut out the shape.
- Also draw on paper various colors loose buds. Cut them out and put them in a vase.
- Cut out thin green lines (stems) and leaves from green paper.
- Start creating the picture. Take a sheet of cardboard as a base and place it vertically. Carefully glue the vase onto the bottom half of the sheet. Attach the stems peeking out of the vase at the top. Scatter flower buds and leaves evenly over the stems.
Gallery: “Flower” applique made of fabric and paper (25 photos)


 Originality ordinary paper painting or a postcard can be given volume. Volumetric “Flowers” applications look more interesting than their usual flat counterparts, so receiving them, and even more so making them with your own hands, is much more exciting. The next master class will tell you how to make a postcard with voluminous daisies in a pot.
- From a sheet of colored paper, cut out a pot in the shape of a semicircle.
- Cut out some green strips. Set aside three of them for stems, and fold the ends of the remaining two or three pieces, forming small loops - chamomile leaves. Glue the ends together.
- Now you need to make the buds themselves. Use a yellow paper circle for the core, and cut out several thin white stripes for the petals. With each of them you need to do the same work as with the sheets. After making the petals, glue their bases to the wrong side of the yellow circle. To ensure that the parts are glued evenly and are the same size, you can draw a smaller circle on the core and glue the petals along this line. In the master class it is proposed to make three such flowers.
- Collect all the details into one application. Per sheet glue the pot with cardboard, place green stems with leaves in it, and then place daisy buds.
Simple fabric flowers
 If you are already tired of ordinary paper applications and want something new and unusual, you can try your hand at fabric crafts. They are no more complicated than products made from paper and cardboard, especially if a child or adult who decides to take up needlework has some sewing skills or ordinary work with a needle and thread. Next voluminous flowers from fabric neither can be easily done with your own hands, even for beginners in the world of needlework.
- First, make a cardboard base: cut out a circle of small diameter (maximum ten centimeters). Wrap the base in fabric.
- Sew the edges of the resulting figure using a regular stitch. In this case, the thread must be tightened tightly to create a bag.
- We sew a large button into the very center, and put a smaller button on top and also attach it to the product, completely forming the core for the flower.
- Having finished working with the button, bring the thread to wrong side, and then sew the resulting flower to a piece of fabric or clothing e.
 Such lush and airy flowers will help not only create beautiful applique, but also interesting to decorate clothes. Many needlewomen use this technology to trim dresses, skirts and all kinds of tops, trying to give this item of clothing tenderness. Meanwhile, such things are being done beautiful flowers DIY is very easy if you put in all the effort. A master class on creating a “Flower” applique from fabric is provided below.
- Make a round template from cardboard. You can make several different sizes if you need a variety of flowers.
- Attach the templates to the mesh fabric (can be replaced with guipure or soft tulle) and trace, then cut out. For each flower you need to make five or six such circles of fabric.
- Take a bunch of fabric pieces and sew them onto a piece of appliqué fabric or garment using the inside edges, pulling the fabric a little to prevent it from fraying. Do the same with the second row of petals, moving them a little. Some of the petals in this row can be left loose to make the flower appear natural.
- Last layer of petals form from petals smaller or the same size, but bent in half to make the bud more natural, closer to the real one.
- When you've finished making, take a beautiful button or several beads and sew on them as the core for the flower.
Buds made from tissue flagella
 This master class is one of the simplest among possible options creating flowers from fabric. You don’t have to spend a lot of time and effort on it, so any beginner in the world of needlework can create an interesting piece for appliqué or an accessory for clothing.
- Take the fabric and cut it into long stripes.
- Sew one end of the ribbon securely with thread to the garment or applique base. Now begin to twist the fabric into a rope and wrap it around the attached tip, forming a round flower. As soon as the flagellum ends, take new strip and sew its end to the previous one, and then start twisting another strand.
- When the flower is formed, finish the work by hiding the tip of the fabric behind the flagella from the previous circle. The core is decorated at the request of the needleworker and the needlewoman; it can be sewn into the center bud beautiful bead.
Children's flower applique
 Such a picture can be made in classes in elementary school, but it may be more suitable for children younger age, if you teach them all the skills necessary here. The result is a bright picture that is sure to attract the attention of guests and decorate the interior. Volumetric fabric appliqué is performed according to the following scheme:
- Draw the petals on cardboard or a piece of paper (it’s better to use thick paper, since plain paper It breaks easily and is not always convenient to use as a template). You can find the necessary petal images, print them out and then cut them out.
- Trace the resulting templates on paper and cut out the petals so that there is a margin that can be folded.
- Fold the edges of the petals to make them look fuller, then iron each piece. Place the petals one by one on the base of the picture and attach them there with large stitches.
- Now that the application is formed, all that remains is Quickly consolidate the result and sew all parts with a hidden seam.
 Skilled craftsmen and craftswomen will definitely handle the next craft. The master class explains in detail how to make satin rose with your own hands, so even beginners can try themselves in this matter.
- Cut out five squares from paper so that each next one is about a centimeter larger than the previous one. Fold each template into quarters and then round the top. By straightening the shapes, you will get squares with round corners.
- Attach the templates to the atlas, transfer the design there, and then cut out. For each petal you need three to four copies.
- Using an ordinary candle or lighter, lightly burn the edges of the petals.
- Start collecting the whole flower. For each bud you need two parts from each pile. The largest parts are located at the bottom, and the smallest ones are at the top. All petals are sewn together.
- The core can be optional decorate with a beautiful bead.
These are so beautiful floral appliques You can make it yourself from paper and fabric. Crafts can be used as gifts for relatives or home decoration.
Volume application « Flower fantasy» do it yourself
DIY interior decoration. Master class with step by step photos.
Target:
- make a gift, do-it-yourself interior decoration
- introduce a new technique for working with paper, the “extrusion” technique;
- teach how to make a three-dimensional applique from paper;
- develop a creative approach to work, fine motor skills hands, eye, aesthetic taste, ability to act according to an algorithm;
- develop imagination and perseverance, creativity;
- cultivate accuracy and patience, love and careful attitude to nature.
Focus:
The master class will be of interest to educators, parents and teachers, everyone who is interested in handicrafts. The craft can be done collectively with children. The composition is made of landscape paper, so each child can choose and make that part of the composition that he can handle and that he likes best. This painting can be given as a gift.
For work we will need:

- Landscape paper
- Scissors, ruler, pencil
- PVA glue, finger
- Stationery knife for extrusion
- Pattern of flowers and leaves
The history of appliqué takes us back to distant past centuries. Even ancient nomads decorated their clothes, household items, and their tents with appliques.
Different nations decorated their life in different ways and used the most different materials. For example, northern peoples often used in their applications except ordinary materials also fur and beads. An unusual and attractive applique made from pieces of straw ribbon. And in the era of knights, appliqué on fabric was used to depict coats of arms. In the 16th and 17th centuries, applique began to be widely used to decorate the clothes of priests.
With the advent of paper, applique on it received special place in history..
Step-by-step process for completing the work:
Bouquet of flowers.A bouquet of flowers, in them meeting and separation,
A happy moment, but for some it’s boredom,
They have a mysterious and delicate aroma,
And the light of love, painfully snow-white.
The dew shines, playing with diamonds,
Sunsets burn out on the petals,
There is a lot of warmth in the bouquet,
They are alive, these beautiful flowers...
By creating a three-dimensional application, we visually get a picture large size. It looks beautiful, unusual and advantageous!
And anyone will love creating such beauty with their own hands! Therefore, a volumetric paper applique will be for you exciting activity. Characteristic convexity in volumetric applique are seeking in different ways. You can use paper sheets folded like an accordion several times, you can use double-sided tape. Volume can be ensured by rolling the paper into tubes and gluing the cut paper in layers. We will squeeze out the paper and paste it over the edges.
For voluminous paper applications, you can, of course, use regular landscape sheets. It can be used for background or small elements. It is better to cut out the main parts from thick textured paper or cardboard. Paper of such density, even glued on top of each other, will already give correct effect.
First, draw a pattern of flowers and leaves on paper

We cut out the pattern along the contour.

We mark on landscape paper and cut out the required number of flowers and leaves for the applique.

We outline and cut out the background of the picture.

Glue the background sheet into the frame.

Squeeze out the leaves along the veins onto the towel stationery knife.


Using scissors, iron the thin leaves until they curl.

This is what the finished leaves look like.

By pressing the centers and edges we make flowers.


These are ready-made flowers different sizes and shapes.

Let's start creating the application. This should be done from the most distant objects according to the laws of perspective, gradually approaching the front of the picture. Therefore, first we glue the leaves.

Using creativity and imagination, we create a composition to our liking.

By cutting thin strips and folding them several times, we get the stamens of large flowers.

Roll the cotton wool from the sticks into balls and glue them into the hearts of small flowers.

We add various curls and arches with small water lilies to the finished composition.
Volume application for kindergarten, for elementary school.
Application: DIY meadow with flowers
Required materials and tools
■ Colored paper different colors, cardboard or thick paper (for the base)
■ Scissors
■ Glue, it is better to use a glue stick
Step-by-step process for making three-dimensional applique flowers from colored paper
1. Select a background. For the background it is better to take blue sky paper or blue. A4 paper format. As a background you need to take thick paper or cardboard.
2. Let's start making flowers.
To make one flower, cut out 5 strips of colored paper (1 cm - width, 12 cm - length).

Advice. You can use ready-made quilling strips as strips
.jpg)
3. Arrange the petals (loops) in a circle so that they form the shape of a flower and glue them to the main background. The bases of the petals should connect at one point (the center of the flower).

4. By analogy, we make several more colors (for example, 3) from paper of other colors and glue them to the background
Flowers must be glued at different levels.
5. Let's move on to making leaves and stems.
From green paper cut out 7 strips 1 cm wide and 20 cm long and 3-5 strips in size (1 cm wide and 12 cm long).

6. Glue long strips of stems to the flowers.

7. Glue together leaf loops from the remaining strips and glue the leaves to the base of the stem.
.jpg)

8. Flowers need to cut out the cores. To do this, choose yellow paper 2 different shades. From one paper we cut out 4 circles (depending on the number of your flowers) with a diameter of 2 cm and from another 4 small circles with a diameter of 1.5 cm. Glue the small circles onto the large ones. The cores are ready.

9. Glue the centers to the flowers, and our applique is ready.

Useful advice. The applique can be decorated, for example, with butterflies.
Any mother is interested in the comprehensive development of her baby. You can do this in games or through joint creativity. Paper applique suitable for this one hundred percent. Children of any age enjoy creating their own crafts from various materials. In our article we will look at the stages of working with paper - volumetric appliqué.
Interesting three-dimensional applique templates for children
Let's divide paper crafts into 2 groups.
1. Flat work with convex elements
These are all kinds of postcards and panels. The easiest way to create something interesting with your baby. For little man it will be a revelation. And for the relatives of a growing child, the best gift.
In such work, the plane is the background.
- For example, flowers in a vase . We'll draw a table, glue a vase out of cardboard, and make buds out of corrugated paper(using a petal blank) or from multi-colored leaves crumpled into balls. Or you can simply glue one bud onto a mini-card.

- Butterflies, dragonflies They will also look great in the meadow. They are very easy to make using a template.

- Cut out a variety of leaves .
Plants catch our eye every minute, and often we do not notice their beauty. You can transfer the original lines onto paper and use these elements in various decorative works. Paper leaves are interesting and unusual and perfectly enrich compositions.

Nowadays you can find many offers with blanks on the shelves of stationery and bookstores. We used these with our eldest son, but it’s great to come up with something ourselves!
Planar work with volumetric elements is perfect for joint creativity with a preschooler.
Don't forget! Working with a young child should not be filled with small details. All preparation will rest on the shoulders of a caring mother.
But you can trust the older child more independent activity. Let him participate in all stages of manufacturing the final product. This will emphasize the significance of the child’s endeavors. Will increase the offspring's self-esteem.
2. Volumetric compositions
This image includes crafts that can be placed on a table or hung (on a Christmas tree, on a chandelier, etc.)
- Crafts in which the template is "circle" .

This decoration can be hung as a toy on the Christmas tree if you add a string.
- Figures consisting made of two mirror halves . An older child already has the skill to use scissors. We bend the sheet in half, apply a design and cut it out together with the young master. We expand it and get the whole piece. You can add details at the discretion of your dreamer.
We tried making piglets and a giraffe.
It is important to take into account the balance in crafts - the heaviness of the front and back parts of the figurine. To prevent animals from falling, you should bend your neck, head, and legs correctly.

- The shapes are interesting using cones . These are balls, flowers and animals. You can use individual elements in the form of round pointed pyramids. Or cones glued together on a circle-shaped base.

Many of the most difficult and beautiful work They are based on simple templates.
Tools and necessary materials
We will need some items without which we cannot make a craft.
- Colored plain, corrugated or printer paper.
- Glue (I most often use stationery in the form of a pencil).
- Scissors, if children are small, are best used with rounded edges.
- Ruler.
- A simple pencil.
- A stem for a flower; when working with boys, I use straws for cocktails or children’s straws for juices. The bend of the tube can be interestingly played out or cut.
How to make a volumetric applique: step-by-step instructions
"Ladybugs"
This option is perfect for children three to four years old. Moms should take active participation in progress. We did this work twice with our youngest son. And both times it caused a storm of positive emotions.
Materials:
- red and greenish paper;
- scissors;
- glue stick;
- paint black, white (preferably gouache).

Materials for application
Step 1
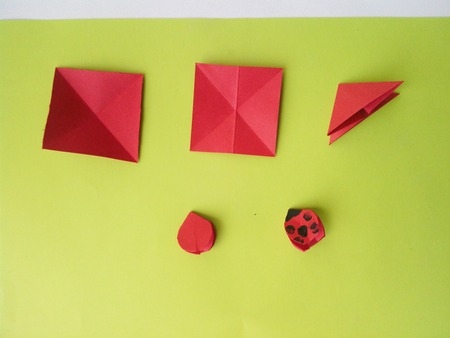
Take a red square and bend it along one diagonal, then along the second.

Step 1. Making diagonals
Step 2
Fold the workpiece in half once.

Step 2. Bend the square in half
Step 3
We wrap the opposite parts of the workpiece inside our insect along the fold line. The result is a triangle.

Step 3. Wrap the opposite parts inside
Step 4
Cut off the excess. We give rounded shape bug. We cut the upper wings.

Step 4. Cut off the excess in a semicircle

Step 4. Expand, and this is what happened
Step 5
We invite the child to draw dots with black paint. You can do this with your finger or cotton swab, if you don’t want to get dirty (my son prefers the second option). And the eyes will be white to stand out brightly and enliven the picture as a whole.

Step 5. Use black paint to add dots.
Step 6
We will need another smaller red square for our neighbor. We perform all actions in the same sequence. We get a smaller God's creation.
Step 6. In the same sequence, create another ladybug
Step 7
Let's work with a leaf, the basis of our composition. Fold the paper in half along the long side and cut out a leaf of any shape. The size of the base must be suitable for placing the heroes.

Step 7. Cut a piece of paper folded in half into a leaf shape.
Step 8
Let's put our ladybugs on a leaf and glue it on. Our composition is ready. It looks unusual. My little son was very happy with the result and showed it to his dad.

Step 8 Ladybugs glue it to a piece of paper
If your child is a little older, then you can entrust him with the responsible tasks of independently cutting out a leaf and giving the greenery a more interesting look.

You can make folds on a piece of paper

This is what an unfolded leaf looks like, more realistic
Looks much more presentable. If this work is a gift, we will add a pre-prepared inscription.

We collect all the details of the application
My eldest son, 6 years old, and I decided to give one of our grandmothers a “bouquet of hyacinths” as a gift.
"Bouquet of hyacinths"
What we needed:
- xerox paper in yellow and soft lilac (I like to use this because there is a choice of color and tone, the shades are more delicate);
- green corrugated paper (2 tones);
- toothpicks (2 pieces);
- glue stick;
- medium-diameter cocktail straws (5 pieces);
- scissors;
- cardboard cylinder;
- satin ribbon (thin).

Materials for application
Step 1
We are preparing future inflorescences. Divide each sheet into 3 parts along the long side. Cut into strips.

Step 1. Divide the sheet into three equal parts

Step 1. Cut each strip with scissors
Step 2
We cut flowers. Take a colored strip. We show the child how to make cuts. The width of the petals should be average (5-7mm).

Step 2. Making cuts
Step 3
Twist the cut parts of the flower. To get a more beautiful curl, we do this with a toothpick (on the sharp side, having previously split the very tip of a wooden stick in half).

Step 3. Twist the cut strips
Step 4
We form an inflorescence. Gradually wind the prepared strip onto the straw.

Step 4. Wind the prepared strip onto the straw
Step 5
The plant stem should look natural. To do this, wrap it with a strip of green corrugated paper. We used dark green and light green leaves. Glue the beginning of the tape at the base of the flower and wind it with tension. And fix the end of the strip with glue to the tube. Leftovers can be wrapped inside a straw.

Step 5. Wrap the flower stem in green paper
Step 6
We collect the flowers into a bouquet and place them in a vase. If your creative impulse associated with some event, you can pack flowers or tie them with a ribbon. We placed our artwork in a cardboard cylinder. Decorated with fine satin ribbon pink color. You can use a tall glass jar of baby puree as a vessel.
New master classes on making panels (applique) - bouquets of colored paper for our collection.
The diversity of the world of flowers amazes with the abundance of shapes, colors and aromas! Everyone will find in this beautiful collection a flower that is pleasing to the eye or associated with memorable event. Our step by step instructions with photos they will show you how to make beautiful ones with your own hands: chrysanthemums, daisies, carnations and peonies.
Chrysanthemums have gained popularity due to the rich variety of varieties. These flowers differ in the size of the buds, the shape of the petals, color scheme and the number of flowers on one stem. This means that anyone will find among this splendor flowers that will meet all their needs and desires. The buds of pink chrysanthemums used in bouquets look very tender and tender, flower arrangements, garlands and wreaths. You can also use the pink color of chrysanthemums as a basis to create a panel, composition or applique from corrugated paper. Let's look at this idea based on our master class.
Materials and tools
When creating a panel applique with pink voluminous chrysanthemums you will need:
- double-sided colored and decorative paper;
- thick pink corrugated paper;
- white paper;
- yellow and dark green felt-tip pen;
- PVA glue (silicate glue).
How to make an applique with voluminous pink chrysanthemums from corrugated paper
To create chrysanthemums, it is better to use high-density corrugated (creped) paper - this way the flowers will hold their shape better. Prepare for work necessary tools and related materials.

Cut out long strips of corrugated paper with a width of about 5-6 cm (the larger the width, the longer the flower petals).
Fold the strips several times, as in the picture.

Cut with scissors sharp petals, leaving 1-1.5 cm from the edge.

Make cuts evenly so that the width of the petals is approximately the same.

Straighten each of the strips. Apply along the entire length of the strip thin line glue.

Start rolling the strip into a tight roll. When the first strip is curled, start gluing the second strip around it.

Execute in a similar way several blanks of chrysanthemum flowers.

Gently spread outer chrysanthemum petals.

Spread the remaining petals to give the flower volume.

Using a scissor blade, curl the ends of the petals. Do this with all the petals so that the chrysanthemum becomes voluminous.

Lightly tint the center of the flower with a yellow felt-tip pen.

The number of flowers can be any, but it is desirable that the chrysanthemums differ slightly in size.

Cut out a vase of any shape from decorating paper. From paper dark green cut out leaves that look like real chrysanthemum leaves. Use a green marker to highlight the veins on each leaf.

For the applique, make a base of office paper in two different colors. Cut the top rectangle with curly scissors to make beautiful frame. Glue the shaped sheet onto the rectangle.
Glue the vase onto the applique base.

Turn the flowers petals down. Make cuts at the base of the flowers and open the edges. Generously coat the edges of the flowers with glue.
Glue three flowers above the rim of the vase. Glue the remaining flowers to the second row.

Bend the edges of the leaves slightly using the blade of the scissors. Glue the leaves near the flowers and inside the bouquet. Glue a couple of sheets near the vase.

Give the painting a little time to rest so that all the parts are firmly glued to the base. The applique with delicate pink chrysanthemums is ready!
That's how wonderful original composition With pink flowers We got chrysanthemums! A little patience, diligence and time, and such a wonderful result of the work done! This master class can serve as an example for creating similar applications with chrysanthemums of any other color or using flowers to decorate the interior.
"Blooming daisies" made of corrugated paper
Spring brings warm sunny days and new hopes. Thanks to the change of seasons, everything awakens from a long winter sleep and the world reveals itself in colors! The harbingers of spring are bird trills and primroses, which inspire artists, poets, and connoisseurs of beauty. And therefore, we will devote our today’s master class to creating a panel with delicate blooming daisies from crepe paper.

Materials and tools
When creating a panel with delicate blooming daisies, we used:
- crepe (corrugated) paper in pink, yellow and green;
- yellow and green office paper;
- stationery and curly scissors;
- toothpick;
- PVA glue;
- green chalk;
- pink marker.

How to make a beautiful panel with blooming daisies from crepe paper
Prepare stripes to create three-dimensional flowers. Cut a strip of 4*20-25 cm from pink crepe paper. Cut a strip of 1.5*15 cm from yellow corrugated paper, and several strips of 1.5*10 cm from green paper.

Fold the strips several times and make notches on the yellow and green pieces, and on the pink ones - deep cuts, leaving 0.5 cm along the bottom.

Straighten the stripes. Divide the yellow blank into two parts. Connect the strips, alternating yellow and green colors. Apply glue along the bottom of the long piece.

Place the toothpick on the edge of the workpiece and begin to twist the strip.

Try to twist the strip so that the length of the notches on the surface is the same.
Twist the yellow-green center of the flower until the strip ends.

Using the blade of scissors, curl the edges of the petals on the pink blank, as in the picture.

Apply glue along the bottom of the blanks and begin to twist the strip with petals around the core of the flower so that the petals open outward.

Curl the pink strip completely and you will get a lush spring flower.

In order to make a daisy bud, you need to twist the strip with the petals inward.

Make a few flowers and a couple of unopened buds according to the sample.

Cut out several rectangles from green crepe paper different lengths. Twist each rectangle into a tight stem, coat the edges with glue and secure around the stem.

Also cut out shaped leaves from green crepe paper, as in the picture.
Use green wax crayon to highlight the edges and central vein of each leaf.

Give volume to the center of the sheets by straightening the paper.

Cut out a rectangle from green office paper, and a smaller shaped rectangle from yellow office paper. Use a bright marker to trace along the edge of the shaped sheet. Glue the shaped rectangle onto the green base.

Glue the flowers to the base of the panel. Choose a layout that is convenient for you to create a harmonious composition.

Glue the stems under each flower.

Glue leaves to the base of the stems.

A three-dimensional panel with blooming daisies is ready!
Which delicate flowers came out of ! As if by magic, spring daisies bloomed in the picture! Such an unusual panel will become a wonderful gift on a holiday or significant date, and also original solution in interior decoration.
“Tender carnations” made from wet crepe paper
Bright red carnation flowers are often given to men and women, variegated ones will decorate any bouquet, and white and pink ones will emphasize the tenderness of feelings. Try making beautiful carnations from paper and decorating them with an applique. Our detailed master class will explain and show how to do it yourself.

To create an application with delicate carnations you will need:
- pink crepe paper;
- colored paper (double-sided);
- thick paper for the base;
- curly scissors;
- stationery scissors;
- stapler;
- glue;
- spray bottle with water;
- colored markers.

How to make an applique with delicate carnations from wet crepe paper
This creative work requires availability different types paper and tools, so you should prepare everything you need from the list in advance.
Cut 4 identical squares from corrugated paper.

Place the squares on top of each other, alternating the direction of the compressed “pattern”. Use a stapler to connect all the squares.

Using scissors, cut a circle from a stack of squares. Make cuts towards the center to divide the circle into petals.

Pick up the petals from the topmost circle.

Do the same with all the rows to get a lush flower.

Use a pink marker to make veins on all the petals.

Spray the voluminous flower with water.

Fold the flower in half and then into a quarter circle.

Let the flower dry in a warm place, or dry it with a hairdryer.
In this way, make several flowers and one unopened bud.

Take half a sheet of light yellow paper and paste a light green colored piece of paper on top.

Cut three 2.5 cm wide strips from dark green paper and glue them into tube stems. Cut out the sepals and narrow leaves as shown in the photo.

Glue the flowers to the base of the applique.

When all the flowers are glued, glue the stems to three large carnations.

Glue the sepals on top of the flowers.

Glue the leaves to the flower stems. Cut off the ends of the stems.

The applique with delicate pink carnations is ready!
What lovely pink carnations we got! Volumetric carnations, with color transitions - such unusual technique allows you to achieve similarity between paper flowers and the original. The applique can be supplemented with a festive ribbon or multi-colored butterflies, or you can come up with other color combinations for decorating carnations.
“Scarlet peonies” from paper accordions
The world of flowers is beautiful and diverse! You're amazed - what fancy shapes, combinations of colors and shades are found in the kingdom of flora. Among the garden flowers curvaceous Beautiful spherical peonies stand out, blooming profusely on bushes and flower beds. These flowers look wonderful in bouquets, arrangements and festive elements decor. You can also make beautiful voluminous peonies from corrugated paper and use them in the design of an applique or panel.

What will be needed in the master class
To create an applique with scarlet peonies we will need to take:
- office paper light green and light yellow;
- colored double-sided paper in yellow and dark green;
- bright red corrugated paper;
- corrugated cardboard of orange or brown color;
- green marker (felt-tip pen);
- scissors, glue.

How to make an applique with scarlet peonies from corrugated paper
Prepare the necessary tools colored paper and cardboard to create a composition with voluminous flowers.
Take a piece of light yellow paper and glue a light green rectangle on top of it, leaving a border around the edges.
From orange corrugated cardboard cut out a basket for flowers. Glue the basket onto the base.

Prepare rectangles of red corrugated paper, as well as small yellow rectangles to decorate the center of the flowers. Divide each red rectangle into four parts and stack them on top of each other.

Fold the corrugated rectangles into an accordion so that the gathers are perpendicular to the fold lines. There should be a total of three vertices or five fold lines. Make an accordion out of yellow paper.

Make the edges of the red accordion rounded, and make notches on the yellow one. Place the yellow piece in the center, inside the red accordion.

Make a small cut with scissors reverse side accordions and tie a thread around the center.