Star news


 My life and soul in Latin")


Download the cardboard basket template. DIY paper basket: step-by-step master classes for beginners with photo and video materials
- Colored cardboard. I have an orange base, and the inserts are light green, peach and yellow;
- Glue, pencil, ruler, scissors.
I used a glue stick, but PVA cardstock works well too.

How to make a paper basket?
Basket drawing
First you need to correctly draw the necessary lines of folds and cuts on a sheet of cardboard. I used the standard cardboard size - A4, based on this I indicate the data.
Look at the photo, on it a sheet of orange cardboard is lined up like this:
- Horizontally, you need to divide the sheet into 3 parts, the side areas are 7 cm each.
- These side sections need to be drawn into small sectors, each of which is 3 cm.
- Divide the remaining middle in half and draw diagonal lines to form a triangle.

Cut
Cut as shown in the photo, that is, the lines between the small sectors, cut out the triangles. Make folds along all lines. The result is this basket frame.

Colored inserts
To make the basket bright and colorful, 12 small sectors can be covered with colored cardboard. If you are more interested in a single-color basket option, you can skip this step.
For a multi-colored basket, cut 12 rectangular strips of colored cardboard, exactly matching the size of each sector. My stripe is 7 cm long and 3 cm wide.

Glue the cardboard strips onto the sectors of the orange frame of the basket on the outside of the folds.

Forming a paper basket
Now start forming the paper basket into a single whole. To do this, turn the basket with a triangle towards you, glue the bottom strip to it, first on one side and then on the other. As you can see in the photo, the orange triangular part overlaps the yellow stripes.

In the same way, glue two stripes on the second row, mine are pink.

And then the last green third row. All parts must overlap each other so that there are no voids. You also need to adjust the symmetry of the sides in the process. One side of the basket is ready.

Glue the sectors on the second side in the same way.

Handle for basket
A basket cannot be without a handle. Cut it out of cardboard. The length of my strip is 28 cm, and the width is about 2 cm. Also cut out two circles, the diameter of each can be 5 cm.

Fold the circles in half and glue them to the basket so that part of the circle is on the outside and the other half is on the inside. Glue the tips of the pen inside onto the halves of the circles. The basket is ready.

Now you know how to make a paper basket. Various toys, flowers, as well as Easter eggs, bunnies or, for example, will look impressive in it.

Baskets and baskets help keep the house tidy and decorate the interior, so you can never have too many of them. Beautiful braids can be bought in the store, but it is much more profitable to learn how to weave them with your own hands.
- If you have a couple of free evenings and a pile of any paper, then you can weave a basket not only without financial losses, but also in the size, color and shape you need. And weaving baskets with your own hands is a very pleasant and peaceful process that you can do, for example, while watching your favorite movie.
And don’t let it bother you that the baskets are not made of wicker or rattan, because if everything is done correctly, then in appearance homemade baskets made from old papers will not differ from real wickerwork. Of course, they will not be as durable and moisture-resistant, but, nevertheless, they are ideal for storing most things.
For beginner craftswomen, we have prepared a step-by-step master class on weaving such a rectangular basket from kraft paper with leather handles. And at the end of the article you can see several ideas for using baskets of different shapes and sizes.
Basket weaving workshop for beginners
In this master class we will talk about how to learn how to weave a basket from rectangular, square or round paper.
For work we will need:

- Kraft paper - you can also take baking paper, several paper bags, packaging mailing paper, pages of newspapers, magazines, etc.;
- 2 identical bases made of thick cardboard or fiberboard, cut in a square or rectangular shape - you can choose cardboard if you want to weave just a basket just for storage, and if you like the idea of a tray basket like in this master class, then use size 24 fiberboard ×38 cm, thickness 2.5 mm.
Important: if you want to weave a basket with higher walls than in our tutorial, then you will need some kind of auxiliary template, for example, a shoebox. The template will help you weave a basket of the correct rectangular shape. The cardboard base in this case should correspond to the size of the box.
- Wooden kebab skewer or thin knitting needle;
- Scissors;
- Any paper glue and stronger glue, for example, “Moment”, as well as double-sided tape;
- Transparent matte water-based acrylic varnish in a spray or can;
- Long narrow leather belt (preferably size XL);
- 8 brass cap nuts, 8 brass flat head Phillips screws, 8 brass washers (available at hardware stores, the entire set of fasteners will cost you about 70 rubles);
- An electric drill or awl to make holes in the leather belt;
- Marker.
Instructions
Step 1. Making tubes
To do this, you first need to cut the paper into equal sizes, for example, A4 or A5. Suppose you chose old newspapers to make a basket, which already have the size we need. Next we need to cut the newspaper pages into strips - future tubes. Here's how to do it quickly:
- Open the newspaper completely, then fold it in half lengthwise and press the fold.
- Now take a kitchen or utility knife and cut the newspaper at the fold. It is advisable that the cut areas be smooth and not frayed.
- Separate half of the resulting stack of paper, bend it lengthwise and cut it again. You will get strips about 10 cm wide. Now carry out the same procedure with the remaining stack of paper.
- Next, sort out those strips that have light edges without text or pictures - it is from these strips that you will get white tubes. They are more convenient for work, because they are easier to paint to resemble rattan or wicker. But this does not mean that you cannot use colored strips; it is simply advisable to pre-coat the tubes twisted from them with light paint, or paint them more densely (we’ll talk about the nuances of painting below).
- So, let's start twisting the tubes. Place a wooden skewer on the very edge of the strip (but not on the white one!) at a minimal (!) angle and try to tightly screw the paper onto it (photos 1 and 2). At first, this can be done on the table, twisting the skewer and holding the paper, and when you reach the middle of the tube, you can lift it up and continue twisting.

When you only have the tip left, you need to lightly grease it with glue and only then screw it to the end (photo 3). Woo-ala, the first tube is ready! All that remains is... to wind another 100-500 of these tubes (the exact number depends on the size of the basket). Don't be afraid, it's not that difficult or time-consuming, but patience will help here.
For those who want to learn all the intricacies of the art of making straws, we suggest watching a video tutorial from Elena Tishchenko.
So, we have learned the basic way to make tubes from newspapers. However, let's get back to the instructions.
- In this master class, the decorator first rolled only 24 tubes from strips of kraft paper (7x45 cm in size), and then about 120 larger tubes (from strips 7x90 cm in size). Why did he do this? Read on.

Step 2. Making the frame
Next we need to make the frame of the basket. To do this, take a base made of cardboard or hardboard and, using double-sided tape or glue, attach the tubes to it, maintaining the same interval between them (2-5 cm). You should end up with approximately the same design as in the photo below, but the exact number of tubes depends on the size of your base and the chosen spacing.
- These tubes are called vertical posts, since later they will “stand” and serve as the frame of the future basket.

- According to the decorator's idea, the main weaving of the basket should be deliberately rough, so thicker tubes were used for the walls. However, these 24 stand tubes are made thin to make them easier to braid later. You can repeat the designer’s technique, or you can weave a basket from identical tubes.
- If desired, the cardboard or fiberboard base can be pre-upholstered with fabric, such as linen.

Step 3. Start weaving
The base is ready, which means it’s time to start weaving! There are a lot of weaving methods, we suggest mastering the most basic one – “rope”.
- Bend the tube in half and wrap it around any vertical tube stand (you can start from anywhere);
- Then cross the ends of the tube as shown in the photo below. You will have your first loop.

- Then wrap the second post and cross the ends again. You will get the first eight.
- Continue weaving until the horizontal tubes run out. As soon as this happens, drop a little PVA glue inside each and insert new tubes to a depth of 2-3 cm (their tips can be slightly bent).
- Thus, you need to weave 7 rows if you want to make a low basket like in our master class.

- If you want to weave a basket with higher walls, then after the first two or three rows you need to use a template box and weave around it. In this case, you should periodically correct the weaving - align the racks, compact the woven rows, etc. For convenience, the racks can be fixed in a vertical position using clothespins, as shown in the picture on the right. By the way, if you want to weave a round basket, then a pan, a round box, a flowerpot, etc. will work as a template.
Step 4. Finish weaving
Finally, we completed the last row, trimmed and adjusted everything, and took out the box template. Now we need to finish the job beautifully. To do this, we simply cut off the horizontal tubes with which we wove the walls, leaving only 5-10 cm of their length, and hide the ends inside the weaving (left photo below).

Great, now let's get to the racks. You can simply cut them off, slightly smearing the edges with glue, or make a simple but beautiful edging:
- Bend the first vertical post 90 degrees and braid it behind the adjacent post on the right, then bring it along the outside of the third post. And finally hide it behind it and glue it. Repeat with the next upright and all the others.
Step 5. Apply varnish
Hooray! The basket is almost ready, all that remains is to coat it with varnish. This tutorial uses acrylic spray varnish, but you can go over your braid with a brush.

- If desired/necessary, the basket can be painted before applying varnish, but it is best to paint the tubes before weaving begins - this way the coating will be of a higher quality. Water-based acrylic paints are ideal for painting; they will give the paper density and dry quickly. For more information on coloring newspaper tubes, see the following video tutorial from Elena Tishchenko.
Step 6. Attach the handles
- Cut off the buckle and the end with the holes from the belt. Then cut the middle part of the belt into two equal parts. This is what you should get.

- On the back of the resulting strips, use a marker to mark the location of 2 screws at each end of the two strips.

- Use a power drill, awl, or just a nail to make holes in the strips at each mark (8 holes total).

- On the front side of the tape, place a washer on the hole made, screw the screws into them using a screwdriver.

- Next, attach the handles to the outside of the basket. Each fastening screw must fit between two rows of weaving as shown in the next right photo. Then, from the inside of the basket, screw the end caps onto each of the 8 screws.

Some crafts are thematic, that is, they are suitable only for a specific event. A child can give this basket of flowers to his mother (grandmother, aunt, sister) not only on March 8, but also on her birthday.
Volumetric applique "Basket with flowers" made of paper
Children 3-4 years old do not yet know how to cut, so all the details for the craft must be prepared in advance. The child’s job is only to glue the leaves onto the basket stencil, make flowers using the paper crumpling method, and then also glue them onto the template.
A small child is restless; he may get tired before he finishes the craft. Therefore, the basket should be small so that the baby can quickly fill it with flowers.
Blanks (leaves and squares for flowers), on the contrary, should be larger. And the flowers need to be made not from several squares, as in the first case, but from one.
An older child will be able to independently cut out a basket and leaves, as well as make flowers from several layers of paper.
To work you will need:
- a sheet of cardboard in a contrasting color;
- multi-colored paper napkins;
- green paper;
- any thick paper (for stencil);
- glue;
- pencil;
- scissors.

Work process. Option No. 1 (for older children)
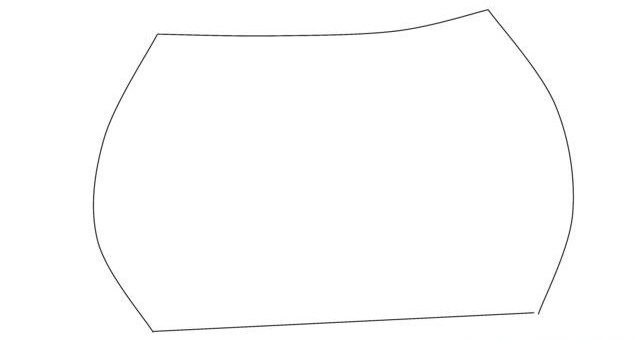
First you need to make a stencil, according to which you will later cut out the basket.
To do this, take a thick sheet of paper, fold it in half and draw half of the basket in any shape you like.

Carefully cut it out.

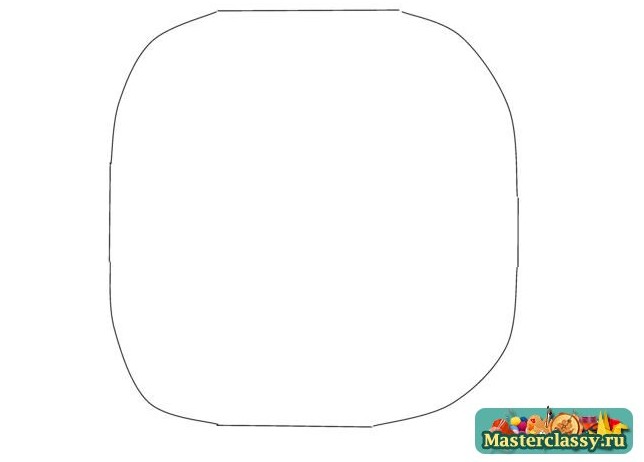
Expand.

Attach it to the cardboard, turning it over to the wrong side.

Trace the stencil.

Cut it out.

On the back of the green paper, draw as many leaves as you are going to paste.

Cut them out.

Cut the paper napkins into squares with a side of 4 cm. For each flower you will need 4 pieces of the same color.

Place the basket in front of you. Place leaves on it. Apply glue to only the corner of the leaf that is directed inside the basket. Glue to cardboard.

Now start making flowers. To do this, take one square and place a pencil (blunt side) to its middle.

Crimp the leaf around the pencil with your fingers.

Holding the paper so that it does not unfold or move, spread glue in the middle of it.
Glue it onto the cardboard near the leaf. Press down the middle with a pencil to prevent the paper from coming off.

Crumple the next square and glue it on top of the first. Do not straighten the edges of the paper: the more they are wrinkled, the better.

Thus, from four parts you will get a flower that looks like a rose.

Also make a few more flowers of different colors.

You will get a basket of flowers like this.


Option No. 2 (for a child 3 years old)
As mentioned above, for a 3-4 year old child, make the basket yourself, like the rest of the preparations.

Place a basket in front of the baby.

Let him lay out the leaves on it himself.
Help him coat them with glue and stick them to the cardboard basket.

Good day everyone! Preparations for Easter are in full swing, the sun is shining brightly outside, the birds are singing, in general the mood is lifted and you want to sing and, of course, create. And they will help us in this case. Today let's make another souvenir in which you can easily put Easter eggs and even put a hen and chicks in it. We are talking about baskets.
I think that you have already learned how to decorate, found the most suitable way for yourself and painted them somehow in a special way this 2020. After all, doing the same thing every year gets boring, you want variety, don’t you?
As usual, I went and strolled through the Internet and what I found there, and in general from various magazines and newspapers, I will show you today, I think you are all for it! By the way, you can also write what else you would like to see in my next articles.
The first thing that comes to my mind is that you can make such a beauty out of paper or cardboard. Or you can cheat a little more, using a lid or something similar as a basis. The box will turn out colorful and original, and most importantly, you can make it in a couple of minutes.
We will need:
- colored paper (can be replaced with office paper) - 2 pcs.
- openwork napkin - 1 pc.
- stationery knife
- satin or other decorative ribbon - 1 pc.
- Hochland processed cheese lid
Stages of work:
1. Take sheets of paper and you need to make them square and then follow these steps which you see in these images.

2. In my opinion, it looks very charming and gentle. Can you imagine, if you put more paint in there, it will definitely be cool!

These cockerels have sunk into my soul, this year we’ll do just such a cool thing with our little one, don’t you like it?

Even an ordinary napkin or fabric can be folded in such an unexpected way, such as bunnies.


You can take any idea as a basis and decorate it with corrugated paper.

Either go the original route, for example, find a wooden ring, or make it out of thick cardboard, tie it with thread and decorate it with something, even feathers can come in handy. And place the testicles. This will make a kind of modest stand, and it also looks very good!

And if you are friends with fabric and are head over heels in love with it, then perhaps you will be hooked by this idea from foamiran.

We will need:
- foamiran
- glue gun
- scissors

Stages of work:
1. Make flowers from this fabric, you can take any shape, or like this:


3. Make the base itself green. These will be the leaves.

4. Then follow these steps. You need to buy or make a bow and a handle yourself.


The most favorite activity for kids is playing with plasticine or you can use play dough. First roll it into a bun, and then use flagella to mold it as shown in these instructions.


There are many options, you can come up with something unusual yourself.

You can’t imagine, but you can even use newspaper strips or paper from old unwanted magazines.

Remember, when you were a child you made bookmarks for books this way, this is exactly the same technique.

This is what it might look like if you show up at someone’s house with an Easter egg.

And one more paperwork.


Or consider this option.

They are even made from twine, hiding it in multi-colored fabric.

It turns out that such a seemingly ordinary egg box can also be used to make another souvenir.

Or this one with grass, you need to cut the egg mold.


Cut out imitation grass from any material or paper. You can also decorate a living one.

Place flowers.

And this is what happens, cool!

This is such an interesting idea made from threads and sticks.

You can take regular threads, preferably thicker ones, and wrap them around any glass or container.


Or you can make a laying hen. The base is a candy box.


The fence is made of ordinary paper strips.

You will be very surprised if you look at this miracle.

This beaded craft looks fantastically elegant and beautiful.

Making a craft from newspaper tubes
It’s not difficult to learn how to do this, so if you like this idea, then go ahead and sing.
Well, for those who are in the know, look what the great Internet offers us, to make such a nice chicken.

Or like this. How cool it is, and the main thing is that you can do everything yourself.


How to crochet a basket (description and diagram attached)
Let's move on and make some wonderful souvenirs for Easter from knitting threads, take note for needlewomen. For those who know how and love to knit, this post will also be interesting. From last years I still have such different ideas on my shelves.
I’ll start with perhaps the egg, namely the stand or case, I don’t even know how to put it more correctly. But one thing I can say is that you can crochet such a beauty in literally an hour. And please others too. You only need a little bit of thread.

So, try to create! An approximate diagram is like this.

Or you can make it even more delicate; to do this, take this idea and turn it into reality. If you need a diagram and description of this model, write to me at the bottom of the article, I will send it to you by email.

I can offer another option, it looks a little like a vase.

Honestly, someone might even say that this is such an original box. Although they put mushrooms here, you can bring Easter gifts here.


This is such a wonderful, beautiful cockerel, just wonderful, I once made it out of a magazine description a long time ago.


I also really like this bird family of chickens. You can hide Easter eggs with them.

Or tie potholders on which to place the Easter cakes.


If you are new to knitting, you can use this craft - an egg stand.

Or knit a chick that will decorate your holiday table. 
Cool new items this year are, of course, basket bunnies and mother hen.

I also have a detailed description and diagram of this illustration in my piggy bank, if anyone needs it, please contact me.

Either take this blank and create something weird, it’s also a cool version of a bunny, or maybe it’s a rabbit. According to the description, this is a mini crochet basket for Easter eggs.


I also liked this option. A very simple diagram.

And in conclusion, this is a charming miracle, which is also unrealistically beautiful.

It feels like a flower opening.


I was really looking for a description for this model, but unfortunately I couldn’t find it. If anyone has one, please share).

Interesting souvenir idea Basket decorated with hares
Another version of the basket with bunnies looks cool and very unusual, and you can take any material, be it cotton fabric, felt or even any unnecessary scraps.
In order to create such an exclusive gift, you first need to outline the correct pattern; it may look something like this.

And then you apply it to the material and trace these funny figures by hand.


After stitching or hand stitching, remove any unnecessary items.


Looks like a whole army of rabbits))).


All that remains is to decorate them, add a nose, mouth and eyes, and embroider these parts of the body with floss threads.

Then give the ears uniqueness and some playfulness, tie them with thread carefully and slowly.


Then stuff the toys with cotton wool or padding polyester.


And now all that is missing is the base, make two circles, insert cardboard.


And then connect the bunnies and the stand together, sew on a gathered skirt. It turns out very cute and attractive.


Now let's make a mold for paints in the shape of a bunny's face.
We will need:
- white fleece or velor
- any fabric: linen or satin
- buttons
- calico white
- padding polyester
Stages of work:
1. Cut out parts of the basket from velor.

2. The template for these side parts will be like this.


4. Make blanks like these from calico.


6. Then make a headband from checkered fabric.

7. Start directly assembling all the parts, sew with a blind seam.


Don’t forget to fill it with padding polyester and add something of your own to this product. It turned out to be a cool Easter bunny.
Templates and diagrams of paper boxes for eggs
Let's start with the most primitive and common form. Take this sample, print it out and color it however you like. Bend where the dotted lines are and then glue them together.

The next option will be more interesting, with a little plot.

Or take this one, you won’t have to paint it at all.


You can even make it in the form of an applique.


Master class on Easter pasta baskets
If you are a fan of all sorts of decorative things, and especially like to create weird things using household materials, then I suggest you watch this charming story. Today you can make such a charming large egg in the form of a handbag where you will place your gifts.
Don't think it's difficult, it's easier than you expect, you will need a balloon, glue and of course noodles and your crazy hands.
Beautiful cardboard basket in the shape of an egg for children
Now it’s time to surprise and make very unusual things, for example from threads.

Stages of work:
1. Take a large bowl or even a basin so as not to get dirty; you can cover it with cling film or line it with newspapers.

Inflate the balloon with your mouth to the desired size. Blow until it resembles an egg, and then tie the ends with thread.
Then apply PVA glue directly over the ball, and fill the threads with glue too.
2. Now rewind the ball with threads randomly. And then boom, pop, pierce it with a needle.

3. Wait until the threads are completely dry, and then take scissors and make a hole.

Each one produces absolutely their own masterpieces.

This time we cannot do without the kirigimi or protruding technique.

You will first have to print the template on your printer, and then use a cutter to cut and glue two bunny blanks together.

Same with the flower.

Do the same with the chickens.

The main thing is to take your time and be careful and everything will work out.

Or will you stick with these options?


This will take a little work.

You can do something interesting and unusual yourself.

Who needs templates and stencils for these crafts, write below.

Easter egg box using origami technique
Another invention looks quite unusual and original, which can be made with children in kindergarten, or with schoolchildren in elementary school.
We will need:
- square sheet of paper
- colored paper
- scissors
Stages of work:
1. Take a piece of paper and start folding it exactly as shown in this photo.

2. Then continue working as indicated in this master class. Make the lines carefully and try to smooth them clearly.

3. Afterwards you will have something that looks like a vase.

4. To give the product a festive look, make and decorate the decoration in the form of any Easter symbol. It could be a rooster or a hen. It's up to your imagination. Accordingly, cut out the parts from colored paper and stick them on. It will turn out just wonderful! And the main thing is that such work can be done even at home.

It is known that bunnies are another symbol of this bright holiday. Therefore, you can make such beauty using the origami technique.


Or you can get such a funny and cool rabbit.

You can draw a nose and eyes with a marker to complete it.

This model also caught my eye.

You can also use this paper type.

These pictures show everything in detail where and how to fold a sheet of paper.


Master class on baskets made from plastic bottles
You may be surprised, but this year, and not only that, it has become popular to create from all sorts of available means. I think that everyone has an empty plastic bottle in their apartment, so it will come in handy, just for creating one masterpiece that any adult or child can handle.
We will need:
- plastic bottle - 1 pc.
- napkin - 2 pcs.
- scissors
- drawing
- PVA glue
- paints or markers

Stages of work:
1. The very first thing you have to do is cut off the top of the bottle where the cap is. Next, turn the bottle over and start cutting the material into strips.

2. Then cut each strip to the size you need to make a petal and fold it over. Leave only two long strips, these will be the handles.

3. Make the tip like this in a triangular shape - this is at one of the strips, and make a regular hole at the other. Connect them together.

4. This is what it looks like, quite easy and simple.

5. Decorate an ordinary napkin as you wish, you can use special scissors, you can come up with something original.

6. Place inside the basket and you’re almost done.

7. All that remains is to decorate; to do this, take any drawing in the form of a coloring book and color it over. Cut out and glue to the surface of the jar.

8. This is the nice result that will await you. Good luck!

You can even use a regular plastic cup, just do it as shown in this photo.

You can cut off the bottom of the bottle and decorate it with beads or self-adhesive rhinestones, scrapbooking.

Here's another funny little thing you can get from a white disposable glass.

Or look at the stages of work here:

In fact, there is nothing complicated; the handle can be glued to a cool gun.

You can also decorate the craft in the form of faces, let them be funny and amusing, this will lift everyone’s spirits.

Basket made of fabric and felt
You can join paper and fabric together. Make a paper sun and wrap it in a circle with fabric strips. This composition looks bright and charming.


Even from an ordinary towel you can make wonderful crafts and place an egg there.

You can make such a chicken handbag from felt.

Or there is another fleece option. Print out all the details and use them to recreate an image that even slightly resembles a box.

Just cut them out with scissors, then sew them and stuff the parts with padding polyester.


And such a cockerel will turn out, will crow and delight you and your family.

That's all for me. I wish you to celebrate Easter cheerfully, to always be positive, to please yourself, your loved ones and friends. Excellent mood and good health. Add to my group in contact, write your reviews and comments. Bye everyone!
Sincerely, Ekaterina Mantsurova
Paper is the most affordable and versatile material that is used both for children's creativity and for serious design work. A paper basket can be an interesting addition to the interior, gift wrapping for a loved one, or just an excuse to do some DIY creativity with your child. In this material you will find a selection of original ideas for making paper baskets.
Making a simple paper basket with your own hands in MK
Even a child can handle this craft, and most importantly, it will take very little time. To work you will need a square sheet of paper or cardboard. It’s good if there is a beautiful design on the outside of the paper.
First, you need to draw a square piece of paper into 9 small squares (3x3) and make 4 cuts, as shown in the photo:

We bend the workpiece so that two opposite squares along the middle line stand parallel to each other. The remaining side walls will be inclined at the same angle.
Apply glue to the middle squares and glue the entire structure. Cut out a strip of paper for the pen and glue it on. The craft is ready!

Baskets made from brown wrapping paper will look very stylish in almost any interior. They can be used as a stand for artificial flowers or a container for storing small items.
To work you will need brown craft paper, scissors, glue and tape, a sheet of cardboard (or other thick paper).
At the beginning of work, you need to prepare strips for weaving, 30 cm in length. To do this, cut strips 4 cm wide and fold them in half lengthwise. One basket requires about 50 strips.
We select 16 paper strips, 8 of them are laid horizontally, the other 8 are laid vertically. We start weaving from the bottom, crossing the strips with each other. Then we bend the strips up and move on to weaving the walls.
We braid the vertical ones with a “working” strip. At the end, we bend the remaining ends inward and glue them. The result is a square-shaped basket.

If you want to make a round basket, you will need to cut a circle for the base from cardboard or very thick paper. To weave the base, we take 8 strips, first fold them crosswise in pairs, and then connect them together in the shape of a star with one center. Glue a round base to the center of the star. We bend the strips up and begin to braid them with another strip in a circle. At the end, leave 2.5 cm of base strips, bend them inward and glue them. The round basket is ready!
Another option for a round basket. For it you will also need a cardboard circle of any suitable size and strips of kraft paper. Using instant glue, glue 12 strips (5 mm wide) to the base circle at an equal distance from each other. We bend them upward and begin to braid them with a working strip, as in the previous example. We leave 2.5 times the height of the strips free at the end, fold them inward and glue them.
A basket made of paper using the origami technique.To work, you will need a square sheet of paper for the basket and a strip of paper for the pen. We fold the base of the origami basket according to the diagram:

We bend the strip of paper for the pen 4 times lengthwise and glue it. The basket is ready!
Basket using 3D applique technique.Three-dimensional applique is an effective and interesting technique, popular in children's creativity. In order to make a basket you will need 2 sheets of colored paper of different colors, PVA glue, scissors, a ruler and a pencil.
Let's analyze the work on the craft step by step. First, cut both sheets of paper into thin long strips 0.5 cm wide. We intertwine the strips together to form a rectangle equal to the desired size of the basket.
The rectangle needs to be given a slightly inclined shape. To do this, slightly stretch out the two sides of the rectangle - the space between the stripes on this side should expand slightly.

If you are completely satisfied with the size and shape of the future basket, we begin gluing the joints of the strips. We turn the rectangle inside out and apply small drops of glue to the joints and dry. We cut off the excess length of the strips, retreating 1.5-2 cm from the basket, bend the tails and glue them.
We cut the remaining lighter strips in half, and divide the dark ones into 3 parts. We roll them into tight bundles (“barrels”). You can wind it on a simple sewing needle and glue the ends. Glue the blanks along the bottom edge of the basket, alternating colors.
Glue the basket to the flower applique. First we glue the bottom edge, then the sides (separately), so that the top edge moves slightly away from the surface. We lay out the handle of the basket with the remaining “barrels” of paper strips, also alternating them.

The craft is ready. If desired, you can add a butterfly or bow to the basket.
Video on the topic of the article
For those who want to get new ideas for creativity and analyze the making of baskets in more detail. We have prepared a selection of video master classes: