Star news


Current types and methods of braiding. How to weave different types of braids
Many girls want to learn how to braid hair different types. Since ancient times, the braid has been an adornment for women: from a little girl to a venerable mother of a family. The length and thickness of the braid were the pride of the hostess and the envy of others. It symbolized a woman's health. Today this ancient hairstyle is still relevant. Modern dynamic life has fabulously transformed simple weaving, turning it into art.
Today there are different types of braids. Not even very thick hair you can make a big one voluminous braid. She will decorate wedding hairstyle bride and will give her image femininity. Many small braids are very convenient during beach holiday. Complex volumetric structures are constructed from braids incredible beauty. Every girl can create her own masterpiece using weaving skills.
Braiding hair for short hair
The French braid is a universal option. It can be done on short hair. Many girls wear this hairstyle. It is very comfortable, looks unusual and elegant. To learn how to braid it, you need to practice a little. It's better to try braiding your hair with your friend first. Once the principle of braiding is mastered, you can begin to braid your hair.
The other part of the hair is braided in the same way. When the second braid meets the first, they are combined and woven into one braid.
The most crucial moment is to add splendor to the structure. Each “grain” of the spikelet must be carefully pulled out. They should all be enlarged equally. The braid will become wider and appear larger. To smooth out stray hairs, cover the hairstyle with varnish.
Conclusion on this topic
Contrary to current opinion, braiding on short hair quite possible. And it’s not at all difficult to do. Whatever types of braids are invented, they are based on one weaving principle. To create a variety of braided hairstyles, you need a little experience and skill. The efforts expended will be repaid with interest by the impression that the masterpieces created with your own hands will make on others. It’s especially nice to please your daughters with an unusual hairstyle. Their eyes sparkling with delight are the best reward.
IN Lately braiding has become very popular. Of course, because with their help you can create excellent hairstyles that emphasize femininity and natural beauty. Since childhood, we have become accustomed to one option - the classic Russian braid. However, in fact, there are quite a few weaving techniques, and each is beautiful in its own way. Today we will look at the most popular ways to create braids.
Russian braid
This is a simple three-strand braid. This option considered classic and the easiest to perform. The entire mass of hair is divided into three strands, which are then intertwined with each other in turn as follows: the left strand is thrown over the middle one, after which the right one is also applied to the middle strand, and then according to a given pattern. At the end, the hair should be tied with an elastic band or secured with a hairpin.


French braid
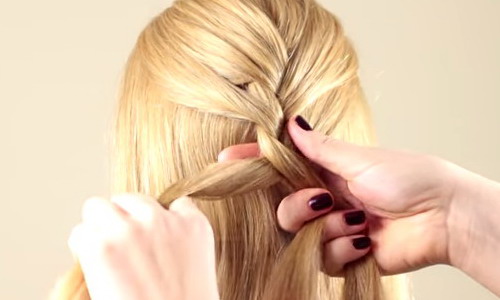
This option can also be considered traditional, as it is used in many braiding techniques. The hair from the top of the head is divided into three equal bundles and braided according to the following pattern: first, the left strand is thrown over the middle one, then the same is done with the right strand. After each step, loose side strands are woven into the braid and connected to the strands in the braid. The hair is braided to the very end and secured with an elastic band.


Fish tail
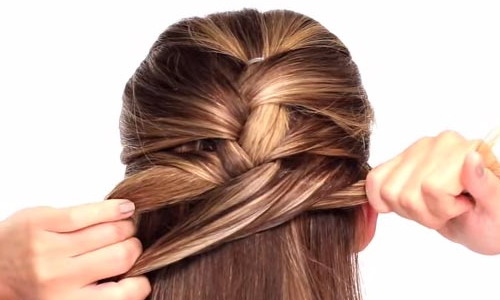
This type of braid is also called a "spikelet". In this version, the entire mass of hair is combed back. Then thin strands are separated from both sides at the temples. Weaving begins with the left strand, which is carefully thrown over the right strand. Then, on both sides, a small part of hair is added to the existing strands and weaving continues again according to the given pattern. Hold the strands with your hands, pressing them tightly to your head so that the braid is even.


African braids
The birthplace of this type of braids is Egypt. They are weaving in the classic way. Their difference is only in quantity - African braids on the head can number from one hundred to three hundred pieces. As a rule, special material is woven into braids of this type, which can be used to lengthen the hair. The main purpose of weaving artificial hair into African braids is to make them stronger and maintain the shape of the hairstyle for a long time. This version of braids lasts on the head for up to three months. African braids are very small, so they are easy to form into various hairstyles, lift your hair up or tie it into a ponytail.

Spiral braid
Such braids are also called plaits. They are easy to weave, and they look quite elegant and attractive. The hair at the back of the head is gathered into a ponytail, then divided into two or three parts. Each part is twisted into a tight spiral along the entire length of the hair. It is recommended to twist the harness clockwise. To prevent the finished spirals from unwinding, they must be secured at the end with an elastic band. After twisting, the bundles are intertwined as follows:
- if there are two strands, you just need to intertwine them so that they wrap around each other;
- three strands are intertwined in the classic way in the form of a pigtail.

Greek braid
This type of braid is woven around the head. This technique is quite simple to perform. It is necessary to divide the hair into a side parting in the form of a triangle - from the middle of the head to the left and right temple. The hair below should be gathered into a bun and pinned up. From the resulting triangle at the top of the head, separate a small strand on the left and divide it into three parts. Then start weaving classic braid from the left to the right ear, with each step weaving the remaining strands into the braid from the bottom on the left side. Carry out the braiding to the right ear, gradually collecting all the strands of the separated part of the hair, secure at the end with a small elastic band or a beautiful hairpin.


Spit waterfall
This type of braid is woven horizontally from temple to temple at the height of the forehead. The braid looks light and a little careless, giving the image airiness and romanticism. The weaving pattern is as follows: one strand is separated at the temple and woven with two others in the classical way, with each next step one of the strands is released down, and instead of it, another strand is grabbed from the top of the head. The weaving continues to the temple on the opposite side. At the end, you need to secure the braid with a thin elastic band that matches the color of your hair. Thus, the released strands will form a “waterfall” on the head.


Openwork braid
IN in this case You can use any weaving technique as a basis. The only difference between this option is the shape of the woven strands. After you have woven a new strand into the braid, you need to pull it out slightly to make it appear fuller. The finished braid looks like lace, creating a festive and romantic look. This option is suitable for anyone special occasion. It is often used as a wedding hairstyle. However, to weave such a braid, it is better to seek help from a specialist.


Danish braid
This is a very beautiful way of braiding, which requires practice. This braid is also called “reverse French”. The technique for weaving a Danish braid is as follows: you need to divide your hair into three strands and intertwine them, but not overlapping each other, as in the classic version, but placing each strand under the next. Weaving is carried out alternately, first the left strand is placed under the middle one, then the same is done with the right one. The end of the braid is secured with an elastic band. You can leave more hair down for a natural look.

Weaving braids and plaits in some cases requires special skill, because many involve complex designs, the implementation of which cannot be accomplished by simply folding three strands overlapping. There are a great many types of braids, and by mastering just a few braiding options you can create a beautiful, complex hairstyle.
What braids are and how to weave different types of braids, you will learn on this page.
History of braids: what types of braids are there?
The history of braids and braids goes back to extreme antiquity. For example, mention of dreadlocks, which are fashionable in our time, can be found in the Bible. Different kinds Hairstyles with braids can be found in drawings dating back to the culture of Ancient Greece and Rome. In Medieval Europe, braids were worn not only by women, but also by men.
Sometimes they were twisted like a ram's horn and placed in a hairnet.
They also knew about the types of braids Ancient Rus', where this hairstyle has been cultivated for centuries. Girls braided their braids and decorated them with ribbons or special braids (birch bark boards with beads). A ribbon was tied on the head over the hair or a wreath of flowers and leaves was worn. Married women braided two braids on the sides of their heads. The braids were wrapped around the head, and a small cap (povoinik) was put on top. Traditionally, married woman She always covered her head in public.
IN European countries Complex high hairstyles were fashionable, in which curls were intertwined with braids and plaits. Often they were wigs. Then the braids came out women's fashion, they were replaced by powdered fluffy wigs with rollers and curls. But braids appeared in men's fashion- they decorated wigs. By historical films You can remember the wigs with a pigtail at the back of the head on the heads of men.

The simplest are “Russian” braids, which are made from three strands. But there are many other simple and complex braids. With distribution in Russia western fashion Braids became less popular at the end of the 20th century. However, they are currently again on the wave of popularity. The mowing is a symbol of femininity and beauty, it is preserved under pressure modern fashion and extravagant styles.
What are the modern types of braids and their photos?
Modern braids come in multi-colors. The strands are dyed in different colors and then intertwined. Different types of braids can be woven into both simple and complex hairstyles. Braids are not only formed from the free part of the hair hanging from the head, but also braided over the entire head.
French braids are very popular. Based on them, many hairstyles have been created, including evening ones. Currently at the peak of fashion are african braids.
Photos of types of braids of various modifications are presented below:


Types of hairstyles with braids and cornrows

1. Tourniquets. They are woven not from two, but from three strands. The result is a braid that looks like a smooth sausage. The disadvantage of this hairstyle is that it quickly loses its appearance and the hair gradually becomes unraveled.

2. Ropes. These braids are also made from two strands that are twisted together. They are often woven with colorful narrow ribbons. They give the braid a wavy look.

3. Threads. This hairstyle is considered festive. These braids are less suitable for daily wear. When creating them, the hair is divided into many strands, each of which is wrapped with special threads. The result is smoothly curving unique braids, and the whole hairstyle looks elegant.

4. Spirals. The braid is woven from two strands. Each strand is twisted slightly in the form of a tourniquet. Then the two bundles are twisted together. This long-lasting hairstyle can last for several months.

5. Dreadlocks. These are the most popular of all African braids. Dreadlocks come in several types. They are woven from hair growing on the head, from hair extensions and from woven hair. The disadvantage of dreadlocks made from your own hair is that they cannot be unbraided. The hair is twisted in such a way that the dreadlocks can only be cut off. And the advantage is that dreadlocks can be made from hair of any length. If your hair is not long enough, the master will extend it or braid it long strands. To make dreadlocks, strands of a special material - kanekalon - are used. To complete the entire hairstyle, you need a lot of hair or artificial material, which is 80 times lighter than natural hair. Due to this, the hairstyle becomes lighter.

6. Pony. Hairstyle in African style, which is created using artificial hair. They are woven at a distance of 6-8 cm from the head. In this hairstyle, frequent thin braids alternate with loose strands of hair. This hairstyle can be done even by those with short hair. The result is a very voluminous, stylish hairstyle.

7. Curly. Hairstyle in the form of a short braid with a curl at the end. First they braid it into the hair artificial strands hair with curls at the end. Then they braid short braid. Artificial material attaches very securely to natural hair, and the curl is well-curled. You can wash your hair, but the curl at the end of the braid will remain. This hairstyle is done for short hair (4-10 cm).

8. Zizi. These are newfangled braids. They appeared quite recently. Zizi is artificial fiber, which is securely attached to natural hair. You can easily and quickly make any kind of weaving from zizi. Zizi is attached if natural hair on the head no more than 20cm.

9. Rastas. This name hides braids made from your own hair and ready-made thin braids. Braids are attached to natural hair, under which they are hidden. All rastas must be the same thickness and length. Distribute them evenly over the head. The hairstyle can be worn for several months, and then it needs to be updated - braided.
Braids give the head and appearance a well-groomed and neat appearance. They open up the back and neck, emphasize their slimness, make the figure more graceful and the appearance more feminine. Braids are the most comfortable hairstyle in the hot season.
Before weaving different types of braids, use the recommendations offered on this page.
Braids are woven using a variety of methods. Hair braiding begins from different areas on the head. It all depends on specific type braids and hairstyles that the master is going to create. When weaving complex braids, the hair is first divided into strands. Their number depends on the specific braid. When weaving braids, you can use various accessories and artificial strands different colors. Finished braids and hairstyles made from them are secured using various objects. Often braided hair needs to be sprayed with a fixing varnish so that the hair lies completely smooth and the hairstyle becomes more expressive. Also, products such as gel and wax are used to secure hairstyles with braids and braids.
When braiding, you will need a comb with a sharp tip to part and separate the hair on your head into sections. A soft massage brush and a regular comb will not be superfluous.
To give simple braids a modern and stylish look, apply the following rules:
1. Wash your hair with shampoo that increases its volume.
2. After washing and drying, apply a little mousse or hairspray to your hair to increase the volume of your hair at the roots.
3. On damp strands you can: Alternative option spray texturizing spray based on sea water, and then dry your hair with a hairdryer.
4. Spray the finished braid with varnish that contains glitter or enhances the natural shine.
Accessories for decorating braids
There are many accessories for decorating braids and securing them on the head. Most necessary when weaving braids thin elastic bands matching hair color, bobby pins and pins. With the help of bobby pins, it is convenient to secure various strands and pin the braids inward so that their ends are not noticeable. Bobby pins put intense pressure on the hair and can cause split ends.

Pins hold hair together without pulling it. In addition, hairpins can be decorative (with rhinestones, flowers, bows, etc.). In this case, they are both an element of fastening the hairstyle and a decoration. If you often do hairstyles that need to be properly strengthened, then choose hairpins to maintain the beauty and health of your hair. Various clips will be useful for securing hair at various stages of work and removing stray hair that is free from braiding.

To secure the braids, you can use various ribbons and floss. You can attach pendants to them, which will give your hairstyle a special style. In this case, the image must be carefully thought out, and the clothes selected to match it.
How to decorate a braid with floss and a scarf
Before decorating your braid with floss and a scarf, choose the appropriate accessory to match your clothes so that your hairstyle and outfit match each other.

Floss looks beautiful when woven into a fishtail or spikelet braid. It is for brave girls who prefer bright outfits that will harmonize with such a hairstyle.

You can weave bright scarves into your braids. thin fabric. Of course, the hair must be long and thick enough for this. In this case, the hairstyle turns out to be more impressive than with ribbons. Silk fabric has a gentle effect on the hair and does not violate its integrity, and the touch of silk is always pleasant.
So, all your hair needs to be gathered into a high ponytail and divided into three even parts. Then place the right strand on the middle one, as a result of which it will be between the left and middle strands. Now it’s the turn of the left strand. Place it on the strand in the middle so that it fits between the right and middle strands. Now continue braiding, laying strands one by one, and when the hair is braided to the end, secure the braid with an elastic band or.
Spikelet. This type of weaving reminds us of cereal. So, comb your hair back and separate a thin strand from each side. Then cross them so that the right strand lies above the left. On the left side, grab another thin strand and place it crosswise on the right side. Now separate a thin strand from the right side and start alternating strands, repeating all the above steps until you finish weaving. Braid tightly, then the braid will look neat.

Scythe from France. The French braid is loved and respected by many. You can weave it in different ways, but it looks quite impressive. And although it is difficult to weave, this does not stop anyone. So, separate a small strand at the top of your head and divide it into three parts. Weave the same way as regular braid, make a few weaves and start braiding the remaining hair. To do this, again separate the strand on the left and throw it through the middle part of the hair to the right. The same must be repeated with right side and continue weaving, adding strands alternately on each side.

Oriental braids. In the east, it is popular to braid 30-40 at once, the main thing is to make sure that they are the same. African braids are becoming very popular, as their weaving allows you to save time and not waste it on daily styling. Yes, and this hairstyle gives the hair a well-groomed and fashionable look. African braids are made from the client's hair or from strands. The hair on the head is divided into square sections, artificial strands are attached with a special knot, and the shape of the braids is round or flat. The end of each braid is sealed using a special apparatus. After weaving
The simplest braiding can be mastered not only by women, but also by men who have to gather their daughters in kindergarten or school. The simplest braids are three-strand braids. Weaving four-strand braids is more difficult, but it is worth it - such hairstyles look very unusual. What can we say about all sorts of other modifications - French braids, dragons, plaits, daisies and other methods! Having mastered these simple and beautiful ways braiding, you will become a real master and will be able to change your hairstyles every day.
Braids are worn by both girls and women on weekdays and holidays. It all depends on what your braid style will be. To master simple braiding, it is better to first practice braiding a simple braid. It's easy to do. With the right in a simple way braiding will work neat hairstyle, and its owner will not experience any discomfort.
How to weave the simplest braids

The simplest braiding begins with combing. Comb your pulled back hair with a wide-tooth comb. Comb the ends of your hair first, then gradually move higher and higher.

In this case, you will minimally injure your hair, combing will be almost painless, and your hair will untangle easily.


Before weaving simple braids, go through your hair with a soft massage brush. Divide all the hair on your head into three parts. Take in left hand the left part of the hair, in the right hand - the right.

Place the side strands alternately on the middle strand. In this case, the strand from the left hand will become central, and the strand that previously lay in the middle will go to the left hand.


While braiding, periodically stroke the strands of hair with your hands so that they do not get tangled with each other, are smooth and even. Braid the braid as long as you want.


Pay attention to the photo simple weaving braid - always leave a tail 10-20 cm long at the end and secure it with an elastic band or hairpin.
Braiding four strands (with photo)
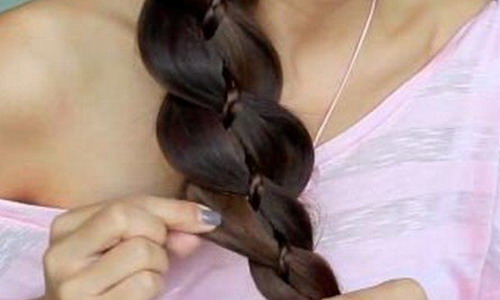
A four-strand braid is woven similarly to a simple braid. Look at the photo of a four-strand braid - before braiding begins, the hair is divided not into three, but into four parts and overlapped one after the other. Follow the path of the strands in the figure, and you can braid such a braid yourself.


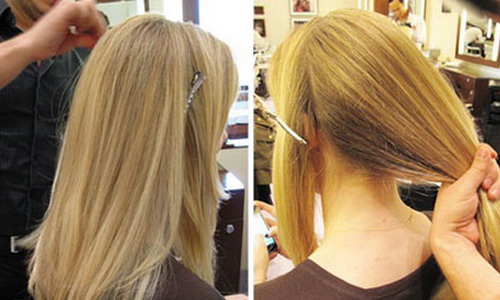
1. To do beautiful hairstyle With these braids, first part your hair with a straight parting, then separate the back hair and pin it up to keep it out of the way.


2. Weave four strands of braids on each side of your head and secure their ponytails with elastic bands.


3. Next, comb the hair at the back of your head and connect the braids with it. Secure your hair at the back of your head with a bobby pin or elastic band.

4. Comb your loose hair. The result is this hairstyle: there are original pigtails on the sides of the head, and a ponytail at the back.
French braiding with step-by-step photos
Below is step by step description French braiding with photos.


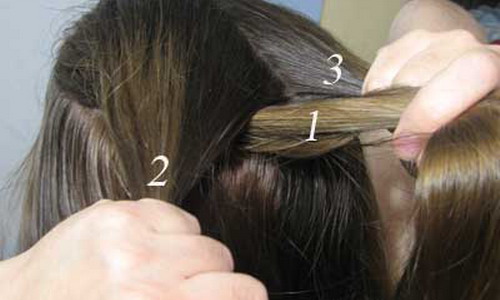
2. Separate the hair at the top of your head and divide it into three sections.

3. Place one side strand over the middle one, similar to a simple braid.

4. Place the second side strand over the new middle strand. Now all three strands should be in one hand (left), but separately.
5. Next, grab a strand of loose hair from each side near the side strands, combine the strands on the sides and continue weaving. Place the enlarged side strands on the middle one and weave them as in a simple weave.

6. Thus, continue braiding by adding loose hair to the side strands and transferring strands from one hand to the other. While braiding, grab your hair tightly and keep your hands as close to your head as possible. Then the braid will turn out neat and will stay on your head for a long time.

7. Gradually grabbing any new loose hair on the sides of the braid, continue braiding all the way to the back of your head.

8. Having reached the back of the head, you can immediately fasten the loose hair with an elastic band - make a ponytail at the end of the French braid. Or you can continue braiding loose hair in the form of a simple braid. The choice is yours.


Look at step by step photos French braiding to consolidate the information received.
Reverse French braid

1. Weaving a reverse French braid, like all other braids, begins with combing. Below are step-by-step photos of reverse French braids.


2. This braid is woven similarly to the French braid. But there are some differences here. Loose hair when added to the side strands creeps up from below. As a result, the braid becomes embossed.


3. Having braided your hair to the back of your head, you can also immediately secure it with an elastic band or continue weaving in the form of a simple braid.


The braid needs to be braided tightly, then it will look neat and beautiful.


4. Comb the remaining ponytail with a brush. A longer ponytail looks more interesting, while a short ponytail looks more childish.
Step-by-step fishtail braids
Step by step braid " Fish tail" is performed in the following order.
1. Comb your pulled back hair.

2. This braid is made from two strands. First, divide all the hair into two equal parts with a vertical parting at the back of the head.


3. Next stage step by step weaving Fishtail braids - separating one part of the hair one small strand at a time and throwing it to the hair of another part.

4. Do the same with the hair on the other half of your head.

5. Repeat all steps many times until you have braided your hair.


6. Leave the hair free at the required length (ponytail) and secure the braid with an elastic band.
Simple beautiful braiding with a tourniquet

1. Before braiding the braid, comb your hair with a brush.

2. Pull clean, dry hair into a high ponytail at the top of your head.

3. Distribute the ponytail into three equal parts.


4. Curl each section of hair to the right or left side, but definitely in one.


5. Twist the three sections of hair together in the opposite direction.

6. Secure the resulting tourniquet from below with a hair elastic.


7. Comb your loose hair (ponytail).
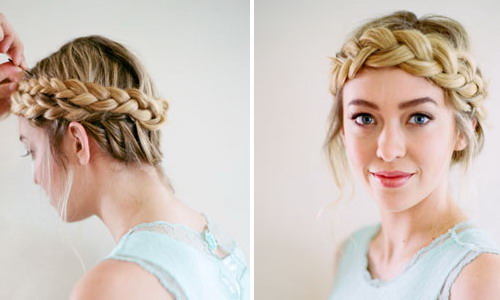
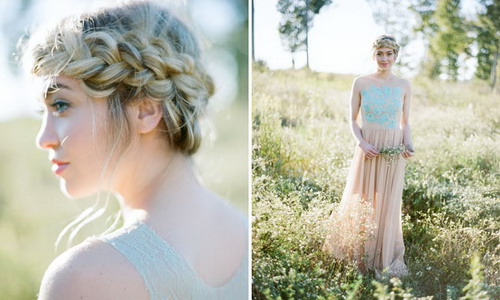
Simple braiding: how to braid a headband braid (with photo)

1. Comb your hair, you can comb it back or make a side parting on the left.

2. Weaving a headband braid begins by dividing the hair into two parts with a parting that goes through the parietal part of the head from one ear to the other.

3. Before you braid the headband occipital part secure the hair temporarily in a ponytail.

4. From the left ear or from the side parting on the left towards the right ear, braid french braid.

You can do it classic version or with reverse weaving.

5. Gradually weave all the hair from the separated upper part of your head into a braid. Pick up new hair strand by strand.


6. Having braided the braid to the right ear, you can continue weaving a simple braid or make a ponytail.


You can strengthen the end of the French braid, and combine the free part of the hair with the total mass of hair at the back of the head.
Braiding: how to braid braids
1. Before braiding braids, comb your hair and divide it with a vertical parting from the forehead to the back of the head into two parts.

2. Before braiding braids, temporarily secure one part of the hair with an elastic band so that it does not interfere.

3. Separate a strand of hair from the forehead with a horizontal parting in the direction from the vertical parting to the temple and twist it 2-3 times to form a flagellum. Hold the flagellum in your right palm.

4. Separate the next strand of hair with a parallel parting and twist it in the same way with your left hand.

5. Twist both flagella together in your hands.

6. With your left hand, take the next similar strand and again make a flagellum out of it.

7. Right hand follow similar steps. Do not let go of part of the braided braid from your hands.

8. Continue braiding one half of your head to the back of your head.

9. Secure the finished braid with an elastic band at the back of the head.

10. Braid the braid on the other half of your head in the same way.

Braid "Double drop"
1. Wash your hair and dry it well. Using two horizontal partings, divide the hair into three parts (one at the level of the crown, the second at the level of the top of the ears), secure each part of the hair with elastic bands.

2. Using a vertical parting, divide the upper part of the hair into two parts.

3. Create a French braid on each half at the top of your head. Weave first on one side, then on the other. Then bring the loose ends of the hair together and secure with an elastic band.

4. Also divide the middle part of the hair on your head with a vertical parting in half. French braid first one half of the middle part of the hair, and then the other. Secure the loose ends of the hair with an elastic band, as in the previous case.

5. After finishing the “Double Drop” braid, simply comb the hair on the back of your head and leave it loose.
Braiding: how to braid “Dragon”


1. Before braiding the dragon braid, tilt your head and comb your hair against hair growth - in the forward direction.


2. Start French braiding from the back of your head to the top of your head.


3. Continue weaving from the crown simple braid, the end of which is secured with an elastic band.


4. The last step of how to make a dragon braid is to twist a simple braid and secure the end under the French braid.
Braid "Petals"

1. Comb your hair. Separate the hair on the left side of the head with a diagonal parting, going from the hairline on the right side of the head to the left ear.

2. Braid a section of hair into french braid.


3. Similarly, separate a strand of hair on the right side of your head. It will start from a French braid on the left side of the head and continue to the right ear.

4. Create a second French braid on the right side of your head.

5. Thus, alternately braid the braids on the left and right side of your head and reach the top of your head.

6. From the top of the head to the back of the head, you need to leave a wide vertical strand of hair. Weave all the hair around it into French side braids.

7. Braid the vertical strand with a separate braid.

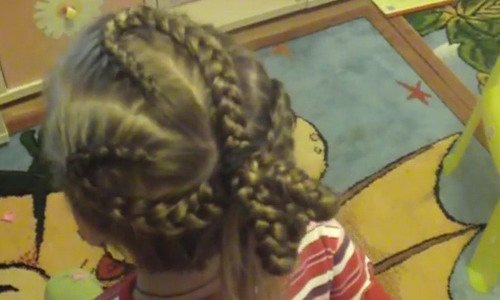
8. The final stage of weaving the “Petals” braid - at the back of the head, combine all the hair into one simple braid or ponytail and secure it with an elastic band. You can make several thin simple braids.
Braiding: how to braid a “Crown” braid

1. Braiding the “Crown” braid begins with combing from the crown in the direction of hair growth. Distribute them evenly in all directions.

2. Start from the back of your head into a French braid, collecting hair that grows from the crown to the hairline at the back of your head.
3. In the process of weaving a Crown braid, move around the circumference of your head in a clockwise direction.

4. Having reached the back of the head, where the braiding began, secure the loose hair with an elastic band and hide it under the braiding.

5. Hair can be decorated with decorative hairpins and flowers.
Method of braiding "Mesh"
1. First, comb your hair. The “Mesh” braiding method begins by separating a rectangular strand from the middle of the forehead and securing it with an elastic band.

2. Separate 2-3 more strands of a similar shape in each direction from it and secure each of them with elastic bands.
3. Divide each resulting ponytail into two parts.

4. Connect parts of adjacent ponytails into new ponytails and secure them also with elastic bands.
5. The tails near the ears do not need to be divided into parts. Combine them entirely with adjacent, higher-lying strands of ponytails.

6. After the second row of elastic bands appears on your head, throw all the ponytails forward (on your face).

7. In the center of the head in the crown area, separate a rectangular strand, slightly smaller in size than the very first strand.

8. Connect a new strand with half parts of adjacent strands and secure with an elastic band.
9. To the sides of them, continue the already familiar weaving.
10. You should have a third row of elastic bands, and the number of tails should be equal to the number of tails in the first row.

11. Comb the hair at the back of your head. Spray your hair with hairspray.
Braiding "Chamomile" braids
1. Comb your hair. Divide your hair with a vertical parting into two parts.
2. Divide each part from the crown into four parts with radial partings.

3. From the top of the head along straight parting Start braiding your hair in a French braid. When you reach the end, make a turn and start braiding from the second part. At the top of your head, gather your hair into a ponytail.

4. Start braiding the “Chamomile” braid from the top of the head with the next French braid on the same half of the head. Do everything in the same way, with a turn to the next part of the hair.

5. Perform similar weaving on the other half of the head.

6. Combine all loose hair into one “ ponytail"or into a simple braid on top of the head.
Braids "Shells"


1. Comb your hair. Divide your hair with a straight vertical parting into two parts.


2. On each side of your head, create simple braids over your ears.


3. Twist each “Shell” braid in a spiral and secure with hairpins.


4. Decorate the “shells” with decorative pins or flowers.
Weaving method "Air cross"
1. Comb your hair with a brush. The “Air Cross” braiding method begins by dividing the hair with a vertical parting into four equal parts.

2. On each half of the head, make another diagonal parting - from the center of the back of the head to the top of the ear.

3. Start French braiding on the left side of your head. At the same time, grab the hair only from the top of the head. The lower edge of the braid should be free, not connected with the hair of the lower occipital part of the head.

4. At the end of the French braid, create a simple braid and secure the loose hair with an elastic band.
5. French braid on the right side in the same way.

6. Then start braiding a French braid on the left side of your head at the back of the head. It will look like a continuation of the braid on the right side of the head. Finish with a short, simple braid.

7. Undo a simple braid that is an extension of the French braid on the left side of your head. Continue braiding it again, but now in the form of a French braid. Weave the hair of the lower right occipital part of the head into it.

8. Two loose ponytails or simple braids decorate each half of the head decorative rubber bands, maybe with flowers.
Braid "Snail"


1. Comb your hair. Tilt your head forward a little and comb your hair again in the direction of its growth, i.e. all hair should lie from the crown in a radial direction.


2. Start French braiding from the top of your head. Always grab new strands of hair from one side only.


3. Braid the “Evidence” braid in a spiral until the hair runs out.


4. Loose hair can be secured with an elastic band in the form of a ponytail or braided with a simple braid. Hide a simple braid under the occipital strands, braided into a French braid.
Snail tail


1. Comb your hair. Make a tail in the occipital-side part of the head.


2. Separate a third of the hair from the ponytail and weave it into a simple braid.


3. Twist the braid into a spiral at the base of the ponytail and secure it with bobby pins.


4. Depending on your desire, you can decorate the “Snail” tail with decorative pins or twist the ends of the tail using electric curling irons.
Bun with braided rim
A bun with a braided rim looks very strict and elegant.


1. Comb your hair. Make a low, loose ponytail at the back of your head and secure it with an elastic band. Section your hair over the elastic and thread the ends of your ponytail through the gap.


2. Divide the tail into two equal parts. Weave a simple braid from each part.


3. Wrap the braids around the base of the ponytail, which now looks like a bun.


4. Secure the braids with hairpins and bobby pins. Make sure that the ends of the braids are well hidden.
Swiss braid

The Swiss braid is woven with the assistance of an assistant.


1. Comb your hair. Create a low ponytail at the back of your head.


2. Divide the tail into three parts and twist a tourniquet from each, ask an assistant to hold them.


3. Weave a simple braid from the strands. It will look fuller and more voluminous than a regular braid.

