Star News


Star from strips of paper for the new year. How to make a paper Christmas star
Step-by-step instruction"How to make a three-dimensional star out of paper" will help you create lovely New Year's crafts with your own hands and you can decorate whatever you want for the holiday.
Photos and schemes "" will do creative process unpretentious, exciting and fast. We offer 3 options for volumetric stars.
For a volumetric star you will need:
- Sheets of colored paper. For the third version of the star - colored cardboard. And you can make white stars and paint with paints, felt-tip pens ...
- Pencil and scissors
- Glue for connecting figures and their parts.
The first option is how to make a three-dimensional paper star
From sheets of colored paper, cut out two squares of the same size.
We fold one of the squares in half on one side, then on the other:
Then fold the square in half diagonally twice, as in the picture:


We make 4 cuts from the edge to the middle of the folds, which we mark in advance with a pencil:

We bend the edges of the future volumetric star. We carefully look at the photo and repeat:

Glue the edges of the rays under the fold and glue:

One half of the volumetric star is ready:

Step 6
In steps 1-5, we make the second half of the star:

Step 7
We smear with glue the rays of one of the halves from the inside:

Connect the shapes carefully. Amazing bulk star paper ready:


The second option is how to make a three-dimensional star out of paper
The star consists of two parts. Cut them out like this:

It turns out such cute details for a three-dimensional star:

Carefully, along the fold lines, bend the parts, as shown in the photo:

Bend back the places for gluing parts. The first detail of the future volumetric star is ready:

Do the same for the second piece for the star. Use paper of a different color, then the star will shine even brighter :).

To glue the two halves of the star, smear all the places for gluing with stationery glue and carefully connect the parts:


The five-pointed paper star is ready!

The last and the simplest option how to make a paper star
For one craft, cut out 2 five-pointed stars of the same size from colored cardboard. Draw them yourself or use this diagram:

Make cuts on each star as shown in the diagrams.
Scheme of a notch on one star:

Scheme of the notch on the second star:

Connect the stars by inserting one into the other through the cuts made according to the schemes and you get a pretty star:

Any voluminous star made of paper can be decorated with drawings or applications, then hung by a thread. They will be great neighbors or.
Good luck!
The New Year is getting closer and closer, and it's time to seriously think about creating a festive atmosphere in the house. Stores offer us just an incredible amount holiday decorations. But what could be more fun than creating wonderful things with your own hands?
We will share with you how to make yourself very beautiful star on the tree This craft can also serve as door decoration or become an unusual element of decor.
Christmas tree star
YOU WILL NEED
- 2 sheets of cardboard 30 × 30 cm gold or silver
- silicone adhesive
- scissors or utility knife
- sequins
PROGRESS
- If a sheet of cardboard is golden on only one side, you need to glue two sheets together. If there is no shiny cardboard, make it yourself: put it on thick paper on both sides with a thin layer of ordinary glue and thickly sprinkle with sparkles. Cut the cardboard into 20 identical strips 1.5 centimeters wide each.

- Take two strips and fold them in the middle crosswise at an angle of 90 degrees, as in the photo.

- Add more stripes on the sides. Interlace the vertical stripes with the horizontal stripes as shown in the picture. Fasten the structure with glue. As a result, there should be 10 strips in a row.

- In the same way, add stripes on top and bottom. Do not forget to fix them with glue at each joint.

- Unfold the workpiece so that its middle forms a diamond in front of you. Glue the two nearest bottom strips together to form a loop.

- In the same way, connect 4 strips on each side of the workpiece. You should have 2 loops in each corner.

- Make another identical figure.

- Glue both halves to get a star.

- Stretch the strips that remained unused inside each ray of the star. Fix with glue.

- Here is such a wonderful star as a result. You can additionally decorate it or mount a garland inside so that it really shines.

It remains only to decorate the Christmas tree with a star. You can make several of these toys and hang them from the ceiling.
To create a paper star, you may need:
- Thick sheets of colored cardboard and paper.
- PVA glue, adhesive tape.
- Scissors.
- Wire and pliers.
- Tinsel and sequins.
- Hair spray
- Colored markers, markers and pencils.
- Measuring instruments: protractor, ruler.

Cardboard can be different color or with a print. The options for flight of fancy are unlimited. Including, you can think of perfect option to style your Christmas tree or room:
- covers from candy boxes With beautiful pictures or patterns;
- fragment of musical staff;
- Children's drawings;
- newspapers;
- gift wrapping paper;
- collage of old postcards, etc.
five pointed star
The easiest model to manufacture is the usual 5-pointed star. First you need to draw a star blank on a sheet of cardboard. Draw a circle with a diameter that will then correspond to the size of the decoration. This can be done with a compass or by circling a round object. Draw a vertical line from the center of the circle to its edge. Next, using a protractor, lay the radii from the center every 72 °: the result will be 5 lines. Connect the points of contact of the radii with the edge of the circle between each other through one - the 5-pointed star is ready.
Repeat the same procedure with another sheet of cardboard. After cutting out both shapes, carefully bend them so that you get 2 halves of the future volumetric star. Glue the parts with adhesive tape, after making the core: a piece of crumpled paper or fabric to give mass and volume to the star with the wire fixed in it. The other end of the wire must be brought out in the form of a spiral. She will be attached and hold the star at the top.

The glued figure must be decorated. You can do it to your taste and in accordance with the chosen color. For monophonic material, the following option is well suited:
- grease the surface with glue;
- sprinkle with dry glitter;
- sprinkle with varnish to secure the sparkles in place.
- tinsel can be glued around the perimeter.
Advice. At the stage of drawing two blanks, you can add a small “extra” piece of cardboard to each top of the star, which, during the connection process, wrap inward and glue. Then you won't need tape.
Two 4-point figures are made for her. A square sheet is folded as follows: in two horizontally, in two vertically, and twice in half diagonally. Next, you need to make 4 cuts: along the line of perpendicular folds, a little less than half of its length. The resulting corners need to be bent inward and glued one on top of the other.
Glue the two halves of the star together so that its rays overlap one on one. You can mount this decoration on the Christmas tree according to the scheme of the previous model.
Advice. A paper star is perfect for decorating rooms or hanging on a spruce tree as a toy. For the top of the tree, it is desirable to use cardboard.
New Year's decor is worth doing not only because of the decorations themselves. it good way spend time with your family or children and create a New Year's mood for yourself.
How to make a paper star: video
We will send the material to you by e-mail
What we associate the New Year with in the first place is winter. Winter itself is full of snow. That's why christmas decor very often complemented by a variety of snowflakes and stars. The editors of the site suggest arming yourself with suitable material and creating wonderful snowflakes and paper stars for the New Year with the whole family.
Snowflakes can be very different
Paper snowflakes can be not only traditional carved from a corner of paper folded several times. Today it is a real art to turn a simple paper sheet into a graceful and ornate wonder. There are several ways to make a snowflake to decorate your home with a minimum of tools and paper.
We twist paper strips: the elegance of quilling
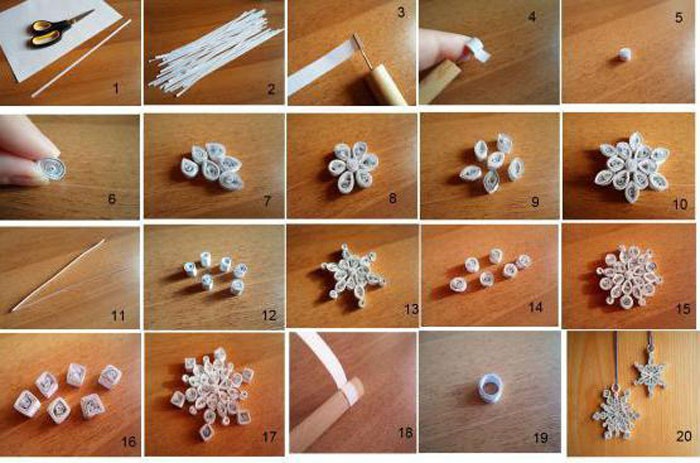
You should not puzzle for a long time over how to make beautiful and light snowflakes for the New Year, when there is a wonderful filigree paper rolling technique - quilling. Interesting elements going to beautiful patterns that make up anything. On the eve of the New Year, we are interested in snowflakes, so we sit back and figure out how to make small miracle from paper strips.


Another interesting and simple option would be to make a snowflake by gluing strips in a certain sequence. No. 9, 10 To make such a beautiful and non-standard snowflake, we either take ready-made shiny paper, or make it with our own hands using PVA glue and sparkles. Then we act according to the assembly scheme: It seems to be a simple thing - fold the paper and cut out a bunch of beautiful snowflakes. But when it comes down to it, many people don't get the expected miracle. The reason is not in the inability to use scissors and paper, but in the difficulties with the image of a beautiful stencil. Therefore, it makes sense to use ready-made stencils. The lines can be redrawn, printed on a printer, or you can attach a sheet of office paper to the monitor and carefully translate the drawing. Related article:
How else can you make a snowflake from stripes
We choose a variety of stencils for the New Year for cutting openwork snowflakes
Stencils for window decorations for the new year: ways to create New Year's paper stencils for windows, tips for creating stencils for the New Year, templates New Year's Eve on windows (symbols, Christmas trees, toys, bells, Santa Claus, Snow Maiden, pig, animals, snowmen) - read in the publication.
New Year's voluminous paper snowflakes: interesting paperwork
When products in volume are required to create a decor, then it is worth using clear and simple diagrams do-it-yourself voluminous paper snowflakes.
Volumetric snowflake: New Year's geometry and curly grace
Wonderful voluminous snowflakes for the New Year from paper are obtained by taking a few repetitive steps.


Snowflake in modular origami technique
There is still a more time-consuming, but not difficult way that can be recommended to those who are wondering how to make voluminous snowflakes for the New Year.

Let's see a small step by step master class for making snowflakes from modules.
| Illustration | Action Description |
|---|---|
 | We assemble the base element for assembling the beam. We install two modules with the hypotenuse of the triangle to the left, and the pockets to the right. In these pockets we insert the legs of the third module, also facing the pockets to the right, to the end. |
 | For a small ray, two basic elements are needed. They can be obtained by inserting the legs of one element, consisting of three modules, into the pockets of the second. |
 | It turns out a small beam, consisting of 6 modules. For the manufacture of all small beams, 36 modules are needed, and for 6 large beams, which consist of 15 small modules, they need 90 pieces. You also need to make 12 modules to connect all the beams to each other. |
 | Total: 6 small and 6 large beams. |
 | We take a large beam and two connecting modules. We insert a pocket into one module in the direction of the elements in the beam with one leg. We do the same with the second module. Let's insert the connecting modules into the remaining 5 large beams. |
 | We alternately connect small rays with large ones using pockets and connecting modules. |
 | It turns out a beautiful snowflake-star. |
Volumetric fluffy snowflake for the New Year
For option volumetric snowflake for the New Year, which is perfectly done with your own hands, you need to take two colors of paper, scissors and glue.
First, fold the square in half, the resulting triangle is again in half and again in half.


Article
As a rule, the older a person becomes, the more nostalgically he begins to remember his childhood years. For many adults today, this time is permeated Soviet symbols, among which red stars can be noted.
In this master class, I will show several options for how to make a paper star with your own hands with step by step photos. Such a five-pointed symbol may be relevant now. For example, a red star is perfect as a decoration or as a decoration. New Year's interior. It is not difficult to make it out of paper, focusing on the proposed master classes.
How to make a paper star with step by step photos
01. Do-it-yourself voluminous paper star
To create a three-dimensional star, we need to prepare:
- red paper;
- scissors;
- pencil;
- ruler;
- PVA glue.

First, cut out 5 squares of the same size from red paper.
Our blanks have a side of 9 cm.

After that, you can begin to add each square. First, make a diagonal fold.

Then we unfold the square blank. right side bend to the middle.

A similar fold must be done on the left side.

Now we need to make folds in the upper part of our workpiece. First we fold the right side.

After that, make a fold on the left side. Our workpiece has acquired the shape of a rhombus.

Fold it in half.

The top layer needs to be bent to the side.

At the same time, attention should be paid to reverse side the vertex of the triangle coincided with the fold line.

Slightly unfold the workpiece.

Smooth out the fold lines.

Now we begin to straighten one of the rays future star.

Gently straighten its inner layer.

Now we give the workpiece next view. We have an element consisting of one whole beam and a half.

We need to make 4 more such blanks.

You can start assembling the star, and this will require glue. We apply it to one half of the beam.

After that, we insert one element into another.

So we connected 2 modules.

We glue the remaining elements in a similar way. Our volumetric paper star is ready.


02. How to make a star using the modular origami technique
Technique modular origami allows you to create volumetric figures using the same elements. In our master class phased production stars from several modules.

To work, you need 10 square sheets of paper. We took sheets of paper in red.
We start by making one module. For him, we need two sheets. First, bend them along two diagonals. Now these same sheets of paper should be bent in transverse directions, but in the other direction.

From one we fold the workpiece in the form of a double square.

From another sheet of paper with pre-planned folds, we fold the blank in the form of a double triangle.

Now insert the triangle inside the square.

We bend the protruding tips from the square inward. First, we do this from two opposite sides.

Then we unfold the module blank and bend the protruding corners again. So we got one of the modules.

We need to make 4 more such modules for the future star. Let's start connecting the modules. They will be attached to each other due to the corners protruding on the sides.
Two corners of one workpiece should be inserted under the folds of the other from the inside.

We introduce the corners of another module from the outside under the folds of the neighboring one.

So we continue to connect the individual modules.

We close all 5 elements in a ring.


