Star news


Current DIY crafts for the New Year. Snowman made from disposable cups
A wonderful holiday is approaching, which many have loved since childhood. This is the only day on which not only children believe in fairy tales, but also adults are overwhelmed by the feeling of something magical and mysterious, and completely strangers united by a common anticipation of the approaching New Year. Examples and ideas for crafts from various materials you will find in this article.
The pre-New Year period is a great opportunity to do handicrafts with your children and prepare crafts for an exhibition, school or kindergarten, and maybe you will even give sweet gifts to your family and friends.
Perhaps inspiration will strike you and you will create a unique craft that will delight the eye, and the time you spend with your child will be remembered for a long time. Besides, what could be better than long winter evenings When everything outside the window is covered with snow, decorate the house and decorate the Christmas tree with handmade decorations.
Crafts for school for the New Year
Magic jar
Surely you have seen souvenir balls with snow, inside of which there is an image, a figurine or an entire composition. With a little imagination you can easily make a similar “magic jar”.
You will need a jar with a screw cap, water, glycerin, glitter, scissors, glue, and a figurine of a suitable size.
- Fill half a jar with water
- Add glycerin, not adding a little to the top
- Glue the bottom of the figure to the lid
- Place glitter in a jar
- Screw the lid on, you can secure it with glue
Important: If large air bubbles form in the jar after screwing the lid on, add some water or glycerin to the jar.

Disc pendant
Unnecessary CDs and DVDs- an excellent material for various crafts. For example, using the decoupage technique, you can make an original pendant that can be used as a wall decoration or hung on a Christmas tree.
You will need a disk, PVA glue, scissors, a napkin with New Year's drawing, decorative glue(with sparkles) - for decoration, ribbon or tinsel.
- Separate the patterned layer from the napkin
- Lubricate the disc with PVA glue
- Stick a napkin
- Use scissors to trim excess edges along the contours of the disc.
- Wait for the glue to dry and cover with varnish or decorative glue
- Glue decorations - tinsel along the contour, bow, loop

DIY New Year crafts for kindergarten
Christmas tree
In order to do volumetric Christmas tree you will need cardboard, colored paper, scissors, glue, tape, decorations
- Fold a piece of cardboard in half and cut it
- Place the halves together and bend in the middle
- Starting from the fold, draw half of the Christmas tree

- Cut out the workpiece. You should have 2 Christmas trees
- Bend each tree in half
- Make a cut in the center on one piece from above, on the other from below, without reaching the middle
- Connect the parts
- If you want to receive fluffy Christmas tree- take more sheets of cardboard

- Decorate the Christmas tree. You can glue colored paper balls, use tinsel, or make a star. To decorate the Christmas tree, glitter, paint, colored paper, foil and other materials that you can find at home are suitable.
To keep the star on the tree, make a small cut in the paper blank and “plant” the star on the tree.
For reliability, secure the connections of the parts with tape.

Deer from prints
Prepare brown and brown cardboard for the craft. yellow flowers, scissors, glue, pencil or pen for tracing outlines.
- Place the baby's foot on brown cardboard and trace the outline.
- Trace the outlines of the handles on sheets of yellow cardboard.
- Cut out the parts along the contour.
- Glue the “palms” with your fingers up to the wide part of the “foot”.
- Make eyes. To do this, you can use purchased pre-made eyes, you can cut them out of paper, draw them, or use a tablet blister and insert beads into the cells.

With only a little imagination, you can come up with a lot of compositions for the New Year from children's prints.

Pompom snowman
You will need cardboard, scissors, white knitting threads, colored paper, PVA glue.
- First make 3 pompoms different sizes. To do this, cut out circles of different sizes from cardboard (2 for each pompom). Make holes in the middle. Fold 2 circles together and wrap as many threads as possible. Cut the threads along the edges of the circles and tie them with thread between the circles. Remove the cardboard circles and the pompom is ready.

- Now connect the pom poms using glue.
- Cut out eyes from colored paper and glue them on.
- You can tie a scarf made of ribbon or fabric to the snowman.
- For a hat, you can use a cap, a thimble, or a blank you made yourself.

The ability to make pom-poms will open up a lot of scope for imagination, because you can make anything out of them. For example, this New Year's composition.

Crafts made from jute twine for the New Year
Herringbone
You will need a barrel (skewer, wooden stick, wire or anything suitable that you can find in the house), a pot (glass, plastic cup etc.), jute twine, cardboard, glue, coffee beans, decorations (e.g. lace, tinsel), plaster.
- Draw a circle on cardboard and divide it in half.
- Cut out a semicircle and connect with joints. Secure the seam with tape. You should end up with a cone.
- Place the cone on the cardboard and trace the outline to cut out a circle for the base the right size.
- Make a trunk. Secure with tape at the top and bottom.
- Coat the cone with glue and wrap tightly with jute.
- Insert the barrel into the circle, coat the circle with glue and wrap it with jute.

- Connect the cone and circle to the trunk.
- Spread the pot with glue and wrap it with jute.
- Now “plant” the Christmas tree. To do this, fill the pot with plaster, insert the Christmas tree and wait for it to dry (about half an hour).
- Garnish with coffee beans and other decorations.

Bells
You will need plastic bottles, plastic bag, glue, tape, jute twine, decorations, scissors.
- Wrap the bottles with tape around the neck to eliminate any unevenness. The working surface must be flat.

- Place plastic bags on top of the bottles.
- Starting from the lid, coat the bottle with PVA glue and begin wrapping it with jute. Roll in a spiral pattern on the cap, then continue around the bottle.

- Wait for the glue to dry.
- Remove the bag of twine from the bottle, then remove it from the workpiece.

- Decorate with different materials.

Paper quilling crafts for the New Year: patterns
Quilling is an amazing technique in which you can create entire pieces from strips of paper twisted into a spiral. volumetric compositions. This type of work requires perseverance, patience, and attentiveness. But the result will delight you and those around you with its tenderness and uniqueness.
So, for work you will need colored paper, scissors, PVA glue, various decorative elements (sparkles, beads, rhinestones, tinsel)
Christmas tree using quilling technique
- Cut the paper into strips
- Cut the edges of each strip
- Using a toothpick, roll the strips and fluff them up
- Glue the resulting rolls into in the right order onto cardboard, decorate
If you master the quilling technique, then by folding paper in different ways, you can create both flat and three-dimensional crafts.

Snowflake using quilling technique, video
Crafts from salt dough for the New Year
Before you start making crafts, you should prepare your play dough. Knead it in the following proportions: 2 cups flour, 1 cup salt, 3/4 cup water.
Important: If your dough crumbles when kneading, add a little water, and if, on the contrary, it sticks too much to your hands, add flour.
Crafts most often require dough different colors. You can add food coloring when kneading or make a craft first and then decorate it with paints.
Snowman
When making a snowman, you will need toothpicks and a garlic press, so prepare everything in advance.
- Knead the dough, divide it into 2 parts and give one of them a blue or blue color using food coloring.
- Make 2 cakes of different sizes - a head and a body.
- Immediately work on the snowman's face. Label the parts of the face - eyes, eyebrows, mouth, nose.
- Fashion the arms and legs and attach them to the body.
- Make a triangle - a hat, and use a toothpick to make a drawing.
- Make a scarf from a rectangular piece of dough, make a pattern with a toothpick, or you can make notches with a knife - you will get a scarf with fringe.
- Make buttons from small balls of blue dough.

- Start working on the broom. Insert a toothpick into one of the snowman's hands. Take a small portion of the dough and put it through a garlic press. Wrap the resulting sausages in a small sausage made of white dough. Attach the resulting broom to a toothpick.
- Dry the finished snowman thoroughly. To make the craft last longer, coat it with acrylic varnish.

Snowflake
To make snowflakes with children you will need stacks and rhinestones or beads for decoration (optional).
- Roll out many thin sausages of different lengths from the salt dough.
- Take the sausage, roll both ends into a spiral and connect in places where the first bend of the spiral begins. Make 4 of these blanks of the same size.
- Make 12 loops from the sausages. Without having the skills to work with dough, it is difficult to make identical loops. You can fold the loops to the desired size from long sausages, and then cut off the excess ends.
- I will make a circle from a small sausage - the center of the snowflake.
- Place the pieces together, attaching around the center. Decorate with beads and rhinestones.
- Dry the craft and varnish.

From these sausages you can make snowflakes of different sizes, shapes and designs.

Crafts for the New Year from beads: diagrams
To work with beads, you should prepare the following: beads of different colors, glass beads, wire, fishing line, scissors. If you string beads on a thread, you will also need a thin needle. Please note that the thickness of the needle should allow you to thread the thread into the bead at least 2 times.
Important: When choosing what to string beads on, consider the following: wire products take and hold any given shape, but require careful handling. Crafts strung on a thread do not hold their shape, they are soft and pliable. Minutes is that the thread becomes dirty and can be worn out. Therefore, use nylon thread.
The fishing line gives durability to the product, but is unruly in taking and maintaining the desired shape.
Snowflakes
Snowflakes - beautiful Christmas decoration. They can be used as a pendant, hung on a Christmas tree, hung on keys as a keychain, decorated with a gift or made part of a New Year's composition.
Simple snowflake with bugles
- String 7 white beads and thread the end through the first one, forming a circle.
- String 1 bead of blue color and pass the end through 5 beads of the first row.

- Put on 1 blue bugle bead and one white beads and return the thread to the glass beads.
- Bring the thread through the nearest white bead of the first row.

- Repeat the above pattern until the second circle is completed.

- Collect 2 blue, 1 white and 2 blue beads and pass the end through the last white bead of the adjacent ray.

- Repeat until the circle is complete, passing the end through the first white bead.
- String 1 blue bugle bead, 1 white bead and again 1 blue bugle bead and pass the end through the 6th (white) bead.

- Repeat until the circle is complete and bring the end through the nearest glass bead and white bead.

- String 6 blue beads and thread the end through the white bead from below, forming a loop.
- Fix and secure the thread.

Complex snowflake
- To make it you will need wire, short and long glass beads, and beads.
Weave according to the pattern:

- At the end of weaving the ray, make 2 horns and secure the wire. For a snowflake you will need 6 of these blanks.

- Use a separate piece of wire to connect the lower side glass beads of the 2 beams.
- String 3 beads onto the wire, twist the wire, cut or hide the ends.
- Connect all the rays in the same way.
- To strengthen the product, make an inner circle by weaving one bead into each diamond at a separate end of the wire.

Schemes of snowflakes, photo


Wreath
You will need wire, yellow, red and green beads, green satin ribbon, pliers and wire cutters.
- Wind the wire around a cup, shot glass or any round object to make a ring, you can simply wrap the wire around three fingers several times and then shape it into a ring.
- Secure the ends.


- Prepare 3 pieces of 45cm wire and twist the ends on one side.
- String beads onto each wire different color so as to take up 30 centimeters of wire length.
- Weave 3 wires with beads into a braid, twist the ends.

- Wrap the braid around the ring of wire that you prepared at the beginning, connect the ends of both pieces, secure and cut off the excess with wire cutters.
- Tie a ribbon.

Crafts for the New Year from pine cones
Christmas tree decorations
For crafts you will need a glue gun, paints, glitter, ribbons or wire, pine cones (it’s better if you stock them up in advance).
- Paint the cones in different colors and hang them on the tree using a ribbon. In a similar way you can decorate the apartment.


Christmas toys made from pine cones

Decorating an apartment with pine cones for the New Year
- String the cones on a ribbon or wire, decorate them and cover them with glitter - you will have a real garland.

You will need paint, cones, disk, cardboard, candle, glue, optional - various decorations(tinsel, Christmas tree branches, beads).
- Spread the disk with glue and glue the cones in a circle
- Apply glitter
- Decorate the craft
- Place a candle in the center

- If you don’t have the required number of cones on hand, don’t worry, you can make a candlestick from one cone.
- Glue the disk to the top, having previously trimmed it. Instead of a disk, you can use caps or other available materials.
- Try to make the craft stable.

New Year's wreath
You will need a lot of cones, glue, decorations. Use a cardboard circle as a base.
- Spread the cardboard circle with glue and glue the cones in any order.
- Decorate the wreath with tinsel, you can use it as decoration fir branches, rhinestones, ribbons.

Little people
You will need glue, pinecones, felt, popsicle sticks, toothpicks, paint, wire.
- Make preparations. Sew a head and a hat out of felt, you can also cut out arms and legs from felt and reinforce them with wire.
- Glue the parts to the pine cone in the right places.
- Paint the sticks and you will have skis. And the toothpicks will serve as ski poles.

Craft from a pine cone - a skier
With a little imagination you can make any characters you want.

Crafts from Thomas - foamiran for the New Year
Christmas tree decorations
You will need 2mm thick foamiran in two colors, a glue gun, a toothpick, beads, thin bead needles, paper, scissors, a pencil, ribbons, and floss.
- Make patterns in duplicate, cut out the details. Transfer to foamiran with a toothpick and cut out the blanks. You should end up with 2 of each piece in a different color.

- Stick on large details small, matching in color. Using a toothpick, outline the design and embroider with stitches.
- Sew beads.
- Make two parts of different toys.

- Glue the halves of the part.
- Glue the halves of the fastener together, placing tape between them.
- Connect the toy and mount.
- Make a bow, decorate and glue at the base of the mount.
- If the edges are uneven, you can trim them and tape the sides of the product.

Christmas tree, video
Felt crafts for the New Year
Snowflakes
You will need white felt and blue flowers, threads, needle, pen, ribbons, scissors. 
Garland
You will need felt of different colors, scissors, thread, and a needle.
- Cut out 25cm strips of felt.
- Connect strips of different colors together in 2 pieces. Secure with a pin or grab with large stitches.
- Make 5-6cm cuts in the center and pull the end of the ribbon through the slot.

- Make a lot of similar blanks.

- Sew the pieces together to the desired length of the garland.

Christmas balls
You will need felt, thread, needle, ribbons or felt strips, scissors.
- Cut 8 identical circles for one ball
- Bend the pieces in half

- Connect 2 parts with threads along the fold
- Cut out the base of a snowflake from cardboard
- Cut corrugated paper into small squares
- Glue the center of each square onto the cardboard base, leaving the edges sticking up
- The tighter you glue the paper, the more voluminous the snowflake will be.
- After you have glued one side of the snowflake, proceed to the second.
- Cut a circle out of a napkin
- Staple in the middle
- Fold the edges up along the layer
- Make a cone out of cardboard
- Glue the blank onto the cone
- Continue in the same way
Felt craft for the New Year
Fabric crafts for the New Year, video
Crafts for the New Year from corrugated paper: diagrams
Snowflake
You will need cardboard, white corrugated paper, glue, scissors.

Garland
From corrugated paper You can do a beautiful garland with a minimum of effort. All you need is some free time, paper and scissors.

And for such a garland you don’t even need scissors, and even a small child can handle such a job.

Christmas tree, video
Crafts from napkins for the New Year: diagrams
Christmas tree
You will need glue, cardboard, scissors, a stapler, three-layer napkins.


Important: For each new row on the cone, cut out smaller circles.

Napkin ball, video
Crafts from candies for the New Year
When New Year's gift not only beautiful and tasty, but also made with your own hands, it brings much more joy. When it comes to crafts made from candies, you can only be limited by your imagination. You can use a base (cardboard, bottle, box), glue gun and sweets to create a clock with chimes, a Christmas tree, Santa Claus, etc.
Candy craft
Video: Crafts for the New Year from pasta
November 8, 2018
Good afternoon dear readers. Today the article will be entirely devoted to crafts on the topic New Year 2019. Of course, you can not bother with crafts, but go and buy your favorite toy or figurine. But it will not be as dear to you as the one you made with your own hands.
Also, the article will be very useful for those who have small children who go to primary school or kindergarten. Since on the eve of almost any holiday in these educational institutions Children are often asked to make something similar at home, preferably in the style of the upcoming holiday. And then they hold a competition for the most the best craft. And of course, you want your child to take at least a prize.
And making New Year-themed crafts is doubly enjoyable, as it evokes Christmas mood. The absence of which many adults complain about. We don’t have such complaints in our family. Because before the holiday, our house is transformed into a fabulous decorated house from handmade crafts. These are snowflakes and paper garlands and much more. In general, the introduction was a little long, I suggest we get down to business right away.
Before you decorate your home for the New Year, you need to make all sorts of decorations. You can also save a lot of money on this matter if you use old unnecessary trash for production, which is a pity to throw out and has nowhere to put it.
Required:
- Tinsel
- Glue gun
- Wire
- Old CDs 12 pcs.
- Drill with a thin drill or awl
- Pliers
Production stages:
From a cardboard sheet, cut out a template in the shape of a pentagon with sides of 6.5 cm. We apply the template to the disk and put dots where the vertices are. These points are for making holes in them.

We drill all the disks point by point, and then connect them using wire and pliers. At the end you should get a ball.

It should look something like this.
 Next we glue tinsel onto each disc. We glue along the contour of the disc using hot glue.
This is what happens in the end. Such a craft and story can also be used as New Year's souvenir will do too.
You can also build beautiful wreath from cones. Although wreaths are not so popular in our country. However, if you decorate with such wreaths front door it will look absolutely amazing.
You will need the following:
- A few cones
- Decorative elements
- Paint and varnish in cans
- Glue gun
- Wreath base
Production stages:
As a base, you can use foam pipe insulation or a small hoop. You can also prepare a papier mache base.

We paint the base the color with the cones and attach the cones to the base using hot glue.

At the end, you can open the craft with varnish to add shine and decorate it with decorative elements.

A wreath of pine cones looks quite beautiful.
Snowman made of threads and balls.
Well, who else but the snowman is the very first one associated with winter and the New Year. You can make it quite easily; you just need to collect all the necessary materials.
Required:
- Balloons 5-6 pcs.
- Tube of PVA glue
- Skein of white thread
- Decorative elements (ribbon scarf and hat)
Production process:
We pump the balloons with air and make them of different sizes.
One needs the biggest one, the other one needs a smaller one, and the third one needs an even smaller one. And two more very small, but identical. Then we wrap the balls with threads in different directions and coat each new layer with glue.
When the glue dries, pierce the balls and pull them out into their resulting shapes.
All that remains is to assemble the snowman using the same glue. And in the future I will use mine creative potential add eyes, mouth and nose to the snowman.

And also attach the hands. These will be two small balls. Here's what you can do from the materials presented.
Or here’s another master class on how to make a beautiful snowman from an ordinary sock.
You will need:
- Scissors
- Super glue
- Scotch tape wide
- Cotton or knitted sock
- Threads
- Several buttons
Production stages:
We cut the toe just a few centimeters from the heel line. We will use the part with the heel. Tie the sock tightly with a thread and turn it inside out. This will be the base of the snowman. We tie it in the part where we cut it.


And fix the figure in this position. Make a few turns and then tie the thread into a knot. We cut off the excess ends with scissors.
 We make a scarf from a piece of fabric to disguise the threads.
 From the second piece of the sock we make a cap by folding part of the sock several times. Apply super glue to the buttons and attach them to the snowman’s body.

To make the snowman's face I use multi-colored beads. Which I also attach with glue.
Santa Claus from a disposable plate
To create a beautiful and original frost case, you will need the following set:
- Disposable paper plate
- Scissors
- Paints
- Red pompom
- Paper
- Red cardboard
- Eyes for toys
Production stages:
We cut a disposable plate into two parts. Cut just above the middle. And paint the inside beige.

From colored cardboard we cut out a large triangle larger than a plate.

From a sheet of white paper, cut out a strip 2 cm wide and two circles. Cut one of the circles into two parts. Next, we assemble the craft according to the picture.

Christmas tree made of cardboard and threads
You can create small souvenirs in the form of a Christmas tree and give them to your guests who come to celebrate the New Year with you.
You will need to cut out their corrugated cardboard and cut it like this beautiful Christmas tree. Approximately 15-20 cm in size.

Then wrap it with threads. We attach each turn with regular glue or you can use hot melt glue. We attach a magnet to the back side. 
Like these ones beautiful Christmas trees can be created using this technology.

Snowflake made from popsicle sticks and buttons. It also turns out very beautiful and unusual.

To create such beauty you will need at least 3-5, and at most 7-8 ice cream sticks. We connect them into a star like this. Then we decorate with buttons, which we also attach with hot glue. At the end we attach a rope and hang it on the tree.

You can try to glue a house and a snowman out of cardboard and cover them with cotton wool. And make a small tree from a twig. You will get something similar to this picture.

Or try making a penguin like this from two bottoms of plastic bottles.

In the year of the pig, you can create such a funny pig. Done this beauty from socks and cotton wool. Watch the sequence and you will understand everything right away. In the same way, we made the snowman a little taller.

An ordinary Christmas tree ball, only painted by you personally, can be an excellent craft. Take a Christmas ball and apply plain paint on it; this will be the main background. And then color it however you want. 
What if there are old ones left? glass balls You can wipe off all the paint from them and fill them with rubber bands like this. It also turns out beautifully.

Or decorate Christmas balls.

Have you ever seen Christmas balls with a photo inside? See how this can be done.

Beautiful stars that we decorate with beads or seed beads will also fit perfectly into the interior of any New Year's beauty. Or maybe such a star will be a beautiful addition to your New Year's outfit.

And if you show your imagination, then even ordinary walnuts can become beautiful New Year's crafts or Christmas tree decorations.


Or maybe you would like to make something like this beautiful snowmen from old light bulbs.

This master class will also be useful to you. Because you can make not only snowmen. Look, I think this idea of creating crafts will be interesting to you.
Souvenirs made of fir and pine cones for the New Year
Crafts from natural material They always turn out very beautiful and attractive. Let's start with the simplest and continue with the most complex.

It’s very easy to create a beautiful candlestick using pine cones and threads. You need to take a small jar, a few cones, natural thread and hot glue.
We tie a thread around the neck of the jar several turns and make beautiful bow. We glue the cones with hot glue to the thread. It turns out to be such beauty.

We put the jar on a tray that we decorate beautifully. spruce branches and the craft is ready.

If you want to make it a little more beautiful, you can decorate the neck of the jar with semolina, which from a distance will look like snow.

You need to first tint the semolina with chalk. Coat the neck of the jar with PVA glue and sprinkle the area in the glue with semolina. We tie a beautiful bow on the neck of the jar.

You can decorate pine cones in the same way. But for the biggies, we’ll prepare something cooler. Add some glitter to the semolina. Now coat the corner of the cone with glue and sprinkle with semolina and glitter.

You can do without semolina at all, just use glitter golden color. And then follow the familiar pattern. In glue then in glitter.

Using white acrylic paint you can make these cones in the snow.

Add a couple of beads and a bow and you will get a beautiful Christmas tree decoration. Next, the decorated cones can be combined on our candlestick.

Now I propose to make beautiful Christmas trees from large cones. You will need small pots, acrylic paints, small stars and hot glue.

We attach the cones to the pot, paint them white or green color. And we attach a small star on top.

Using the same principle, you can make a larger Christmas tree. We make a cone out of cardboard. The height depends on the number of cones. We attach the cones to the cone using glue. Decorate beautiful bows and beads.

Now the craft is a little more complicated. This technique is called topiary. With the approach of the New Year, a bunch of craftsmen have appeared who make crafts in this style.


Master classes and ideas for paper crafts for the New Year
You can make a huge number of crafts from paper. And the simplest and a little more complicated. And as always, let's start with something simple, and then continue with more complex models.

The simplest thing you can make is a Christmas tree like this. It is enough to cut a circle out of colored cardboard, cut off a piece and roll it into a cone. Then decorate with stars or circles made of colored paper.
But here is a box of chips that was pasted over with sweet souvenirs and it turned out to be a train.

Or here’s a more complicated souvenir, Santa Claus using the origami technique. How do you like this idea? If you learn how to do it, you can offer it as a New Year’s card.

You can make a bunny like this using the origami technique with the addition of appliqué.

If you have the desire and time, you can cut out the same paper and glue a beautiful wreath on a door or wall using paper handprints. I think that you can make such a wreath using the prints of the whole family.

Try making this unusual Christmas ball from colored cardboard. We cut several strips of the same length and width. Next, we lay them out so that they all connect in the middle. Then we make a hole and thread a piece of a cocktail tube onto the thread in the middle. There is a small bead at the top. Everything is simple and easy.


Do you have a huge amount of unnecessary newspapers accumulated at home? Then you can find a use for them. Let's make it out of newspaper tubes volume New Year's ball to the Christmas tree. We make tubes and wind them layer by layer. Gluing each new layer. Finally, we paint with spray paints and the Christmas tree toy is ready.

At the end of this chapter, I offer a video clip on how to make a cool paper snowman.
DIY felt toys ideas with patterns
Now a topic for those who like to craft with their own hands from such a pleasant-to-touch material as felt. Soft and voluminous toys have always been something unusual and pleasant for me.
You can build such a beautiful Christmas tree from cut out pieces of felt.

We cut the flaps and then assemble them into a single composition.


Or try using this Christmas tree as a basis. Here you will have to tinker.


And if you want, make a larger Christmas tree out of green felt and hang it on the wall. All that remains is to make beautiful toys for her and decorate her.

You can make a Christmas tree toy. Here is an example and patterns.

Here's an idea for making toys for the Christmas tree. You can sew balls, crackers and bells.


Well, of course, what would a New Year be without Santa Claus? Video about how to sew Santa Claus from felt.
Beautiful works for the New Year's competition for school
I don’t know how in your school, but in ours, such competitions are held every year. Well at least in primary school so that's for sure. So you have to look for and make crafts in order to take part in the competition, and of course, take at least second and third place.
Here simple craft, but it looks completely different in the new year. But all you need is a beautiful jar, a small Christmas tree, and a machine.

We attach the Christmas tree to the roof of the car, add some foam chips and ribbon to the lid.


At the end we decorate with New Year's decor and your craft is ready.

For those who have coffee beans, here is an idea to make a Christmas tree from coffee beans. We attach the grains to a paper cone and decorate with decorative elements.

Or you can use candy instead of coffee beans.

And here is a Christmas tree made from ordinary buttons. Gather buttons of different diameters on a thread and the Christmas tree is ready.


And of course you can embroider Grandfather Frost.

A Christmas tree made of beads will also look beautiful.


You can make a beautiful New Year's beauty from plastic bottle. Just first you need to put it in a pot. We pour plaster into it and place it wooden stick as a trunk. We make a hole in the bottom of the bottle and put the bottle on the barrel. We attach the bottle to the pot with glue and decorate the Christmas tree with tinsel and toys.


Or take foam ball and cover it with beads or beads. It also turns out to be quite original.

How to make a garland for a Christmas tree with your own hands
Probably the most accessible and cheapest option is paper garlands. And the simplest one is garlands of rings. Probably each of us glued such decorations from colored paper as a child.

Or make a rainbow like this out of colored cardboard.

Or here are some more ideas for creating paper garlands.


And if you spend a little more time creating a garland, you can make it very beautiful and original. I suggest you see what can happen if you try a little.
You can also use cotton wool.

Or buttons of different colors. It will look beautiful too.

And this option is exactly for street tree since this garland is made of ice. We make multi-colored ice cubes. The main thing is not to forget to put the thread so that it freezes in the mold.


Unusual crafts "Winter's Tale" for kindergarten for exhibition
When in kindergarten they give you the task of making a craft with your own hands. This means that the child must do almost everything himself, and not mom or dad did it, but the child just carried it. Therefore, I give the simplest thing that your baby can do practically on his own.
Here's an idea on how to make Santa Claus from a star. There is cutting, coloring and applique.

Try this with your child winter picture from cotton pads and sticks.

Or this idea of creating a snowman from cotton swabs and a foam ball.

A bottle, wire, and rags can make a fairy-tale character.


But of course something more complicated, a house made of plastic ceiling tiles. The child, of course, won’t be able to do it on his own, but he can help cut it out.

Or here’s an example of what kind of houses can be made from all sorts of things.


Beautiful New Year cards for children Master class and templates
If you decide on a gift, then you will definitely need a postcard to accompany the gift. And you can easily do it by following our tips. Here are just a few templates for you to print.


You can decorate a standard postcard book with a grandpa or a fairy-tale character like this.


And if you want, you can make a voluminous congratulations.

You can also design your card in scrapbooking style. Well, isn't it beautiful?

Here is a master class on creating beautiful New Year cards. Take a look, you might find something for yourself.
Do you want to do something that no one else will? Take this Christmas tree postcard into service.

Print this template on your printer. The dotted line is the fold line.


And we glue it the same way as in the photo. All that remains is to do everything beautifully and arrange it. You can find out more about how to make such a postcard by going to.

This selection of crafts for the New Year has come to an end. Perhaps there will be another selection soon. Follow our blog and you will definitely find what you are looking for. Well, for today, all the best to you in the coming year.
New Year is the time of a real fairy tale, when something that can only be called a miracle happens. Do-it-yourself New Year's crafts will certainly add magic and a festive atmosphere to your home, both with their appearance and the manufacturing process, in which you need to involve all family members!
Postcards
Let's start with postcards - the most popular New Year's souvenirs.
Such a cute card can be made in just 15 minutes -
Postcards using the Scrapbooking technique are a little more difficult to make (but all the more interesting!).


Snowflakes
How to do New Year's snowflakes from felt, beads, polymer clay, dough, as well as knitted, embroidered and many other options for their manufacture, see


It is very easy to make a snowflake from glue: in order to make it, you need to draw a snowflake on wax paper (greased with dishwashing detergent) using a glue gun. After drying, separate the snowflake from the paper and attach a thread to it, with which you will hang the snowflake on the Christmas tree. Lubricate with PVA glue and sprinkle with glitter. Ready!

New Year's toys
New Year's toys can be made from completely different materials, you just need to use your imagination and add a drop of New Year's magic)
You can make a New Year's toy from any children's toy by just adding sparkles) Coat the figurine with glue and sprinkle with glitter

Making such a sheep is very simple - you will need cotton buds, cardboard, sticks for legs and ribbon. The process of its creation is in the photo:
This wonderful goat can be bent from ordinary wire.

How do you like this paper sheep? It's very easy to make!

You can make many interesting crafts from paper. Here, for example, is a paper cone:

And crafts made from real pine cones Even children will enjoy making it.

Christmas tree toys using the Kanzashi technique
Like this wonderful toy you can make by reading this master class

Christmas decorations made from old light bulbs
To make such Christmas tree decorations, you will need old light bulbs, which you need to coat with glue and sprinkle with glitter, paint with acrylic paints or decorate using the Decoupage technique. A string for hanging toys can be glued or wrapped around the thread.

Christmas trees
Christmas trees can be made from anything. Here are 25 options for New Year's beauties!


Snowmen
Snowmen can be sewn or embroidered, glued from paper or cardboard, or painted.
This wonderful snowman is made from children's socks) Read how to make it


Christmas wreaths
The simplest option for making such a wreath is spruce branches twisted into a ring and secured with wire, decorated with beads and bows.

Although when creating wreaths you should not limit your imagination)

To make your next wreath you will need a wire hanger, Christmas balls and glue. Having given the hanger the shape of a ring, unwind it and put balls on the wire, securing them in the right places with glue.

Fairy lights
To make simple garlands, use colored paper, scissors and stapler:

You should end up with something like this:

Now, taking the workpiece by the edges and spreading our hands to the sides, we will get this piece of the garland:

By connecting several similar pieces together, we get a long garland, which, however, can also be hung vertically.
Hello, friends! Very soon our great and long-awaited holiday. All of Russia is resting on these New Year's days. Every person, be it an adult or a child, congratulates all their loved ones and acquaintances. But before this long-awaited year comes, we will all have to work hard in terms of choice and...
Also, in addition to all this, children in kindergarten or school begin to be asked to make various gizmos and trinkets. Yes, and adults do all sorts of things for themselves. various decorations, including on the Christmas tree. It is precisely in this article that I would like to tell you how to make simple and simple crafts, which everyone will be happy about.
In addition, if you have unnecessary things lying around the house, then you can come up with a bunch of them different ideas that will please you. Well, now let's move on to the main thing and see what can be done. I think you will really like them.
In this chapter I wanted to tell you in detail how to make a pig. After all, it is considered a symbol of the coming 2019. Piggy will serve great craft to kindergarten, to school, or as a souvenir gift to loved ones or friends. It can also be a decoration for the New Year tree. The materials will be simple and there will be no difficulty in manufacturing. This is interesting fun for children.

To make a pig we will need:
- Glue moment;
- Medium sized pine cone;
- Pink button Ø 2 cm;
- Black beads Ø 4 mm;
- Brush;
- Scissors;
- White and red paint;
- A small piece of felt.
1. Since we decided to make a pig Pink colour, then we need to mix white and red paint together.
The symbol of the year is a yellow pig, so if desired, our souvenir can be painted in this color. But this is at your discretion.
2. We begin to cover the bump with the resulting paint. This must be done so that there are no black spots left.

3. We set aside the future body of the piglet to dry, and at this time we make ears from a piece of felt. Fold it in half so that when cutting out there are 2 ears.

4. After the cone has dried, glue a patch (button) to its back using glue.

5. In the same way, applying glue to the ears, glue them to the body.

6. Well, the last thing is to glue the beads onto the head of our souvenir.
Since they are very small and it is inconvenient to take them with your hands, you can do this with tweezers.

7. If desired, you can attach a tail from wire to the back of the body, having first rolled it into a small spiral. But this is at your request.
Well, the pig is ready, as you can see, it’s not at all difficult and a great activity for children.
Craft - New Year's toy made from acorn caps
I present to your attention interesting master class for mothers and children. A beautiful toy for the New Year tree. The kids will be very interested in making it. And it looks just great. But there is one difficulty - finding the main material from acorns.

For the toy you will need:
- Christmas tree decoration;
- Sequins;
- Caps of acorns;
- Glue gun or moment;
- Sequins;
- Rhinestones;
- Gouache paint;
- Brush;
- PVA glue.
1. On Christmas tree toy Using a glue gun, glue on the acorn caps. Of course, it will take a lot of time, but it's worth it.
By the way, for this craft you can take a foam ball if you feel sorry for the toy.

2. Now after the sticker, you need to color the outside of the ball blue and white inside.

3. Take glitter and mix with PVA glue. We paint the entire craft with this mixture. After drying, I can tell you, it looks much more interesting.

4. Now we glue rhinestones into the middle of the hats to make the toy shine better.

5. Well, to close the hanger thread, for beauty we glue a flower bow. If it’s not there, then you don’t have to do it and everything looks beautiful.

That's it, the toy is ready.
How to make crafts from pine cones for the New Year
In this chapter, I want to show simple ideas decor. Here we will make not one, but 3 interesting crafts, which will each have its own purpose (for festive evening, a souvenir gift and a New Year tree). If you're ready, then let's go:
For three ideas we will need:
- Cones;
- Hot melt adhesive;
- Glitter (colorless and gold);
- Jar;
- Semolina;
- Rope (tape);
- Beads (red and white);
- Satin ribbon;
- Paint (white);
- Brush;
- A piece of bark.
Beautiful New Year's candlestick:
1. We need to make white snow. To do this, use chalk to paint semolina.


3. We leave our workpiece to harden, and in the meantime mix the glitter and semolina together. Squeeze out some glue next to this mixture.
4. Take a cone and alternately dip it in glue and in our mixture, paint a couple of cones. That is, it looks as if it was covered with snow.


6. As soon as the craft dries, tie any thread or ribbon around the neck.
7. Using a heat gun, glue our decorated pine cones to the twine.

8. Pour the snow that you have left into the bottom of the jar, and insert a candle into it.

That's it with the first one, let's move on to the second one.
New Year figurine:
1. Pour gold glitter onto separate paper, and pour a little PVA glue there side by side. We take a cone and, one by one, dip it in our mixtures on paper and paint the entire cone.

2. For the figurine, you can choose tree bark or any other material that you like. Using hot glue, glue a pine branch to the side of the bark.

3. In the same way, but glue a pine cone at the top of the figurine, and a twig at the bottom.

4. From satin ribbon make a bow and attach it to the craft.

5. Decorate the top of the figurine with beads. We do the same with the bark.

Like this interesting craft we succeeded.
Christmas tree toy:
1. Take white acrylic paint and paint the bump with it

2. Using hot glue, we glue white and red beads to the bottom of our craft.


4. Add glitter to the pine cone using glue. Just like in the crafts above, dipping into them one by one.

These are the 3 beautiful crafts we made. Now let's move on to the next product.
DIY New Year's fairy house
Here I decided to show you how easy it is to make a fabulous New Year or Christmas house out of paper. After all, the more fabulous objects that surround us, the stronger the feeling of the upcoming holidays will be. Because the older we get, the less we look forward to the holiday. And with such small but bright accessories your soul becomes warmer.

Materials for work:
- Colored paper;
- Glue;
- Simple pencil;
- Ruler;
- Compass.
1. First of all we make the walls. This is probably the easiest part. We take a sheet and draw a strip along the length along which we will make a cut. One should be larger than the other, since the height of the walls depends on this. About 15 cm and roll it into a tube, sealing the ends.

2. Now let's move on to the roof. We need half a circle. We won’t be able to make the circle itself, since the sheet of paper is smaller. Its diameter is approximately 23 - 24 cm. Therefore, we extend the compass to a width of 12 cm and draw a semicircle. We roll it into a cone and fix the edges.

3. Let's make more tiles. For colorfulness, it is better to take paper of different colors. I used blue (roof color) and pink. We cut out circles from them. Their size can be any. I have a radius of 2 cm.
How smaller size circles - the more you will need.

4. Glue them, alternating the color of the row. Since I sculpt them randomly, no one can name the number. I even have these blanks left, which will probably be useful for another craft.

5. To prevent the roof from moving, it is necessary to fix it. To do this, lubricate one edge of the wall with glue and put on the roof. Hold it for a while until it sets and the glue sets.
6. Then cut out a window and snowflakes from the circle. We also need a door. We adapt all this to the house and that’s it.

Our work is finished. Let's find him a place in the house.
Master class on easy crafts for a school competition
Now I’ll show you what you can quickly create for children for school for the New Year. After all, in anticipation of this have a wonderful holiday, teachers begin to ask their students various works on the creativity of all sorts of interesting products.

We will need:
- PVA glue;
- Toilet paper;
- Cotton wool;
- Acrylic paint;
- Foil;
- Toothpicks.
1. Make 2 balls from food foil, consider the diameter at your discretion. We wrap them on top with toilet paper.

2. In a separate bowl, dilute the glue with water, just a little. Using a brush, apply the resulting mixture onto our products.

4. Surely everyone has some kind of face or hand cream at home. We spread it on a regular small one a plastic cup, and on top of it is paper. Apply glue again.

5. We apply cotton wool to our headdress made of a cup and paper.

6. Blow dry again. And we begin to make the nose. Roll a piece of cotton wool into a tube and coat it with glue.

7. We also make buttons.

8. Using hot glue and toothpicks, we make hands with fingers.
9. Take a glue gun and connect all the parts in the form of a snowman. To insert the arms, you need to poke a hole with scissors and also glue it with a gun.

10. Black paint color the eyebrows, eyes, mouth, hat and hands with fingers. Red carrots, and buttons of your choice. The body and head itself are naturally white.

That's it, the craft is ready, if you're interested, let's move on to the next chapter.
New Year's craft for kindergarten for an exhibition (fairytale house of Santa Claus)
Well, friends, since we already came up with the idea for school, why not come up with it for kindergarten. Agree, often when you go to kindergarten to pick up your child, in the locker room there are various crafts that parents make. Therefore, it was decided to dedicate this chapter to the upcoming holiday. You and I will be making a New Year's house for Santa Claus.

From the materials we will need:
- Packaging of ceiling tiles;
- Scissors;
- Scotch;
- Glue gun;
- Wire cutters;
- Decorative strip;
- Ruler (square);
- Tinsel;
- Stationery knife.
1. On the tiles we mark the walls of Santa Claus’s home. We make the height and width 15 cm each. The roof, if you look from the middle of the drawn house, is raised by 7 cm.

2. Now we need to make windows. In the middle of the wall 6 x 6 cm.

3. Now we begin to draw the side. Width 20 cm, height 15 cm. Draw the windows.
To make the house look aesthetically pleasing, try to draw the window at the same height as the first one.
4. We make the door by retreating 1 cm from the bottom and 2.5 cm from the side. Its height and width can be taken arbitrarily. I got it 6 x 12 cm. We draw only on three sides.

5. We cut out our blanks with simple scissors.

6. Stationery knife cut out windows and doors (on three sides).
7. Let's take it plastic decor and cut to the size of our cut niches with wire cutters. We glue them, making the finishing.

8. C reverse side We glue the door with tape so that it can open and close easily.
9. Glue all sides of the home using a heat gun.


11. For beauty, to hide all the cracks in the seams, we cover it with regular tinsel.

12. All that remains is to make the bottom and yard of our house. In the house, the floor can be decorated with paper printed on a printer in the form of a carpet. We make chairs and a table from the leftover material. We put them inside the house and glue them.

13. The yard can also be decorated with tinsel. Also, if desired, we can print out Santa Claus from the Internet and glue it together.

14. And at the end of our house we glue a Christmas tree and Santa Claus in the yard.

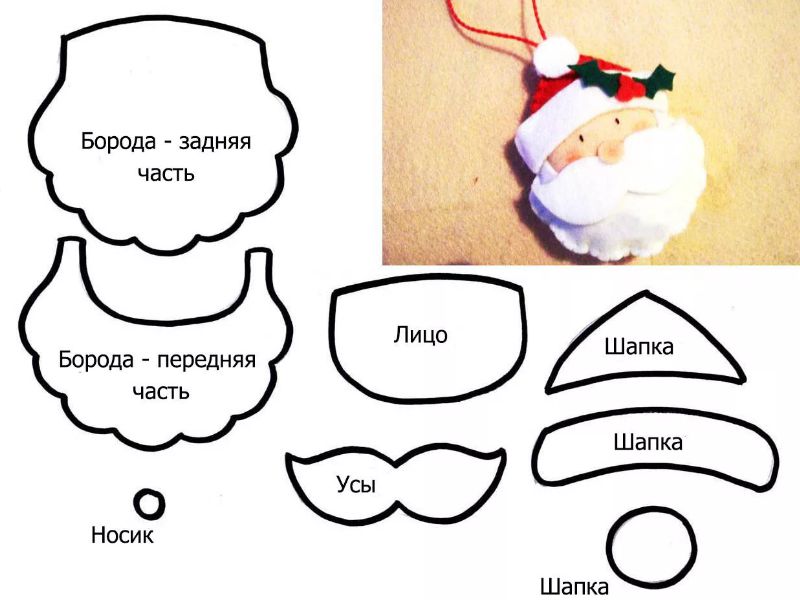
New Year's crafts from felt with patterns
With such soft material very nice to work. And it makes simply beautiful souvenirs. But before starting the craft itself, let's first look at several patterns, then a video will be shown on how to make one of them.
Since this is the year of the pig, let's start with the symbol of the year.
Piglet:

Christmas tree pattern:

Father Frost:
Well, let’s see how to make a Snow Maiden detailed video, where the author will tell and show everything in detail. And all we have to do is get the materials and make such a wonderful granddaughter of Santa Claus. The most important thing is that children participate in the process, then this craft will acquire its real value!
Thus, from watching you will learn how to quickly and easily make a souvenir (craft) using patterns for a holiday, be it New Year, Christmas or another celebration. By the way, there are many on the Internet detailed toys made of felt, if you wish, you can look. In general, there is nothing complicated, cut, sew and decorate the Christmas tree!
How to make a Christmas tree with your own hands?
But what is a holiday without a Christmas tree, you ask? So it was decided to make and decorate it for everyone’s fun. An interesting and fun idea that will not leave you indifferent, isn’t it?
We will need:
- Chenille wire;
- Half a wooden skewer.
1. First you need to cut the wire. That is, 4 sticks 15cm, 4 x 13cm, 6 pcs. 11 cm each, 8 x 7.5, 8 x 6.5, 44 x 4, 2 x 30 cm.

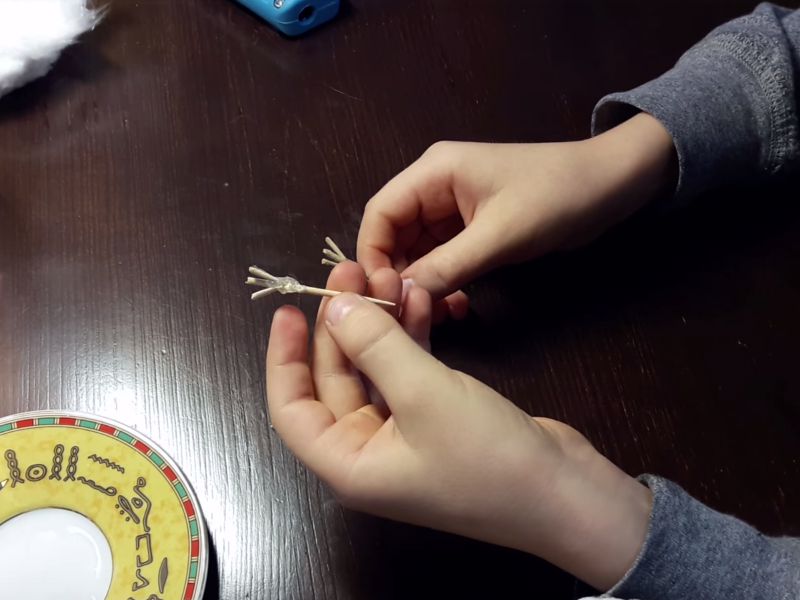
2. On a skewer (barrel), slightly larger than the palm of your hand, we begin to wind the longest wire, that is, which is 30 cm long.

3. We retreat 3 cm from below and begin to wrap the 15 cm tinsel around the trunk.


5. We also do the second row along the trunk, only we retreat from the first by about 1 - 1.5 cm. We already take the strips, which are 13 cm each. We do it in the same way as the first row. Thus this row is also ready.
6. The third row requires 11 cm sticks, 3 pieces each.

There is a slight difference in the third row. We screw one wire at a time onto the tree branch from the edge.

7. For the fourth row, we take tinsel, which is 7.5 cm long, and begin to screw it onto the trunk. There is no need to twist anything onto the branches anymore. The last row twist 6.5 cm.
In this interesting way we collect the Christmas tree until the very end.

We have such a beauty. At first glance, this seems complicated and confusing. But in fact, it is not just easy, but also interesting. I always involve children in creativity. They immediately have so much energy! And now I say goodbye to you, until we meet again!
With the onset of winter cold, the need to see something beautiful, especially something built with your own hands, becomes much more acute. Have you noticed that kindergartens and schools are immediately starting to hold all possible exhibitions of crafts? For which children, together with their parents, sometimes create simply incredible things.
And if you also decorate the decoration of your house, apartment, yard or office. Because, in my opinion, the use of New Year's paraphernalia in the interior greatly enhances the anticipation of the holiday itself and some kind of magical miracle. And who, if not we ourselves, will create this magical mood for ourselves.
So read the article below, take note of the examples you like and be sure to involve your children, this will significantly raise your New Year’s mood. And it will make the holiday atmosphere incredibly wonderful, with elements of magic and anticipation of a miracle.
When I first saw these cute toys, I couldn’t believe that they were made from a sock. And of course, I was itching to make them together with my children; it turns out it’s very simple. To celebrate, we made a lot of snowmen and decorated almost the entire house with them.
What you will need to prepare them:
- Two socks (white and colored) - 4 pieces;
- Buttons – 10 pieces;
- Black marker – 1 piece;
- Rubber bands - 10 pieces;
- Glue gun – 1 piece;
- Filler (any cereal) – 300 grams.
What we do:
We cut each sock into three pieces, thus getting rid of the heel. We tie the edge where the elastic was with an elastic band.
We fill each part with any prepared cereal.
After this, divide them into two or three balls. Whatever you prefer.
Now we make clothes from a colored sock. Cut off half and put it on the craft. Sew buttons along the top, use different ones, it will look more interesting. Use a glue gun to decorate the craft to your liking.
All that remains is to sew on the eyes and nose and the snowman is ready.
I construct the hands from toothpicks, after dividing them in half.
This is how beautiful it turned out with minimal effort.
Pasta Christmas tree
An original product made from improvised materials. The main thing is to get used to gluing each pasta using a glue gun and you will definitely succeed.
What you will need:
- Pasta – 1 kilogram;
- Plastic cup – 1 piece;
- Glue gun – 1 piece;
- Paint – 1 can;
- Beads are at your discretion.
Let's start cooking:
If you don’t have a glue gun, you can simply coat the plastic blank with plasticine and glue the pasta on top of it. But such a design, unfortunately, will not please you for long.
You should start gluing the blanks from the very bottom edge in a circle. Then comes second layer and applying drops of glue gradually move to the top of the structure.
Then we make a leg, to do this, fasten two bases of plastic glasses together and attach it to the pasta tree.
You can paint each pasta separately with a brush, but I like to use spray paint. Fast and convenient.
Then, after the paint coating has dried, we decorate our beauty to our taste.
Souvenir snow fairy tale
It's just magic, that's all. The souvenir turns out to be so unbelievably beautiful that you can’t believe how easy it is to make. But believe me, preparing it yourself is as easy as shelling pears, which is what I’ll show you. My children and I have prepared them for exhibitions at school more than once and there have never been indifferent people, only admiration.
What you need for preparation:
- Jar with lid – 1 piece;
- Rubber glove – 1 piece;
- Scissors – 1 piece;
- Water – as needed;
- Glycerin – 150 grams;
- Decor is at your discretion.
Let's start production:
First, decide what, in addition to the main composition, will be in your craft. Because the more interesting the details are selected, the more colorful the craft will be.
We wash the required container together with the lid and dry it.
Glue the prepared decor onto the lid.
Be sure to make sure it will not dissolve in water.
Cut plastic snow into a jar. I made it from plastic from candy.
Pour glycerin into the container and then water. For a tighter closure, I cut off part medical gloves and put it on the jar.
If desired, you can add a little glitter.
Coat the lid with glue and screw tightly. Decorate it beautiful ribbon and “voila” – the craft is ready!!!
DIY Christmas tree star
The classic color for making a star on top of a Christmas tree is, of course, red. But today it is very fashionable to dress up green beauty into the decoration of one color, so you can easily build yourself a star of absolutely any color.
What you will need to prepare it:
- Paper of the desired color - 2 sheets;
- Glue – pencil – 1 piece;
- Stencil – 1 piece;
- Scissors – 1 piece.
Let's get started:
I present to your attention wonderful stencils that have helped me out more than once for decorating not only a beautiful Christmas tree, but also decorating rooms and decorating various holidays.
This is one side of the star.
All you have to do is download the templates of the size you need and collect beautiful stars together with your children.
And now for more details about this:
It is necessary to cut out two blanks from paper of the desired color according to the template. Fold them in the center of each side and along the edges.
Coat the ends with glue and connect both parts. Allow the product to dry. The New Year's beauty star is ready!
Step-by-step video lesson on making a snowflake with your own hands
No one would have said that such beauty could be created from an ordinary plastic bottle. But it is possible. Be sure to involve your children and grandchildren in joint creativity.
And it turns out to be quite economical for your wallet.
You can decorate trees in your yard with these snowflakes or give them as souvenirs to friends and neighbors. Their main advantage is strength and wear resistance; they are not afraid of rain and snow, and any frost.
Funny octopus made of plasticine
Great option for joint creativity with baby junior classes or age kindergarten. Children who grow up with plenty of attention and communication with their parents become more independent, decisive and achieve more in life. So don't miss out precious time and dedicate it to your children.
What you will need:
- Plasticine of different colors - 1 package;
- Stick – 1 piece;
- Plastic knife – 1 piece.
Let's get started:
First, let's roll two balls of the same color, but different sizes. This will be the torso with legs and head.
From the small one we form a small droplet, and squeeze the second one into a layer.
Using a plastic knife, cut into strips.
It turns out something like a flower; we make long tubes from each petal.
The result should be a star like this.
We form small balls from a brighter color and attach them to the legs.
Make a tube of balls into something like suction cups.
Now we bend the legs with suction cups in any shape.
We make the head like this: cover the plastic case of a chocolate egg completely with plasticine and attach eyes. We attach the head to the body.
Pour liquid into a glass container and place the octopus in it, screw on the lid. Turn the jar over and decorate the top with seaweed and colorful fish.
Snowman made from disposable cups
Every year millions of people try to decorate their home New Year's symbols. Some people buy them, while others make them themselves. Recently there has been a fashion for making crafts from plastic dishes, that’s why I decided to tell you about making a snowman from glasses. It’s simple and quick, the main thing is to select the necessary materials in advance.
Required tools:
- Plastic dishes – 300 pieces;
- Stapler – 1 piece;
- Decoration is at your discretion.
Let's start making a snowman:
For the first row you will need exactly twenty-five cups; we place them on the floor in smooth circle and fasten with a stapler.
The second row will no longer be shifted much, like the colors on a chessboard.
Fasten each glass in several places, so the structure will be more stable and durable to the touch.
Move each row slightly deeper to obtain a spherical shape. We don’t finish it, seven rows are enough.
We form the head from eighteen pieces in each row and close it completely.
Cut out eyes from paper and sharp nose, decorate the head.
We connect both parts and fasten them as tightly as possible with a stapler.
We add decorative elements at our discretion. At home we put a light bulb inside and it looks simply fabulous.
Original Christmas tree made of threads
I make this beauty every year for the kitchen and other rooms where there will be no standing living beauty. It also looks great in offices, or you can give it to friends.
What you will need:
- Thread – 1 package;
- Glue – 1 tube;
- Decor - at your discretion;
- Scotch tape – 1 piece;
- Scissors – 1 piece;
- Brush – 1 piece.
Let's start cooking:
First, draw a circle out of paper and assemble a cone from it. It’s better to cover it with tape so the threads won’t stick. Then we begin to wind the thread onto the cone. The tighter you wind it, the less fluffy the tree will be.
Apply a thick layer of glue to the threads after you have wound the entire thread. And set aside to dry completely. After the product has dried, all that remains is to remove the workpiece from the cone and decorate it with decorative elements.
Christmas tree toy “Gentle angel”
The simplest decoration that even a child can make.
What you will need:
- Tape with a hard edge - 55 centimeters;
- Bead – 1 piece;
- Glue gun – 1 piece;
- Stapler – 1 piece.
What we do:
We cut the ribbon 30 centimeters long and make an indent of two centimeters, folding it like an accordion bellows. We cut off one hard side and secure it with a stapler. From the rest of the tape we make the same accordion, only we fasten it in the middle.
We fasten both pieces together, attach a bead with thread on top and carefully straighten the edges. A wonderful craft is ready.
Master class - Christmas tree made of pine cones
Of course you can build a small Christmas tree from pine cones and paper cone, but I decided to go further and tell you how to make a big beauty that will look great even on the street.
What you will need:
- Wooden sticks and wire - for the frame;
- Sheet - cardboard;
- Glue gun – 1 piece;
- Spray paint – optional;
- Decor – to choose from;
- There are a lot of cones.
Let's get started:
First of all, we build a frame from sticks and wire. Make it as strong as possible. Make a base out of cardboard and glue it to the bottom of the frame.
That's all my friends, I hope this article has become at least a little useful to you, and you have found something for yourself interesting ways making crafts. Write your opinion in the comments, it is very important to me. And now I say goodbye and write only until we meet again.

