Star news


Step by step snowman made from disposable cups. Unusual New Year's toy made from plastic cups
It’s already on the doorstep, and I want to somehow decorate my home in an unusual and beautiful way. There is no longer any desire to buy standard snowflakes with Velcro or Christmas tree toys from the “neighbor” category, so needlewomen have to resort to some tricks. And it has become fashionable today to decorate your home with handmade parts and crafts.
Homemade snowman that won't melt
So today we will tell you how to make a snowman from plastic cups with my own hands. The work, let’s say right away, will be painstaking and not too fast in time, but the result will be surprisingly unusual.
So, a snowman made from plastic cups. The instructions will be quite detailed, so we have no doubt that you will understand all the nuances. By the way, feel free to involve the whole family in this exciting process. Some housewives say that “modeling” such a snowman captivated children and adults much more than a street one made of snow. Gather the whole family. Common work, joint conversations, common fun mood and preparation for the holiday will only unite and unite you. Let's get started.

How many cups will you need?
As you know, before you make any craft with your own hands, you need to decide on the amount of materials. It is clear that the work will require disposable plastic cups. But how long does it take to make a small snowman from plastic cups, and how much does it take to make a larger model?
The average figure is three hundred glasses. You will need to purchase three packages, each containing one hundred. This is exactly the number you should start from when varying the size of your snowman. The volume of the dishes will also affect the size. If you take 200 ml cups, the snowman will be quite large. For smaller decorations, purchase 100 ml cups.

Experienced housewives who have made crafts like a snowman from plastic cups with their own hands more than once recommend buying identical cups in one place. Decide on the size of the craft in advance. It may turn out that there are not enough cups, and the store will not have the size or quantity you need. As a result, the details will be “mismatched”, and the snowman will not turn out the way you intended. Why do we need unnecessary frustration before the New Year!?
Additional tools
In addition to plastic utensils, you should take a few more tools:
- A stapler with a large supply of cartridges (so that you don’t have to run to the store at a crucial moment).
- A piece of foam plastic (for the stand).
- Decorations (tinsel, scarf, garlands, etc.).
- Colored paper (for making eyes, nose and buttons).
- A good mood, pleasant company and a desire to do something unusual.
How to make a snowman from plastic cups if you don’t have a stapler at hand? You can always replace it with good quality glue such as “Moment” or “superglue”. Add it to your shopping list.

First ball diagram
So, how to make a snowman from plastic cups, if everything necessary tools is already at hand and the desire to create overwhelms your whole family? To begin, unpack one package of dishes and count out 25 pieces. This is the amount required to make the first row of the snowman.
New Year's craft “snowman made from plastic cups” can consist of different quantities balls. There may be two or three. But the first and second rows in any craft will be the same. Having selected 25 units of dishes from the package, you need to place them so that their edges touch each other. In this case, the bottom of the cups should look inside the craft, and the wide part should protrude outward.
Using a stapler, we fasten all the parts and form the first circle. Experts advise not to press the stapler too hard when you connect the parts. Plastic cups are quite fragile things. If you are not sure that you can operate this device carefully, replace the stapler with glue.
So, the first row is ready for the “snowman made from plastic cups” craft. We will now explain step by step how to make the second layer. It will be laid out in a checkerboard pattern. We recommend securing the cups not only on the sides, but also on the top. In addition, try to move them forward a little when fastening the parts. This way the structure will be much more stable and durable.
Using this principle, you will need to make seven rows. Do not cover all rows of the first ball. The head or the second ball will also be attached to the remaining hole.

Snowman head
A standard DIY snowman made from plastic cups consists of two ball segments. The first is the body, the second is the head. But you can, as we have already said, vary the number of segments at your discretion.
We are making a standard version, so after the body is made we make the head. In addition to cups and a stapler, plasticine and tennis balls(for eyes).
The number of vessels required to decorate the head is eighteen. They should be attached in the same way as the glasses for the body. In the upper part of the ball there will be the same hole that was in the body. It can be closed later knitted hat, a bucket of colored paper or any other headdress (as you imagine).
The main accents on the head are the eyes, nose and mouth. They can be made from colored paper. Eyes are often made from tennis balls, which are pre-painted black. But if you don’t have them at hand, it’s okay, glue two large circles of colored cardboard or paper and draw eyelashes.
The nose can be made from bright orange plasticine. Such a spout will be easy to attach and will last longer than paper version. The shape of the nose is carrot, button or any other option.

Connection of body and head
Having assembled the two parts of the snowman, all that remains is to connect them together. This can be done using a stapler or, if you are unable to work with the tool carefully, using instant glue. Don't worry about leaving a noticeable seam. It can be easily hidden with the help of jewelry and accessories.
Accessories and decorations
We told you how to make a snowman from plastic cups. All that remains is to talk about its decoration and transformation. In order to hide the junction between the torso and head, the usual one is most often used. light scarf. You can put a matching cap or wide-brimmed hat on your head to make the craft look stylish.

If desired, from ordinary rubber gloves You can make hands for him from the pharmacy. Add some tinsel, bows or ribbons to make the snowman more elegant and Christmassy.
Soon New Year will come into its own legal rights. The long-awaited first snow has already fallen, children are writing letters to Santa Claus about their deepest dreams: dolls, cars, etc. New Year trees and performances are ahead.
Everyone, young and old, is preparing for the New Year: they cut out snowflakes, put up Christmas trees, and decorate their home. And, of course, Santa Claus will visit all the children in the kindergarten, or rather those who behaved well and prepared a gift for Santa Claus.
Thank God, nowadays we have the Internet, and interesting ideas There are plenty of crafts for the New Year. Our choice fell on a snowman, but this time we decided to make it from plastic cups. 
In three days these cups will turn into a snowman.
So on initial stage We purchased 324 cups. All this quantity fits into 27 packages of 12 cups. Not as much as it seems at first glance. At home, when we began to unpack the cups, we discovered that a third of the cups turned out to be “defective”, because... the cups were noticeably wrinkled. But, as it turned out later, this does not affect the appearance crafts and crumpled cups cannot be distinguished from normal ones.
It is better to start making a snowman from the circumference of the lower ball, which has 25 cups. Each of them is connected to the neighboring one with a stapler. The second and subsequent layers of cups are superimposed on each other and connected in a circle with all the cups in contact. All this is done to ensure that the structure is solid, because in the process of connecting the cups with staples, many cups burst. 
Half the circle is already done. 
The first circle is ready! A start.
For those who decide to repeat our feat, we recommend choosing cups with a small rim or without it at all, because... It interferes greatly when working with a stapler. Of the two staplers we have at our disposal, only one could cope with this obstacle. 
Where would we be without our daughter’s help?
Making the bottom ball is not difficult. Everything is intuitive and fast. In three evening hours we managed to make one and a half balls. We could have done more, but the snowman’s “head” caused difficulties. No matter how hard they tried, the “head” turned out to be the same size as the body. 
The outlines of the ball are already visible. 
Fun break :) 
The beginning of the snowman's head.
Overnight we came up with an idea that we brought to life the next day. We bought additional red cups (48 pieces) and, having sorted bottom layer“torso”, they remade it in red.
The head still wouldn't give in. The advice in the instructions that the head should be made from a circle of 18 cups still did not help. Ultimately, the second ball was the same size as the previous one. After many attempts to find a compromise between the possible bending of the cups and the dimensions, we were finally able to complete the head.
In order not to suffer with your “head” like we did, we recommend that you squeeze the bottoms of the cups, which will significantly reduce the radius of the ball. 
Just a little more and the snowman will be ready!
Almost the entire evening was spent on my head.
The third day was the logical conclusion of creating a snowman from plastic cups. We attached the head to the body, which is quite difficult, and began decorating our New Year's craft.
A New Year's cap also filled with cups, a scarf made from purchased fabric, stars from last year's purchases, safe Christmas decorations instead of buttons - all this gave our snowman a unique New Year's charm.
The nose for the snowman was made from white and red cups glued together and inserted into place.
The final version of our craft can be seen in the photo.
We completed this craft in 3 winter evenings, although it can be done in one weekend. Our costs for a snowman made from plastic cups were:
What is needed and how much does the material for a snowman made from plastic cups cost? 
We had staples and staples in abundance at home, and we didn’t have to spend money on them.
For those who like to save money or don’t know where to buy “spare parts” for a snowman, we recommend going to the FixPrice and Carousel store. It was in these two stores that we purchased almost all the necessary material.
As you can see, the price is not that high for such a fun and interesting craft, and it will surely become the most talked about craft in your garden. Plus, you'll have a great time with your family doing this fun activity.
If you have any questions about making a snowman, ask them in the comments, we will definitely help you and share our experience. 
Increasingly, disposable tableware is being used to make all kinds of crafts from it. Especially on New Year's Eve. This is how Santa Claus appears from plates and a snowman from plastic glasses. These crafts are always unique and cute. Moreover, the whole family can be involved in the work. And then surprise guests and friends.
Therefore, the largest and interesting craft For the New Year, we propose to make it in the form of a huge Snowman, which also feels great outside. It is made from disposable plastic cups and can be used as a street New Year's craft or to decorate large halls and schools. kindergartens. He feels good at home too! A step-by-step instruction How to make a snowman from plastic cups, very simple.
How many cups does a snowman need?
This question is important because the size of the future craft depends on it. It turns out that in order to make a snowman from disposable cups, you need to purchase at least 300 of them and preferably white cups rather than transparent ones. Moreover, from this amount you will get a figurine of two balls. And its height will be about a meter (if the cups are 200 ml).
If you want to make a craft bigger size, then more glasses will be needed. The same thing happens when a third one is added - the most big ball. However, it is worth noting that this winter craft turns out to be very unstable. It will require additional support and attachment to it.

What to look for when purchasing disposable tableware? They must be from the same batch, then the product will turn out neat. It is advisable to choose glasses without rims. This will simplify the process of assembling the New Year's craft and the joints between the parts will not be so noticeable.
In the process of making a snowman from plastic cups, you will need the following tools:
- stapler with staples small size(so that when fastening the dishes do not crack);
- transparent super glue.
To decorate a Snowman craft made from disposable cups, the following will be useful:
- a cap and a scarf (they can be made from paper and tinsel, respectively);
- imitation carrot nose (cardboard or plasticine cone);
- paper eyes and grew;
- Christmas balls for holiday buttons.
Snowman made from cups step by step instructions
First you need to think about a scheme for creating a craft. And it is very simple: the torso and head. This is if a simplified snowman craft is created from plastic cups. In the full version there will be three parts varying in size. Subsequently, all the parts must be fastened together to decorate.
First detail: torso. The beginning of its production is the central part of the sphere. It is formed by 25 cups. They are supposed to be fastened with their bottoms facing inward. The shape of the dish will tell you how to hold the circle together. There is no need to tightly fasten the cups; they should be positioned freely.

Then lay the next rows of glasses in a checkerboard pattern. It is necessary to take into account that in each of them there will be less and less dishes. For the structure to be stable, the hemisphere does not need to be completed. The hole left will be the bottom of the snowman.


Turn it upside down in the starting circle. Continue the same work. That is, lay the circles in a checkerboard pattern (there should be 7 of them), gradually completing the ball. The topmost one does not need to be installed. This hole will be useful for fastening the snowman parts.

Second detail: the head. It is made similarly to the body. Only the initial circle is supposed to be made from 18 plastic cups.
Fastening parts. Use super glue to attach the head and body of the snowman. You may end up with an uneven seam at the attachment point. This defect can easily be hidden with the tinsel of a scarf.

To add a decorative touch to the craft and a festive New Year's effect, place an electric light on the floor under the snowman. Christmas garland. The snowman and plastic cups will sparkle and shimmer like Christmas tree with the onset of dusk.

All that remains is to put on the cap, attach the eyes and mouth, install the nose, and tie the scarf. For stability, you can thread and pull a thick ribbon from the top of the snowman to its base, then it will definitely stand straight and not fall.

hat for New Year's snowman It is best to make it with your own hands in the form of a black cylinder. This way it looks more impressive. The black color contrasts with the white and the snowman turns out to be polite and cute.

But here is a master class - how to make a snowman from disposable cups - more detailed and visual!
Create your own snowmen and decorate your home and world for the New Year!
Happy first day of winter, friends! And what would winter be without a snowman? Today I will show you, master class, how to make a snowman from plastic cups with step by step photos And detailed instructions, I’ll tell you what you can’t trust, how many cups it took and how to avoid mistakes.
On the eve of the New Year, parents have added chores; they need to have time to do crafts in kindergarten and school. Again, I am coming to your aid, sharing all sorts of inventions, ideas and fantasies. Very soon I will tell you and show you ideas of simple and original postcards for the New Year, but for now I’m returning to the snowman.
DIY snowman made from plastic cups - step by step
This idea haunted me for a long time, because on the Internet everything is so beautifully depicted in the photo, everything is shown in the video simply and clearly. I also decided to try to realize this idea, to make a craft for kindergarten for a competition. The job description is honest, there is no point in saying that it is easy and simple, no, it is not, the work is complex and painstaking.
To make a big snowman from cups you will need:
- 400 plastic white glasses.
- Regular size stapler.
- Packaging of staples for a stapler.
- Scarf or piece of fabric.
- Colored paper.
- Red sheet of cardboard.
- Glue gun.
- Santa's cap.
How to make a snowman from plastic cups step by step
You need to start work by preparing the materials, remove the excess, leave only the cups and stapler. Choose a wide space so that you will not be disturbed or distracted. For me, this place was the floor in my apartment; I also advise you to position yourself in the same way.
For this craft you only need white cups, transparent ones will not work.
- Lay out the cups individually, fill the stapler with staples and get to work. Take two glasses and connect them with a bracket. I advise you to insert the stapler as deep as possible into the glass, connecting them together in a circle. The number of plastic containers will appear by itself when you form a circle. There is no need to tighten or save the glasses; they will break and the structure will turn out uneven. For the first round I needed 26 white cups, but not transparent ones. Look at the photo carefully, each subsequent one attached should overlap the previous one with its rim.

- The second row will be more difficult. Here it is important not only to fasten in a circle, but also to fix them together. Let's put plastic cup chik on top, between the two previous ones, so that the side is shifted inward. We fasten it with a stapler, place another one next to it and fix it too. Here it will not be possible to place the dishes exactly between the two previous ones, so be careful, just place them next to each other and fasten them together, as shown in the photo.

My step by step description will help you make an even and beautiful snowman for the New Year. Let's continue in the same direction, friends. All subsequent rings with disposable glasses are done like the previous ones. You should end up with half a ball like this.

- Then follow the same step-by-step instructions as in the first case. The only thing is that you will constantly have to either crush the bottom of the white glass, or pull it, or insert an extra one. Here you will have to tinker and ruin more than one piece of plastic.
Proceed in the same way, do not finish one side of the ball, it will be attached to the first ball. Look, two parts of the New Year's snowman, made by yourself, are ready. We need to connect them together.
I made a rather small snowman from plastic cups, which means the fastening must be strong.
How to make a snowman from plastic cups
You can make a snowman with your own hands from plastic cups in half a day, just follow my instructions and repeat the step-by-step description. The two balls must be secured to each other using pieces from disposable white glasses. Cut off such pieces, staple one edge to the top ball by the bottom cup, the second edge by the base and also by the top cup. This happens in several places. Let's take a look at the appearance. We roll a cone out of colored red cardboard, glue the edges with superglue, it will fix it firmly and instantly. From orange paper We cut out the eyes, a little like droplets, and draw the pupils inside. The mouth was cut out in the shape of a smile from red colored paper. All this must be secured using a hot gun. Don't forget about the buttons, they can be cut from any color you like.
 We tie a scarf to our big snowman from disposable cups, attach a cap and you can take it to a competition in kindergarten or school. You can place a garland inside, then there will be a glowing snowman made of glasses.
How many plastic cups do you need for a snowman?
This question is most likely of interest to many people, as it once was to me. I tried to find reliable information and instructions in the articles, but I came to the conclusion that everyone is copying each other and you shouldn’t trust anyone.
Friends, for a snowman made from plastic cups you will need 385 white cups. I ruined 8 of them, which means I need 377 in total. Don’t forget that the diameter of your snowman may be a little smaller or a little larger, so I advise you to buy 4 packs of 100 pieces.
Snowman made from plastic cups - video
Friends, here it is big snowman I made it out of plastic glasses, I made it with my own hands for kindergarten. My step-by-step instructions should help you repeat this craft, because you know how many cups you need for it and how to assemble it correctly, thanks to my step by step photos. Share your work on in social networks and congratulations on the first winter holiday.
Yours Nina Kuzmenko.
Content
Winter is coming soon, new year holidays, time for matinees, time to decorate your home. Now you can practice creating several interesting New Year’s items; you won’t notice how time flies by and your child will demand a craft for school or kindergarten. And there will be something to decorate your home with. So, involve the kids in the creation. In this article we will look at several options for creating a snowman from cups.
The simplest option
Let's start with a simple option. For this we will need a couple, or even more, disposable paper cups, felt-tip pens, thread, glitter, glitter glue, paint, and wire. This set of items may vary, it all depends on how exactly you want to decorate the snowmen.
Turn the cups upside down. And start creating: draw eyes, a carrot nose, a button mouth with paints or felt-tip pens. Knit from wool threads a kind of scarf for a snowman; on top you can wear a knitted small hat. You can make a kind of headband with ear cannons. Use glitter glue or glitter polish to decorate your snowmen.
By the way, instead of disposable cups? can also be used plastic bottles from under yoghurts, detergents, decorating it all with buttons, colored paper, paints and bright varnishes.


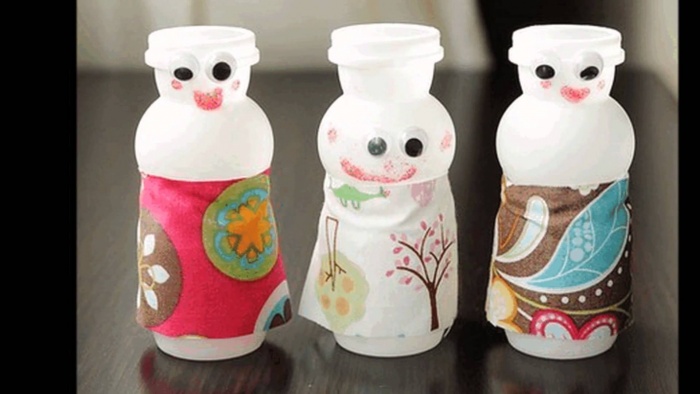
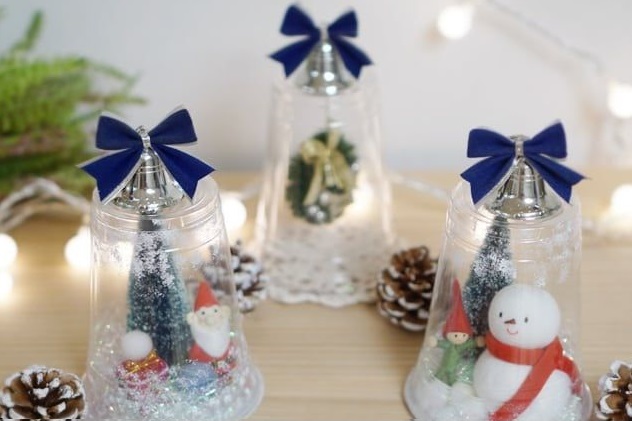
New Year's toy made from a plastic glass
Another one is quite simple, but interesting way create a New Year's toy. We will need a transparent plastic cup, polystyrene foam, cardboard, a bell, a snowman figurine, and a Christmas tree.
You need to cut a circle out of cardboard that will be slightly larger than the top of the glass. We attach a snowman figurine and a Christmas tree to it, and decorate it all with grains of polystyrene foam. Cover the composition with a glass and attach it with glue. The protruding part of the cardboard can then be carefully cut off or also decorated with small grains of foam plastic. You can glue a bell on top, the souvenir is ready!
Any figures can be used as internal filling. Small figurines of angels, deer or favorite children's characters are suitable.

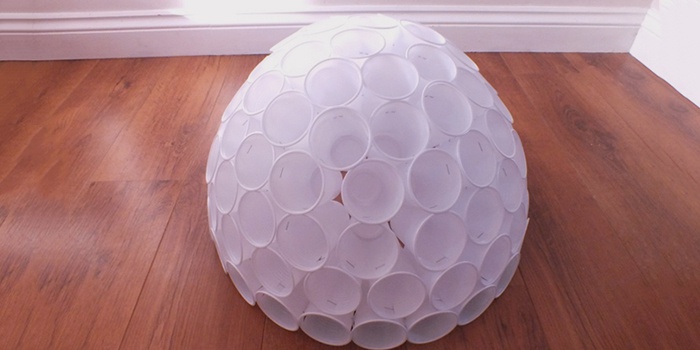
Snowman made of plastic cups: lamp
A snowman made from plastic cups with your own hands can be very multifunctional: firstly, it will decorate the house and please the eye, and secondly, it can become an excellent night light or lamp for reading a book or doing handicrafts. What we need:
- about 200-300 pieces of plastic disposable cups (yes, you will have to splurge a little here, just a little);
- stapler with paper clips or glue;
- colored paper for decoration;
- scarf or piece of red fabric;
- light bulb or garland.
To begin with, we lay out 25-30 cups inside with the bases and fasten them with a stapler or glue. We lay out another row on top, but with fewer glasses and in a checkerboard pattern. And so you need to lay out about 6-7 rows, do not completely cover the structure so that you can attach the head.

Now we prepare the snowman's head. For the head, first fasten 18 glasses together, as in the version with the body. Next, lay out several rows, and you should be left with a small hole, which you then just need to cover with a hat.
Please note: the glasses must be connected to the glasses from the previous row.
Now you can decorate the snowman's face. To do this use colored paper, cut out eyes, mouth, create a voluminous nose. For the eyes, you can use tennis balls, after painting them black or dark blue color. The nose can also be sculpted from plasticine and attached to one of the cups; many people use foil for the nose.
The junction between the body and head can be covered with a scarf. The craft will look impressive if you place a light bulb or a whole garland in the middle.

To create such a snowman, you can use both matte and transparent disposable cups, it all depends on what effect you want to achieve.

You can also use colored plastic cups as decoration; you can use them to make buttons for a snowman, and blue cups can serve as eyes.

In addition, such a craft can be a good decoration for a wall or door in classroom. To do this, you do not need to make a full circle of glasses, but leave a semicircle to make it easier to attach the product to a flat surface.
Use a garland to highlight the body and head separately; it looks very original and at first glance you can’t even tell that the snowman is made from disposable tableware.

By the way, not only plastic cups can be used. Also use plastic bottles from under water, transparent or can be painted White color. The assembly principle is similar, only it is better to use serious glue rather than a stapler.


It looks amazing, and, most importantly, it teaches children, and adults too, to reuse plastic products.
And here is a version of such a hybrid of a snowman and Santa Claus. Please note that there is a method of using materials of different colors.

