Star news


Fashionable braids of luxurious long hair. Volume braid for medium hair: braiding patterns, interesting ideas
It came into fashion a few years ago. They remain popular throughout this time and are winning more and more fans, because they are constantly being improved, and more and more new varieties are appearing.
Volumetric braid- it's gorgeousThese hairstyles are good because they are comfortable and easy to wear, and quite practical. However, they look sophisticated and sophisticated. A braid can act as an independent hairstyle or be an integral element of a more complex solution. These hairstyles help hide hair imperfections and remain elegant.
Some braids are easy to do and you can do it yourself. Others are more complex. These are impossible to braid on yourself, and in order to braid them on someone else you need a lot of training.
Volume braids: with and without ponytail
WATCH VIDEO INSTRUCTIONS
Particularly popular are voluminous thick braids, which can be created even on the floor. thick hair Oh.
- You can braid a voluminous braid different ways– it can be French, inverted, waterfall, etc.;
- The volume of the links is created plucking technique, that is, the outer part of the hair is taken from their edges and stretched outward, as if pulling out of a braid. This is not the easiest way, as it may turn out sloppy;
- An alternative to the previous method is a very fine corrugation, which gives volume to the hair.
Weaving voluminous braids is a good option for those who have thin or sparse hair. They allow you to visually give them volume. Create the effect of thick, healthy curls.
Add volume with and without side bangs
Braid a thick one simple way. Even a standard three-strand braid can become voluminous if you know the rules for stretching curls.
- and gently secure the ends of the hair without over-tightening. Start pulling out your curls. Move from the end of the braid to the beginning of the braid. You can do this sequentially during the braiding process;
- Hold the link from which you are pulling the curl. Pull only the outer strands;
- To make your hair look neat, first stretch it out a little. If necessary, then pull harder;
- Make sure that the axis on which the strands intersect does not collapse. This is why you hold the links;
- Fix each elongated link with varnish.
After braiding, also fix the entire hairstyle, since it is not as strong as a tight braid.
Reverse French hairstyle: pattern with long hair
All fashionistas are familiar with the French braid. It fits closely to the head and its strands are directed inward, towards the bulk of the hair. It will be voluminous if you weave such an element in reverse, directing the strands away from the head. Visually, this hairstyle looks like a braid lying on the surface of the hair. Weaving pattern simple option French reverse braid is shown below. This hairstyle can be independent or part of a complex hairstyle.
Waterfall: no knitting needles needed, the main thing is a beautiful pattern
In essence, it is another type of French braid, leaving a lot of hair free. This hairstyle will allow you to surprise others with a voluminous, luxurious braid and show off the beauty of your hair. Easy to do. Suitable for those with thin or thin hair, as it adds volume to loose hair. Looks at wavy hair. How to weave a voluminous braid of this type is shown in the diagram.
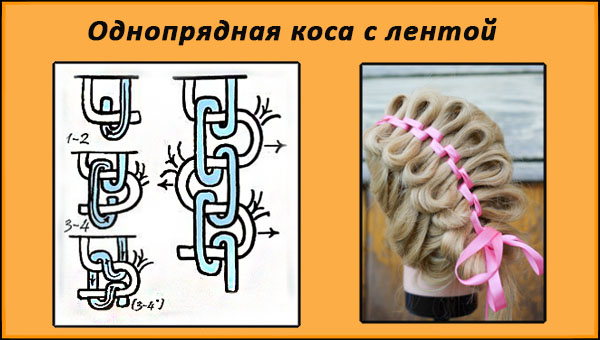
Braiding with ribbon for medium hair
This type of reverse French braid is suitable for a holiday, but is also acceptable in everyday wear. The result is a reverse braid, but there is a ribbon running along the axis, the line on which the strands intersect. This version of a very simple hairstyle is not so easy to do on yourself because the tape gets twisted and mixed with the hair. Monitor your position at all times. Attach the ribbon under the central strand.
Side braid option: adding elastic bands
A braid is made on the side, which is woven using a technique with tiebacks on both sides. You braid as standard, but you pick up the hair not from the sides, but from the top and bottom of the head.
A voluminous double braid, reverse French braid, French braid and other elements are obtained in this way.
Long luxurious hair It is customary to wear them loose only on holidays and special occasions. And on weekdays, they can be styled and braided into a variety of braids, which have always been in fashion and currently do not want to give up their crowning positions. In the hands of a professional hairdresser, long hair turns into a true work of art. But also in common days possible when using simple weaves create especially original hairstyles.
Face shape and choice of braid styling options
People's faces have a wide variety of shapes, so experts divide them into 5 main categories. This classification helps makeup artists, stylists and professional hairdressers to find the most appropriate images for each type of face.
From point of view classical beauty is considered the most correct oval shape faces and therefore all types of hairstyles or styling are selected in such a way as to try to visually bring the face shape closer to an oval, while hiding the shortcomings that women and girls have.
Experienced stylists, taking into account the variety of face shapes, suggest choosing the following braided hairstyle options:
The most daring experiments with braiding are allowed when oval face. A variety of variations and models of braids will look great on thick curls.
- Girls with round shape For faces, it is most rational to use weaving starting above the crown. This will give your face greater expressiveness, visually lengthening it. The braid is braided over the entire length of the hair, only leaving a small ponytail or knot at the bottom.

- The smoothest possible lines are used to visually smooth out the angular shape square face. First, a braid is braided over the entire head, leaving the traditionally braided end of the braid at the side or behind. Braids braided with these options visually eliminate the excessive angularity of the face, smoothly bending around its contours.
- Girls who have triangular shape face, you should use techniques that visually increase its volume below. Stylists recommend letting go long bangs, then you can start braiding from the back of the head in the classic way or sideways.
Girls with rectangular face you should visually shorten its shape, while smoothing out the angularities of the face. Here it is advisable not to use long, traditionally straight braids. Such voluminous weavings as braided over the entire head will look wonderful voluminous spikelet or French braid. The face is visually shortened due to the elongated bangs. Choosing a hairstyle in this case will be much easier.
Daily hairstyles with braids - basic braids
Truly diversify your jewelry from long braids development will help different options weaving - this will allow you to create original and elegant hairstyles for every day.

In certain cases - a spikelet, openwork weaving, french braid– to create an unusual hairstyle, a single element is enough – braids. Sometimes with the help of braids, like additional element, you can create very interesting styling:
- The classic option is to divide your hair into 3 parts of equal volume. Then the right strand of hair is moved to the center, between the middle and left strands. Thus, the right strand becomes central. The left strand of hair is moved between the right and middle, this process is repeated until a certain length, then a small ponytail is left at the end. You can decorate a classic braid with an elegant elastic band or bow.

- Fishtail - unlike the classic version, only 2 strands are used here. The braid comes out voluminous due to thin strands. The thinner the strands are, the more gorgeous the hairstyle looks!
Hair collects in low bun and are divided in half. A thin strand is separated from the right side from the inside and moved to the left. Thin strands of equal volume on the main strand are always laid on top. The strand on the left, accordingly, moves with another thin strand to the right.

Weaving continues with alternate shifting of different halves thin strands, while the two main strands always remain in the hands. A free ponytail remains at the end, secured with an elegant elastic band or ribbon.
- French braid - this model is different from traditional version the fact that the hair begins to be braided, starting from the very top of the head.
The hair is divided into three parts of equal size, the right strand is moved to the center, while adding to it a thin strand on the right from free hair. The same action is performed with the left strand - it is thrown over the middle strand, and a new thin strand is added to it on the left. French braiding is repeated along the entire length of the hair and ends with a classic braid or ponytail.

The French braiding option allows you to create the most fantastic hairstyles. Strongly stretched small strands allow you to create a thin, neat braid. In the coming season, slight negligence is popular, so fashionistas should take this moment into account.
If voluminous strands are added during braiding, the braids turn out to be quite thick, creating the effect of thick, chic hair.
- Air braids are one of the options for French braiding. The result of this weaving is a visually airy and weightless design on a fashionista’s head.
When creating an openwork-airy model, you should take 3 small strands at the back of your head, intertwining them twice with classic weaving. Then take a strand of the same size from the right temple and move it to the side extreme part. The same is repeated on the left side - a new strand is added from the left temple to the left side. The weaving continues until the end, with the constant addition of additional strands from the temples. The airy openwork styling is secured with a beautiful elastic band.
- Rope-harness - this option helps to create fashionable and stylish hairstyles quite quickly. The “Rope” style looks great, holding long hair neatly and firmly throughout the day. Laying this weave is simple and can be done by any girl.

Make a tail high on the top of the head and divide it in half into two parts. Each of the 2 strands is twisted clockwise so that the result is a weave that looks like a twisted rope. Small rubber bands secure each end.
Then they begin to twist both braids together counterclockwise. An important condition This type of weaving involves a fairly strong tension of the strands and tight twisting of the “ropes”.
Individually protruding hairs are additionally treated with gel and smoothed. This styling lasts for a long time attractive appearance. The hairstyle is secured with an elastic band.
- Double reverse braid– weaving such a voluminous original braid is somewhat more difficult than conventional styling.
To get this extraordinary nice option You should divide all your hair into 2 equal parts, mentally numbering them. Each of the two parts is gradually divided into three more. They don't braid classic version, but vice versa – down.
Each of the woven “reverse” braids is secured with thin multi-colored elastic bands; to give additional volume, the braids are carefully pulled out and fastened at the bottom elegant ribbon or an elastic band.
To give yourself a flawless appearance you should master the basics of weaving simple braids, which make up any most original hairstyle. With a little imagination and creativity, you can freely create magnificent hairstyles, creating a wonderful mood for the whole day!
Braiding patterns with ribbons:


Detailed master classes on braiding
We offer you 20 options that are fashionable, but at the same time simple hairstyles with weaving elements.


Since ancient times, braids for long hair have been considered one of the most feminine hairstyles. It is impossible to determine exactly when they first began to be woven, but it is known that girls and women all over the world used this method to curb unruly curls back in antiquity. The hairstyle was popular with the ancient Greeks, Indians, Egyptians, and was also part of Slavic culture.


Braiding long hair: pros and cons
Much has changed since then, but braids have not lost their popularity and have been adapted to modern realities. Today, with their help, you can create a strict business or gentle romantic image, highlighting the features of your appearance and character.
They have found their application in wedding fashion. More and more brides, when choosing a hairstyle for a celebration, prefer exquisite braids in Roman or french style. A young fashionistas and their mothers value braids for their practicality, because few hairstyles can keep hair in order for so long, despite all the children's pranks.

There are several reasons that make braids an ideal hairstyle for those with long hair. Their first advantage is convenience. By braiding your curls, you don’t have to constantly straighten and comb them. In addition, this hairstyle does not damage the hair, unlike straightening irons, curling irons and curlers. In a braid, curls are protected from harmful effects ultraviolet radiation, which helps preserve their beauty and health.


Another plus is variety. There are so many braids and hairstyles with them that with their help you can change your looks every day and always look original. Next argument in favor of braids is versatility. They adorn a woman of any age and look good on both ceremonial events, and in everyday life - at work, study, rest.
There are few disadvantages to this hairstyle. But the complexity of the process and the complexity of creation individual species weaving can sometimes be intimidating for beginners. You also need to remember that a braid that is braided too tightly often causes headaches.

Combination of braids and face shape
Since braids primarily draw attention to the face, it is important that their combination with it is harmonious. You can understand which hairstyle is best for you by reading several recommendations from stylists.
So, according to shape, it is customary to distinguish five main types of faces - round, oval, square, rectangular, triangular. Each of them dictates its own rules in choosing braid hairstyles:

For triangular face A good solution would be hairstyles that create volume in the lower part. These can be various braids combined with long bangs.
Basic rules for braiding
In order for the braid to turn out neat and keep its shape for a long time, the hair must be properly prepared. Braiding is done only on washed curls, preferably slightly damp (this makes them easier to work with). For durability, a special mousse is first applied to them, and the finished braid is sprayed with varnish.

Braiding is not complete without aids– bobby pins, hairpins, hair clips and a set of elastic bands. They are necessary for separating and fixing strands during intermediate work. It is better to take a comb with a sharp handle; it is convenient to add volume to lush braids.
Advice!If you choose braids as your daily hairstyle, try not to wear them continuously for more than 8 hours at a time. Constant tension weakens the hair roots.

How to make a voluminous braid?
If the hair itself is not too thick, you can visually add volume to the braid by pulling out a few strands. But it is important to do this carefully so as not to damage the weaving. It will be easier to maintain a neat appearance of the braid if you first apply varnish to it.

They begin to pull out the strands from the end, gradually moving upward. In this case, the braid is held with one hand, ensuring that symmetry is maintained relative to the center. It is not recommended to pull too hard right away. It is better to fluff your hair slightly first, and then, if necessary, repeat the procedure.


Braids: step by step
The essence of braiding is to divide the hair into separate neat strands of equal size, which are then crossed with each other in a certain sequence. Usually three to five strands are used, although in complex techniques there are more of them. Let's look at the step-by-step creation of classic types of braids that serve as the basis for other hairstyles.
Simple Russian braid
Hair should be thoroughly combed and divided into three equal parts. Then they are intertwined as follows: the right strand is placed between the left and middle, and the left is placed between the middle and right. Alternation continues until the desired length is achieved. Having finished weaving, the end of the braid is tied with a tight elastic band.

Note!To keep the braid in shape and not fray, it is important to hold the strands with slight tension when braiding.

Pigtail-harness
This original braid it is very easy to braid. The curls are gathered into a ponytail at the top of the head and divided into two equal strands. Each of them is twisted clockwise until a strong rope is formed. The twisted strands are connected so that they wrap around one another, and the ends are secured with a hairpin or elastic band.


The hairstyle looks better on straight hair the same length. When cutting a cascade, the ends, coming out of the strands, will ruin the whole picture.


French style braid
The hairstyle is similar to a classic braid, but it starts from the forehead rather than from the bun. The sequence of actions is as follows:
- Comb your hair well.
- Take the top of your curls and divide them into three equal strands.
- Braid your hair according to the principle of a Russian braid, adding after each crossing new, equal-sized strands on the sides.
- When the desired length is reached, the weaving is completed. regular braid or tail. If you need a lush braid, take the strands thicker and not pull them too tight.


"Fish tail"
This braid uses four parts of hair, which makes it wider and denser than other types of braiding. The small strands in it resemble scales in appearance, which is why the hairstyle got its name.


To braid a fishtail, the hair is gathered into a bun at the back of the head and then divided into two equal halves. From the outer part of the hair in the left hand, take a thin strand and add it to the curls in the right hand, the same steps are performed for the second side. The braid will turn out symmetrical and neat if all the strands are the same size. You can add a French touch to your hairstyle by starting the braiding not from the back of the head, but from the top or side of the head.


Braid for long hair with bangs
Bangs can complement stylish look and stroke the irregular oval of the face, but in our case it seriously complicates the work. It is not easy to weave it into a standard braid, because individual short hairs constantly get out of the braid. Therefore, for connoisseurs of braids, hairdressers have invented several ways to harmoniously combine bangs with other hairstyle elements.

French version With a bang
The weaving technique is the same as a regular French braid (spikelet). The washed curls are slightly moisturized and three strands are isolated on the top of the head at the temple - one from the bangs, the second from the bangs and the main mass of hair in half, and the third only from long hair.


As you weave, new strands are gradually added to the braid until the bangs are finished. Next, they move to the main part of the hair or leave the bangs in the form of a hoop, and secure its end with a hairpin or bobby pin. When finished, it is advisable to fix the hairstyle with hairspray.
Waterfall
The “waterfall” braid is also based on french weave, but the result is different, due to the release of some of the strands downwards. To make this hairstyle, the hair is parted sideways and three identical strands are isolated at the base of the bangs.

The first 2-3 spans are performed in the same way as a “spikelet”. Then each lower strand is released, replacing it with a new one from the top of the head. They finish the hairstyle by braiding the braid in a circle and pinning it at the temple with bobby pins. But you can even let it diagonally down your hair.
Advice!“French waterfall” looks more romantic and elegant if you curl the lower part of your hair a little with a curling iron.


There is also a simpler version of braiding a waterfall braid based on a tourniquet

Step-by-step master class:
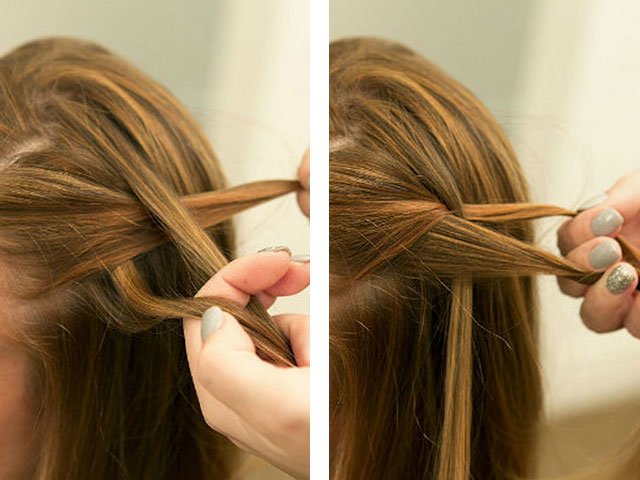
- We separate a strand of hair from the temple, divide it in two and throw one strand over the other:

- From the top of the head we grab the next strand, throw it between two crossed strands and leave it hanging freely:
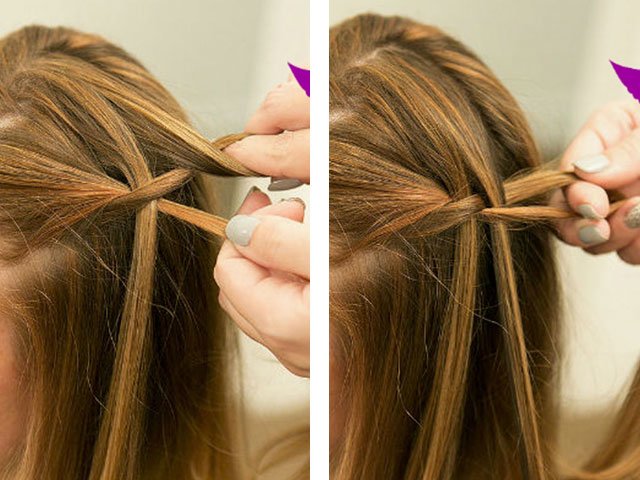
- We pull up the front and middle strands and cross them. We pick up the next portion from the top of the head, also throw it between the two and leave it hanging freely:
- So we continue braiding to the desired length, braiding the remaining tail into a regular thin braid.
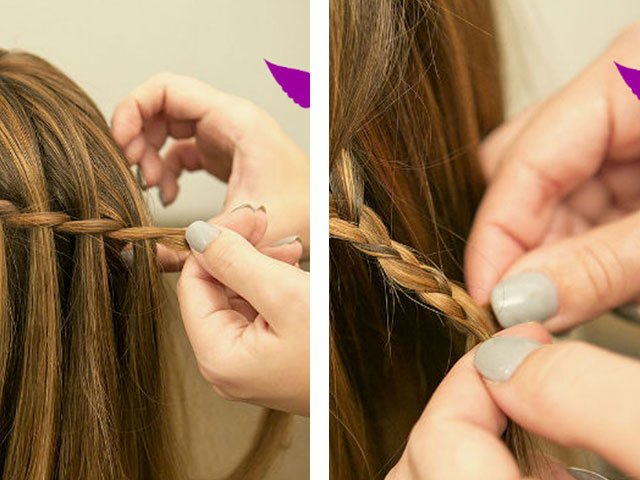
- We secure it with an elastic band and a bobby pin under the hair.

You can not braid the braid, but secure it with an elastic band and pin the free ponytail to the rest of the hair in the right place with a beautiful hair clip.
Hairstyles with braids
Hairstyles in which braids are not the only element, but complement them, deserve special attention. big picture. Here are some interesting options.
Bun of braids
Hair tied up in a bun – comfortable casual hairstyle, but boring and boring for a long time. You can freshen it up by replacing the ponytail with beautifully styled braids.

What should be done:
- Comb your hair to make it fuller and tie it into a ponytail high at the back of your head.
- Divide the bun into two halves and weave each into a classic braid.
- Tie the ends with discreet elastic bands.
- Gently fluff out your braids.
- Wrap the braids around the base of the bun, covering the elastic band. Tuck the ends in.
- Strengthen the finished hairstyle with hairpins.
If your hair becomes a little disheveled during styling, straighten the stray strands using bobby pins. Finally, spray the structure with a strong hold varnish.


Hair flowers
Option for special occasion– long hair braided in the form of flower arrangement. When creating such a hairstyle, your imagination is unlimited; the only drawback is that you can do it without outside help difficult and you will need help.


The basis is usually a French braid, starting from the temple and weaving around the entire surface of the head with smooth curves. Closer to the back of the head, the hair remaining free turns into classic weaving of three strands. The end of the braid is tied with an elastic band, and the braid itself is rolled up in the shape of a flower in a spiral so that the tip is in the middle and wrapped inward. The hairstyle is secured with hairpins, preferably decorative ones.

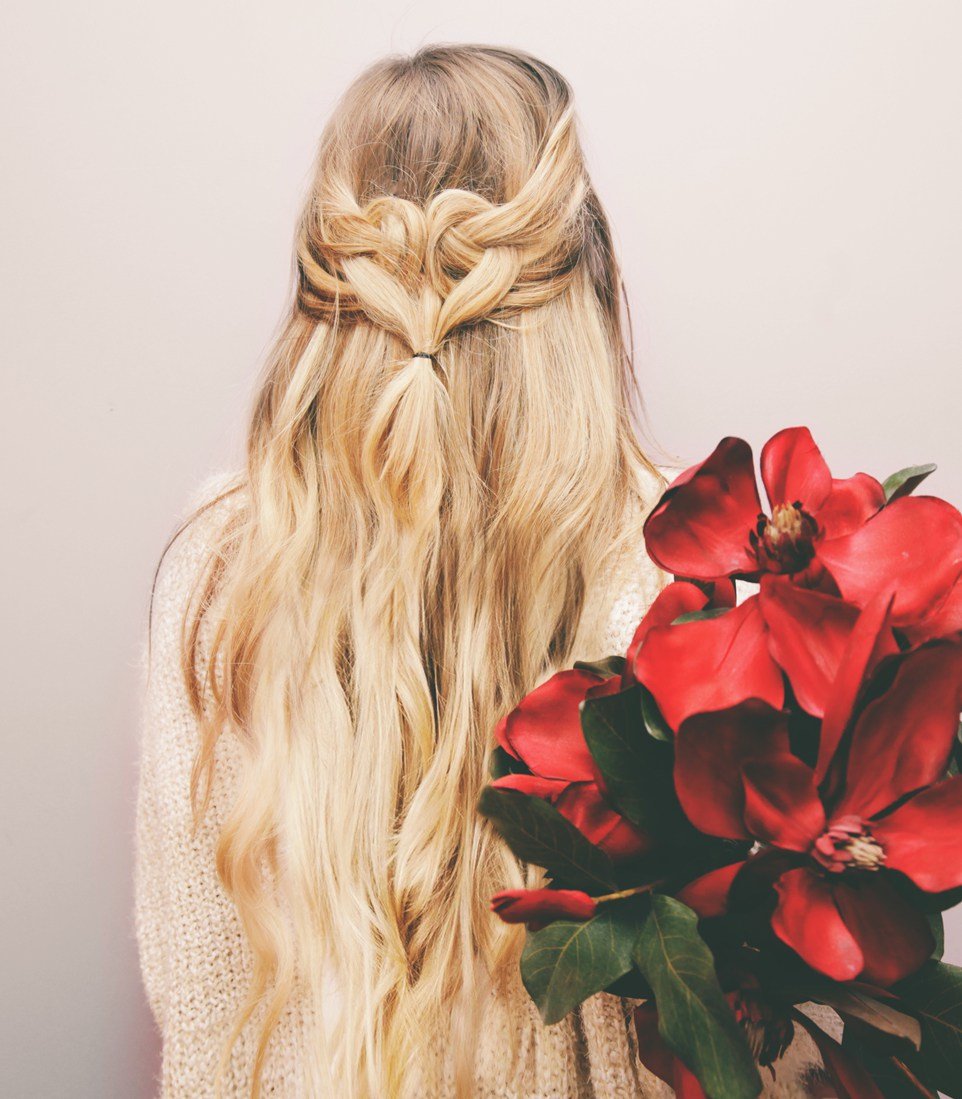
Heart Braid Hairstyle
Need a hairstyle for romantic date? Braided heart from braids – interesting solution, which will not take much time. Comb your hair back and divide it into two parts horizontally. Then, divide the top half in two with a vertical parting going from the forehead to the back of the head. Make simple braids on both sides from the top part of the hair, leaving the bottom part free. Temporarily tie the ends of the braids with rubber bands to prevent them from unraveling.
 Heart made of braids. Step 5-6
 Wrap each braid around its base counterclockwise and secure in this position with hairpins. All that remains is to connect the ends of the braids into a single whole with a hairpin. The loose hair is combed, the surface of the braids is sprayed with hairspray and the heart-shaped hairstyle is ready.
 Hairstyle heart made of hair. Step 5-6 Reverse French braid-headband for a little fashionista
 Twisted tail
This hairstyle is suitable for girls of primary school age. It is done in literally 5–10 minutes. The child's hair is lightly sprayed with water from a spray bottle, combed and tied with an elastic band at the back of the head. The resulting tail is divided into three equal parts.
Each of the three strands is divided in two. The halves are twisted and braided around each other. As a result, three braids are formed. They are joined together into one large braid and secured with an elastic band.
Advice!If you decorate this hairstyle with a bow on top, it will take on an elegant, festive look.
Half-spikelet
This is a simplified and adapted to a child's head improvisation from a French braid. Weaving begins from the left temple, dividing the hair in this place with a parting. The lower part of the hair is divided into three parts and a braid is made from it. New strands are grabbed only from below.
Having reached the opposite side of the head, the remaining hair is gathered into a ponytail and secured with a hairpin. Another option is to braid the braid to the right temple and finish it by twisting the end into a bun or flower shape.
Crown
For a matinee or other holiday, a braid with French braiding that covers the head like a crown is suitable. The braid starts from the back of the head and moves until the circle is closed. Strands for this hairstyle are grabbed only from the outer edge of the hair. The finished braid will be successfully complemented by 3-4 small hair clips in the shape of flowers.
One of the very beautiful and at the same time simplest variations of the “crown” of braids, which also has the more prosaic name of a basket or wreath, is weaving around the head from strands.
As you can see, you can make a lot of original hairstyles for girls from braids. You just have to use your imagination and be patient. And remember that although it’s a pity to unravel such beauty, for the sake of hair health, you shouldn’t wear braids for longer than 12 hours.
The best decoration for a girl is a fluffy braid. But don't despair if your hair isn't too thick and doesn't look particularly exciting if you simply braid it. Today it is very fashionable to braid in various ingenious ways, which from a modest amount of hair create a chic, luxurious braid. One of these methods, beloved by women and hairdressers, is voluminous braid.


Volumetric braid
Beautiful weaving today it is considered the best option hairstyles, suitable any woman. But not everyone knows how to weave a wide braid. For those with thick, long hair, this problem is very easy to solve. However, having certain skills and knowledge of some simple secrets, it is possible to weave a wide, lush braid even on thin hair. Although, patience and diligence will still be needed, because a hairstyle is not something that can be cooked up “anyhow.” There may still be some margin for error in trial exercises, but the final result should be at least neat. Therefore, you will have to put aside current problems and fully concentrate on the mystery of hair braiding.
So, for work you will need: a regular comb, styling product, hair dryer, hairpins and elastic bands.
Three strand braid
This is the simplest and most common option. The hair is combed back and divided into three equal parts. Then the first and second strands are distributed between the fingers of the left hand. Third strand right hand moves between the first two. Then the first strand is placed between the other two, and the second - between the first strand and the third. You need to continue weaving according to this pattern until the end. To make the weave visually look thicker, you should slightly extend each outer strand by 3-5 millimeters. You need to start from the foundation. The hairstyle will be somewhat loose, but this will make the hair appear fuller and the braid thicker.


How to braid
A beautiful wide braid will turn out if it is woven from four, five or more strands. The hairstyle will look much more voluminous and original. Before you start braiding, you need to comb your hair thoroughly and slightly moisten it with spray. The hair is divided at the back of the head into four equal strands. Then the first strand is placed on the second, the third on the first, and the fourth is placed under the first. Then you need to put the second strand of hair on top of the third, and the fourth - above the second. The first strand is moved under the bottom of the second, the third strand is placed on the fourth, the first is placed on the third, and the second strand is placed under the bottom of the third. And so, again, until the end.

Want to make your braid fuller?

Just pull out the strands a little after you finish braiding.


Two-strand braid
You can weave a braid even with just two strands. First you need to make a ponytail from all the hair and divide it into two separate strands. Then two strands are taken to different parties and connect. The principle of this weaving is to throw each new strand to the other side.
Five strand braid
It is more difficult to cope with a five-strand weave. First, the hair is divided into five identical strands. The first of them lies on top of the second, the third - on top of the first, the fourth strand is placed under the bottom of the first, and the fifth is placed on the first. Then you need to place the second strand on top of the third, the fourth on top of the second, and the fifth under the bottom of the second. In this order, weaving is completed to the end, and the result is secured with an elastic band. A braid decorated with multi-colored ribbons woven into it. To add volume, artificial strands are also woven into the hair, which can be an excellent solution for not very thick hair. You just need to choose the right unnatural strands to match the tone of your natural ones, and then weave a voluminous, wide beautiful braid. And to make the braid visually even wider, you don’t need to braid it too tightly. You need to loosen the braiding a little, or you can simply pull out each strand at the end, which will give the hairstyle additional softness and femininity.

A five-strand braid looks simply luxurious


The French braid can also be considered as a voluminous braid. The simplest braiding begins with the usual thorough combing of the hair. Next, at the roots of the hair, at the beginning of the frontal tubercle, a small strand of hair is taken and divided into three strands. This will be the base of the hairstyle. After separation, the weaving itself is performed, which consists of sequentially placing the outer strands on top of the central one. After the base is formed, strands are added to it on each side. But the thicker the strand is picked up, the larger the weave will turn out. The work ends by securing the finished weave with an elastic band. The remaining ponytail is hidden under the resulting braid and secured with a hairpin. If desired, you can make the braid thicker by adding ribbons or artificial strands. You can also lightly pluck the strands so that the braid appears looser and more voluminous. The same effect can be achieved if you first curl your hair.


Inverted braid
One of the most popular methods is the French or inverted braid. It is woven according to the principle of a simple braid, but the strands should not be applied from above, but placed from below. Since weaving is done in reverse side, the braid takes on a convex appearance. Upon completion, all that remains is to secure the resulting weave with an elastic band. During the weaving process, you need to hold the strands tightly to prevent them from unraveling. You must first comb your hair thoroughly so that the strands are picked up as evenly as possible and lie smoothly. And additional splendor can be achieved using the previously described methods.

The peculiarity of the inverted French braid is that when braiding, the strands are placed not on top of one another, but under the bottom, as can be seen from this photo


Another one wide french braid– the so-called “disheveled”. It is obtained from a simple French one, from which, starting from the end fixed with an elastic band, small strands are pulled out that weaken the weaving. In this case, the main thing is to loosen the braid not over the entire width, but only its individual strands. They need to be pulled to the side to add volume and width to the hairstyle. You can pull out the strands on both sides, or only on one side, then you will get a kind of flower or crown on your head. It is also important to make the elongated strands approximately equal in thickness and height so that the hairstyle looks neat and not randomly disheveled.

The fishtail braid, which begins to be woven from the back of the head, looks very beautiful and voluminous.

Comb the hair at the back of your head a little and divide it into two halves.

Start weaving the spikelet slightly diagonally

Near the neck, smoothly switch to fishtail braiding.

When finished, pull the strands out a little.

Spikelet and fish tail
To braid a spikelet or fishtail, the hair must be divided into two equal parts. On one side, a small strand stands out on the edge and spreads over the other half. The same is done on the other side. Small strands on both sides are separated one by one and joined to the opposite half of the separated hair. Outwardly, such a braid generally appears very thick and lush.

This hairstyle is done very quickly and looks beautiful and interesting.

You can loosen the tourniquet in the same way as a braid, thereby giving it fullness
Tourniquet
A fairly simple way to braid a wide braid is with a tourniquet. It is braided from a tail previously fastened with an elastic band. The hair in it needs to be divided into two equal parts. Each of them must be twisted in turn in a spiral in the same direction. After both strands are tightly twisted, you can begin to intertwine them with each other. This must be done in the direction opposite to the twisting of the initial spirals. The harness is secured at the bottom with an elastic band.
In general, there are no difficulties: just start and everything will work out!
Photo

Comb the bulk of the hair at the roots so that the wide braid does not contrast with the “sleek” hair

Miley Cyrus in the good old days :)


In this article you will learn the basic techniques of braiding with step-by-step photos.
After reading it, you will be able to independently create both everyday simple and the most sophisticated and extraordinary designer hairstyles.


Braiding step by step photos: varieties
The braid is not only one of the most feminine, but also practical hairstyles. With braided hair, you can easily walk throughout the day without fear of it becoming disheveled. Moreover, such a hairstyle is quite universal and looks natural and harmonious both in a business setting and at a youth party.


There are several main types of braiding:
- classical Russian;
- European: Swiss, Greek, English, Dutch and famous French weaving;
- eastern: plaits ( side braids), ropes, threads, braids, zizi, curlies, rastas, etc.; the last three types can also be used for short hair;
- designer: " french waterfall", knotted braids, Lino Russo, "basket", "dragon", "fishtail", "figure eight", etc.
The best way to master any of the techniques is to watch video tutorials on this topic or study photographs of step-by-step braiding. Moreover, for any of these weaves you can use not only your own hair, but also false strands or hairpieces. Their color can either match or contrast with your own hair color: the main thing is not to use more than three colors at the same time.


Advice! IN Lately The so-called careless styling, which can be used with any type of weaving, is very popular. But even in this case, the strands should be pulled together evenly and not get out of place. general style. Otherwise, the hairstyle will look simply sloppy.
Classic braids
The traditional Russian braid has long been a frequent guest on many famous catwalks: the Valentino fashion house, theatrical shows of Victor&Rolf, Emerson, etc. Today it is presented in various variations: from braiding on the back, sides or top of the head to creating the most intricate hairstyles of the two and more braids However, to master even such complex species braiding your hair yourself using step by step photos not difficult.


The traditional Russian braid consists of three equal strands that are intertwined alternately. It can be not only smooth, but also voluminous, slightly disheveled, multi-colored, asymmetrical, or used in combination with other types of hairstyles. The hair can be parted straight or sideways, asymmetrically, or have no parting at all. The weaving density and the number of strands used can also vary.
One of the varieties of the Russian braid is the “spikelet” braiding: a technique that allows you to achieve volume and pomp in your hair. In this case, only two strands are used with the sequential addition of new ones. The order in which they are added may vary. However, for the hairstyle to look neat, the density of each new strand added should be the same.


Advice! Perfectly smooth braids look too strict, so you should let some strands stick out a little.
Straight from Europe
Designers distinguish several options for weaving that came to us from Europe:
- Swiss braid: it is woven according to the Russian principle, but before that, each of the strands is twisted into a tight strand, due to which the hairstyle looks more voluminous; This type of weaving goes perfectly with any style and looks great with jeans or open summer dress, and with a business or cocktail suit; step by step weaving Such braids for medium hair or hair of maximum length can be seen below;
- French weaving: unlike the “spikelet”, the strands are not woven one on top of the other, but are laid inside; the braid begins with a small bun, divided into 3 main strands, with the gradual addition of additional strands after 2-3 cm so that at the end of the braiding all the hair is collected; strands can be taken from one or both sides; weaving can be direct (towards you) or reverse (away from you); start from the crown or pass throughout the head in the form of a wreath;


- English: its only difference from the Russian version is that the braiding begins with a ponytail, attached to the back of the head or closer to the crown; Similar braiding for long hair is shown in the step-by-step photo;
- Dutch: braid “inside out”; the woven strands do not hide inside the hair, but rise above it;
- Greek: combination smooth hair and a braid that resembles a headband that runs all over the head; in this case, three small strands are taken closer to the parting, the rest of the hair is pinned up for a while; small strands are gradually added in a circle, with the help of which such a headband-braid is firmly held on the head; There can be two braids, in which case they start on both sides of the parting, and then are cut into one at the back of the head.


Advice! Stylists advise doing a little backcombing at the roots before braiding. It will make your hair more voluminous and your hairstyle more feminine. This technique is especially relevant when creating evening hairstyles.
Oriental tales
A distinctive feature of such hairstyles is the intricate shapes and the presence of large, eye-catching decorations:
- strands (Sinhala braids or screw braids): the hair is divided into two equal strands, each of which is twisted in one direction; then both strands cross and twist in the opposite direction; harnesses can be used in combination with loose strands, a ponytail, side braids, etc.;

- rope braids: a side parting is made on the hair, and braiding (twisting two small strands) begins on the side where there is more hair; when passing such a braid, new small strands are added around the head; at the level of the back of the head it intertwines with the main mass of hair in the direction opposite to the main weave;
- Afro braids (braids): many small braids weaving from the back of the head to the temples; you can let them loose, create one or several thick braids from them, make a tail out of them, twist them into a shell, etc.;


- zizi: a type of braids, ultra-thin braids made of artificial hair, created using machine weaving; woven into every separate strand own hair;
- Curly: the method is similar to zizi, but the curls are twisted into a tight spiral; can be used for extensions.
With the help of step-by-step photos for beginners, you can master braiding quite quickly. The main thing is patience and extreme care.


Advice! Unraveling small braids is quite problematic. To make this procedure easier, before creating a hairstyle, the hair should be thoroughly washed with a cleansing shampoo, not an ordinary one, and then any high-quality balm should be applied to it.
Modern design techniques used in weaving
IN last years Braid hairstyles received the most unexpected execution. However, for any design techniques, are, in fact, improved ethnic variants of the Russian, European and Eastern variants:
- “French waterfall”: resembles the usual one or two braids, starting at the temples and ending at the back of the head; however, each lower strand is released into “free floating” and falls freely onto the back. The hairstyle can have all sorts of variations: be asymmetrical, go over any part of the head, sag, etc. It can be used even on short hair;


- knot braid: two strands are connected to each other using a series of knots; in this case, both part of the hair can be woven (one or two small knots are used as a kind of decoration), or its entire volume;
- Lino Russo: a combination of knots and the “spikelet” technique. After each knot, new hairs are added to the already selected strands; for such a hairstyle, the hair must be cut evenly and be the same along the entire length;
- “snake”: a regular French braid is not located along one line, but meanders over the entire surface of the head; may have 2-3 or more turns;
- “basket”: part of the hair on the top of the head is gathered into a high ponytail, then a regular French braid is woven from the temple with alternate addition of strands from the ponytail and free hair;

- cornrow braiding: classic afro braids are arranged all over the head in the form geometric pattern, reminiscent of rows of corn (from the English corn - corn and row - row); To obtain such a pattern, each miniature braid is braided in the manner of a classic French braid.
Advice!To make it easier to weave when creating a braided hairstyle, you can use any styling products: foam, varnish or gel.


Braiding for short hair
Thanks to advanced weaving techniques and the presence modern means fixation, you can decorate yourself with braids even if you have short hair:
- “headband”: two braids are braided at the temples, and then secured with hairpins at the back of the head;
- braid parting: a weave of side strands located on one or both sides of the face;
- bangs with a double braid: the upper part of the face is framed by two small braids;
- a braid around the head: can be located in any part of it, pass over the entire head, or located on the left, right of the face, or braided only at the back of the head;
- “French bangs”: long bangs can be pulled to the side in the form of a French braid; since in case short haircut the hairs will invariably stick out to the sides, you should fluff and tousle the rest of the hair mass so that it looks as organic as possible;
- a combination of the “punk” style and the French braid: some of the curls are combed in the form of a mohawk; the side strands are braided.

