Star News


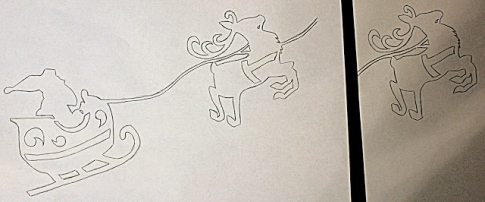
Kirigami schemes are voluminous. Kirigami scheme - from simple to complex
Many will appreciate the kirigami style pop-up card with the image of a delicious cake! This product is perfect as a birthday card.
Let's take a closer look at the manufacturing process:
1. save the templates below on your computer:


2. now we print the templates, it is better to use thicker paper. The base itself is on white A4 paper, and patterned additional details, which are blue in the image of the finished cake, are on blue colored paper.
White paper can also be used to print patterned details.
3. we put cardboard under a sheet of paper so as not to damage the surface of the table;
4. Using an X-Acto knife, or another sharp knife, cut out the cake along the contour, blue patterned details.
If before that you printed patterned details on a white sheet of paper, then you need to put colored paper under the bottom of the sheet with a contour, fasten it with paper clips on all sides and cut it out immediately through a double layer of paper.
5. At the moment, our postcard in a collapsible state looks like this:


6. bend the sheet along the lines marked with dots in the opposite direction from ourselves.
7. We apply the patterned details to the white base of the cake and carefully thread the candles into the slots on the blue paper of the top part. We glue the patterned blue details to the base cake, after which the cake will look like this:

8. now it remains to glue the colored paper on the back of the sheet. You can use blue paper, as in our example. Pink paper is also well suited for this purpose.
9. The cake card is now ready.
Perhaps this will be of interest to you too.
"! Today we will talk about a new technique for making paper crafts - kirigami. This type of paper art is related to origami (read). However, there is a difference between them, which is that kirigami cutting and gluing paper is used. This difference simplifies the work with paper and allows you to create real works of art that are distinguished by beauty and originality.
KIRIGAMI technique
For the manufacture of crafts in technology kirigami, diagrams and drawings are used, in which the symbols show which parts need to be cut (solid line) and bent (dotted line - bend inward to the center of the sheet, a line of dots - outward).
It is better to use thick paper (see) in kirigami (150-220 g / m2), it is easier to cut and it retains its shape well.
A clerical knife is used as a tool. It is desirable for him to have a good supply of replacement blades, since the quality of the cuts in the paper depends on the sharpness of the knife.
In addition to a clerical knife, you will need a stylus (instead of a stylus, a ballpoint pen that does not write is suitable). It is used to make bending easier.
And also we will need an even ruler. It is better to use a metal ruler, because. it will be used not only for drawing, but also for making cuts in paper with a clerical knife.
In the workplace, you will also need to use a lining so that the knife does not spoil the furniture. For this purpose, ideally, a special self-healing rug is used, but a piece of linoleum, a piece of plexiglass, or, at worst, a few old magazines may work.
Crafts KIRIGAMI
And now we propose to make some crafts in the style of Kirigami. To do this, you will need to print out the diagrams on the printer and, exactly in accordance with the drawings, make the necessary cuts and bends.
cubic pyramid

Diagram Cubic Pyramid


Castle scheme

Cathedral of Saint Marcus

Diagram of Saint Marcus Cathedral
And now we offer you to watch a video about what kind of kirigami-style crafts you can do if you wish.
Kirigami or pop-up (pop-up) - the art of cutting paper postcards, "clamshells". You open one - like a devil from a snuffbox, an image pops up. Postcards are unusual, but in their manufacture, in fact, there is nothing complicated. To help you, we have collected the simplest schemes and kirigami patterns for beginners.
We analyze kirigami schemes
Kirigami schemes for beginners are extremely simple: paper will need to be cut along solid lines, and bent along dotted lines. Where color markings are used, red lines usually indicate the fold-"trough", green - the fold-bulge, black - cuts.
Tools for the job
Unlike origami, the art of folding, kirigami allows the use of a knife and glue. To make a simple kirigami for beginners, you will only need:
- craft knife or cutter
- ruler,
- a self-healing rug or any dense backing that will protect your table from scratches,
- paper clips or masking tape to attach the template to paper,
- thick paper or thin cardboard.
How to make a kirigami postcard
If this is your first time getting started, print out a simpler diagram and practice on it. Place a rug under the diagram and use a ruler (preferably a metal one) to make neat cuts. If you are afraid to make a mistake and cut something superfluous, color the cut lines and fold lines with different felt-tip pens.
Happened? Then print out a new diagram, attach it to a sheet of colored paper with paper clips or masking tape and cut it out. Even beginners can handle the pictures from our selection of kirigami.
Experiment, and you will always have an original postcard for any holiday!
The simplest kirigami postcards
herringbone kirigami
These are the simplest kirigami postcards - it will be convenient for beginners to train on them. For these postcards, you don’t even need a printer - you can redraw the diagram on a piece of paper in a cage.
When you get your first Christmas tree, try to draw your own and cut it out: you can make kirigami postcards according to your own patterns.


birthday kirigami cards
Such a card can be made for any holiday: birthday, wedding day ... yes, even Cosmonaut's Day! To simple "stands" you can stick any image suitable for the occasion.

This postcard is not much more difficult. You will need double-sided paper for this.


Postcards with letters
Mastered the simplest postcards? Then learn how to cut the letters pop-up.

Kirigami Valentines
You don't have to wait for a special occasion to surprise your loved one. A kirigami postcard can be hidden in a diary or a book that a loved one reads - it will turn out to be a real surprise.


"Seasonal" postcards
In this collection, we have collected simple kirigami postcard schemes dedicated to the new year or the onset of autumn. Having adapted, you can cut out several of these postcards at once, just take care that the sheets of paper do not move relative to each other.
For such postcards, you can use double-sided paper.


Kirigami is a fairly light form of creativity, but at the same time very airy and interesting. In this article, we will consider the basics of technology and schemes for beginners. Our article provides diagrams for learning the kirigami technique, which is suitable for beginner needlewomen.
Consider the basics of kirigami creativity with diagrams for beginners
kirigami- the work of Japanese masters. Denotes "kiru" - to cut and "kami" - paper.
The founder of this type of creativity is the Japanese architect Masahiro Chatani, and the date of birth of kirigami is 1980.
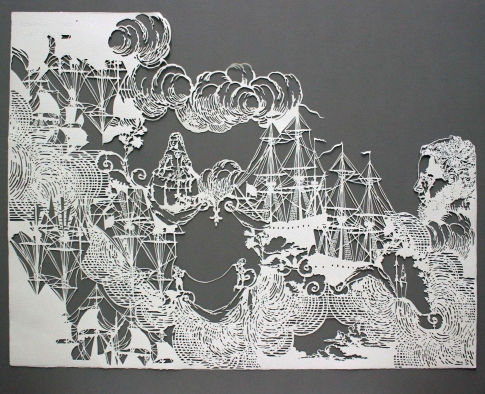
This technique is closely related to origami, but it can be cut with scissors and, in some cases, glue can be used. To some extent, kirigami is very similar to origami, but in this case, the crafts are voluminous and have a rounded shape.
Sometimes kirigami is equated with pop-up - the art of cutting out voluminous postcards - folding beds. But if we consider this direction as Japanese art, then only one sheet of paper is used here and it is better not to use glue.
Learning the main types of kirigami
Over the years, the kirigami has been subdivided into many species.
Let's consider the main ones:
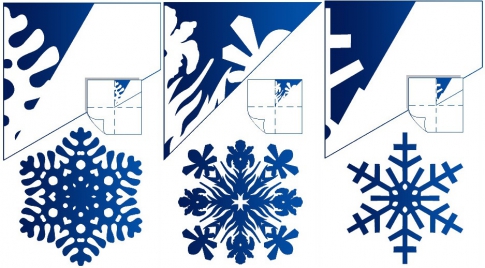
Flat images. The peculiarity of this type is that it is just a drawing of any complexity, cut out of paper and set against a bright background. These include New Year's snowflakes on the window.

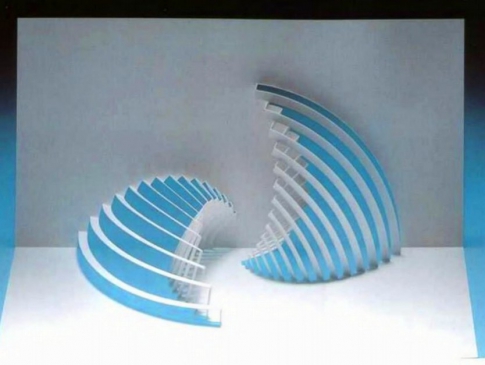
Volumetric images. A feature of this type of technique is that it is all done from one sheet of paper using a cut and fold in the right places to obtain the desired pattern. This technique includes voluminous postcards in the style of pop-up.

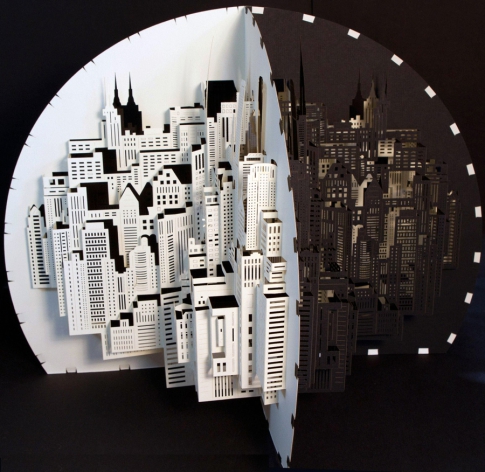
three-dimensional figures. This is perhaps the most difficult type. He is a figure, worked out and thought out to the smallest detail. In this kirigami technique, it is necessary to use templates, as even masters with many years of experience use them.

A simple master class for creating paper crafts
Tools for work:- The main tool is paper. On it we will cut out any pattern that we want. It is better to choose thick paper so that thin lines can hold well
- Ruler
- Staples to connect the template to the base paper
- backing to prevent damage to the table
It is worth starting work with flat drawings. This will help to fill your hand and develop your technique. The field of this will already be possible to create masterpieces.
If you immediately want to make a postcard in the style of kirigami, for starters it is better to use templates.
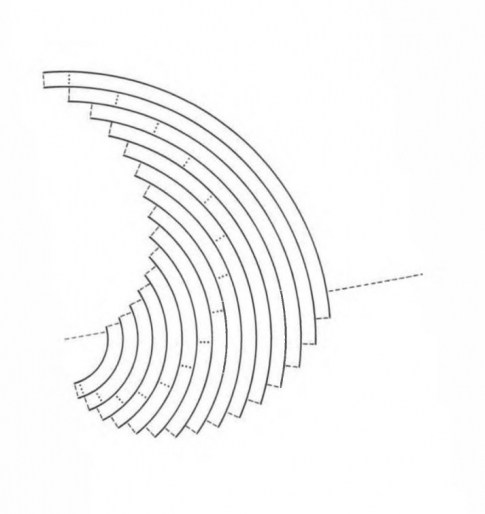
You can try to make simple volumetric stars.

The scheme of the picture corresponds to a standard size A4 postcard. Solid stripes indicate incision sites, dotted lines indicate back fold lines. And the dotted segments indicate that the picture needs to be bent forward.

For those who find these options too simple, you can try to make more complex images.
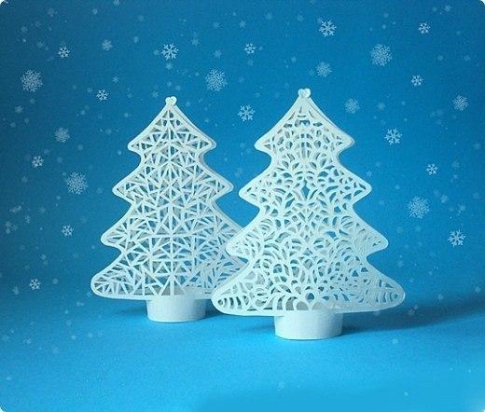
The kirigami technique is perfect for creating interior decorations before the New Year. Figures created from ordinary white paper will look like snow-covered ones and fascinate with their beauty, creating a festive atmosphere. You can also bring in kids. For children, this will be a great way to spend time.
Consider a master class on making voluminous Christmas trees using the kirigami technique.
Print out templates on two sheets.
Cut out small details inside the Christmas tree.
Then we will cut out the Christmas tree itself.
There will be a stand at the bottom of the tree. We make a small incision there and connect the two parts with the help of valves at the bottom and top with hooks.
So the first three-dimensional kirigami is ready.
Using flat kirigami, you can decorate windows not only with snowflakes, but also create your own fairy tale story on the window.

Kirigami is a wonderful art that is easy for both adults and children. Using this technique, you can make three-dimensional figures, postcards according to the schemes. You can even create your own picture, unlike any other.
In order to learn all the intricacies of working in this technique, we suggest you watch several videos with various master classes.
Video on the topic of the article
Finished products in the kirigami technique amaze with their beauty and airiness, with many carved windows and patterns. An interesting kind of creativity, related to origami, can be mastered by everyone - it is enough to have scissors and a sheet of paper at hand.
Kirigami technique - the basics of creativity
What is kirigami? The intricate word comes from two Japanese meanings: "kiru" - "to cut", "kami" - "paper". Thanks to the sound, you can see that this technique is similar to origami. Indeed, kirigami masters also create paper products, but, unlike origami, they can use scissors, and in some cases, glue.
Exact date of appearance kirigami unknown - most likely, creativity appeared simultaneously with the art of origami several centuries ago. However, since the 80s of the twentieth century, this work has experienced a new wave of popularity - it was at this time that the Japanese architect Masahiro Chatani invents one of the subspecies, which is called paper architecture.
The principle is the same as when working with other types of kirigami - the professor tried to cut out from one sheet of paper a three-dimensional image of a building with as many small details as possible, which characterize famous architectural monuments. This principle helped to make his works recognizable - they all have an incredible resemblance to the original buildings.

Some attribute the kirigami technique to similarities with the art of pop-up - cutting out paper postcards, when opened, three-dimensional figures appear. It is important to understand the difference here: Japanese creativity is made from only one sheet of paper and preferably without glue.
Kirigami cutting - types of products
Over the many years of existence, kirigami has managed to acquire many features, each of which characterizes a separate type of this art. To understand their differences, check out the classification of possible paper products.
flat images
This variety consists in preparing a flat image with filigree patterns and fixing it on some bright background.
One example is the beautiful paper snowflakes that we decorate our windows with every winter.
Volumetric crafts
This includes postcards that can be opened 90 or 180 degrees and get a pop-up figure - a heart, letters, a gift.
The principle is simple: cut out the details of the image from one sheet of paper without separating them from the base, and bend them in the right places, forming three-dimensional pictures.
3D shapes
In this case, with the help of cuts, holes, flaps and folds, the master folds a full-fledged three-dimensional image - a figure that can be studied from all sides for a long time, considering the smallest details.

If you want to make something like this, use kirigami-cutting templates - without them, even professional paper craftsmen can not cope with this kind of Japanese creativity.
Kirigami patterns and patterns
Each work in the kirigami technique is performed according to a specific template, previously transferred to the working paper. And if professional craftsmen are able to develop drawing schemes themselves, based on the principles of adding figures, then it is better for beginners to use ready-made sketches.
Kirigami for beginners
If you are just starting to master the art kirigami, give preference to the creation of flat crafts. Don't worry, in terms of beauty they are in no way inferior to three-dimensional ones, and some even surpass them.
For example, you can practice cutting out snowflakes! First, use ready-made templates, and after about 5-10 products, try to develop your own original design.
In addition, you can try making a cute simple card with 3D stars inside.

The scheme of the picture corresponds to a standard size A4 postcard. Solid stripes indicate incision sites, dotted lines indicate fold lines back. And the dotted segments indicate that the picture needs to be bent forward.

If you choose the right paper color, you can make a very beautiful image with an advantageous play of light and shadow on it.
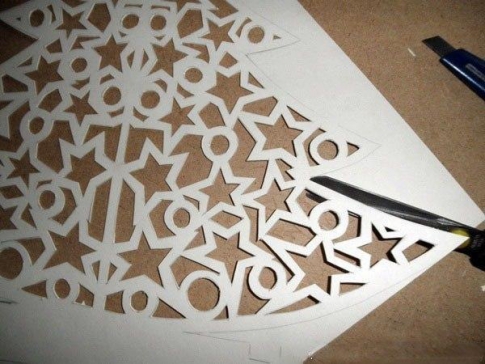
Complex kirigami
Those who find the kirigami patterns in the previous paragraph too simple can try more complex paper craft options. For example, sheets folded in half with figures from many folded strips have recently become popular.
One of the simplest is the kirigami postcard scheme called “Wave and Sail”. When performing the same element, deployed in different directions, a beautiful imitation of the seascape is obtained.
- Print this template on half a standard sheet.
- Fold an A4 piece of paper in half widthwise and unfold, leaving a fold mark.
- Attach the template to the blank 2 times: the first time the way you printed it, and the second time turning it upside down.
- Cut into strips, guided by solid lines.
- The dotted designation indicates the folds back, and the dotted designation indicates the place where the craft needs to be bent forward.
Such crafts with many thin narrow details are difficult to cut with scissors, even nail scissors. Therefore, prepare a clerical knife in advance.
New Year's kirigami - master class
On the eve of the New Year, I want to plunge into a fairy tale a little and decorate the house with festive attributes. And white openwork kirigami patterns are perfect for decorating an apartment - they look so much like frosty patterns on glass!
For example, a desktop and shelves can be decorated with such homemade figurines of Christmas trees made of paper.
- On two A4 sheets, print the same schemes for the future product.
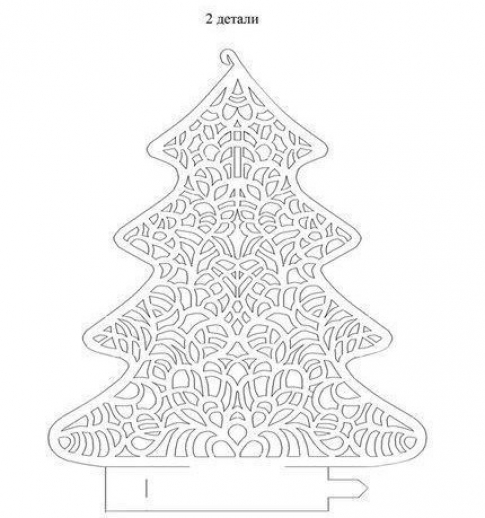
- First, cut through the small parts inside the blanks.

- After finishing work, cut out the details along the edge.
- At the bottom of the Christmas tree - stand - make a small slot in the place of the vertical line. Connect the workpieces with the help of valves from below, and with the help of hooks - from above.
Your Christmas tree is ready! It can also be used as a New Year's toy, and if you increase the size of the product - as a festive headdress.
Don't forget about decorating windows for the New Year! Beautiful patterns on the windows will create a festive atmosphere in the house and cheer up those who see the composition from the street.
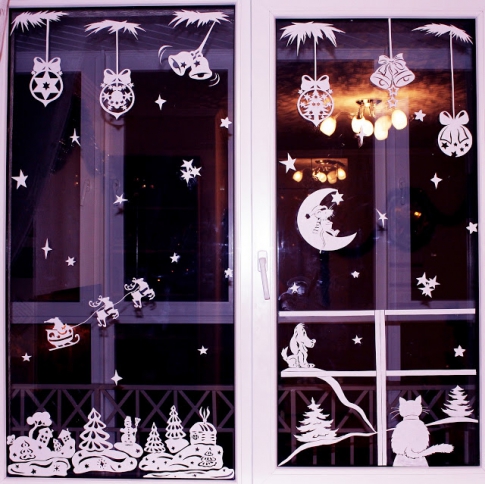
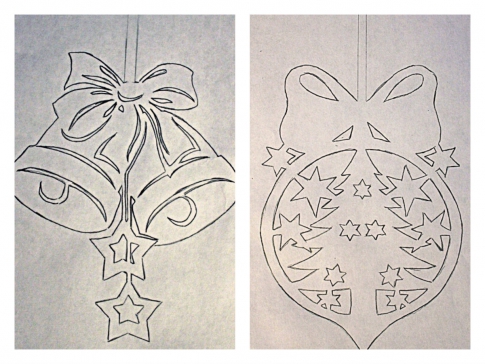
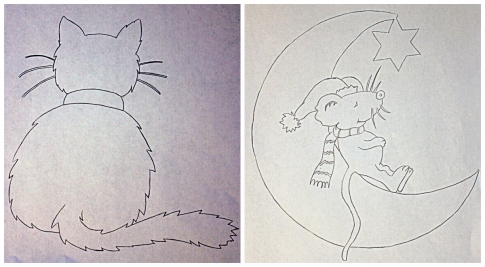
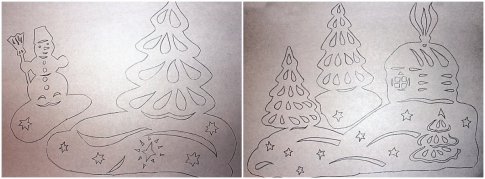
- Use the templates below to cut out beautiful Christmas decorations, animals and winter landscapes from paper.

- You can glue paper pictures with soapy water: moisten a paintbrush liberally, and rub it with a bar of soap to pick up some of the sticky top coat. Smear the paper and stick to the window in the right place.

- You can use tape as a fixing material, but after removing it, it will be more difficult to clean the window from the sticky layer.
- If you don't have a printer at home, you can manually redraw the templates by placing a sheet of paper on a glowing computer screen, which will display the desired size.
Another example of a New Year's scheme kirigami for beginners, you can see in this video tutorial - try to make a beautiful Christmas decoration with it.

