Star news


How to make a Christmas tree out of green paper. Christmas tree made from one sheet of paper
Hello!
Today, on the eve of the New Year, I would like to offer you another a wonderful craft, which you and I will make from paper. This volumetric herringbone, which you can easily do with your own hands right now. Because you will have everything you need, these are diagrams and the necessary templates. The forest beauty will turn out lush and fluffy.
Well, if you want to do a more complicated job, you can take a look, there we created products from various available materials, and even made a stomp.
Don't forget to decorate your apartment with others.
Well, let's start looking at and choosing the works we like and roll up our sleeves to create and surprise everyone. I wish everyone good luck and patience.
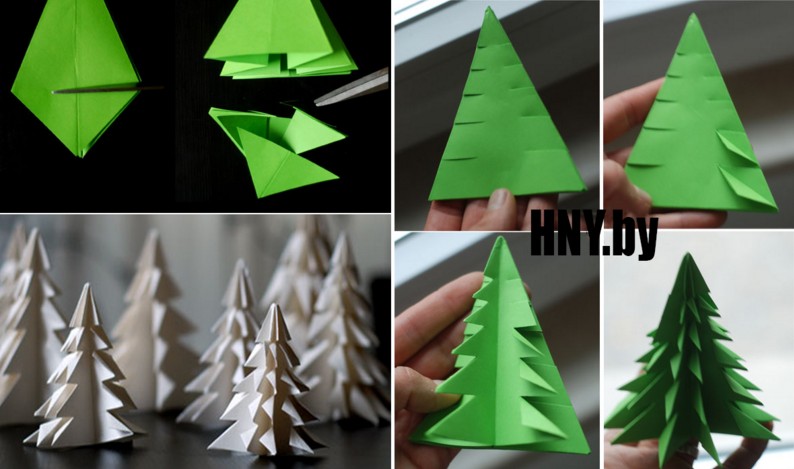
You always want to make this kind of decoration yourself, because it will look original and at the same time beautiful. All you need is a piece of paper from which you can easily create a stunning Christmas tree craft.
In addition, such work can captivate your child and he will be happy to sit and bother. Well, take a white sheet or perhaps a green sheet, but then double-sided. Bend it in half with its short side. And draw a Christmas tree symbol. Here are examples of templates that you can use.

Then start cutting along the lines, and then make cuts and fold them as shown in these pictures. You need to make the blank in triplicate, and then glue them together. It will come out stylish and very delicate, but also, of course, voluminous, which will undoubtedly please everyone.

The next option is no less interesting and charming in its simplicity. Take these stencils and print them on a printer, and then you will receive the work in the form of a PO.


Where you see the main outline, take it and cut it out with scissors, but in the recesses, make only notches so that you can then turn it out, as shown in the photo. Two blanks same shape then they stick together.

And if you want to really surprise or amaze everyone, then make a whole composition, that is, a forest beauty, and not just one, but with a fawn.


And one more version of a 3D craft, which I propose to cut out on a simple landscape or office sheet, and then paint with gouache paints to make a real masterpiece.
You can use a can of glow-in-the-dark spray paint to create a shimmering effect.

Look with what zeal and desire the child does such work.

And this is what we have in the end. The beauty is indescribable.

The next option is also quite interesting, the Christmas tree is made from green paper in the form of loops, read these instructions and create with me. This year we made such a charm with my son. It turned out great.


Well, if you still have any questions, then I will be happy to share with you this video, which shows this master class.

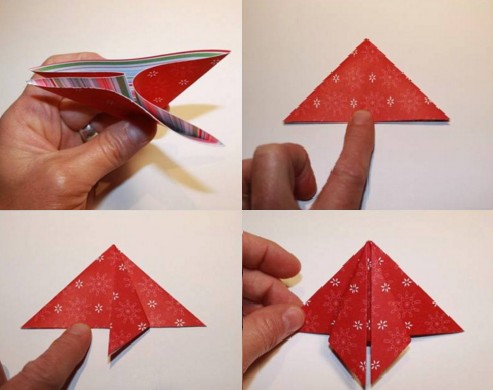
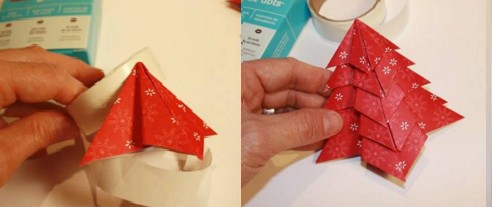
Christmas tree using origami technique (simple diagram for children with description)
I think that in childhood everyone was fond of such an activity as origami. All because, it would seem, from an ordinary sheet of paper, an amazing result emerges. Preparing for this article, I didn’t even suspect that such a decoration as a Christmas tree can also be made using this technique. Imagine, this is what I was lucky enough to find.

Any old book without thick binding or a notebook will do. And the sequence of folding actions will be like this. Fold all the pages of the book from the left corner to the middle.

And then make a bag, that is, another fold.

Cut off all excess, do it carefully and efficiently, take your time.

Then unfold the product on the table and sprinkle with tinsel or glitter.

If you decide to make the work a little more complicated, for example, if your children are already going to school, then you can invite them to create such a forest beauty.


The following work, which is done in labor lessons in primary school or classes are held in kindergarten. The description and all folding steps are presented in this illustration. Let's get down to business.

If you love modular origami, and you own this technique, then make a souvenir like this.

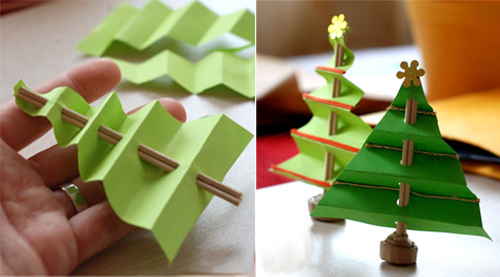
How to make a three-dimensional Christmas tree from corrugated paper for the New Year

We will need:
- cardboard or thick paper
- green corrugated paper
- any glue
- scissors;
- bows, red paper, beads
Stages:
1. From regular cardboard make a cone, then cover it with corrugated paper.

2. Now all that remains is to build twigs, like needles, for the future product. To do this, cut the corrugated paper into strips, cut the edges to make a fringe and twist each onto a wooden stick into a bobbin. The result will be something resembling a flower.

3. And glue the blanks to the cone using the trimming method. For a spruce tree 15 cm high, you will need 120 small blanks in the form of lush flowers. You can take a ready-made bow for decoration, or make it yourself from the same corrugated paper. Also use cotton wool with glitter, this will give the tree a chic and elegant look.

The next option is no less intriguing, as if the Christmas tree was made in a spiral, also based on an ordinary paper cone.

Make a base for the tree to create the following. Use glue, scissors and thick paper or cardboard.

2. Take corrugated paper 18 cm wide, but the length should be about 2 m. Fold the strip in half with the long side. Apply glue from the edge, leaving a gap of 1 cm.

3. And start pulling it a little to make a skirt.

4. Wrap the product with such a prepared strip, drip glue here and there so that everything sticks tightly.
Wind it only in a spiral to make the work voluminous.

Here's another wonderful option.

Forest beauty made of colored paper and cardboard
The next beauty will be made of colored cardboard, but make the decorations from colored paper. The Christmas tree is folded using such a simple technique that you can create this great gift or a souvenir that can be kept for a long time on the shelf.

You will need three blanks in the form of semicircles of different diameters, on which you can make a fringe like this. Then roll and glue each sample to form a cone. Then put a little less on top of the largest cone and then smaller ones.


There is another option, which is made from one paper cone and covered with circles. He looks wonderful, you can’t take your eyes off him.

By the way, I found a similar work in this story, who needs it, go for it. There the author came up with the idea of making mugs using one little thing, in general, see for yourself.
In addition, you can still fold the Christmas tree in this way, using circles as a base, and use wooden caps instead of a stand.


If you have wrapping paper lying around, roll it into a ball, trim the edges so that they become round at the base and decorate.

Moreover, you can make a huge craft in this way by gluing together several sheets of cardboard.

Then decorate the cone with packaging and glue the edges to the base.

Trim off everything you don't need and decorate with stars or balls.

Now let's do the craft using cardboard, which we will fold.

To create such a product, print out this stencil.

Then place it on cardboard, trace the stencil, and cut it out. And fold the workpiece in half. Make 8 of these products.

Go through the edges of each Christmas tree with a hole punch, and then, where the middle is, go along the fold line that you made before with double-sided tape.

Now all that remains is to sew the edges where the holes are.


Apply glitter or artificial snow from an aerosol and attach a star to the top.

Next job, take a cardboard base and stick a stick into it and secure it with glue. And then cut out circles of different sizes from old postcards and stick them on a stick.

Something similar can also be made from candy wrappers or just newspaper or magazine sheets.

Or you can create a souvenir from children's palms. It also looks good, especially since schoolchildren or preschoolers are always happy to do such work.

By the way, here is another idea from a newspaper or magazine.


Can you make a green tree out of an accordion? Fold a salad-colored office leaf into an accordion shape and use a hole punch to pierce the center. Insert a stick into the resulting hole.


Among other things, I saw such a lovely composition on the Internet.

Whoever is good at anything, there are so many ideas, take them and do them, friends.

A simple toy can even be made from ordinary ribbons, which you cut, then fold into a snake and connect.

Here are a couple more ideas, write your suggestions or corrections on how and what else you make such cute Christmas trees from.


Even from notes for writing, they managed to create a real masterpiece.

For kindergarten children, this kind of work is suitable: take thick cardboard and cut it in the shape of a triangle. A base will come out, onto which you ask the child to stick stripes.

Well, in conclusion to this chapter, here is another invention, this is a quilling-style Christmas tree.

Master class on making a New Year tree from napkins
It turns out from regular napkins You can also quickly build a Christmas tree, and if you get creative with the colors, it will turn out absolutely unique.

Such a masterpiece is made in this way: circles are drawn on a napkin, and then the middle of each figure is connected with a stapler. Then cut along the contours of the workpiece.

And right towards the middle, start crumpling the edges, lifting them up. To make a flower. And then glue it to the conical base, which you made in advance. You can even arrange it in the form of a topiary. Now decide for yourself.

More details if you are interested this work you can also use this one step by step instructions in pictures:


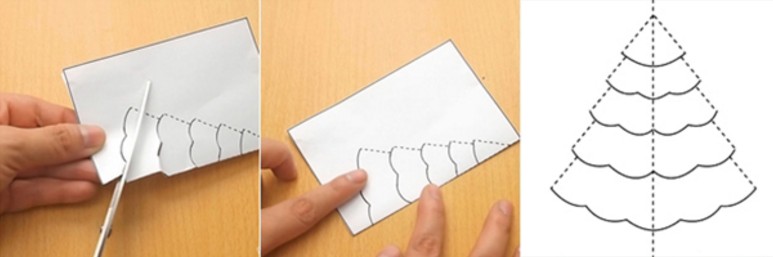
Christmas tree stencils for cutting and printing
For those who love masterpieces in the style of vytynanka, they will take these stencils as a basis. Using a regular stationery knife, cut out the Christmas tree, or you can take a special tool that the masters of this craft have.

Cut two blanks at once, cut a strip on top of one, and cut a strip on the bottom of the other.


Here are a couple more ideas about what beauty can appear, see for yourself. Tender and white forest beauties who are so attractive.

Take a leaf and crumple it in half, draw patterns and the outline of the spruce. Cut out all the parts with a cutter.

Take your time, this work does not require fuss.

You can print the template without folding it and draw the tree yourself. Don't forget to also leave gaps of paper at the bottom so that you can roll and glue them later.

That's what I mean. As soon as you make these two blanks, connect them together.


I suggest you download the stencils right now from my blog:


By the way, you can create a whole composition with a hut. These are known to everyone. Wow, it will be beautiful! Request templates via comments if you like the house.

Volumetric Christmas tree for a New Year's card (step-by-step instructions)
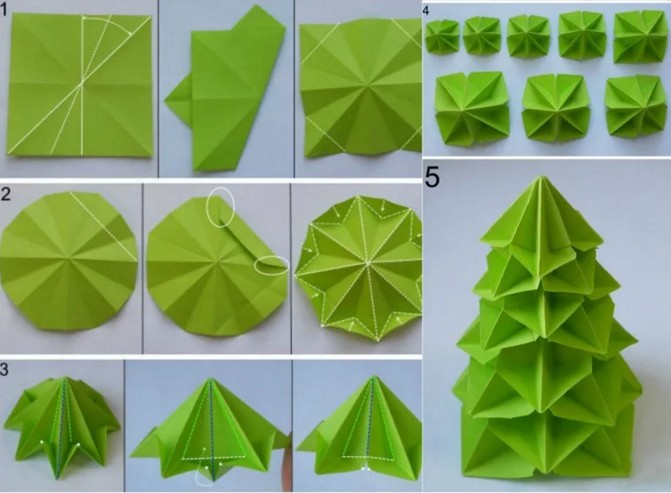
Of course, on New Year's Eve we give everything to each other, and we do it together with the children, and of course. I propose that you also design them unexpectedly, namely, use the origami technique. This can be done using ordinary triangles, which are obtained by folding ordinary squares.

The next work, to complete it you will need two sheets. On one you print out a Christmas tree and make cuts along dotted lines, and then glue this blank to the background.


Anyone who doesn’t understand the stages of work in this photo can easily use the video hint.
Another masterpiece, using the same origami technique you will get a cool little thing that you can give to your mother or loved one. Watch the instructions and repeat step by step.


These are the work ideas you can use as a basis.


Paper Christmas tree on the wall
For a long time I couldn't find suitable option, but then I still came across these ideas. It turns out there is nothing difficult in creating such a huge and huge Christmas tree. See it all for yourself and be amazed, because it’s so great when you and your family are together.

Besides everything, I also found an awesome paper beauty that can be glued to any wall.
This decor can be used to decorate any children's room or kindergarten. I was blown away by this idea and am sharing it with you. You need to download the templates (you can request them from me, I send them for free to email address). And voila, let your imagination run wild and color with your children. The file will contain 22 stencils that need to be printed on a large A4 sheet and then decorated.

This is what can happen, go for it. By the way, there are other options for New Year coloring pages for children, go ahead and take note.


That's all, the article has come to an end. I enjoyed sharing everything I found. I hope you were completely delighted after scrolling through this page.
Everyone have a good day And sunny mood. Bye!
Best regards, Ekaterina
It's hard to imagine New Year's fun without the forest beauty. However, not everyone has the space or opportunity to put up a real Christmas tree. Artificial ones look unnatural, as a result of which the surroundings and individuality are lost. To make this New Year the most beautiful and original, needlewomen are coming up with interesting design solutions replacing the holiday symbol.
There are many options for execution. The most common question: “How to make a paper Christmas tree with your own hands without special costs? ". The answer is simple - use the materials at hand and what you can find at home. Turn on your imagination, think about what you want to do and evaluate the items in the bins. Surely you will find old magazines, newspapers or even colored paper. Paints, felt-tip pens, buttons, bells and everything that your ingenuity suggests will be useful.
It has become widespread. How to do it is up to you, but try to follow general rules to create such toys:
- Decide on the shape you want to get. Most often, Christmas trees look like a traditional triangle and a cone. But if you want to create a unique designer item, then choose interesting models. For example, with a slope, with an unusual tip, in several tiers, round, etc.
- The color scheme does not have to be standard. Few people can be surprised by a green Christmas tree, but yellow, blue, white or blue - please.
- After you have outlined what the toy will look like, think about the technique. How to make a New Year's Eve so that it can withstand all the holidays and not fall apart under its own weight? There are many mounting options: on a frame, on tape, on glue, on a monolith.
- The final chord is the decoration of the top. Today it is fashionable to attach symbolic things to the crown. So, a family expecting a child puts an angel there, those who want to expand their housing - a house, etc.
Creating the base for the Christmas tree
As a base, you can use a purchased rolled part of the bottle and paper sheet. Here we will look at which will be the basis for almost all masterpieces.
To do this you will need thick cardboard, tape or glue, scissors and a compass. Measure the height of the future beauty on a compass and draw a quarter circle on the prepared cardboard. For ease of fastening, leave a small allowance. Now connect two straight lines and secure with glue or tape. This will become the basis. How to make a Christmas tree out of paper. The photo below will tell you where to start.

You can use one or more glued wooden skewers as a tree leg. Now you can start decorating the cone. The easiest way is to wrap it in tinsel with a slight tilt and fix it with glue.
Christmas tree made of toilet paper
Today, few people are surprised that the Christmas tree is made of paper. Few people know how to make such unique things. Imagine the surprise of the guests when they see the beauty from toilet paper!
Creation instructions:
- Cut a piece of toilet paper.
- Cut out four semicircles so that the radius of the next one is 0.5 centimeters smaller than the previous one.
- Shape them into four cones.
- To add splendor to the trees, cut the bottom of each of them with a fringe.
- Place one on top of the other, starting with the largest one.
- Place them on a suitable sized leg.
Simple and affordable way will allow you to create an original and funny decoration that will surprise your guests.
Christmas tree with paws in the form of cones
Using a compass, draw a circle and divide it into 12 equal sectors. Cut them along the marked lines so that they can be easily formed into cones. Fasten them with a drop of glue or a small piece of thin tape. You will need at least 10 such parts for the smallest Christmas tree. For big beauties, much more is needed. Start your creativity with a small copy, and only then aim for “world-scale” masterpieces. Each next circle should be slightly smaller than the previous one. Continue decreasing until the job is no longer possible.

To fasten them together, use thick wire or a skewer. The great advantage of wire is that it can be used to create a small base that will give the tree stability. Many people are interested in how to make Christmas tree toys from paper, because it is not able to withstand massive decorations. Consider gluing rhinestones and sparkles, in some cases these may be plastic buttons. The surest option, suitable for any beauty, is decoration paper toys or which can be purchased in shops selling handmade goods.

Christmas tree with sharp ends
To create this designer version, you will need thick colored paper. You need to cut out even circles from it, which will differ in radius by about 0.5-1 cm. After that, fold each of them in half. The workpiece must be folded in half as long as possible. Carefully smooth out all folds with the tips of your nails or scissors. It is important to achieve rigidity and understand the principle of how to make a Christmas tree from colored paper. Now carefully straighten the tier without straightening the resulting accordion. As a result, you should end up with a cone that looks like a wavy skirt. Do this with all the circles.

You can assemble the resulting tiers on a skewer placed in a cork and fixed there with a solution of alabaster or ordinary plasticine. Attach beads, rain or other light decoration to the paws. As a star, you can use a large shiny bead that will hide the tip of the wire or skewer.
A Christmas tree that even a child can handle
Crafts with children are the best way to spend quiet time family circle. A modern 2D Christmas tree made from children's handprints is very easy to make; even schoolchildren can figure out how to make a Christmas tree out of paper. Give your child colored paper and have him trace his hands. The more prints you make, the more magnificent the Christmas tree will be. You can do this with the whole family: trace the palm of the child, mother, father. Involve grandparents in this matter. Think of the activity not as decorating, but as a family reunion.
Cut out the resulting prints and place them either on a large piece of whatman paper, or by attaching them with glue one to one in the form of a cone, fingers down. A paper Christmas tree looks very nice on the wall. We figured out how to do it, now let’s talk about how to decorate it. To make it a masterpiece, use colorful paper, buttons, bows, hairpins, etc.
Christmas tree from a magazine
Surely everyone has a stack of magazines hidden somewhere that you are unlikely to use for their intended purpose. Fold all the pages into triangles, then turn the magazine inside out and glue the two outer pages together. The big advantage of such a Christmas tree is that it does not need any decor. Aesthetic appeal is achieved beautiful drawings that were on the pages.

The second option is also made from an old magazine. Instead of folding the pages, cut them according to the template same pattern, for example, in the form of several traditional triangles.
Christmas tree using quilling technique
Thanks to the quilling technique, a unique carved paper Christmas tree is obtained. They will tell you how to make lovely curls in master classes on this art. You can understand the secret in a few hours; a specialist will help you create a unique designer beauty.
Get creative with your kids. They can then take it to school and participate in a winter craft competition.
Useful tips
From paper you can make a huge number of different Christmas trees , one is more beautiful than the other. You just need a few simple tools, which can be found at home or in any office supply store, a little time and imagination.
On our website you will also find:
- 20 small DIY Christmas trees that will decorate any home
- DIY Christmas tree toys
Here are some of the most interesting ideas for turning paper into a beautiful Christmas tree:
Christmas tree made of paper (photo instructions)


Origami Christmas tree (diagram)


Video instruction:
DIY paper Christmas tree: cardboard cylinders from toilet paper


Video instruction:
Christmas tree made of green paper

Video instruction:
Christmas tree made of corrugated paper


Craft "Christmas tree" from paper (video instructions)
How to make an origami Christmas tree out of paper (video)
How to make a Christmas tree from paper strips with your own hands

You will need:
Colored cardstock or green colored/wrapping paper
Tape (in in this example its width is 6 mm and length 25 cm)
Thin brush
1 bead bright color(in this example, golden)
Several beads of a different color (in this example there are 12 brown beads)
Scissors
Ruler
Pencil
1. Draw and cut strips of colored cardboard 4 cm wide and long: 8, 10, 12, 14, 16 and 18 cm.


2. Using the tip of scissors or a needle, make 3 holes in each strip: 1 on the right, 1 on the left and 1 in the middle.


3. Take a thin pipe cleaner and make a small loop at one end.


4. Start threading a thin pipe cleaner through all the holes in the paper strips. Start with the most long strip and add the next one in descending order. Add 2 beads between each strip.
5. When everything paper strips used, add 1 bright bead to the top of the tree.


6. Make a loop at the end of the pipe cleaner so that the craft can be hung. Cut off the excess part of the pipe cleaner.
7. Thread the ribbon through the loop and tie the ends into a knot.
Volumetric Christmas tree made of paper for children

You will need:
Scissors
A compass or several round objects of different diameters (saucers and plates, for example)
Wooden bead and sandpaper (if desired)
A skewer or any flat, thin stick.
1. Draw several circles of different sizes on paper and cut them out.

2. Fold each circle in half, in half again, and in half again.


3. Using scissors, cut off the tip of each folded circle.


4. When all the circles are ready, unfold them and start threading them onto a skewer, starting with the large circle and ending with the small one.

5. Insert the skewer into the wooden bead and sandpaper make the bottom side of the bead more even so that the tree stands better.
*Instead of a bead you can make cardboard platform for the Christmas tree. Simply cut out a square or circle from thick cardboard and insert a skewer into it. For reliability, you can glue several cardboard circles and then insert a skewer into them.
DIY paper Christmas tree. We use old magazines.

You will need:
2 magazines
PVA glue
5 wine corks(optional)
Aerosol paint (optional).
Below is a video instruction
1. Fold each journal page as shown in the pictures. Bend the lower end and hide it inside.


2. Repeat the process until all pages are folded. You will end up with half a Christmas tree.
3. To make a full-fledged Christmas tree, take a second magazine and fold its pages in the same way as before.
4. Glue both halves together.

5. If you wish, you can make a tree trunk; to do this, glue 5 wine corks and glue them to your paper Christmas tree.
6. You can decorate the Christmas tree with beads on thin wire, tinsel or other small decorations.
Video instruction
Christmas tree made of colored paper (master class)

You will need:
Thick cardboard or fiberboard
PVA glue, super glue or hot glue
Colored cardboard (can be with patterns and ornaments).
1. Cut a rectangle from cardboard, which should be slightly larger than the base of the future Christmas tree.
2. Stick a skewer into the cardboard and secure it with glue.


3. Cut out several circles from colored cardboard different sizes and colors, 3 circles in each group. Make a small hole in the center of each circle.
4. Add a drop of glue to each hole and begin threading circles onto the skewer, starting with the largest ones. The distance between circles can be up to 1 cm.
5. Cut out a star from cardboard and glue it to the top of the tree.
Do-it-yourself volumetric Christmas tree made from old paper

You will need:
Cardboard or foam cone
PVA glue or hot glue
Scissors
Pencil
Compasses or round object (plate, saucer)
Decorations (bells, beads, tinsel).
1. Draw several circles of the same size on a newspaper and cut them out.

2. Fold each circle in half and in half again.

3. To make the base of the tree, you need to cut out some squares, fold them into triangles and glue them exactly to the base of the cone as shown in the image.

4. To cover the top of the cone with paper, simply glue a piece of newspaper to it (see image).

5. Start covering the cone with folded circles of newspaper, starting at the bottom and working your way up to the top (see image).

6. Glue a bell, star, or other decoration to the top of your head. You can glue small tinsel around the tree Christmas decorations or just a bright ribbon or lace.
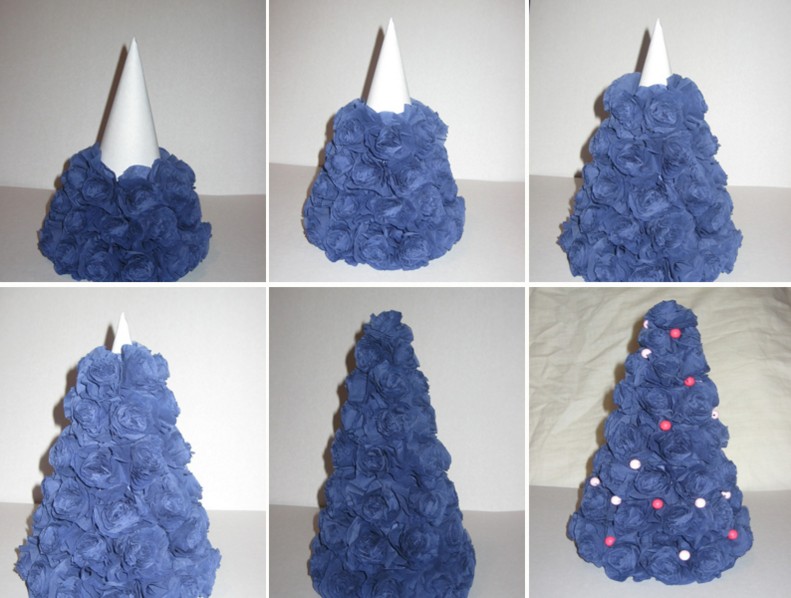
Beautiful paper Christmas tree with roses for the New Year

You will need:
Old newspaper or unwanted book
PVA glue
Scissors
Beads (optional).
To learn how to make these roses, go to HERE .
1. Make a cone out of paper and make a lot of roses - several large ones for the base of the cone, medium ones for the central part, and small ones for the top part.
* If you purchased a foam cone, then you need to cover it with pieces of newspaper (see image).

2. Start gluing paper roses towards the cone, starting from the bottom of the cone and moving towards the top of the head.


3. If you wish, you can glue 1 bead into the center of the roses - this way you can decorate all the roses or just some.
4. You can add another decoration to the top of your head - it could be a piece of tinsel, a bell or a star.
*If you want to learn how to make a star, go to HERE .
Christmas tree made of paper (step by step)

You will need:
Colored paper, colored cardboard, old music book or unwanted book
PVA glue
Curly scissors and simple scissors
Thick cardboard
Glue brush (optional)
Decorations (sequins, bows, beads, buttons, stars).

1. Cut out a platform for the future Christmas tree from cardboard.
2. Insert the skewer into the cardboard platform and secure it with glue.
3. Start cutting out squares from paper. It will be more beautiful if you cut with curly scissors (they can be found in office supplies).
* You need to cut 9-10 squares - first 9 squares with a side of 20 cm, then 9 with a side of 18 cm and so on, reducing each group of squares by 2 cm.
*Choose the total number of squares yourself. You can also choose the size of the squares yourself - if your tree is tall, then you can reduce the size of the next group of squares by more than 2 cm, and if it is short, then less - 1-0.5 cm.
4. Cut out several small squares from cardboard that will be located between the squares of colored paper.

5. Start stringing 3-4 squares of colored paper, with a small cardboard square between them.
* If you use 3 squares between cardboard pieces, it is most convenient to cut out 9 squares of each size.
*You can attach the squares to a skewer using glue.
6. To decorate the Christmas tree, you can carefully apply with a brush Apply a little glue to the ends of the squares, then carefully sprinkle glitter on them.
7. On the top of your head you can glue a button with a bow or something else - a star or a bead, for example.
Original DIY Christmas tree made from colored Japanese paper

You will need:
Colored cardboard
Thick paper with a pattern (can be replaced with colored cardboard)
Colored or wrapping paper (you can use a page from an old magazine)
White list A4 paper
2 skewers
Pencil and ruler
PVA glue or glue stick
Scissors
Darning needle (if necessary).
1. Cut out 14 rectangles of 2 of the same size from colored cardboard. In this example, 2 rectangles have a size of 21 x 28 cm, two more have a size of 18 x 28 cm, then (also 2 each): 16 x 28 cm, 13.5 x 26 cm, 12 x 26 cm, 9 x 25 cm, and 6 x 22 cm.
2. Preparing the base for the Christmas tree:
Plain paper A4 size cut into strips 2 cm wide. Twist the strip into a circle, add a little glue at its end and glue the next strip (see image). Repeat the same action until you have glued all the strips into one big circle diameter 3.5 cm.

* The larger the circle, the more stable the tree will stand.
3. Take a large rectangle of colored cardboard and start folding it like an accordion, 1.5 cm wide. Cut the ends of the accordion into a rounded shape.

4. Fold the accordion in half and glue the sides - you have a semicircle.

5. Repeat the same with the second rectangle, then glue two semicircles to form a circle - these will be the branches of the lower level of the tree.

* To secure the halves of one circle, you can thread a thin wire through them and twist its ends on the reverse side.

6. Do similar images 6 more levels of your Christmas tree.
7. Take a colored or wrapping paper and cut off several small rectangles from it, about 2 cm wide, with which you will later cover the skewers.
The skewers will play the role of the tree trunk.
8. Thread the skewers through one large circle. Since you need to leave gaps of about 2 cm between the circles, these gaps need to be hidden, so we will wrap them in small rectangles of colored paper.

9. After each circle, wrap the skewers in colored paper, 2 cm wide, and glue the ends together. Continue to repeat this step until all the tree branches are on the skewers.
10. It remains to insert the skewers into round base(see point 2) and secure them with glue.

* You can decorate the top of the Christmas tree to your taste - paper star, bead or button.
Large Christmas tree made of paper

You will need:
Sheets of green paper (preferably 2 shades - lighter ones will be at the top of the tree, and darker ones at its base)
Cardboard cylinder 2 pcs. (from paper towels)
PVA glue or hot glue
Scotch tape (if necessary)
Big bow.

1. From green sheets of paper you need to roll many cones of approximately the same size. Secure the edges of the cones with tape or glue to prevent the cones from unraveling.

* Try to ensure that all cones are attached with tape or glued with glue in the same place so that they are not visible when creating the Christmas tree.
2. Glue two cardboard cylinders together so that the tree can grow tall.

3. Draw lines on the cylinders at equal distances from each other so that the cones can be glued evenly.
4. Start folding the tree. Apply glue to the tip of one cone and press it to the cylinder, or rather to the drawn line. It's better to start gluing the cones from the bottom up.

* Glue so that the cone hole is on the side of the cylinder (i.e. tree trunk).
5. Glue the entire row of cones, pressing them tightly together and, if necessary, gluing them together.
6. Move higher and glue the next row of cones. But you shouldn’t glue cones to the top of your head.

For the top of the tree, it is best to glue several cones together. Stick to them big bow and “put” this entire structure onto the cylinder. It is not necessary to glue it.


Approaching family celebration New Year– time to receive and give gifts, joy, care, good mood. This event brings families together, brings peace and comfort to homes. The attributes of the New Year are multifaceted. Perhaps one of the main symbols of the holiday is fluffy beauty and the keeper of gifts - the Christmas tree. A spruce craft made by a child’s hands is especially valuable. I suggest you spend productive time with your child and “create” together an original paper Christmas tree for the coming New Year.
Festive Christmas tree made of scrap paper
You can make such a Christmas tree together with preschoolers, and younger schoolchildren can be trusted to create independently. It’s even better if children take on making this decoration. different ages. Collaborative creativity develops thinking and Creative skills and also strengthens relationships.
For work we will need:
- scrap paper green shades- with large and small ornaments in six colors;
- paper scissors,
- glue,
- double sided tape,
- stapler,
- two sushi chopsticks,
- decoration for the top of the Christmas tree.
First you need to prepare paper. Sort out the colors, alternate large patterns with small ones, bright colors- with dull ones. For the “layers” we take a neutral color (for us it’s blue paper).
For the first layer, we take a full sheet of paper, for the second, we cut off a couple of centimeters from the side of the sheet, for the third, another couple of centimeters, and so on.

We fold our blanks like an accordion, find the middle and fold them too. From blue paper we cut out four strips about 3.5 cm wide.

Now we fix the edges of the accordions, opening our “fans” in a full circle. We staple or glue, but be sure to leave holes in the middle for putting on sticks.
We twist the strips into tubes, but do not glue them together.

Now we begin the assembly. Lubricate the middle of the largest (bottom) layer and glue the bases of the sticks. At the very “root” we wrap the “trunk” once with tape, and on top with one of the blue tubes. Glue the edge.

We repeat the same with the remaining layers - we place a corrugated circle, secure it with tape and a tube. After the last, topmost layer, a tube is not needed, you will just need to decorate it with a snowflake made of foil, a decorative paper clip (like ours) or make a star from sculptural plasticine and paint it with shiny paint. The Christmas tree will look even more festive if you spray it with a special shiny hairspray.

This Christmas tree can be used to decorate a window sill at home, a shelf in a library, or can be taken to kindergarten to the holiday exhibition.
Elegant Christmas tree made of paper by the hands of a child

You will need:
- whatman;
- white sheets of paper A-4;
- double-sided colored paper (2-3 colors);
- mother of pearl beads;
- green rain;
- PVA glue;
- stapler;
- pin;
- scissors.
Completing of the work:
1. You need to decide on the height of your future product and cut out a rectangle from whatman paper of the appropriate size. I was size A-4.
2. Fold the resulting sheet in half and draw half a drop, so that in the end you can make a cone (without a bottom) from the cut-out blank, twisting the paper like a homemade cup for seeds and gluing the edges with glue.

3. The cone must be “transformed” into a pyramid by pressing it to the surface, then perpendicularly again, so that the figure has 4 sides.

4. Cut off the “antennae” of the rain - the more, the fluffier and brighter your Christmas tree will be.

5. From white A-4 sheets we make an “accordion” (you need one piece for each wall). Place the paper horizontally with the longer side.
6. Glue the accordions to the sides of the pyramid, applying glue only to the outer sections of the paper.

7. The result is a figure that doesn’t look like a Christmas tree at all - it’s too voluminous and not collected. To achieve the result, you need to beautifully distribute the accordions and fix the paper with glue at the top of the cone, pressing it down with a clothespin for a couple of minutes.
8. Now it’s the rain’s turn – coat the Christmas tree blank with glue with a brush and sprinkle plenty of “needles” on top. If necessary, repeat again on top of the already attached antennae for thickness.

9. Decorate finished Christmas tree it can be done in different ways. In the presented version, double-sided pink and yellow colored paper was cut into squares, then it had to be crushed, a pearl attached inside and such a decoration glued to the Christmas tree. We did the same with candy wrappers, only without the beads. It turned out unusual.

My 4-year-old son was my assistant - the child really liked it, he got carried away and even made a sleigh for Santa Claus in the end according to his own design.

In every home, people decorate spruce and pine trees for the New Year. You won’t surprise anyone with a living tree or a plastic one, but you can complement the interior with an original analogue, made from scrap materials with your own hands, and especially valuable - by the hands of a child.
Preparing for the New Year is the most fabulous time for children and adults. Create the atmosphere of a fairy tale, decorate the house, write a letter to Santa Claus, and of course, spend time together with the children. Prepare crafts as gifts for grandparents, relatives, and decorate your parents’ office desk.
Christmas tree made of green corrugated paper
Such a Christmas tree will become good decoration, will create a festive mood. Materials required for work:
- cardboard,
- green corrugated paper,
- glue stick or PVA,
- scissors,
- pencil,
- compass,
- hot glue,
- beads,
- glitter,
- Polish for hair,
- large brush for painting.

The base will be cardboard; its color does not matter. Using a compass, draw a circle; the height of the Christmas tree will depend on its size.

Unfold the corrugated paper, cut out a piece corresponding to the size of the cardboard circle, apply glue to the base and glue the green layer.

Now we need to make the future needles of the forest beauty. Cut the paper into strips 1 cm wide, fold them, and cut them. Apply glue to the edge of the paper to prevent the scroll from unrolling. For convenience, you should use a pencil, wrap a cut strip of paper 2-3 times around the rod, this will be enough.

The width of the needles (strips) should increase towards the bottom of the cone so that the craft looks harmonious. For bottom row needles need to be made into wider strips so that the needles are larger. Multiple shades can be used Green colour, alternate light with dark.

Grease the base of each scroll with glue and press well onto the cardboard. Allow time to dry. Then straighten the paper strips. All that remains is to decorate the Christmas tree and give it a festive look.

Warm up the hot-melt gun and insert the glue stick. Apply 1 small drop of glue to one side of the bead and glue. Distribute the decoration evenly throughout the tree.

Spray the tree with hairspray. Dip a paint brush into glitter and apply it to the craft. Then use hairspray again. This will set the shine.

Beautiful origami paper Christmas tree
This master class will show you how to make a Christmas tree out of paper using the origami technique. Simple scheme and an elegant Christmas tree will appeal to all lovers of clear lines and symmetry.
To work you will need very few materials and tools:
- colored paper;
- scissors;
- Ruler and pencil.
We measure the workpieces.
Cut out squares from colored paper. 2 squares of green and light green colored paper with a side equal to 19.5 cm. Cut out the remaining five squares from green paper with sides of 17.0 cm, 14.5 cm, 12.0 cm, 9.5 cm and 7.0 cm, respectively . If you want to make a big Christmas tree and have colored paper bigger size, then you can independently set the size of the squares by simply reducing the length of the side by 2.5 cm.

We fold the Christmas tree blanks.
Fold the green square diagonally.

Without turning the sheet over, bend the corners of the square towards the center.

Turn the square over and fold it in half twice.

Turning the sheet over again, fold it into a square-base smaller size. This square is the basis of many origami products.


Having unfolded the sheet, fold each side of the square to the middle of the square and fold only the fourth part of the line with right side as shown in the photo.


Roll up the base square. We place the corners marked with a cross inside the resulting trapezoid.


Making a tree trunk.
From a large light green square we fold the base square in the same way. To make the trunk narrower, we additionally bend the sides of the base square towards the diagonal in one direction.

Having unfolded the square completely, fold each side of the square to the middle from the middle of the square and bend the eighth part of the line on the right side as shown in the photo.

Again we fold the base square and bend the sides to the diagonal. We put the corners inward to make a trapezoid.

The result was a trunk and six parts of the tree crown.

We assemble a Christmas tree from parts.
We insert the tree trunk into the largest green part.


Similarly, like a pyramid, we collect the entire Christmas tree.

So I'm ready green tree from paper. It can be decorated and given as a New Year's gift, made two-colored or multi-colored, and glued to shelf branches artificial snow. By increasing the size and number of blanks for the crown parts, you can make trees of different heights.

Christmas tree with a surprise made of paper and cardboard

Christmas mood scatters around the world, capturing large city squares and small children's crafts. Beautiful Christmas tree made from colored paper will help to present a pleasant surprise friends, parents and neighbors. In honor of festive mood The evergreen beauty is ready to change her usual colors to any other fun and fantasy shades.

Necessary materials:
- Thick paper in two contrasting colors;
- A piece of cardboard for a template;
- Scissors;
- Hole puncher;
- Double-sided tape;
- Pencil and ruler;
- Attention and desire to create a surprise.
To cultivate paper spruce choose bright and beautiful shades. We will make a base from one color of paper, and the second will serve as an additional lace decoration.
A miniature craft should have neat and clear lines. Therefore, we begin work by making a template. Using a ruler and pencil, draw an isosceles triangle on the cardboard. The size of the blank depends on the parameters of the intended gift.

Based on this template, we construct the inner part of the Christmas tree, which consists of two triangles connected by a transition 2-3 cm wide. We cut out a solid symmetrical figure.

We cut off the additional cover of the Christmas tree by 0.5 cm at the top and bottom to slightly reveal the color of the paper of the main sheet. Then carefully use scissors to cut out a pair of spruce paws on each side. Branches can be located at different heights. A slight deviation from strict symmetry will add visual mischief to the Christmas tree. And a few clicks of the hole punch will give our New Year's tree stylized Christmas balls.

We secure the additional paper layer to the main one with double-sided tape. We cut two oblong strips for gluing the additional layer to the main one and one small piece for connecting the tops. If you don’t have suitable adhesive tape at hand, you can connect the parts with glue or a stapler.

Everything is ready, all that remains is to add the present: sweet surprise or a New Year's wish, or maybe something else. Beautiful colorful Christmas trees in New Year's Eve can be placed throughout the house so that everyone can accidentally stumble upon an original small gift.

If you find an error, please highlight a piece of text and click Ctrl+Enter.
New Year is the most fun and most children's party. Even adults are not afraid to look funny in red Santa hats and with a bunch of gifts. What can we say about the kids who, in this joyful chaos, are trying to take part in all the activities! The main attributes of the New Year are Santa Claus and a Christmas tree. Traditionally, a large Christmas tree is decorated with toys and tinsel, and round dances are performed around it. What if you make a non-traditional Christmas tree? A beautiful DIY paper Christmas tree will not claim a central place, but it can decorate a child’s room or become a souvenir gift. Believe me, such a Christmas tree will find its use. 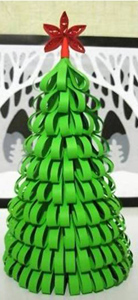
Done Christmas tree from paper, cardboard, colored and corrugated paper, tinsel and any other available materials. It’s easy and fun to do: the kids take part in the work with great pleasure. Two-year-old children, for example, can roll plasticine balls, which later become a toy, or glue a small part to the place indicated by adults. And the memories of joint crafts enough for a few days.
There are at least a dozen ways to make a paper Christmas tree with your own hands, but in any case you will need:
- Paper (colored, corrugated, thick - whatever)
- Pencil with ruler
- Glue and stapler
- Scissors
- Sometimes a compass
Model No. 1. Three-dimensional paper Christmas tree
First, the base of the tree is made - a cone. If the tree is planned to be large, the cone is made from whatman paper (it can be replaced with four A4 sheets glued together). Mark the center in the center of the wide side, draw lines from it to the two lower corners, cut it off (don’t forget to leave an allowance for gluing), cut off the semicircular base, glue it, check that it’s level. On this basis - the cone - you can make several different options Christmas trees It might work out big Christmas tree from paper, if you make a large cone, and a small one - on a small cone. A different ways making needles will generally be misleading: it may seem that these are different Christmas trees.
 To make the blank cone look like a Christmas tree, we make needles from colored paper. Traditionally, the needles are green, but you can assume that there is snow or frost on the branches - the choice of color is yours. We outline the rectangles: for the lower needles, the width of the rectangle is 7 cm. We make a trapezoid from the rectangle: the upper side is cut off. The wide side is folded into a triangle and fastened with a stapler or glue, the top side is convenient to glue to the cone.
 Volumetric needles can be replaced with circles glued to the top. If you cut out circles different shades green color, the tree will look more original.
The needles are glued in rows, starting from the bottom. To make the tree look beautiful, reduce the size of the needles every three rows. That is, we first draw rectangles 6.5 cm, then 6 cm and 5 cm. We decorate the top of the tree with a small cone, the bottom of which is cut off with triangles. If desired, the Christmas tree is decorated with sparkles. You can use ready-made glitter, or finely chop tinsel. Apply glue to the needles and sprinkle glitter on them.
The second version of the Christmas tree-cone
We build a frame, cut thin short strips from colored paper, and wrap each strip around a pencil. The stripes take on a curled appearance. With a certain skill, you can twist strips of paper with scissors: carefully draw the blade of open scissors from one end of the strip to the other, while simultaneously pulling out the strip. Glue the twisted strips to the cone. You can decorate the Christmas tree with anything: sparkles, bows, balls, stars.
The third version of the Christmas tree-cone
 We glue drop needles onto the prepared frame. We make needles from strips of green (or any other) paper, glue their ends together - we get a drop. We glue larger drops at the bottom of the cone, and smaller ones at the top.
The fourth version of the cone tree
Wide strips of paper cut into fringes are glued to the base. Again, the stripes are wider at the bottom (accordingly, the needles are longer), at the top the stripes are narrower. The color of the needles can be any: green will make it natural, multi-colored – decorative. We cut the strips into small “needles”, not cutting to the end of about 1.5-2 cm. After the glue has dried, the needles can be bent upward - carefully draw the blade of the scissors from the base of the needles to the ends. Such a Christmas tree made of corrugated paper will look beautiful.
Model No. 2. Christmas tree made of paper and cardboard
You will need double-sided cardboard. Fold a sheet of cardboard in half and draw the outline of the Christmas tree. We draw exactly the same outline on another sheet. We cut out both contours, then make slits along the axis to the middle: on one Christmas tree at the top, on the other at the bottom. We insert the parts into each other. We decorate with tinsel, balls (glass or paper), sparkles - whatever you like. The photo shows slotted toys.
A similar Christmas tree can be made from colored paper. It will require 4 sheets. Fold each sheet in half and cut out a triangle. We glue the resulting parts together and cut them at an angle with the needles. You need to tighten them before the glue dries.
Model No. 3. Christmas tree made of colored paper
 For this model you will need thick paper. It’s easy to do: cut out a triangle, fold it like an accordion, make through hole, into which we insert a stick-rod. To make the Christmas tree stable, a stick can be inserted, for example, into an eraser. This Christmas tree can become a small souvenir or decorate workplace. She will definitely create a New Year's mood.
Model No. 4. Christmas tree using papercraft technique
 The diagram clearly shows how such a Christmas tree is made from paper. You need to cut out several circles of different diameters (the bottom of the tree is from circles of larger diameter, the top is from circles of smaller diameter). Circles are drawn and cut, needles are folded. The finished tiers are strung on a rod. We decorate the Christmas tree with sparkles, beads, foil bows - the imagination is limitless.
Model No. 5. Folding Christmas tree

For such a Christmas tree, several circles of different diameters are cut out. The diameter and number of circles depends on the desired size of the Christmas tree. Fold each circle in half 4 times, unfold and straighten the circles. The trunk of the Christmas tree can be made from an old pencil, a cocktail straw, wooden stick– all this is wrapped in colored paper, the tip is glued. We cut a small hole in the center of each circle (it should be smaller than the diameter of the trunk to hold it tighter). We string circles in tiers onto the trunk, starting from the bottom. A stand for a Christmas tree can be made from a wooden spool, cork, a lid from plastic bottle, plasticine, glued together from thick paper.
Model No. 6. Paper origami - Christmas tree
This popular technique can be used to make any figures, including Christmas trees. The video will demonstrate better than any words how a paper Christmas tree is made using the origami technique. We offer two options.
But the third option is more complicated.
Model No. 7. Christmas tree in a hurry.
For this Christmas tree you will need a color printer, paper, scissors with glue, hands and a few minutes of free time. We print a Christmas tree template from paper, cut it out, fold it, and glue it together.

