Star news


Paper towel holder made from newspaper tubes. Weaving newspaper tubes for beginners step by step How to make newspaper tubes
Many people use paper towels, mainly in the kitchen. I suggest making a holder for them from newspaper tubes. This is an easy and necessary craft; on the one hand, you will make the right thing to use, and on the other hand, you will develop your skills in this area of creativity. The holder will decorate the kitchen; with its help, the paper will have its place, and not lie anywhere. As always, we will need newspaper tubes and glue, as well as a cardboard tube for the barrel.

Immediately twist a small plug.

We insert it into the tube after smearing the plug and the inside of the hole with glue.

Gradually coat the entire tube with PVA glue and wrap newspaper tubes around it.

We make a base on which the entire holder will stand. Decide when to stop, but you can’t make it too small, otherwise it will fall, and too big will be cumbersome.

Something like this, the base is made relative to the height of the trunk.

As always, we stain the entire homemade product with stain.

When everything is dry, place a roll of paper towels on the holder. The most important thing is convenient and practical.

- this is a new type of needlework, having mastered which you will be able to create real masterpieces. Modern craftswomen weave not only paper baskets, but also beautiful animals, ships with sails, doll houses and even bird feeders. We advise beginners to first master the technique of twisting the tubes themselves, and then try to make a stand for notebooks from newspapers.
How to make newspaper tubes
Completely different types of paper are suitable for preparing tubes. The ideal option is a clean office one, since it is non-toxic and it is much easier to repaint it in any other color. To work you will need a knitting needle, scissors and glue. Cut a sheet of paper into strips from 7 to 13 cm wide. The longer the tube, the better, otherwise you will have to constantly extend it. At the same time, remember that strips that are too long are also difficult to twist.
Watch the video: How to twist newspaper tubes
Now take a knitting needle and start winding a strip of paper onto it from the bottom corner. In this way you need to completely wind the paper onto the knitting needle. Don't forget to fix the edge with glue and pull out the knitting needle. You can paint the tubes right away. It is best to store them in an upright position so that they do not become wrinkled until the time you start making the craft.
Master class: Stand for pencils or notebooks
Make enough tubes from office paper or newspapers. Using a pen, mark on the cardboard bottom the location for the tube stands. It is important to do this under a ruler so that the finished craft is beautiful. To make gluing easier, take double-sided tape and stick it to the bottom. Then apply the prepared tubes according to the markings. Apply pva glue on top and glue the second part of the base. As a result, you will have a beautiful blank for the bottom of the stand and 4 stand-up tubes on the narrow side, and 9 tubes for weaving on the wide side.

The workpiece should dry well, and then you can proceed to further weaving. For beauty, you can braid the base with a beautiful lace or braid of a suitable color. Or take a newspaper tube and braid the bottom in a simple way. Now lift all the racks up. To do this, place the tube under two adjacent ones and lift it up. Using a knitting needle, you can lift and secure the two remaining tubes.

Then take two newspaper tubes again and braid the posts with rope. Using this method, you will need to braid about 9 rows, and then change the angle of inclination in order to make an openwork element.


Ready-made tube stand
Also see :


Basket and ship
At first glance it may seem complicated making baskets or stands from newspaper tubes. But if you get the hang of weaving them correctly and carefully, then your very first craft will be quite beautiful.
A stand woven from paper tubes for napkins and spices. The stand is made in the form of an open suitcase. Stylish accessory for the kitchen.
We will need:

You can see how to twist and extend tubes in my previous one. It also shows calico weaving in more detail.
Stages of work:
1. The bottom of the stand will be cardboard. It is necessary to cut two rectangles to the size of our shape (photo 1).
Let's draw one of the rectangles. The distance between the strips is approximately 1.5 cm (photo 2). Then we glue strips of double-sided tape along the edges (photo 3). And, guided by the stripes, we will glue the tubes - these will be the racks (photo 4). Lubricate the surface well with glue (photo 5).
Cover everything with a second piece of cardboard (photo 6) and place it under a press. With my glue, a few hours were enough for everything to stick together well. If you glue it with PVA glue, it is better to leave it under pressure overnight.
2. Now let's weave. First, let's braid the bottom in a circle. We take the working tube (the working tubes must be wet), bend it in half (photo 7), place it on the racks (photo 8) and weave it with a rope, as in photo 9. When finished, bend the working tubes so that they do not interfere (photo 10).
We raise the racks, as in photo 11. The white tube is temporary; the last rack in the circle will stand in its place. When raising the posts, pay attention to the corners; the corner post should rise at the level of the corner (photo 12).
The stands were raised and the working tubes were returned to their place (photo 13). We insert the shape from which the bottom was cut out and braid it with a “rope” (photo 14). We braid the corners as shown in photos 15 and 16.
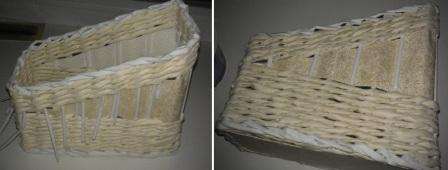
3. We weave it to the desired height (mine is 4.5 cm) and move on to the pocket. On one side we lower the racks horizontally (photo 17, 18). And next to each lowered rack we insert additional racks (photo 19, 20). In the photo, the end posts are not inserted, but as work progresses I will add them too.
Now we will weave the bottom of the pocket on bent posts. We weave the first row into a “rope” with two tubes (photo 21, 22).
At the end of the first row, we leave one end of the tube sticking out, and bend the second (photo 23) and weave it with calico weaving. At the end of the row, leave the end of the tube and glue a new tube for the third row (photo 24). We continue to weave with calico weave. It should look like in photos 25 and 26. We added two racks to the left and right. I ended up with about 3.5 cm of weaving.
Here you can weave without a form, but since I have a construction set and it’s not difficult for me to build a form, I use this form. In photo 29 you can see that I press the side posts against the corner ones and secure them with a clothespin (so on both sides).
At the corners, when the working tube passes behind the stand, we draw it around the stand (photo 32).
The higher the weave, the smaller the distance between the posts on the side walls, so I start braiding the two outer posts together (photo 33).
When the side posts are already pressed tightly against each other, I cut off one of them (photo 34).
Before weaving the last row, I cut off the corner posts (photo 35). I add a second tube to the working tube (I glue it to the stand - photo 36). I weave the last row with a rope and at the end I cut the tubes and hide the ends to the stand (photo 37).
We cut the racks and fill them (photo 39-41).
Photos 42, 43 – this is what our work looks like at this stage.
Apply glue to the bend (photo 48). It is left to dry, and we will move on to the front post of the pocket.
5. Let's return to the pocket. Now you can see that I also added the outer pillars. I glued a tube and a chintz braid to the post on the left (photo 49, 50). At a height of 4.5 cm, I finish the weaving, cut the tube and tuck it to the outer stand (photo 51, 52).
Then I cross the posts as in photo 53 and secure them with clothespins. We continue to weave with a “rope”, substituting a tube (photo 7, 8). We move to the second row and again weave with a “rope” (photo 54-56).
At the end of the second row, we cut off the working tubes and tuck the ends. We cut off the posts, except for the outer ones. We coat the “stumps” with PVA glue. And then we immediately cut off the ends of the posts that we previously bent if the glue has dried (photo 57).
We bend the outer posts that are left sticking out and glue them, as in photo 58.
6. When the glue dries, we prime the work. You can use a primer or PVA glue + water 1:1.
Let it dry well and cover it with dark paint. I added a brown tint to the white paint (photo 59).
The paint has dried, we begin to apply the patina. We do this with light paint using a sponge. Finally, we coat the work with varnish (photo 60).
To make our stand look like a suitcase, we glue straps and a handle to it. Here you can already dream up!
Create your own miniature kitchen suitcase!
Anastasia Yata

