Star News


Paper crafts and how to make them. Russian paper oven
We all made applications from colored paper in childhood. kindergarten, V primary school and at home with mothers and grandmothers. Such crafts are also made with pleasure by modern children, joining the arts and crafts and learning to create and embody their fantasies.
Umbrella
If you want to make a simple but original application with your child, then you can recommend a voluminous one in the form of a postcard with an umbrella as an option.
For such crafts from colored paper with your own hands you will need:
- colored paper;
- "eyes" for toys;
- A4 office paper;
- glue stick;
- scotch.
Operating procedure:
- fold a sheet of white paper in half;
- on the right half stick a triangle of colored paper of any bright color, which will depict the dress;
- draw a nose and mouth on a beige paper mug;
- stick a face so as to hide the upper corner of the triangle;
- draw hair, arms and legs;
- stick "eyes";
- take a rectangle of colored paper measuring 5 by 10 cm;
- fold it like an accordion along the long side;
- fold in half;
- connect the edges that are on the last fold of the accordion with tape (see the figure);
- glue the free edge of the accordion to the fold of a white postcard sheet;
- draw an umbrella handle;
- depict streams of rain.

Peacock
Children always really like crafts made of colored paper, made in the form of animals with their own hands. For example, you can easily make a voluminous peacock.
For this you need:
- cut out the silhouette of a peacock from dark blue colored paper;
- glue the beak in the form of a small yellow triangle and draw or stick eyes on the bird's head;
- cut long strips of colored paper 1 cm wide in the amount of 8 pcs. each color (purple 16 cm long, green 13 cm, yellow 10 cm);
- glue the ends of the yellow strip;
- do the same with all other parts of the same color;
- glue on one of the yellow “drops” from above, first the ends of the green strip, and then the purple one;
- assemble a tail from eight received parts;
- stick the silhouette of a peacock on top;
- attach a ribbon with a piece of adhesive tape so that the craft can be hung on a wall or Christmas tree.

Christmas garland
Even 100 years ago, Christmas trees were decorated with children's crafts made of colored paper. It is very easy to make them with your own hands. For example, you can assemble a garland of dancing ballerinas.
To make one such figurine, you must first make a skirt. To do this, an A4 sheet of white or colored paper is folded so as to get a square. The excess part is cut off, and the square is folded three times diagonally. Cut off one of the outer corners in a semicircle and cut out small triangles, as when they do paper snowflakes. Then the silhouette of a ballerina is cut out with joined hands raised up and two protrusions at waist level. An incision is made in the center of the skirt and the head and hands of the dancer are set into it so that the skirt remains on the ledges and does not slip off the figure. They take New Year's rain and thread it through the hands of ballerinas. All! The garland is ready.

Such crafts from colored paper, do-it-yourself flowers can be made by the whole group in kindergarten. They are very original and will become unusual decoration for the New Year's room.
DIY colored paper crafts for beloved mothers and grandmothers
Each mother carefully keeps the simple gifts that her children gave her when they were small and tried to express their love by diligently drawing or carving figures and making colorful compositions from them.
Most often, DIY colored paper crafts on March 8 are made in the form of postcards decorated with flowers.
For example, you can try to make a volume version.
You will need a piece of cardboard white color, several sheets of plain colored paper, glue stick, yellow marker.
Order of execution:
- cardboard is folded in half;
- cut out 7 flowers different colors, each of 6 petals;
- fold each part so that three folds are obtained, through the center of the flower;
- cut out several sharp sheets of green paper;
- stick a flower on the fold of a sheet of cardboard;
- the remaining 6 flowers and leaves are glued around;
- stamens of flowers are drawn with a marker;
- fold the card so that the flowers fold along the folds;
- the number 8 and letters cut out of paper of different colors are pasted onto the cover of the card so that they form the word "March".

Beautiful do-it-yourself colored paper crafts for the celebration of Valentine's Day
The art of gluing paper figures was originally considered adult entertainment. In particular, even today you can see, for example, crafts on the theme of a completely “adult” Valentine's Day.
For example, you can make very beautiful heart. You will need a piece of cardboard, PVA glue, scissors and colored paper different shades Red.
Operating procedure:
- a heart 20 by 20 cm in size is cut out of cardboard;
- cut colored corrugated paper into many squares 2 by 2 cm in size;
- a heart is cut symmetrically from the middle of the first heart smaller so that a kind of frame is obtained;
- lubricate a small area of \u200b\u200bthe heart with an emulsion;
- a toothpick is inserted into the center of the paper square and, lifting its corners up and towards the center, glue the square on the heart;
- do the same with all other details until the whole heart is pasted over so that the base is not visible.

In this style, you can also arrange letters that form the word LOVE, or write your own names. All these crafts are also suitable for decorating the hall for a wedding banquet.
Owl postcard
An interesting gift for any occasion can be made using the usual application technique, which even the smallest children can master. For such a do-it-yourself colored paper craft (instructions below), you only need a sheet of cardboard, scissors, a black marker and glue, as well as a printer on which you need to print an image of some kind of owl from a children's book.
Operating procedure:
- a sheet of cardboard is folded so that two flaps are obtained in front, converging in the middle;
- stick brown paper on the doors;
- applied to the sash with a black line marker in order to give the appearance of a tree bark;
- cut the edges of the valves so that when folded it turns out to be a hollow;
- on inner surface crafts stick green paper;
- on a green background stick the silhouette of an owl, eyes, beak, etc.
If everything is done correctly, when folded, it will turn out that the bird looks out of the hollow.
Tree
original crafts from colored paper with your own hands (see photo below) can be made using a regular paper bag.

In its upper part, you need to make a small fringe and fold it so that you get a tree with branches on a square base. Next, straighten the branches and cut out red, orange and yellow leaves from paper. They need to be glued to the branches of the "tree" in order to form its crown.
Now you know what a variety of souvenirs you can make from colored paper with children, and you can organize their useful leisure time.
Paper crafts are one of the easiest, most interesting and popular areas of needlework. Paper allows both children and adults to create: Small child can make a small simple color application, A experienced craftswoman will create from it a picture of a masterpiece in the technique of quilling.
The industrial production of paper was mastered in the 18th century. With its appearance in wide access, the first crafts began to appear: postcards self made, applications, figurines from folded in a special way leaflets. How to make crafts from colored paper, children are now taught even in kindergarten, and every student will surely be able to build a paper plane and a boat, a flower from corrugated paper. However, often at this level, knowledge about paper crafts ends. Meanwhile, there are many techniques that allow you to create real paper masterpieces.
Technique for creating paper crafts
Depending on the desired result to make paper crafts, you can choose one of the following techniques:
- origami (creation paper figurines without the use of scissors, glue);
- kirigami (origami with glue);
- papier mache ( volumetric figures from pieces of paper, glue);
- quilling (crafts from thin twisted strips);
- facing (use of twisted squares in crafts);
- katagami (cutting pictures on paper using templates);
- Iris Folding (spiral layout of paper drawing);
- decoupage (decoration of items with paper);
- parchment (artistic perforation on parchment);
- collage (picture from paper pieces).
Some techniques have several subspecies, for example, origami can be classic, modular, wet, etc. Usage various techniques allows you to create your own unusual crafts from paper and cardboard, in particular, we recommend paying attention to. It is easy to learn how to make interesting paper projects with us, thanks to master classes in making paper crafts.
Choice of craft paper
To make paper crafts with your own hands, you need to choose the right source material. When choosing paper, consider:
- density (tracing paper, thin, thick paper, cardboard, etc.);
- structure (smooth, corrugated, perforated, etc.);
- softness (soft supple, medium, hard);
- color (double-sided, containing pictures, etc.).
So for classical technique origami uses medium-weight smooth paper with two-sided color. For papier-mâché, it is better to choose soft sheets of newspaper type, napkins. For quilling and trimming, double-sided thin paper is ideal.
How to learn paper craft
In fact, learning how to make paper crafts is easy. There are enough master classes on the Internet with diagrams and templates, detailed description actions. The best master classes presented free of charge on our website.
For the first paper art, it is better to choose simple model And step by step description by its execution. Compliance with the main principles - consistency, accuracy and clarity will allow paper master achieve success from the first craft.
For creating voluminous crafts you need to learn how to read diagrams from paper, but it's not difficult. Paper art is interesting in that it does not imply the presence of any special knowledge or skills. Everyone can master the technique of creating paper crafts.
We learn to make unpretentious paper crafts with our own hands in childhood. ship, airplane, christmas snowflake, a postcard to mom by March 8 - which of us has not made them at least once. Accessible and malleable material became the basis for the amazing art of origami, invented by the Japanese. About how to do under the tree from paper for home decoration, we will tell you.


papier mache bird

paper carousel

Cute paper dandelions
For crafts, you can use any paper. Colored sets for children's activities, corrugated sheets, paper napkins, cardboard - all these varieties make entertaining, useful and beautiful things for the home.
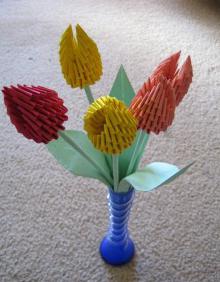
In do-it-yourself corrugated paper crafts, flowers look very beautiful and realistic. Rose petals from such paper are obtained like real ones. The same rose can be made in another way by cutting out thick paper spiral, and bending it outward.
All kinds of boxes, caskets, cardboard coasters will always find application in household. Children's favorite turntables fit perfectly into the environment suburban area. toys on Christmas tree cardboard can be made by the whole family, giving them the most original images.

Turntables for children
A traditional paper fan can become wings and a tail for a bird of paradise, and a cardboard cylinder can be toilet paper will successfully serve as the basis for the cockpit of an aircraft or the body of a dog.
The paper craft “daisy flowers” will look amazing, the production of which will take very little time. The middle of the flower can be made by wrapping a rolled ball of napkin with yellow paper. You should end up with a paper lollipop. Then wrap a strip cut out of corrugated paper several times around it and secure it with a thread. To give the flower a realistic look, shade the edges of the paper with a different color. Craftsmen who have been working with paper for a long time create amazing things. This and flower arrangements, and figurines of animals and birds, and picturesque panels.

Volumetric craft imitating rose petals
Advice! For serious work, with lots of details, such as chic paper peacocks and parrots, it is worth starting with a solid paper experience.

Decorative fans

tea bag house

Elegant envelope for the holiday
holiday decorations
openwork snowflake you won’t surprise anyone on the window, but if you want to stand out and bring pleasure to your guests, while spending a minimum of money, then you should master more complex designs.
paper garland - This universal decoration for New Years and birthdays. It can also become permanent. decorative element for a nursery or bedroom. Since our task is to teach you how to make paper crafts with your own hands, we will not only tell you, but also show you the entire manufacturing process.

garland links
Let's start with the preparation of tools and materials. We will need:
colored paper
Our goal is a flat chain garland. What do you need to assemble a chain? Of course, links. We will cut them out of colored paper.

3D chain garland

Multilayer colored paper garland
Important! Decide in advance what size links and chain length you need. Proceeding from this, prepare the amount of colored paper.
Let's get to work:
Fold a sheet of paper in half.
We draw on one side the shape of the link. It could be a circle elongated loop, square or heart, whatever you like.
The first link can be used as a template for subsequent parts, so as not to draw it every time.
Cut out the link along the outlined lines.
Having prepared enough links, we begin the assembly of the garland.
Glue both halves of the link.
We pass the next, not yet glued link into it, and then glue it as well.
We continue to assemble the garland to the length we need.
The whole family can take part in the work process. Distribute responsibilities and things will go faster.

Paper gift wrap

Newspaper roses with ombre effect

Colored paper balloons
paper application also applicable for greeting cards, and to create wall panels. And again, do-it-yourself colored paper crafts with step-by-step instructions are waiting for us.

Volume application from paper - heart
The easiest way is to cut a flower out of colored paper, stick it on White list and the application is ready. Even a child can complete such a picture, which he successfully does in labor lessons. For the creativity of an adult, we offer voluminous paper crafts, including applications.
This is the panel we should get.

Paper panel with terry effect
Let's prepare for work:
Colored paper (blue, yellow, green and brown).
Pencil.
A piece of cardboard for the base.
Since we have to create a paper and cardboard craft with our own hands, we will draw up a step-by-step instruction.
We line the paper into squares with a side of 2 cm.
Cut the paper into squares.
We take one square, put the sharp end of the pencil in its center and crumple the paper around the pencil. (In order not to tear the paper, blunt the pencil, and twist the canopy).
Having prepared a sufficient number of details, we proceed to the “writing out” of the panel.
We draw the borders of colored fragments on the cardboard.
We begin to fill them in by sticking the prepared squares. For ease of operation, we string the square on the finger, put a drop of glue on its bottom and press it against the cardboard.

DIY New Year's card

Thematic postcard as a gift to a needlewoman
In the same technique, you can perform more complex plot pictures. You can give this paper craft for a birthday or use it as a decor for a summer house or children's room.
Very beautiful crafts do-it-yourself paper can be made by replacing smooth sheets with soft napkins. In order to lay out a panel, you do not need scissors and a pencil, just crumple multi-colored napkins and draw a picture from shapeless spools.

Cardboard cake with gifts for guests

Decor for Valentine's Day

Gorgeous decorative shoes
Origami
If you want to decorate your house with paper figurines, you should pay attention to the ancient japanese art. Original origami paper crafts require care and patience when assembling.
Wedding bouquet of the bride
If you first decided to do origami, then it is better to start with simple designs. Here, for example, is how a swan is going. In addition to the scheme, we have compiled a step-by-step description for such a paper craft with our own hands.

Take a square sheet of paper of a size convenient for you.
Fold the sheet in half diagonally.
Bend in both directions and return to the starting position.
We bend the sides of the square adjacent to one corner to the central diagonal.
We make the wings of a swan by bending the tops of the resulting triangles at an angle.
Turn the folded sheet down and fold up diagonally.
We measure 1/3 of the length of its largest side to the base of the resulting triangle.
Now the left sharp corner must be turned inside out. Make sure that its sides form a right angle with the base.
We bend the top of the resulting small triangle 1 time to get the neck of a swan.
We get the tail of the swan by bending the right triangle of our workpiece in parallel. Fold them into an accordion and the figure is ready.
Please note that the first experience of assembling origami may not be ideal in execution. Don't worry, repeat the fold a few times to fill your hand.
Funny crafts for the summer with your own hands made of paper will help you decorate a summer gazebo or country house. And we offer you a practical video on creating a paper lamp:

Paper metropolis

Paper candlesticks

modular origami
Paper crafts - video
Both boys and girls of any preschool and junior school age love to design. Cubes and constructors, plasticine and paper - even the smallest children are drawn to the creation of the same tower of cubes. early classes parents or caregivers with children directly influence the development of their abilities.
Design helps shape figurative thinking, contributes to the improvement of hand motility, broadening one's horizons. At 3-4 years old, the child is already able to make paper easy craft. He is able to fold paper, learn to cut with scissors, create three-dimensional structures, do-it-yourself paper crafts. At the same time, accuracy and accuracy of movements develop.
The easiest way to keep a child busy with paper crafts without giving them dangerous scissors or glue is origami.
Introduction to origami
It is better to start the first origami lesson by creating the easiest paper crafts, the child's hand should get used to working with this material. Start by getting to know the simplest geometric figure- square. Try to tell on behalf of the square about what you can do with it. IN game form you can explain that it has sides and corners, and show the child how to find its center. Having taught how to fold triangles, a child can be shown how to make a composition from them, folding, for example, a Christmas tree. From a folded rectangle, you can make a door that can be glued onto a base prepared with the help of an adult in the form of a drawn house.

Gradually, tasks can become more difficult. From squares different sizes, turned into triangles, the child can be asked to fold the Christmas tree, expanding downwards. From a triangle and a rectangle folded by a child, you can construct a fungus. Origami-type paper craft templates can be found in special books. Below is

Origami for advanced masters
Origami Art - Appropriate creative occupation not only for children, but also for adults. It calms, creates a meditative mood, and eventually allows you to create a beautiful little thing with your own hands.
Modular origami is more difficult than primitive children's, but it also allows you to create not only simple crafts paper, but also more complex, voluminous compositions. Such creativity requires spatial imagination, perseverance and patience. The most popular direction of such origami is the creation of flowers. You can make a rose and a primrose - they will turn out bright, voluminous and elegant. In this form, origami paper is not only held by itself, due to friction. The craftsman may also resort to using glue to hold certain parts together, especially if we are talking about the manufacture of complex large structures.
Weaving from newspaper tubes
The art of weaving newspaper tubes became widespread relatively recently, but masters hand made already know how to create real masterpieces in this technique.
To twist the tube you need a newspaper, long needle, PVA glue, stationery or kitchen sharp knife. The newspaper spread is folded in half lengthwise and carefully cut with a knife. Then again fold and cut until you get four strips for four tubes. After that, they take a knitting needle and, applying it to the edge of the newspaper at a slight angle, begin to twist it gently. Having screwed it up to the end, a drop of PVA glue is applied to the corner, pressing lightly, the needle is taken out and the resulting tube is set aside until the glue dries. When weaving, the tubes must be held in order to give them the intended shape. Weaving starts with products small size, over time, taking into account and evaluating all the features of the material.
From newspaper tubes, baskets and caskets, photo frames and coasters for mugs, vases and wall panels. But a developed imagination allows you to use this material and type of technology almost unlimitedly.

quilling
Quilling is another type of paper craft that is gaining popularity. This is a technique of twisting in a spiral of narrow long strips paper with their subsequent modification to compose flat or three-dimensional compositions.
Quilling comes from Mediterranean Europe. This hobby is quite common in America, England and Germany. It is also called "paper filigree". Despite this name, the technique allows even a child to make simple paper crafts. Spirals of paper skillful hands turn into flowers and patterns used for decoration gift boxes, handmade postcards, albums, photo frames. Products made in are used as wall decorations, and even make jewelry out of them. This is a budget, beautiful and simple type of needlework.
In quilling, colored paper of special density is used. It is important that both sides and the cut itself be the same color, although paper with two different colors on both sides of the sheet.
Ready-made paper sets are sold in specialized stores, but you can also cut the strips yourself.

Facing
In this technique, you can make paper three-dimensional figures and images. For facing, thin and soft paper, for example, corrugated. Small squares are cut out of it, which are then folded into cones or funnels. The top of this cone is smeared with glue and glued to the base. Multi-colored cones glued to the base create a three-dimensional and beautiful panel. Thus, you can make a picture or a postcard, or you can create an interior topiary.
Iris Folding
This technique of paper art in Russia is not very common, but it has rich history and unlimited opportunities for self-expression. At its core, it is a folding technique. paper strips so that their pattern resembles a twisting spiral. The drawing is laid out from colored paper or paper with a pattern, carefully choosing shades to make it harmonious. From above, the resulting pattern is covered with a frame - a motif or silhouette cut out of paper. As a result, even a child can make light paper crafts - a beautiful panel or postcard.

Papier mache
Papier-mache is a simple and affordable technique with great potential for needlework. Caskets and caskets, vases and jewelry, theatrical props, dolls, figurines and animal figurines, toys, covers with painting, embossing and varnishing are made using this technique. Even interior decoration elements are made from papier-mâché: from decorative panels for walls and doors to architectural stucco for walls and ceilings. Frames for mirrors, candlesticks, lamps and even furniture made in papier-mâché technique are distinguished by their beauty and originality. However, even the lightest paper crafts can be made using this technique.
Papier-mache (French papier mâché) means "chewed or torn paper"The basis of papier-mâché is paper, which easily turns into a mass that can be molded. Glue, gypsum or starch are added to the composition of the mass.

Three techniques for making papier-mâché products
First way
A model of the product is being prepared, which will need to be pasted over with paper. It can be made of wood, clay, plasticine or plaster. The model can be smeared with glue and fixed under the layers of paper, or it can be removed from the paper layer, for which it is pre-coated with Vaseline. On the selected model with glue impose a torn wet paper. Alternating a layer of paper with a layer of glue, paste over with layers, the number of which can reach up to one hundred. Previously, a starch-based paste was used for gluing, but special glue is now available. Gluing paper in layers is called mashing.
Second way
The product is formed from liquid paper pulp, for which the paper is cut or torn into pieces and soaked a day before they plan to start work hot water. After that, the soaked mass is boiled. Then the water is squeezed out, pieces of paper are loosened and dried. The dry mass is mixed with chalk and a special glue from the mixture and starch paste is gradually poured into it until a dough with a soft and plastic structure is formed. Such paper dough is poured into a mold or applied to a product.
Third way
For this type of papier-mâché, you need hard cardboard and PVA glue. The method resembles plywood manufacturing technology. The model is made by gluing pieces of hard cardboard together. After that, the cardboard is subjected to pressure, specialists use brackets and a stapler to fix the glued plates, or a vice and clamps. Dried products are puttied, sanded, primed, and then painted and varnished or embossed.

Thus, paper is one of the most versatile, inexpensive and easy-to-use materials for creativity and needlework. You can make an easy craft out of paper, decorate your life, transform the interior, make original gift resembling a work of art.
One of the most popular materials for children's crafts is colored paper. Children's crafts made of colored paper perfectly develop imagination, perseverance and fine motor skills hands, besides this activity allows you to have fun.
The advantages of colored paper as a material for crafts can be listed and listed, but we will not waste time on this, but will immediately offer you best ideas colored paper crafts that can be realized with a child.


Crafts from children's palms
The child may enjoy doing various crafts from palms cut out of colored paper. Here there is really a fantasy where to roam! After all, very interesting works can turn out from the palms!

Crafts from circles
Another way to develop children's imagination. Invite the child to fold some shape from circles of colored paper. Circles can be glued whole or divided into halves.

As for ideas, the simplest thing is to make a snowman out of circles, you can also make animals, fish and birds. You will find photos of colored paper crafts both on our website and on the Internet.

Mosaic from colored paper
Very beautiful options do-it-yourself crafts are obtained from mosaics. You can download ready-made templates for laying out a mosaic or draw by hand.

The smallest children can be offered to tear off pieces of colored paper and stick on paper base with a template, older kids can cut neat squares with scissors.


Crafts from accordions of colored paper
Everything is simple here, you need to fold a sheet of colored paper with an accordion, and then straighten it a little and make a fish, a bird, a butterfly out of it.

These crafts can be independent, for example, glued to skewers, or can be used to original applications. Simple and interesting master Colored paper craft classes are easy to find.

Crafts from lumps of colored paper
A great way to develop fine motor skills of the baby's hands. For crafts, it is better to use thin colored paper, napkins or corrugated paper.

Just tear off pieces of paper and roll them into balls, and then stick them on the template with PVA glue. The works are beautiful and voluminous.


quilling
Older children can be offered to master the quilling technique, this is when a spring is rolled from thin strips of colored paper, using a knitting needle, pencil or thin stick, and then these fragments are made various compositions for postcards. Trains fine motor skills and perseverance.


Volumetric crafts from colored paper
Despite the fact that the paper is flat, you can make various volumetric crafts from it. For garlands and postcards, as a rule, several identical parts are cut out, folded in half, and then glued together in halves.

From the strips, you can make three-dimensional figures glued together according to the ring principle.

And another type of voluminous paper crafts is to print ready-made templates of 3D shapes, cut and glue them according to the instructions. Now they even sell entire albums with templates for voluminous paper figures, there are also detailed instructions how to make craft.

Colored paper garlands
Since we have touched on the topic of garlands, colored paper is ideal for these purposes. From it, you can most quickly make various figures, and at a price such a garland will come out much cheaper than if you use, say, felt, or corrugated paper.

Crafts from paper rings
Remember how we used to make long christmas garlands from rings? It turns out that from these rings you can make not only a chick, but also very interesting crafts: fruits, crowns of trees, hair for dolls drawn on a piece of paper, making voluminous snakes, lambs and other animals.


Colored paper postcards
Easy to make for the holidays various postcards from colored paper. Children 2-3 years old can do simple postcards in the form of an application, with older children you can already do complex work with volumetric elements. For example, here's how to do voluminous postcard with colored paper daisies.

Volumetric paper card with daisies
For crafts you will need:
- Colored paper, a sheet of cardboard, as well as a plain white sheet of office paper;
- Glue stick;
- Children's safety scissors.

First of all, you need to cut strips of white paper. To make the strips even, mark the same width, and then draw the cut lines with a ruler and a simple pencil.

Now, cut out circles from yellow paper - these will be the middle of our daisies. We return to the white stripes, we will make chamomile petals from them. We glue each strip with two ends in the form of a loop, and then glue it to the middle, which we made yellow.

When the chamomile is ready, you can cut out several leaves from green paper. For a postcard you will need 3-5 daisies. We make the card itself from any sheet of colored paper, fold it in half, and paste our daisies on it.


You can add a postcard with a butterfly. Butterfly cut out of bright paper. Butterfly templates are easy to find on the Internet. To make the butterfly also acquire volume, bend it in half and stick it on a postcard.

Postcard-application with a rabbit
The next postcard will be with a bunny, it can be made as a gift for Easter. From the materials you will need all the same, as well as doll eyes. By the way, I’ll tell you a little lower how you can make puppet eyes yourself.

According to the template, we cut out all the necessary elements of the postcard from paper: a muzzle of a bunny, two ears made of white paper. From pink paper, cut out a nose and a smaller silhouette of the ears. Cut out grass from green paper.

We collect the figure of a bunny on a sheet of brightly colored paper. Glue puppet eyes on the bunny and draw antennae with a felt-tip pen or ballpoint pen black color.

And now let's digress a little, I'll tell you how you can make puppet eyes for children's crafts on your own. They are made from an ordinary tablet plate, two cells are cut out, and beads, small beads or peppercorns can be used as pupils.

Origami
And the last type of colored paper crafts is origami. For beginners and small children there are simple circuits folding various shapes, for older children, you can suggest doing something more complicated.

For origami, it is best to use double-sided colored paper so that the pale side of the sheet does not “shine”. If your kid is seriously interested in this art, then you can purchase special paper for origami.

Photo of colored paper crafts


