Star news


Heart from origami diagram. Origami heart: how to fold a beautiful paper heart
The art of origami is very ancient; China is considered its homeland, and it developed in Japan. The Japanese believed that handmade paper figurines carried a piece of the soul. Making origami is useful and exciting activity, developing imagination and artistic taste. The heart is a symbol of love, hope, attention. It’s not without reason that an origami paper heart is one of the most original and desired gifts on Valentine’s Day.

Let's look at how to make a heart out of paper, its types and materials for making. Our master class, we hope, will help you with this. We will need: paper, ruler and good mood.
Origami consists of two directions: classical And modular. In the classic version, they create a simple paper figurine. The modular option focuses on creating complex compositions that can be connected with glue.
Classic options
Scheme classic version"Simple Heart":
- Take a square sheet of bright colored paper;
- We bend it diagonally twice - we get a triangle;
- Unbend the sheet;
- We alternately connect two opposite edges along the fold line;
- Bend the top edge so that it aligns with the center of the square;
- Place the bottom edge in the middle of the top part;
- We bend the right side of the heart up in the center;
- We do the left part in the same way;
- We bend the top and side sharp corners inward.

We offer another option - “Woven Heart”.
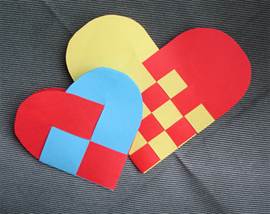
An original item for beginning craftsmen. You will need two sheets multi-colored paper, required sizes choose according to your taste. Fold each sheet in half and then fold them again. Now we cut the resulting blanks into narrow rectangles.

Then we round the sides of the rectangles opposite to the fold. We make cuts of the same length on the sides of the curve.

We thread the blanks through each other in a checkerboard pattern and decorate the top with ribbon.

Another simple and fast work, which is done in 10-20 minutes. To do this, you will need a heart-shaped template that you can draw yourself. To carefully cut out the workpiece, take a stationery knife, make a slit in the paper, and then work with small scissors. Then we trace the template along the contour thick paper. The number and color of hearts depend on your taste. We glue the cut out hearts on top of each other, aligning them in the center.
An interesting solution would be to stick heart templates of different sizes on top of each other, starting from the largest.

Origami heart with flower:

You will need white thick paper, measuring 15 by 30 cm, and a ruler.
We take the paper, bend the lower corners up, getting a triangle, and unbend it. We bend the upper corners down and straighten them. Accordion fold the paper along the fold lines. We bend the top corners down, the bottom corners up.
We bend the edges, straighten them, bend them towards the center. As a result, there are four small squares on the large square. We bend their side corners inward. Next, we bend the edges, straighten them, and bend them towards the center. We have a flower appearing. Turn the craft over so the flower is facing down and place the top corner on top of the bottom corner. We bend the side edges inward. Fold the bottom corner up to the top point and straighten it.
Then we lift the bottom edge up to the first fold line. The heart with the flower is ready!
More volume
Volumetric heart will be an excellent present, suitable for home interiors, it’s easy to make.

We will need a sheet of red paper.
Take the paper square shape. We bend the sheet in the middle and open it.

Bottom part We bend the sheet down 5-7 mm.

Fold the square in half on the other side. There is a fold at the top.

Align the bottom edge of the rectangle with the fold. A triangle has formed.

We form a triangle on the other side.

We turn the figure over.

We bend the edges of the triangles outward from the fold line, then unfold them. We do this to form creases.


We bend the lower outer corners towards the center.


We bend the inner edges outward and then put them into the resulting pockets.


Insert a pencil or stick into the top hole. We blow there and get our cherished heart.

A video on making a three-dimensional heart can be viewed here.
Do you want to be on trend? Start creating souvenirs in hand-made style. Try making a heart out of paper. Origami gifts are fun to give and create. There can be several options for such a souvenir: from the most basic, which even a child can master, to complex three-dimensional products.
Prepare everything you need
So, you decided to make a heart out of origami paper. The options don't require anything special. You will need the following:
- Paper, preferably thin one-sided or double-sided pink or red.
- Ruler, scissors, pencil to measure and cut blanks (squares) of the desired size.
- Schemes for folding products.
- A knitting needle or old ballpoint for tracing fold lines when using construction paper.
The last point is needed to ensure that the folds are smooth and neat. If you start folding cardboard or a thick sheet along the lines drawn only with a pencil, creases and unevenness may form. Using thin paper such difficulties will not arise.
Origami paper heart: voluminous and flat
Make a souvenir from this simple material absolutely possible different ways. The simplest thing is to fold a flat product that can be used as a “Valentine” or a decorative element. Once you have mastered this origami paper heart (the diagram is shown below), you can move on to creating more complex things - envelopes and heart-shaped boxes. This way you can create a whole set of gifts. Made from the same type of paper and similarly decorated, they will become a harmonious holiday souvenir set.
How to fold a flat heart
The diagram below shows how to make the simplest paper heart. Origami always involves folding the original sheet in several stages. There are few of them here, and they are all very clear.

If something is unclear in the picture, read the instructions, or even better, immediately take a square blank (can be from an unnecessary draft) and perform all the steps sequentially, as described below.
Work like this:
- Take a square blank. If the paper is single-sided, place the colored side away from you. In front of you is a white turnover. Fold the square in half on both sides so that you get two diagonals.
- Place the unfolded workpiece at an angle towards you. Fold the far corner towards you so that the vertex is in the center of the original square.
- Fold the corner closest to you to the middle of the one formed in the previous step. smooth edge above.
- Fold the lower right part of the resulting part to the middle of the top. Do the same with the left side.
- Round the sharp corners of the workpiece by tucking them in reverse side.
The heart is ready. You can glue a bow, write a congratulatory phrase - and the gift is created.
Flat heart: option No. 2
With this method, more steps will be required, but the product will have a smoother contour shape. You will also get a pocket in which you can put a piece of paper with congratulations and wishes. For work you will need a square blank. The size of the finished product will be four times smaller than the original sheet. This should be taken into account.

So, the work is done as follows:
- Place the square with the back facing you (if it is white and the face is colored).
- Fold it in half twice, but not diagonally as in the previous method, but parallel to the sides of the square.
- Fold the top side of the piece to the middle of the top half of the square.
- Flip object front side to yourself.
- Fold the top corners towards the middle of the piece. The lower sides of the resulting triangles should be 1/4 of the original workpiece vertically.
- Turn the workpiece over to the other side again.
- Fold the right and left parts of the workpiece to the center line.
- Fold the bottom corners up.
- Turn the workpiece vertically so that the corners folded in the previous step are at the top.
- Fold the piece in half so that the top corner (top) aligns with the bottom. Straighten the upper elements so that the workpiece takes the shape of a heart, and in the middle of the upper part you get a shape similar to a bow.
- Tuck the bottom corner of the top layer of the workpiece into the pocket that is the layer below.
- Fold in the top right and left corners to create a smoother shape.
- Fold the upper corners of the heart halves down. In the resulting pocket on this side you can insert a card with wishes, and on the front side, where only one middle “seam” is visible, glue additional decor, for example, in the form of eyes and a smile.
All is ready. Your product is completed.
Paper origami: volumetric heart (diagram)
The first version of a volumetric product is very simple. To do it, just print out the heart templates, cut them out, and then make a cut at the top of the middle line and glue the parts to the right and left of the cut. You will get convex hearts. You can use them to make a garland or other decoration.
Another way to get volumetric product- fold the previously prepared scan. This method makes it easy to make a box. An example of this option is shown in the following illustration.

It’s easy to draw a template for such a souvenir yourself. You can also use a ready-made box, slightly modifying the shape of the lid.
The assembly diagram is shown below volumetric boxes in the shape of a heart. By the same principle, only from the workpiece a little bigger size, you can make a lid that will fit on the bottom of the base.
Valentine's Day, popular among young people, is approaching, which means that on February 14, the red color and heart shape will be popular again. We offer three simple master class, guided by which you can do volumetric hearts from paper. Decorate the interior of your apartment, office with them, or simply give them as a gift to your loved ones and acquaintances!
Simple volumetric paper hearts
Look how original this wall decor looks!
In order to do decorative composition from hearts, prepare:
- sheets of colored paper (not necessarily only red);
- scissors;
- pencil;
- glue.
⇒ Step 1. Draw hearts on a piece of paper different sizes. You can use a template to keep the heart shape neat and correct. Use scissors to cut out each shape.

⇒ Step 2. Make a small cut in the upper part of the figure, slightly bend the edges inward. Apply a small amount of PVA glue on the edges.

⇒ Step 3. Use your fingers to grab the edges with glue and press them well together on the back side of the heart.

⇒ Step 4. Hold the glued edges for a couple of minutes.

⇒ Step 5. Repeat steps 2-4 with the remaining hearts.

You can first glue the hearts to a sheet of cardboard and then hang the composition on the wall. Or attach directly to the wall using double-sided tape. If convex shape heart prevents you from securely attaching it to the wall, stick a corner of paper on the inside, like this:

Volumetric origami hearts
The origami technique offers a lot of options for making various figures, including three-dimensional hearts. We have chosen for you the cutest, roundest and smoothest. This voluminous shape is achieved by... inflating the heart with air!

To work, you only need scissors and colored double-sided paper.
Detailed step-by-step instruction shown in the photographs below.
Fold a square piece of paper in half, then in half again and straighten it out.

Fold the corners as shown in the photographs. 

The final touch is to inflate the heart through the hole at the bottom! 

Hearts in the form of boxes
How do you like these hearts made in the form of a box? This technique can be used to make holiday wrapping for a small gift. However, as original crafts These hearts look very interesting, reminiscent of pixel art.

Required materials and tools:
- thick paper (for gift packaging- cardboard);
- scissors;
- ruler.
⇒ Step 1. Print or draw the template on paper.


⇒ Step 2. Cut it out with scissors or stationery knife(with an X-Acto knife). Fold over areas to be glued. To make it more convenient to bend thick paper, help yourself with a ruler.

This handicraft technique is gaining more and more popularity among children, youth and adults. It’s so exciting to make crafts and souvenirs with your own hands. And the basis is paper, which is found in every home. You can add romance to your relationship or simply please your loved ones with the help of a heart made using the origami technique. In the photo in our gallery you can admire the paper hearts made using this technique.
Preparation
Before starting work on the product, you need to prepare the materials at hand. Regardless of the complexity of the workpiece, there are no requirements for the list:
- Colored paper (single-sided, double-sided).
- Scissors, ruler, simple pencil.
- Schemes according to which you will fold
- Any metal object with a sharp rounded end (knitting needle, file, rod from a used pen, etc.).

Using the tools from point 4, you can fold a craft from thick cardboard without much difficulty. When using thin paper sheets this point can be omitted.

Types of hearts
What types of origami are there and how to use them later? We have selected several ideas for origami hearts:


You can make a simple heart and use it as a valentine. And you don’t have to wait until February 14th. Such romantic gift relevant any day.

This heart-shaped bookmark will appeal to those who love to read.

You can put a note or a small gift in the envelope heart.

A heart-shaped box will perfectly complement the main gift. Or it will become a box for small items.

Simple circuits
So, we've looked at a few ideas. Now let's start implementing them. First, let's look at simple circuits for folding the hearts of novice masters. After you learn how to fold them, you can safely proceed to more complex things.

Even though the pattern is very easy, practice on a scrap piece of paper. And learn, and don’t spoil the sheet.


Take a square-shaped piece with the colored side down. Fold both sides of the square diagonally. There should be a cross in the center. We bend one corner to the middle of the square. The top is an inverted triangle.


We bend the opposite corner so that its tip is in the middle of the “base” of the small triangle. Mark the bottom middle of the base. Fold parts of the figure up on both sides. We bend the corners of the heart on the sides and top to give the product roundness. Ready.

Another simple and straightforward method you can use if you don’t know how to make an origami heart with your own hands. To do this, you can find a blank (scanning) on the Internet. Then print on colored paper or cardboard. Glue the required sides together. The result is a heart-shaped box.

Heart bookmark
This method is also easy to implement. Even a child can handle it. And step-by-step instructions for bookmarking origami in the shape of a heart will help with this.

First, decide on the size of the product. The standard size is 10*10 cm. The dimensions can be increased and you will get a larger bookmark. It is not advisable to reduce it, otherwise it will be difficult to carry out small details.

Step by step
- Take a square sheet of paper of the desired color.
- Fold in half twice.
- Let's expand.
- Bend the bottom of the figure towards the midline.
- Turn it over to the reverse side. Fold the triangular edges.
- Turn the front part back.
- Fold it into a triangle on the inside so that its vertex touches the top line of the square.
- Turn it over. Use your finger to open the tabs on both sides.
- WITH front side We perform the same operations (see paragraph 7).
- Fold small triangles on both sides towards the center.
- We make triangles from the lowest corners.
- Turn over and fold dotted lines. (see picture).

It turned out to be a small bookmark. It can be used to decorate not only books. This execution technique allows the bookmark not to slide off the pages even if the book falls. Make 4 of these hearts and you will get a clover leaf.


Modular origami
If you want to surprise with your skill and please an unusual gift, do modular heart origami. Let's look at how to implement this idea step by step.

A module is a set small parts, connected to each other in a certain order. For a medium-sized solid heart you will need 80 triangular modules.

Divide A4 size paper into 24 parts (long side into 8, short side into 4). We get rectangles. We fold them according to the diagram (insert photo)

Having done required amount blanks, let's start assembling:
- 1 row – 1 module,
- 2 row - 2 modules.
- Next, the serial number of the row is equal to the number of modules in it.
- 10 row - 10 modules
- Row 11 – 4 modules on the left, skip one, 4 modules on the right. The outer parts in the 10th row on both sides should remain free.
- Row 12 – 3 modules on each side.
- Row 13 – 2 modules each
- Row 14 – 1 module each.

We have reviewed detailed master classes and showed how to make an origami heart. Products using this technique are quite simple, but very beautiful. Don't miss the opportunity to please yourself and your loved ones with a handmade creation.


Photo of origami heart


Origami is a type of decorative and applied art, which is based on the creation of various paper figures.
Souvenirs made by yourself are highly valued, because during production you put a piece of your soul, love, positive emotions. An origami paper heart can be such a meaningful and valuable gift for your family and friends.
You can use crafts to decorate your apartment for the holidays or decorate a separate area, for example, a desktop. Large figures will look great on a wall or shelf, while small hearts are best placed in transparent vase or a bowl: such a decoration will look very stylish. In addition, such hand-made things create a special atmosphere of warmth and comfort at home.
In this article we will tell you how to make an origami heart out of paper step by step with your own hands, and we will provide several assembly diagrams.
We only need a paper square. You can take either white or colored, it depends on your desire.

- Fold the sheet in half. Iron each fold well, so the product will better hold its shape and look neater.
- Unfold and bend the top side a few millimeters.
- Fold the sheet in half.
- Place the bottom corners of the resulting rectangle up.
- Now we have a triangle in front of us. Its sides need to be bent down, but we don’t fold it, we just mark the lines we need.
- It is necessary to bend the two upper corners to the resulting marks.
- We also bend the “ears” formed on top and put them into the formed pockets.
- There is a small hole at the bottom of the future figurine. To achieve the effect of a voluminous heart, blow into the structure.
All is ready! Even a child can cope with such a simple scheme!
Remember that origami loves precision and accuracy! Don't skip a single step and you will succeed.

Origami paper heart bookmark
Book lovers will be very happy with such a heart bookmark, because it is not just a cute souvenir, it is a useful and necessary thing.
Even a beginner can do it; it will only take 5 minutes of your time.
- For this craft we will need a square sheet of paper. Fold it diagonally.
- Then we bend both sides of the triangle towards the center.
- Turn the workpiece over.
- We turn the top corner down.
- There are two parts left at the top of the figure; they need to be bent down and the corners hidden in pockets.
- Now the corners that are located in the center need to be bent down.
- After this, we form the side parts, we also bend them and smooth out the sharp corners by folding them inward.
The bookmark is ready. There is a pocket in the lower part, thanks to which the finished product is convenient to put on the pages. This craft looks very cute, and can also be used to decorate a personal diary or creative notebook.
Origami paper heart box
The following craft is perfect for packing small gift: you can put a tie, ring or some kind nice little thing for a loved one.
For production we take rectangular sheet paper, which is colored on one side, for example red, and white on the other.

- We bend one of the sides along the line.
- Straighten the resulting pocket, attach it in this state and iron it. You should get a larger red triangle and a slightly smaller white one.
- Bend this white part down, and bend the edge of the entire part up slightly.
- Then we apply the bottom corner to the middle. It turned out to be half a heart!
- We bend this side and apply the white edge to the center. We hide the remaining white corner inside.
- We do the same on the other side.
We have created a wonderful package for your gift! If you pull the halves of the heart, the box will open. This craft will also be a great surprise for Valentine's Day: you can put a card in it with warm words or an envelope with a declaration of love.

Origami paper heart with wings
For the craft, take a square sheet of paper measuring 20x20 cm. One side is colored, and the other is white.
- Bend it halfway.
- Unroll and fold in half again.
- We bend the bottom side to the top line.
- Turn it over and bend the bottom corners to the center line.
- We also apply the middle parts to the middle.
- Turn the workpiece over. Then we hold it by the triangle, bend the upper part down and straighten it.
- Fold the bottom side to the top line.
- Straighten and place the lower part towards the center so that a triangle of colored paper opens inside. It's the same on the other side.
- The result was a figure that looked like a boat. The lower part should be folded like an accordion: bend it up to the middle line and bend it down. Repeat this three more times. This makes 7 folds. These are future wings. Gather them in the center and spread each wing slightly beyond the edges.
- Then we bend small white triangles on top (there should be two of them on each side).
- To ensure that there are no sharp corners at the top of the heart, you need to smooth them out and bend them down.
Valentine's card is ready!

Modular origami paper heart
The next option is more suitable for those who already have an initial understanding of origami and have managed to get their hands on it.
Such figures are assembled from separate module parts, inserted into each other in a special way. Ready product looks impressive and turns out very beautiful, voluminous, bright. Can act as an independent gift.
Often in modular origami combine several colors of modules, alternating them with each other.
You will need to prepare the component parts in advance; their number directly depends on the size of the craft. Assembling the figure begins from the bottom, gradually adding modules with each row.
In order for your heart to make you happy for as long as possible, many recommend gluing it.
This technique requires even more concentration and patience. Its production will take significantly longer than previous figures.
Don't give up what you love. Even if you don’t succeed the first time, try again and you will succeed! Don't be afraid to learn new techniques and experiment.

