Star news


Paper models made from paper. Paper Modeling Basics
Paper modeling can be classified as an activity that never ceases to interest a person. Many orphanages for creativity always organize design clubs, because paper models not only provide an opportunity to get a new interesting figurine or toy, but with their help you can improve your knowledge of physics and mathematics.
Tools for work
To learn how to fold basic paper models, you will need simple tools like scissors, stationery knife, PVA glue and brushes for applying it. Give preference to PVA construction glue - of all varieties, it has the thickest consistency; it does not spoil the paper, making it wet and sticky, like regular glue.
Different models are made up of different types paper - from tissue paper to thick cardboard. Beginners are advised to start with watercolor paper with a density of 200 grams per m 2 for large elements and drawing paper with a density of 140-160 grams per m 2 when developing small parts.
Individual details, such as masts, railings, small finishing elements, are created by craftsmen from polymer clay, gypsum, plasticine and self-hardening plastic. If you also complement your work with molded parts, stock up on various stacks and molds - like those used in ceramic floristry.
How to make a paper model
The workflow for creating a paper model takes place in several simple steps. Before starting the process, the master decides what kind of figurine he wants to design. In fact, almost any product can be made from paper, but paper modeling often involves the following options:
- geometric figures, polyhedra with convex and concave corners;
- scaled copies of famous buildings;
- luxury car models;
- models military equipment: tanks, armored vehicles, heavy guns;
- vehicles: airplanes, ships and submarines, trains.
Figures of humans, animals, and plants are constructed much less frequently than others. After determining the product category, the main part of the work process begins.
Creating a Layout
Three-dimensional paper models are made from several large and small parts - diagrams of the elements must first be drawn on paper sheets the desired color. A person cannot cope here without understanding certain knowledge of geometry and the ability to represent a three-dimensional image.
To make it easier for beginners to learn, many specialized magazines began to publish drawings of ready-made developments for paper models, by gluing them together to create a figurine.
You also need to cut out the layout according to the rules. For example, a solid line along the contour indicates the location of the cut, and a dotted line indicates the fold. But in each diagram the designations are individual, so before cutting you need to read the explanations for the figure.
Assembly
After the paper model drawings are ready, the model is glued together and finishing work is carried out, if necessary.
To make the surface of the product look realistic, craftsmen use different coatings: glossy varnishes, matting sprays, craquelure liquids, stains, etc.
Paper car models
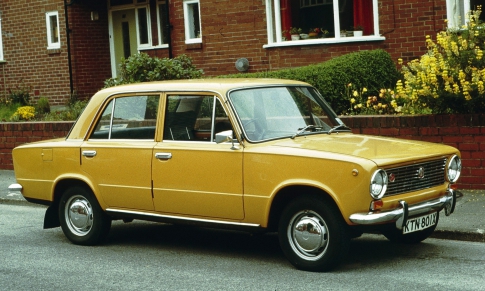
Anyone new to paper modeling will enjoy this master class, which contains information on how to design famous model a VAZ 21011 sedan car in just half an hour.
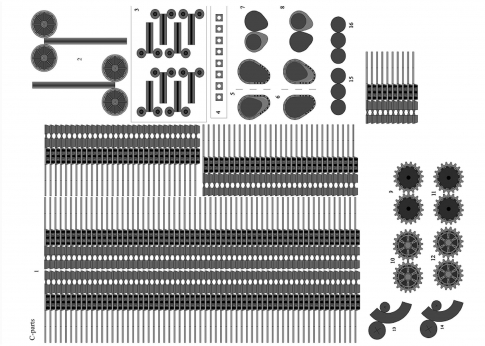
Stock up on thick drawing paper or a coated sheet if the figurine is being created as a gift for a friend.
- On an A4 sheet of paper using a color printer, print out the finished layout of the paper model with your own hands. If you want to enlarge the diagram, make sure that the proportions of length and width are maintained - changing the parameters may interfere with the correct joining of the parts.

- Have a picture of a real car of that brand in front of you to use the picture as a guide when assembling. Bend the development in the required places.
- Shape the blank into the shape of a car to mark the gluing areas for yourself. Only after this can you sequentially lubricate the white valves with glue and glue them to the necessary parts from the inside, fastening the parts of the machine to each other.
Please note that the tread strips need to be glued together to form rings that will be attached to the wheels in order to obtain the most voluminous paper models.
Paper tank models
Designing military equipment from paper is somewhat more difficult than creating civilian vehicles because the guns consist of many small parts that form the body.
To make sure of this, try to form a complex, but very interesting model German tank "Panther".

- On a thick A4 sheet, print drawings of the tank components using a color printer. Small parts It is better to cut it out of thin cardboard so as not to bend the narrow curled elements.

- You need to cut out the parts with sharp scissors to make the work easier.

- It is better to glue in blocks - separately connect the parts of the hull, propulsion system and turret, and then fasten the large elements together.
To glue tank parts together in the right order, follow this video tutorial when assembling.
Sometimes the joints are connected with small errors, which is why white marks appear on the model. paper strips. You can get rid of them using felt-tip pens or pencils of a similar color to the armor.
Paper airplane models
If you already have certain skills in building paper figures, you will probably enjoy constructing a paper and cardboard model of the Tu-104 passenger aircraft.
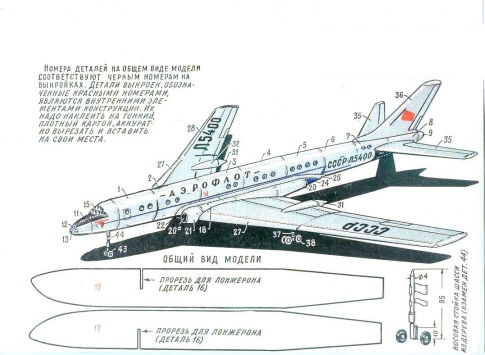
- Print out the airplane drawings on thick paper.
- Glue the elements of the internal frame of the product onto thin cardboard- they are marked with red numbers.
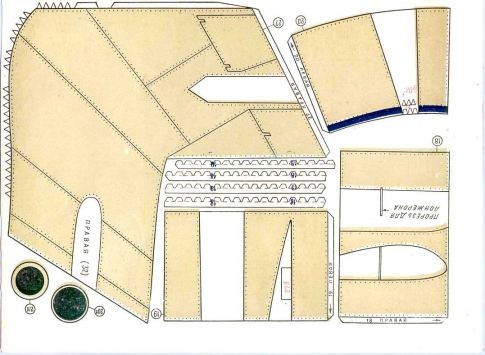
- The parts marked with a cross - frames or frame - are transferred to the cardboard using a compass. IN in this case You can calculate the radius of a circle by placing a compass needle in the middle of the cross and a pencil on the circle. Patterns of paper frames need to be glued to these cardboard blanks.

- After developing the frame, start creating the fuselage, or body of the aircraft. Please note that, unlike previous products, fuselage sections #1-8 do not have white securing flaps. They are connected to each other with special ribbons, represented on the patterns by the corresponding numbers in blue.

- The frames are glued into the joints between the fuselage sections.
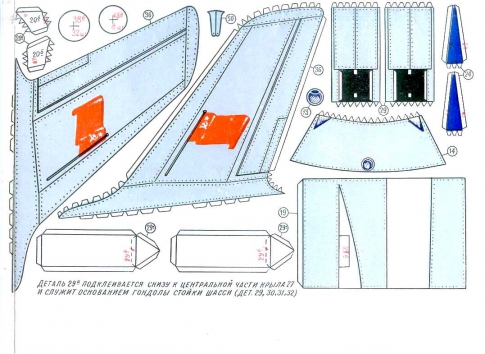
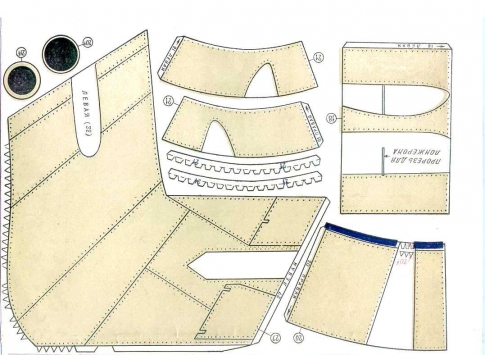
- While the glue in the airplane body is drying, glue the tail parts together.

- The engines of the device are assembled like a fuselage.

- Next, the wings are formed using cardboard and paper.

- Connect the parts of the hull, wings, bow and cockpit together.

- Assembly of the chassis takes place in several stages - initially the wheels and their components are formed, after which the chassis is glued to the wings in a specially designated place.

- You can also use the pattern to cut out a wooden chassis - it will be stronger and last longer than paper and cardboard.

To avoid bends and creases on the body and tail, stuff the parts with cotton wool during assembly. Decorate the plane as desired using decoupage sprays and paints.
More simple model You can make a paper airplane with your own hands, following this video.
Take it for yourself and tell your friends!
Read also on our website:
show more
Any beginning modeler should know the basics of working with paper. The quality of the paper models created depends on this basic knowledge.
All the following techniques should be taught to children from a young age, so that at school they can do it without thinking. Like any good habit, the basics of modeling need to be brought to automaticity in the child’s mind. I’m not just talking about those children who want to do paper modeling, this applies to any child because any creativity and development of children begins with working with paper! This type activities not only contributes creative development, but also develops perseverance, accuracy, and hand motor skills in the child. Let's move from theory to practice.
Workplace. Make sure you have a good, comfortable table and chair, the lighting should fall from behind your left shoulder, if necessary, use table lamp. To avoid staining the table with glue, cover it with paper, film, or place a sheet of glass with sanded edges to avoid cutting yourself.
Remember that your elbows should not rest on the glass - this is harmful to your joints!
Paper- this is what we work with. Should be given Special attention paper quality, I like working with good paper! Good and bad paper are like two cars, one a Mercedes and the other a Zaporozhets, choose for yourself what you “drive” :) For initial creativity and simple paper toys, it is best to use plain paper, for printing on a printer, A4 format, “Snow Maiden” type, it has good qualities and is the most snow-white in relation to other brands. The density of such paper should be 80 g/m.
More complex models and toys are glued from thick paper or cardboard. Today, cardboard is produced of very poor quality and it is very difficult to find good sheets. A set of cardboard can be colored or white, choose which cardboard you will use to glue the models yourself.
If you like thick paper, then I recommend purchasing thick paper for drawing. Please note that the sheets in the set are not secured along the edges with sticky glue; it is best when the sheets are simply folded without gluing. The thickness of drafting paper can vary greatly between sets, so when choosing, compare sheets from different sets and buy the whitest and thickest paper.
If you need super white and thick paper, then there is a wide selection of photo paper at your disposal. You can print color scans on this paper. Sheets of photo paper make the most beautiful and colorful models. For work, choose photo paper with a density of 200 g/m2 or more; sometimes photo paper is almost like thick cardboard. Depending on the future paper model, you can buy single-sided photo paper or for double-sided printing - this is very convenient!

For gluing plain paper Stationery (silicate) glue is suitable, but I still recommend using PVA glue, you will understand the difference when you try to glue with both. It may be possible to glue photographic paper with PVA glue, but it is better to use Moment glue. Remember, they are on sale different adhesives and cheap doesn’t mean high quality, that’s why I’m bringing you photos of what I use myself.
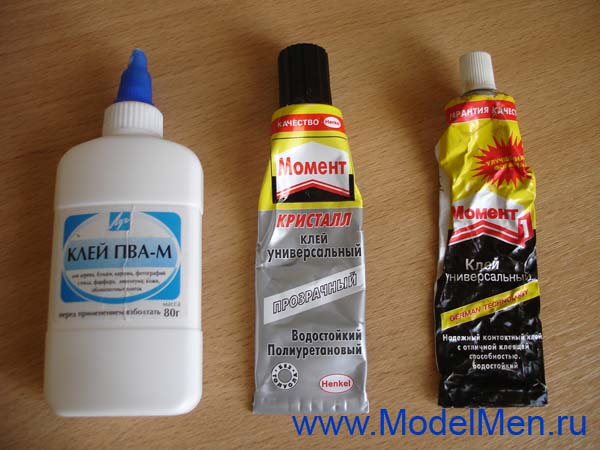
You can spread the glue with a brush or squeeze it out of the tube directly onto the paper part and spread it with a strip of thick paper (use scraps). If you glue with Moment, then ventilate the room, as the glue is very toxic!
Working with paper. Paper modeling does not require a lot of knowledge and tools.
Basic tools: pencil, knife, eraser, ruler, compass, scissors.
The pencil must be wooden, of medium hardness (letter designation on the pencil: TM, T, F), even with different markings Pencils may not be of the same quality, please choose carefully. A pencil sharpening knife should not be too long!
Remember that it is easier to cut yourself with a dull knife than with a sharp one!
The eraser must be large and soft so that it does not smudge the pencil, but erases it!
A ruler, preferably metal, from 30 to 50 cm. Plastic rulers, even new ones, have practically no straight line. The compass must be rigid, without loose parts, the lead or pencil must not move, otherwise such a compass is worthless!
Scissors can be different sizes, the main thing is that they do not fit tightly and lie comfortably in the hand.
The most difficult thing in paper modeling is to draw the development of the model, and without drawing knowledge it will be difficult to do this. If you don’t like to develop models yourself, then you can take ready-made scans.
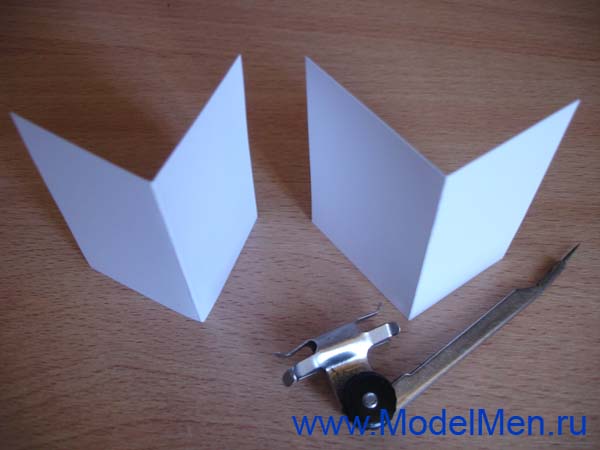
I will tell you about a common technique for high-quality paper folding so that the fold line is smooth and sharp. For example, I took two rectangles, I bent one with my hands without using any tools, the line turned out to be simply disgusting, it is very difficult to bend paper along a straight drawn line in this way. I will bend the second rectangle along the line made with a needle from a compass under a metal ruler. Many people advise doing such actions after working ballpoint pen, but it’s difficult to find an empty rod and you still won’t make a line with a pen of sufficient quality, which is why I advise using a compass. Attention, you can cut through paper with a needle, it is better if the needle is blunt; when you draw a line, bend the compass in the direction of movement, almost laying it on its side.

Look at the result, the fold on the left is terrible, and the fold on the right is very neat. Try to do this experiment yourself, you will see for yourself in my words.
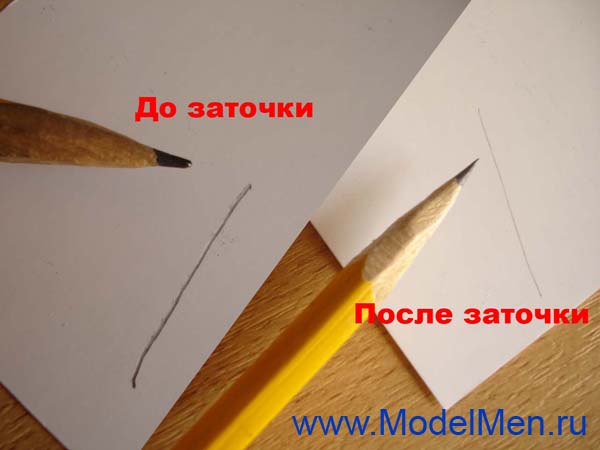
Working with a pencil. Pay no less attention to this than to everything else, because the final work depends on the quality of sharpening the pencil. Whether your parts come together when gluing or not depends on the pencil!
Sharpen the pencil sharply so that it draws a thin, clear line. The point is not even in the quality and beauty of sharpening the “wood”, but in the sharpness of the stylus. Learn to sharpen pencils with a knife or blade, but forget about the sharpener forever!
Be careful with cutting tools!
Now let's talk about cutting. You need sharp scissors to cut paper! Do not sharpen scissors by cutting sandpaper , the scissors will be sharpened, but at the same time you will scratch their inner side edges, they will cut sloppily and tear the paper. Better ask someone who knows how to sharpen scissors for help!
The most difficult element to cut out is the most ordinary circle. Children without skills cut out a polyhedron instead of a circle; you need to show and teach them how to do it correctly! First, you need to cut the part around the line at a distance of 2-5 mm, so that nothing else interferes, then cut along the finishing line.
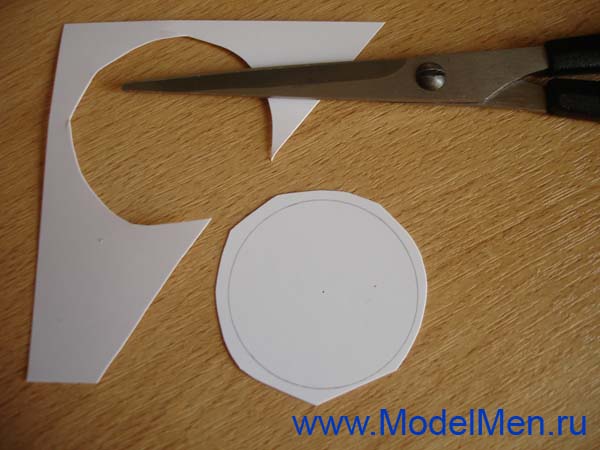
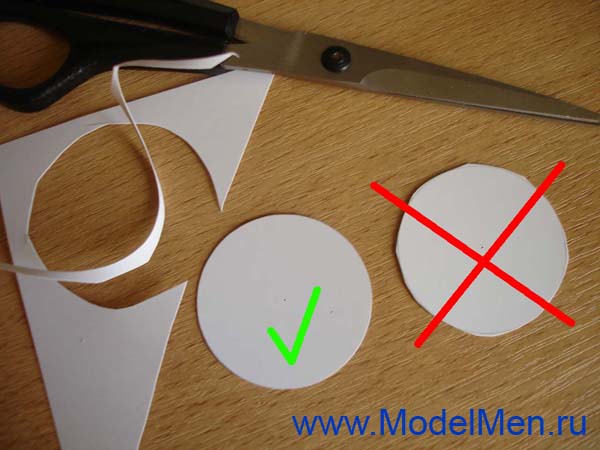
The cut circle should not have any corners, just a clean, straight line!
Often you have to cut out complex parts with small triangles for gluing (see photo). Before cutting out such a part, you must first go through all the folds with a compass; they are drawn with a dashed line. Next, use scissors to cut off the excess paper along the tops of the triangles.
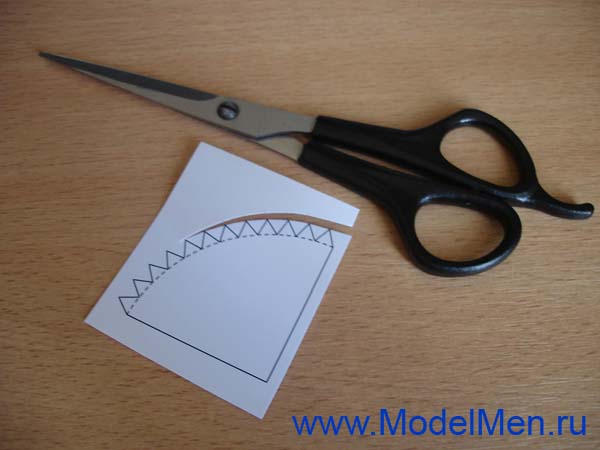
In any direction, make cuts along one side of the triangle to the fold line.

Then from reverse side make a second cut in the triangle until the piece of paper falls off on its own, no need to pull it out of the corner with your hands! You can do it neat detail, and the corners are easy to bend thanks to a pre-drawn line with a compass needle.

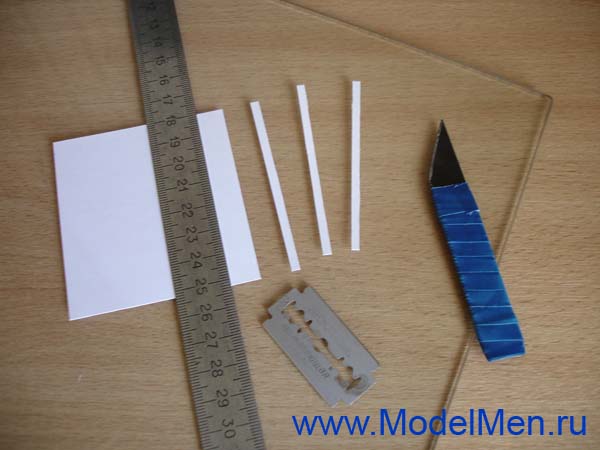
To cut strips long or short and save time, use a metal ruler and sharp knife or a blade. You need to cut on a sheet of plastic or glass so as not to ruin the table! Press the ruler firmly, otherwise it may move and ruin the paper.
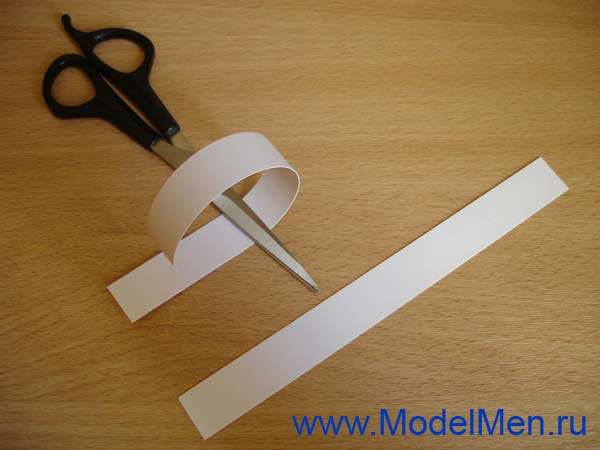
Often, to glue a cylinder, for example a car wheel, you need to glue the paper around the circumference so that the paper does not resist; it can be bent with scissors or on the edge of the table. To do this, take the folded scissors in your right hand, in your fist, place a strip of paper on top and press thumb right hand, now with your left hand pull the strip of paper so that the strip rubs against the edge of the scissors. You can also do this by stretching a strip along the edge of the table.
This is where I finish my acquaintance with the basics of paper modeling, if I didn’t tell you something in this article, I will tell you in others or you will learn it yourself in the process of work. I wish you creative success and will be happy to look at your paper models, go to
Podolsk resident Mikhail Paperfreak is 30 years old, he works as a system administrator, and free time dedicates to paper polygonal modeling - assembly volumetric models from cardboard and paper. He told RIAMO in Podolsk where unusual 3D models come from, how to assemble them, and why they are used for interior decoration.
- Mikhail, how did you become interested in modeling?
Previously, I worked with metal - I made three-dimensional drawings using deep chemical etching. Before that I was fond of bicycles, but 2.5 years ago my son Evgeniy was born, and I decided that extreme sports were not suitable for me. I had to look for other hobbies.
I have long wanted to start working with paper. This idea appeared when a few years ago I saw masks by British designer Stephen Wintercroft for Halloween and costumed corporate events and parties.
At the beginning of the year, I found and printed out diagrams of parts for my wife Elizabeth, who is currently on maternity leave. I wanted to captivate her, but she was cool about this activity. Then I decided to try it myself. I sat down at the table and got carried away. The next day I printed more and more, then began choosing more complex models. I studied all the nuances - what paper is better to use, what glue to choose, how to optimize the process. It’s good that work helps - I can order the necessary materials at the office warehouse.
- What attracts you polygonal modeling?
I like paper products that retain texture and structure. When creating models, I select good quality paper and glue the parts together very carefully. It is important for me that sharp angles are visible, since it is with their help that the play of shadows and mysterious images figures that change depending on the lighting. Some paint, putty and plaster models, but because of this, sharp corners are blurred and the play of shadows disappears.
- Tell us about the nuances of your hobby.
Modeling not from one, as in origami, but from several folded sheets of paper is called pepakura. This is also the name of the program in which 3D models and files for printing are created. Pepakura lays out objects into polygonal parts, but you still have to work with them - each part needs to be checked, to make sure that the valves for gluing are in the right direction.
Spatial orientation is very important. It's like you're putting together a three-dimensional puzzle. First you need to take something simpler, then more difficult. Beginners can contact me, I will advise and help. There were thoughts of holding master classes - for example, in Necafe, which is located not far from me. If I get a lot of people willing, I will hold it. One master class is enough to understand the principle.
- What did you manage to achieve?
When I learned how to cut efficiently, well and quickly, I tried to unfold the models myself. I found several free 3D models on websites - an armadillo, the fists of the superhero Hulk. I downloaded them and, using the Pepakura program, organized them into sheets. It takes about a day to create one small, simple scan. You spend 8-9 hours cutting, gluing, cutting again, laying out in different orders, moving the valves - in the end you come to an understanding of how it all should look.
I can now quickly and accurately, almost blindly, glue models of any complexity. He developed his own method of action. It took about a month to hone my skills. I can collect one large one a day and complex figure, and before I could spend a week on this. I can assemble the same Hulk fists in just a few hours. At the same time I can play with the child. By the way, my son really likes my hobby. I think many of the figures would make a great addition to a nursery.
I have already collected about 40 large models and many small ones. Several products have already found new owners - they were given to someone, they were made to order for someone.
- Can paper modeling generate income?
On at this stage I can only charge money for materials and physical work, but not for the models, because they are not mine, and I have no right to demand payment for them. Copyright must be respected!
If a person wants a certain model, he can buy a scan, and I will do it. Besides I have big choice paper that is difficult to buy in individual sheets. I can also do preliminary creasing of the model, which will only need to be glued together. Cutting and pressing is not the most interesting thing.
The “Hulk Fists” model cost 800 rubles. Not long ago I was ordered to develop an elephant, which cost 2,200 rubles, since I first had to assemble a test model. But even if I sell something, all the money goes to buying cardboard and glue, since quality materials are expensive.
- Can you change the size of the models at will?
Each model is laid out on a specific paper size. For example, the Triceratops was originally laid out on 50 A4 sheets. You can lay it out on A3, then there will be fewer sheets, and the size of the triceratops will be larger.
Personally I like large models. If the elephant is made from A4 paper, it will look like a toy, but I want it to look like a decorative element that can be hung on the wall. But some models turn out to be too large - for example, an astronaut, for which it is difficult to find a place. Therefore, it is very important to choose the optimal size every time.
- How widespread is your hobby?
Paper polygonal modeling is not a new hobby; people have been doing it for a long time. It’s just that now a large database of models has appeared, so beginners have a wide choice of what to collect. IN social network VKontakte has several communities for people who are passionate about this hobby - for example, “Selected Waste Paper”, where people post and discuss scans. There are personal groups where masters share their creativity and give useful advice.
In Podolsk, I don’t know any other people who are passionate about paper modeling. To some extent, I am its popularizer: I post my works on my page in Instagram and to the VKontakte group

