Star news


DIY origami paper lilies. DIY paper lilies: quick schemes for creating a royal flower


We get these double triangles, we do the same on the other side. In total we get four triangles

Now we need to hide the outer side of each triangle inside.


4. Each triangle we have is double, and it can be opened (divided into two parts). Open the triangle and begin to flatten it along the fold lines


But we did this with only one triangle, and as you remember, initially we had four of them. Therefore, we repeat steps starting from the 3rd for each triangle. As a result, we get a figure of eight triangles that can be flipped through like the pages of a book. There are like four pages on each side. This figure is considered basic and has its own name -


12. Bend triangles 1 and 2 to wrong side, and as if stretching points 3 and 4. Point 3 is pulled to the upper corner, and point 4 - down

If I work with small sheets of paper, for example, 8x8 cm, then at this stage to straighten the corners, I help myself with a toothpick
This is the kind of figure we should get. Do steps 6 to 12 on all four sides

I specially took several intermediate photographs so that you could see how, after steps 6-12, a large quadrangle gradually decreases on each side


13. Repeat steps 6-12 on the last side and finally get a small quadrangle, which can also be flipped through like a book


15. We get a rhombus. Repeat step 14 for each side


The lowest flower is sepal can be done . Or you can simply bend the bottom lily a little differently.
To do this, stretch the nearby petals


The sepal is ready!

We put two lilies together and insert them into the sepals. It turns out so complicated beautiful flower

This flower can be used, for example, to decorate the interior

How to make paper lilies for kusudama “Lily”
As a rule, such beautiful flowers, like lilies, grow in forests, mountains, swamps, meadows. They are used for decorative purposes, and in Japan the white lily is considered a symbol of good luck. In this article we offer ways to quickly make paper lilies with your own hands.


Option #1
To make it, we needed watercolor paper, three beads, wire, and some corrugated paper. white, sharpener, soft rag, watercolor pencils, PVA glue, knitting needles, scissors.

Draw a petal template (an example is provided below in the article under the samples section). From watercolor paper cut out the petals according to the example. Choose the quantity at your discretion, but remember that to create one lily you need 6 pieces. Using a sharpener and watercolor pencils in green and pink flowers it is necessary to sharpen the dust and paint the paper. Wet and wring out a kitchen cloth. Then we lower the flower into the water and immediately remove it. Place it on a rag front side down. We draw two parallel strips with a knitting needle. Round off the petals.

Now you need to make the stamens. We wrap the wire with white corrugated paper, smearing the edges with glue. Cut the wire into small pieces of the required length. We bend either end and then wrap it with a piece of paper. After which this edge needs to be painted Brown color, and the stem itself is green. To make a pestle, attach beads, wrap them in corrugated paper and paint.

We collect a flower. We make small cones. Take one, cut it bottom part and insert three symmetrically located petals on the glue. Then we insert another cone with three petals, and at the end we insert the stamens with a pistil. The leaves must be arranged asymmetrically. Cover the back side of the petals with PVA glue.
Origami technique
This master class presents step-by-step instruction on creating a lily using the origami technique. For work we need a regular sheet square shape. The length of the sides is as you wish.
Note! In the photo, dotted lines show the places of bends, and arrows show the direction in which direction to bend.

First of all, fold the square diagonally on both sides. Thus, we made lines along which the origami should be folded in the future. Next, fold the square so that the sides that are located on opposite sides of the sheet bend in the center. The fourth picture shows the process of bending the corner into the center of the triangle. It should look like a rhombus. Then we move any edge of the diamond to the side. We do similar actions with the remaining corners.

We bring the two sides together to the center, and then bend them back. Next, we move the bottom of the diamond to the top and bend it along the finished line. Repeat the same with the remaining sides. Unbend all the rhombuses. Then you need to fold the top of the sheet on both sides. Unfolding the workpiece, bend the petals outward. You can twist them a little.
Method No. 3
Using the photos of the master class below, you can learn another, easier, scheme for making lily petals.


Bend diagonally.

We make a diagonal on the reverse side.

We bend the edges so that we get parallel diagonal lines.

Fold opposite corners.

Rotate the sheet 45 degrees.

Turn the petal over.


Round off the edges.
By fastening the corners of the petal, you can make such a beautiful lily.

You can also create a paper lily with your own hands by simply printing it out and then cutting it out. ready-made templates shown in the photo.
"Origami" is the art of paper folding that came to us from Japan. In art salons and Japanese stores you can purchase a special thin paper for origami, which is easy to fold. But you can use any kind, including floral or gift packaging. You will also need scissors and a pencil.
Lilies are made from a square sheet of paper of any size. But first, we recommend taking a square sheet of paper 24x24 cm, it is easier to fold than a small one. You need to work on a hard surface. First do main workpiece:
1. Place the paper face up on the table. Fold along one diagonal, straighten it, then fold along the other diagonal and unfold the paper again.
2. Turn the sheet wrong side up and fold it in half along the side edges. Unfold it.

3. Fold the sheet in half along the top and bottom edges. Grasp it with both hands by the bottom edge on either side of the diagonal folds.
4. Move your fingers so that all diagonal folds align with each other in the center. You will end up with four protruding triangles.
5. Bend the front triangle to the right, and the back triangle to the left. Smooth the paper flat. There should be two triangular protrusions on both sides.

The main workpiece is ready. It is used for many origami models. Next stage of work:
1. Place the workpiece with the open edges facing up. Bend the upper left corner perpendicular to the plane of the table.

2. Place your finger or pencil inside the folded triangle and open it.
3. Flatten the bent cone with your finger and gently smooth it out. The top fold line should match the folded edges below it.
4. Turn the product 180 degrees and repeat steps 1-3 symmetrically. Both sides of the piece should now look the same.

5. Bend the left small triangle so that it lies on top of the right one. The outer edges should match.
6. Raise the left large triangle as in step 1 and repeat steps 2-3. Gently smooth out the paper so that it lies flat on the table.
7. Turn the paper over to the other side and repeat steps 5-6.

The result is a blank for the flower and you can move on to the next stage:
1. Place the workpiece on the table with the open ends facing up.
2. Bend the corners of the top layer of paper towards the middle so that the top edges coincide with the center fold line. Unfold the paper.
3. Bend the bottom corner of the workpiece upward so that its end coincides with the top corner. Press the fold down well as you fold multiple layers of paper. Turn it back.
 |
 |
 |
4. Place your fingers as shown in the figure and slide the top layer down along the pressed lines so that its outer edges bend forward and inward along the lines pressed in steps 2-3.
5. The edges folded inward in step 4 should touch each other along the center line of the fold. Smooth the workpiece onto a plane. Bend the corner indicated in the figure upward and press the fold.
8. Bend the top left triangle so that it lies on top right side. Turn the paper over reverse side and repeat the previous step. Now both sides look the same.
9. Bend the corners of the top layer of paper indicated in the figure towards the middle so that their outer edges coincide with the central fold line. Turn the paper over and repeat the previous step on the other side.
 |
 |
10. Bend the top two left triangles of paper so that they lie on top of the right side. Now bend the corners of the top layer of paper towards the middle, bending them along diagonal lines, as in step 9.
11. Turn the paper over to the back side and repeat steps 10. Gently straighten the top corners and twist the petals outward: wrap it around the pencil, starting from the very top.
 |
 |
 To plant a lily on a stem, insert the bottom corner of the lily into a thick cocktail straw that bends at the top. To make it more believable, you can apply specks on the inside of the petals using paints or a felt-tip pen, although the classical art of origami does not provide for additional decorations or auxiliary means.
Based on materials from the book “Origami” by Eileen O’Brien and Kate Needham
Lilies are considered a symbol of purity and freshness, and a bouquet of them has always been a welcome gift for a woman for any occasion.
Natural flowers, of course, can be bought in a store, but lilies made with your own hands from paper are especially touching, especially if they were made together with a child. Paper original flowers They will decorate any interior, and they will delight others with their beauty for a long time.
You can make such flowers from any paper of different shades, and even an ordinary white lily will look very elegant and interesting. Well, if you make lilies from gift, glossy or corrugated paper, then such a bouquet will look simply gorgeous.

Perhaps the most difficult bouquet to assemble, which you can make with your own hands, is from flowers in origami style. Assembling it is not easy, as it may seem at first, but with a little practice, you will become almost a professional. Our master class will show you how to make a paper lily. To work, you only need a square piece of paper and a little patience.


- Make a triangle out of paper. To do this, fold the square in half to form a rectangle, which you fold in half again. Then unfold it and fold it diagonally. This is necessary to form fold lines. Unfold the sheet and fold it into a triangle so that the opposite sides of the square touch in the center.
- Press one of the corners of the triangle with the middle towards the center. Turn one side of the resulting irregular diamond to the side and repeat the procedure with the next corner. Do the same with the other two corners.
- Fold the two sides of each diamond into the center and then fold them back.
- Pull the bottom of the diamond to the top with your hands and bend along the fold lines. Do this with the remaining three sides.
- Now, bending the top, unfold all the diamonds.
- Fold the top of the leaf on both sides towards the center.
- Turn the resulting flower over. Bend each petal outward sequentially, twisting it a little. Origami style lily is ready!

Corrugated paper lily
Lilies made from corrugated paper can be both decorative elements and an integral part of flower arrangement. Bouquets of paper lilies with sweets or toys have become especially popular.
This bouquet is very easy to make. Identical boat-shaped petals are cut out of corrugated paper, which are stretched slightly along the edges with your hands and folded inward. The candy is attached with tape to a toothpick and the leaves of the flower are glued to it in a checkerboard pattern.
Flowers made in this way are collected into a bouquet and decorated with ribbons and other accessories. If you add small Stuffed Toys, glued to a toothpick, you will get a very funny and cute gift that can be presented to both the little girl and adult lady.
Origami water lily

A water lily made with your own hands from paper using the origami technique is good because it can be folded even from regular napkins. Arrange these flowers according to the pattern, and you will succeed original decoration for any festive table.

Everyone knows perfectly well that the best gift for a woman is flowers, and if these flowers are made with your own hands, then this is even better, because manual labor is valued much higher, moreover, paper flowers are much more durable. Today we will just learn how to collect one beautiful flower called origami lily. This flower is also known as "iris".
The scheme may seem complicated at first glance, but it is not. This flower will perfectly decorate and complement the design of your interior, if you make every effort, then final result will surprise you. For assembly, it is better to use pink or dark red paper; you can add various patterns. Alternatively, you can collect several crafts at once different sizes and colors and make a bouquet out of them. There is room for your imagination to run wild.
For assembly you will need:
- 1 square sheet of paper;
- 5 minutes of free time.
- Mark fold lines on both sides.

- Turn the sheet over and mark diagonal fold lines.

- Fold the figure as shown in the diagram, bring the two side points to the central one. This is how we get the basic model, which is called an origami water bomb.

- Fold the top triangle in the center and unfold it.

- Repeat step 4 for the reverse side.
- Fold and unfold the sides as shown in the picture and return them back.

- Fold the model in half and return to its original position.

- Repeat steps 6, 7, 8 for each side, eventually the model should take its current form.
- Now unfold each of these triangles along the fold line.
- Turn the model over so that the open part is at the top.

- Fold back side edges as shown in the picture towards the center.
- Repeat step 12 for all sides, the model should look like this.
- The final stage: unfold all the petals along the fold line.
- That's all! origami lily is ready!

Congratulations, the assembly is complete, I hope we answered the question of how to make an origami lily? This beautiful flower is a symbol of purity, peace, resurrection and royalty. Several flowers on one stem meant virginity, immortality and rebirth. At one time, Dante called it the lily of faith. Opinions have not yet decided whether it is a lily or an origami iris, although it seems to me that this is not so important, the main thing is that it is beautiful and pleasant.
Well, for those who for some reason were unable to assemble it, I suggest watching another origami lily video diagram and assembling it right away together with the operator while listening to pleasant music.
Stay tuned and stay tuned for updates!
planetaorigami.ru
How to make origami flowers from paper
If you want to learn how to do beautiful origami flowers made of paper, then come here. Some paper flowers are so beautiful that they can be confused with real ones.
They may be easy to assemble, others are more difficult, but it’s worth trying to assemble them all, so that you can please your loved ones later.
Origami flowers made of paper. Box with a rose.

To make such a flower you will need:
- 12 squares of paper (4 each for box, lid and rose)
- approximately 30 minutes of free time
Modules with curls will serve as connecting links for attaching the rosette to the lid.
In the video tutorial by Tadashi Mori you can clearly see how this gift is assembled.
like this beautiful craft can be used as a box for wedding ring or other small gift.
Origami flower (video)
Origami paper flower. Azalea.

In this master class you can learn how to make a beautiful azalea from paper. This paper flower is so beautiful that it can be confused with a real one.
Despite its complexity, origami azalea is still worth trying, especially if you want to prepare an unusual surprise for someone.
It is worth noting that the paper azalea consists of two parts: the flower and the stamen.
To start collecting a flower, you need to prepare 2 sheets of rectangular paper, which should be in a ratio of 2 to 1.
You can prepare a square of paper and divide it as shown in the image:

To make the main flower you will need a large rectangle (1), and to make the inner part you will need a small rectangle (2).
* It is advisable to use soft and thin paper, as you will need to make a lot of folds.
Below you will find a video tutorial on assembling an azalea in 3 parts. The flower model was created by Kalei Anne Lundberg, and the video tutorial itself was prepared by Mari Michaelis.
Origami flowers (video)
Origami curl flower

This flower is very easy to make. You can give it to your girlfriend, mother, grandmother, etc.
In fact, the curlicue flower consists of several modules that were connected together. Unlike other origami schemes, modules in in this example They don't fold, they roll up.
To make such a flower we will need:
- 10 triangular sheets of paper in two colors (5 sheets of each color)
- square stickers measuring 9cm (you will need to cut them diagonally in advance)
— Chinese chopstick(can be replaced with a thin pencil)
— 20 minutes of free time
It is worth noting that each petal of your flower must be rolled separately.
* To make your paper curl better, try brushing the edges a little with water.
When you have prepared all the petals, start assembling the model.
The inner petals need to be folded towards the middle, and the outer ones should be attached to the side edges of the inner petals.
Watch the video tutorial to learn more about assembling the flower. This paper flower was designed by Krystyna Burczyk.
Modular origami flowers (video)
Origami of paper flowers according to the Del Rio pattern

You can decorate any interior with this flower, and thanks to the fact that you can easily attach a stem to it, you can make a whole bouquet.
To assemble it you will need:
- 1 square sheet soft paper size 15x15cm or larger
- about 20 minutes of free time
This flower was created by Ernesto Del Rio Jimenez. It is not difficult to assemble it, the main thing is to carefully watch the video tutorial presented.
* Try to make all folds evenly, as after unfolding paper flower they will all open up and its symmetry may suffer.
* If you want to make a stem for a flower, you need to roll a thin tube of paper, and then carefully cut off its lower part and insert it into the flower. You can secure your origami flower at the top and bottom using thin elastic bands.
Origami flowers (video)
Video tutorial presented by Tadashi Mori:
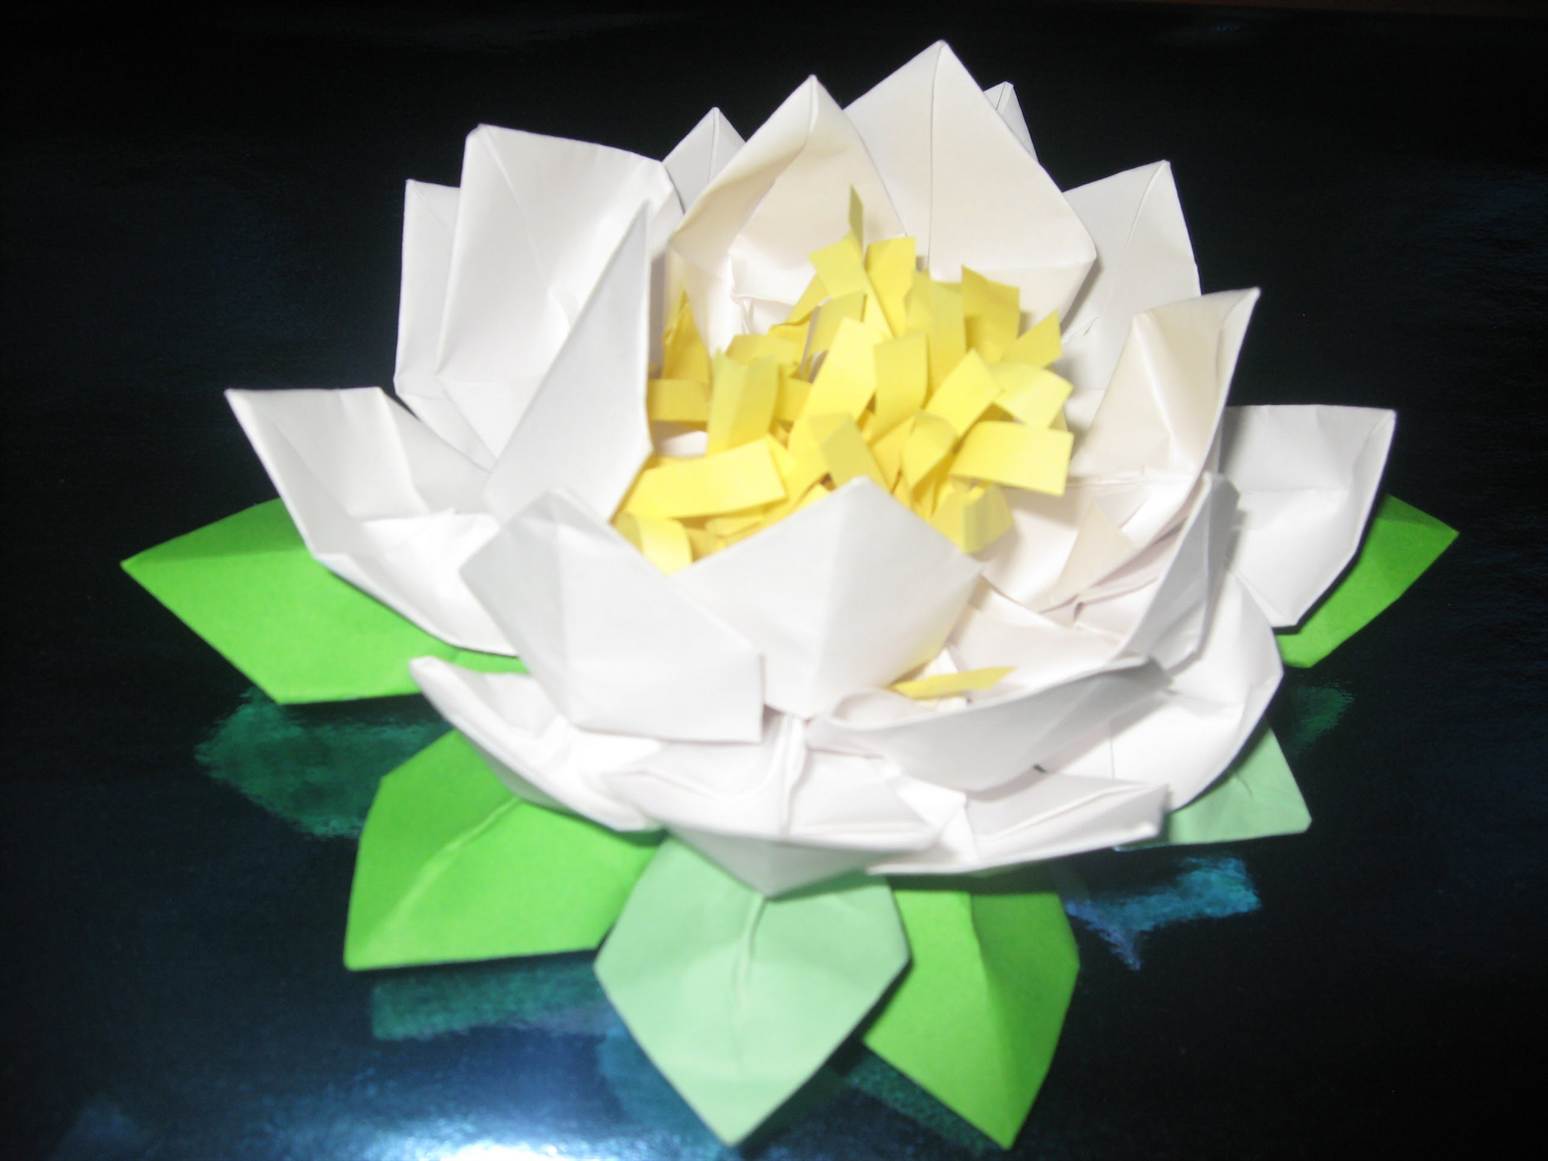
Origami lotus flowers


Even though the lotus flower emerges from swamp water, after it sprouts, it looks completely clean. That's why this flower is a symbol of purity.
To make an origami lotus flower you will need a large square sheet of paper. It is worth noting that you will have to fold the leaf a lot, and each time it will become smaller, which means that in order to make it more convenient to collect the flower, the leaf must be rather large.
Origami flower diagram

You can also use the video tutorial to assemble a lotus.
Origami of paper flowers (video)
Origami lotus made from paper modules

If you want to collect more complex model lotus, then you will need more than one leaf.
Prepare 8 strips of red paper, measuring 13.5 x 7.5 cm - they will be used to make the flower itself - and 4 strips of green of the same size for the leaves.
Origami flowers made of paper (video)
Origami diagram of sunflower flowers

This colorful, sunny flower can be made in several ways. You will be interested to know that in Peru the sunflower was the emblem of the Sun God. In China it is a symbol of longevity. It is believed that it imparts magical powers.
We present to your attention two different schemes assembling a sunflower and one video lesson.
1. Origami sunflower (diagram)

2. Scheme of an origami sunflower flower

3. How to make an origami sunflower flower (video)
Paper origami. Flower scheme with four petals.

In this master class you will be able to make a beautiful, delicate and very simple flower with four petals.
*It is worth noting that both sides paper sheet colored, and in the middle of one of the sides there is yellow spot, which is the core of the bud.
* Fold the square paper into a “mountain” along the marked vertical and horizontal lines. Also fold with a “valley” along diagonal lines. Next, straighten your workpiece.
* The petals need to be straightened and you will get an origami paper flower with four petals.


How to make origami flowers. Bouquet of kirigami.

These cute flowers can be used to decorate a room or as a gift to a loved one.
It will be interesting to note that each detail of such a flower is assembled separately, and after that all the parts are assembled together and you get a beautiful composition.


We attach several sheets to the middle


We make a stem from thin wire and attach a flower and petals to it

After assembling the bouquet, you can place the composition in a vase.
For a more harmonious composition, it is better to place short flowers in the front and long ones in the background.
DIY origami flowers. Poppy.

You can divide the entire process of assembling an origami poppy flower into 10 steps, which are listed below.
*Please note that the paper in this example is not square - it is a hexagon. You can use scissors to get this shape.
* You can use markers to give the flower a special touch and add patterns. Since this is a poppy, the color should be appropriate.
* Make “valley” and “mountain” folds along the intended dotted line in the following order: valley-mountain-valley-mountain.


*When you have done all the folds, you will need to prepare a shape like this. To do this, bend the top along the indicated line, and then straighten it again.


* To form a flower, bend the paper as shown in the picture.


* Insert your finger inside the structure and “open” the figure.

* Now you need to make a “valley” fold in the place indicated by the left dotted line. Next, make a “mountain” fold along the right dotted line and repeat “valley-mountain” across the entire surface of the paper.


Origami flowers for beginners. Bell.

This paper flower model is one of the most popular. It is usually recommended for beginners.
To collect such a flower you will need:
- a sheet of square paper
- thread, ball, twig
— 10 minutes of time

First you need to prepare the basic shape of an origami frog. In the future, you will only need to make a couple of bends to end up with a paper bell.
Below you can watch a video tutorial that shows how to make a bell flower out of paper.
How to make an origami bell flower (video)
Origami paper flower (diagram). Flower-gift.

This flower can be given to a loved one, and there is no need to give it a reason. Not only does this flower look beautiful, but it is also not very difficult to make.
Once you collect the flower, you can use it for decoration. gift packaging, or bottles of champagne, for example. This origami flower can also decorate a holiday table.
Watch the video tutorial to learn how to collect this flower.
How to make origami flowers out of paper (video)
Origami flower for beginners. Lily (iris).

Despite the different names, the scheme for creating a flower is the same. This lily is very easy to make, which means it is suitable for beginners.
To fold such a flower you will need a square sheet of paper. Just 14 steps and you will have a lily, to which you can also add a stem and create a nice bouquet.
Video tutorials will show you how to assemble paper lily, and if something is not clear, then a step-by-step diagram is indicated under the video.
Origami flowers (diagrams, video)
DIY origami flower (video)


Origami flowers from modules

To collect a flower you will need:
— 75 triangular modules(10x6cm)
— 1 green leaf A4 format (for stem)
The entire structure is made of 7 rows, which are built in a checkerboard pattern.

Also from the modules you can learn to do:
Origami flower made of modules (video)
www.infoniac.ruHow to make a paper lily with your own hands - master class

Lily - wonderful delicate flower, a symbol of purity and innocence. Previously, people worshiped it as the most exquisite plant on earth.
I would like such a flower to be constantly in sight and pleasing to the eye. Eat great idea: you can make this beautiful plant out of paper, or better yet, a lot of it to decorate the whole house with “eternal” flowers.
Making a paper copy of your favorite plant with your own hands is very simple. Reading the instructions once is enough to learn this. Below in the article are several different ways to create a flower to your liking.
Simple lily using origami technique
 At first glance, it seems that making a lily using the origami technique is difficult, but the instructions and a little practice will teach you how to create such crafts with ease. Below is step-by-step master class on a paper flower.
A square sheet is all you need.
Dotted lines in the diagram indicate folds, and arrows indicate their directions.


Now let's move on to the flower itself:
- Fold the paper square along the dotted line, run your finger along the fold line and unfold it again.
- Fold along the dotted line towards the center.
- Fold along the dotted line again towards the center.
- Flip the origami.
- Fold along the dotted line towards the center.
- Fold along the dotted lines, as in the picture.
- Turn over.
- Holding by the places marked with arrows, turn it out.
- Place the marked pieces together.
- cardboard for template;
- pencil;
- corrugated paper;
- wire for stamens;
- sticks for stems;
- glue or tape;
- scissors;
- optional - felt-tip pens and colored pencils.
It is best to use colored paper, as well as glossy and fairly thick paper. In this combination, the flower will look very natural and beautiful.


The water lily is ready, you just need to combine it and the already made leaves.
Water lily in two minutes
 This method is very simple and works well for joint creativity with kids.
You need to cut a circle out of paper and make small equal cuts along the edge to create petals.
Roll all cut sections into cones and secure with glue.
The first circle is the first “tier” of the water lily. We also need a second one, which will be glued on top.
The third will be the yellow core of the flower, which can be made from colored paper or drawn.
The finished flower can be glued to a circle of green paper, just like on a real water lily leaf.
An article on how to make beautiful flower bed from perennials, read here.
Corrugated paper
Five minutes is enough to create several at once beautiful flowers from corrugated paper.

You can choose the number of petals and stamens, size and color of the lily to your taste.

- You just need to cut out five identical petals in the shape of a boat from corrugated paper according to the template. This template is very easy to draw yourself.
- Fold them all in half, press them slightly and unfold them again.
- Halfway through, pull each petal outward to stretch it into shape.
- To make stamens, take a piece of wire, string a white bead on it, fold and twist. You need to make several such stamens and twist them together using the “tails” of the wire.
- Now take and twist the petals around them. Secure the result to a stick with glue or tape.
- If you wish, you can also make leaves - cut them out and glue them onto a stick.
- if you don’t have corrugated paper on hand, you can simply use wrapping material for bouquets;
- flowers can be supplemented with candies by screwing them into the core along with the stamens or replacing them. You can also collect lilies into a ball or decorate something with them, for example, boxes;
- if on white corrugated paper For the petals, draw dots in watercolor; the paper creation will look very believable.
- Fold a square piece of paper in half horizontally and vertically to form a cross with the center of the intersection in the center of the square.
- Fold the corners of the square so that they meet in the center.
- Fold the corners of the new square formed so that they also meet in the center.
- Turn over the sheet of paper and bend the corners of the square, as shown in the diagram.
- Turn the resulting figure inside out.
- Spread the lily petals.
- Lily is ready
Read an article on how to grow lilies in open ground here.
This is a wonderful idea for joint crafts together with children, as well as an easy and accessible way to decorate the interior. You can experiment with the paper material and its color to create the most unusual and beautiful paper flowers.
Origami lily
Home » Flowers » Origami lily

The article presents an origami diagram of a lily. Origami lily is done like this:
Fold short version basic form"bird".

1. Fold the sides of the “blind” corner to the fold line on both sides of the work.

2. While bending the bottom corner, stretch the folded corner.

3. Repeat the action in all planes. Then flip over.

4. Raise the bottom corner in all planes (open them by flipping).
5. Extend the inside corners.

6. Flip over and extend the other two corners. Open the flower slightly.

7. Top view. Use a pen shaft or scissor blade to twist the corners of the petals.
Origami flowers: Paper lily (video lesson)

Good day. Today, as part of the section - Origami flowers, we will learn how to make a lily from paper. To do this, you will need a square piece of colored paper (can be decorative) and another green piece of paper to create a trunk for the flower. If everything is ready, then click next.
You all know very well that best gifts for the female gender these are flowers and jewelry. I don’t know how you will do the second, but I’ll teach you the first now. At the right approach and with due diligence you will turn out great decorative flower. We have already examined a similar model, but this one, in my opinion, is much nicer, although it is assembled almost the same way.
Paper lily diagram:
Follow the simple video instructions and you will succeed the first time. This craft doesn't have complex elements, and even a beginner can do it. All you need to do is carefully fold the elements.
I hope you liked the instructions on how to make origami flowers, in in this case paper lily. Come again and learn a lot about this art. In the meantime, try making a paper basket that you can use as gift wrapping.
Origami lily diagram
Origami lily is one of the most popular paper origami. If you don’t know how to make an origami lily, then on this page you will find everything you need to assemble this simple paper figurine.
In the first photo you can see what you will get if you follow the assembly diagram below. The second photo of the origami lily was taken by one of our site users. His lily looks much more attractive, but it is also much more difficult to make. To collect such a lily, you need to have extensive experience in assembling paper crafts. If you have photos of origami you have collected, send them to this address Email protected from spam bots. You must have JavaScript enabled to view it.


Assembly diagram
Below is a diagram of how to assemble an origami lily from the famous Japanese master origami Fumiaki Shingu. If you strictly follow the instructions, then assembling the origami lily will not take much time, and the result will be the same as in the picture. After doing what is described in the diagram several times, you will understand how to make an origami lily quickly and without looking at the diagram.


Assembly instructions
Video master class
Assembling an origami lily for beginners may seem challenging task. Therefore, we advise you to enter the query “origami lily video” on the largest video hosting site on the Internet, YouTube. There you will find a lot different videos about the origami lily, which clearly shows the steps to assemble the lily. We hope that after watching the video of the assembly master class, you will have no more questions about how to make an origami lily.
This video tutorial will teach you how to assemble another type of paper lily:
This is another instructional video on assembling an origami lily:
The lily is a very popular symbol. White Lily in many countries it is strongly associated with faith - in Christianity it is considered a symbol of youth, purity, purity and innocence. The lily is also considered a symbol of femininity and motherhood. IN Ancient Rome Lily flowers were considered a symbol of prosperity, hope, and in France the lily is a traditional symbol of power.

