Star news


Pictures on the theme of sewing. Patchwork for beginners: different techniques, patterns, ideas
There are several methods for creating art from fabric scraps. The technique of this type of needlework is quite simple, you don’t need to buy materials and tools, they are in every home. Despite the low cost of the finished product, a fabric painting, made with your own hands, will please the eye no less than a landscape or still life, which costs a lot of money.
Japanese painting technique
Paintings made from fabric scraps - relatively new type art that came from Japan. It's called kinusaiga. Even in ancient times, when sewing Japanese traditional clothes Expensive fabrics of the highest quality were used, and initially banal economy created such an original artistic form of making panels and paintings from fabric.
The Japanese tried to use old clothes by decorating various items in the house, and it was these attempts that led to the creation of the Kinusaiga technique.
 Experts giving a master class on creating paintings from fabric with your own hands according to the ancient Japanese technology from scraps, they teach step-by-step specific actions. First, a sketch of the future painting is created, which is transferred to a specially prepared wooden surface. According to this sketch, a contour is cut out on the board in the form of narrow slits, up to two millimeters deep. The fabric is cut into small pieces with a border of about one millimeter. The border is inserted into the slots using a special tool.
As a rule, artists in the paintings created from pieces of fabric depict landscapes, less often people, since the kinusaiga technique does not allow one to accurately convey nature.
Therefore, if people appear in these paintings, they are stylized to match the subject of the image.
Modern kinusaig
Modern kinusaiga technology has undergone some changes. It has become simpler and more accessible, which has given it the opportunity to become widespread throughout the world. Expensive silk was replaced with ordinary pieces of fabric, and pieces of foam plastic were used instead of wooden boards.

You can see once how paintings are made using the Kinusaiga technique to understand the principle of operation. First you need to prepare necessary tools and materials. This is primarily a sheet of foam that matches the size of the design. In addition, the work will require colored pieces of fabric.
The fabric should not stretch or unravel into threads. In addition, it should be thin enough to be comfortable to work with.
Then you need to select the appropriate template and prepare paper for copying. Tools you will need:
- scissors;
- scalpel or thin knife;
- a thin but not sharp instrument (nail file).
First you need to create a template based on simple geometric shapes. It will be much easier for beginners to work with it. After which the finished image is transferred to foam plastic using carbon paper. Then, along the contours, it is necessary to cut slits with a depth of no more than 3 millimeters using a scalpel or knife.
The next step is to cut out pieces of fabric that match the size and color scheme individual image details. After which the edges of the fabric are pushed into the grooves of the foam, you can use a nail file for this. This is how the whole picture is created.

The grooves can be filled with glue so that the fabric holds better and does not fall out. To make the panel complete, you can place it in a frame. Now the painting made using the kinusaiga technique is completely ready. In the same way, you can decorate Christmas toys, which will look very original.
Other methods of working with flaps
There are several other methods for creating paintings from pieces of fabric with your own hands. One such method is to glue pieces of fabric onto a backing. The uniqueness of fabric appliqué paintings lies in the fact that images from fabric flaps are created without the use of a needle and thread. The advantage of this method is its relative simplicity implementation. In addition, this does not require the purchase of expensive materials; everything you need is in every home.

It is necessary to prepare materials and tools, as well as all types of colored pieces of material of appropriate sizes and thickness. Thick and dense material not suitable for small parts. Required tools:
- PVA glue;
- scalpel or sharp knife;
- manicure scissors;
- drawing of a future picture or plan;
- felt-tip pen.
You need to take a rectangular or square piece canvas and stretch it over wooden frame. This will be the base of the picture onto which pieces of fabric will be glued. Instead of a frame, you can use a small wooden rim.
The working diagram of a do-it-yourself painting made from scraps of woven material is as follows. The drawing is transferred onto the base using carbon paper or a felt-tip pen. Imagery doesn't have to be difficult for beginners. Initially, it is recommended to choose a simple image with no small details. Over time, when experience comes, it will be possible to create more complex crafts.
Then you need to cut all the details of the image and put them together to form a drawing. This will allow you to see shortcomings and correct them. When all the details of the image are prepared, you can start gluing them onto the base. You can also use not only textiles, but also cardboard or a wooden board as a base.

Very interesting compositions can be created using pieces denim different shades. Swedish artist Ian Berry uses different shades of denim to create incredibly realistic cityscapes.
Fabric paintings
Another method that is used to create original paintings is to stitch together pieces of material (using a sewing machine or by hand) so that the surface forms a three-dimensional relief drawing. This technique appeared quite a long time ago, it can be seen in interiors country houses last century.

Our grandmothers collected all kinds of fabric scraps and embroidered colorful blankets and pillows. Such products can still be found today. They are characteristic of the interior and style of Provence, identified with life in the village. A little later, craftsmen began to create paintings based on this technology.
Patchwork panels can be a kind of abstraction or convey a certain plot. To do this, use a variety of pieces of fabric that can be found in every apartment. In addition, the work requires scissors, needles and threads, and flaps corresponding to the selected image are cut out. For stitching flaps it is best to use sewing machine. Although it is possible to sew by hand, the process will be much more labor intensive, especially for beginners. To smooth seams you can use steam iron.
Attention, TODAY only!
Not so long ago, paintings made from scraps of fabric came into fashion. This type of needlework is called kinusaiga. The technique originated in Japan. There are several areas of kinusaiga, the main ones being: 1. Patchwork.
2. Quilting.
These types are similar in the material used. These are pieces of fabric. They differ from each other in the way they are executed. Patchwork is interesting because textile fabrics are created without a needle and thread. Quilting is patchwork sewing. A panel made from scraps of fabric with your own hands in the “patchwork” style can not only decorate the interior of your own home in an original way, but also become an excellent present to all friends and acquaintances. This technique is quite simple, so even novice needlewomen can create real masterpieces.
 Schemes for making canvases can be downloaded on the Internet. For a fabric painting using the patchwork technique, you will need the following materials:
1. Foam base for a painting about 2.5 centimeters thick ( suitable material, left over from the packaging of household appliances).
2. Fabric scraps different colors, shape, size (the thinner the material, the easier it will be to work).
3. Glue (do not use superglue, otherwise it will melt the foam base).
4. Knife and small scissors.
5. Tool for ripping seams. It can be purchased at a sewing supply store.
Some people use nail files, but the first option is more convenient.
6. Buttons and printed diagram.
7. Copy paper and felt-tip pen.
Tools for creating a picture using the patchwork technique During work, the foam will crumble, so it is better to work in a room without carpets, so that it will be easier to clean up later.
Below is a master class that will help you make a lovely picture from scraps of fabric.
First you need to prepare a drawing. To do this, you can use a printer or draw on the cells yourself. The ornament can be applied to the foam base using carbon paper or drawn with a felt-tip pen. The manufacturing process begins with a frame, which a textile painting must have.
- The base of the foam painting can be made in the shape of a rectangle or square. The frame is made like this: on each side of the workpiece, margins are drawn, retreating from the edge by a few centimeters. To make it easier to transfer the pattern, you need to secure the foam with buttons.
- Use a knife to make grooves. They should be no deeper than half a centimeter, otherwise the foam will break.
- Now you need to decide where the material will be placed. It is better to take knitwear: it stretches quite well and does not slip.
- Apply glue to one of the drawing areas. Place the selected piece of paper in this place and tuck its edges into the recesses with a nail file or steamer. Excess fabric is trimmed with scissors.
- First the frame is made. The hanging edges of the material are secured to the back of the foam base with buttons. After this they begin to draw the pattern.
- So that the picture can be hung on the wall, on it back side attach the loop. To attach it to the wall, you can also choose a mastic that is used to fix the tiles. If you have no experience in patchwork, it is better to choose a simpler pattern at first.


Quilting: materials needed
As mentioned above, quilting is sewing from scraps of fabric. The essence of this technique is that several layers of fabric are sewn together by hand or by machine. As a result, patchwork panels are voluminous and embossed. They are called quilts. Similar view handicraft has been known for a long time.Previously, in villages this method was used to sew bedspreads, pillows, and blankets from multi-colored pieces of fabric. To make a picture from scraps of fabric with your own hands using quilting technology, you will need:
1. Scraps of fabric of various colors.
2. Faux fur trims.
3. Photo frame.
4. Synthetic fabric.
5. Threads.
6. Fabric for background.
7. Animal templates. 8. Cut thin skin
black color.
Master class on creating panels using the quilting method Below is step by step instructions
- , which will help you create a panel using the quilting method.
- Using a template, you need to cut out an elephant with its head and ears from gray fabric. Then you need to embroider his eyes and mouth with black thread, and also sew on his head. Next, you need to cut out a sheep from the fabric. For this you need white or gray artificial fur
- short pile or fluffy fabric. Then her eyes are hand embroidered.
- A giraffe is made from yellow spotted tissue. You can also glue or sew black leather onto the yellow fabric to create spots on his skin.
- Two canvases are taken, and thin foam rubber is laid between them. The resulting frame is sewn on the side using braid.
- Palm leaves are made from green material. To do this, ovals pointed on one side are cut out. The edges should be made in the form of waves or fringe. Tree trunks are made from brown material. To add volume to the figures, add them reverse side
padding polyester is attached. And at the end they are sewn onto the background.
Textile flower painting From scraps of canvas you can create very with floral ornament. It will take some time.
You will need:
2. Bright patches.
3. Cardboard stencils.
4. Scissors.
5. Glue.
6. Beads.
7. Needles and threads.
You will need:
1. Printed or drawn diagram.
2. Bright patches.
3. Cardboard stencils.
4. Scissors.
5. Glue.
6. Beads.
7. Needles and threads.
 Using a stencil, parts of different sizes are cut out of fabric. round shape and build a pyramid out of them. The largest fragment is at the bottom, the smallest is at the top
The pyramid is sewn into a flower, and a bead is inserted into the middle. Next, the edges of the flowers are burned with a candle to create waviness. Grass is cut out of green fabric and sewn to the base with a machine. The canvas is stretched over a frame or attached to a frame, and flowers are sewn onto it. Small parts are glued. That's all. The picture is ready. Instead of a frame you can
take a hoop, then the picture will look especially neat. If you use a hoop different sizes, one can compose quite interesting composition on the theme of flowers. These can be tulips, roses, lilies. The resulting panels are hung on the same wall close to each other, only at different heights. This creates a real homely feeling in the house.
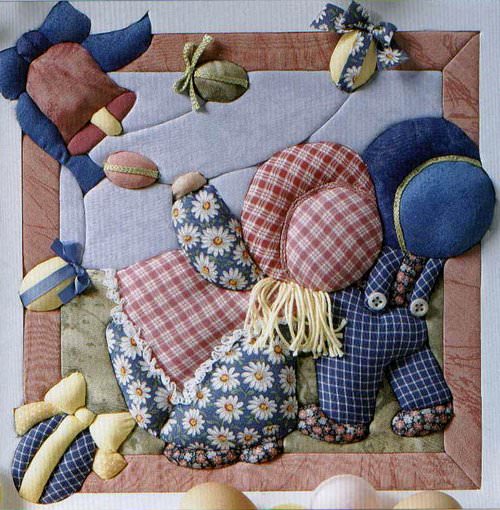
Panel "Tea Party"
The panel on which two women drink tea after a bath looks very interesting and unusual. It looks no worse than an expensive painting painted on canvas by an artist.
To create it, you need:
1. Print out the picture “Tea Party”.
2. Pencil and scissors.
3. Fabric for the background (for example, stretch gabardine).
4. Fabric scraps.
5. Web for fabric.
6. Lace for a tablecloth.
 You need to attach a picture to the window, put background material on it and transfer the outline of the picture onto the material. On window glass transfer the outline of the samovar onto the pattern, and then cut it out of fabric with glitter. Then a cobweb is attached to this fragment with an iron and with this part the samovar is applied to the background. It is made in the same way and attached to the canvas. teapot made from floral material. The joints of the elements are covered with a part made of samovar fabric. The shoes of the woman on the right are cut out of darker material. A skirt is drawn on the window and attached to the panel using a spider web. The remaining fragments of the picture are cut out and attached in the same way. After this, all the parts are sewn on a machine with a “small zigzag” stitch. Then the panel will turn out neat. The tablecloth is made of lace. The faces of women and cats, as well as steam from a samovar, are embroidered with stitches. In place of the earring in the ear, attach a pebble with glue. The panel is ready. All that remains is to insert it into the frame and hang it on the wall.
Isabella Baykova (Peter) "innovative quilt"
Isabella Baykova
Isabella Baykova, a member of the Union of Artists of Russia, section of monumental painting, graduated from the Higher Art and Industrial School named after V.I. Mukhina in 1993. She was engaged in monumental paintings for public institutions of the city. Since 1996 he has been working on carpets using high-tech techniques. decorative arts"innovative quilt"
Preparatory stage to a tapestry picture sometimes lasts up to two years. The beginning of each work is a game with the unknown, which is first transferred to the sketch. Months pass from the moment the first idea appears to its full implementation. This “romance with the material” lasts until it completely takes shape, is filled with details, painted in colors and in the right shades. And only when the artist is satisfied with this image, which deprives her of sleep, which is torn out, not giving a single moment of calm existence, then she takes the fabric in her hands, so that soon that work will be born that will deprive you of sleep, just as it once deprived you. sleep Isabella Baykova.
artist’s website nversio.com/main_rus.html Enjoy your viewing:))
"Paris in Spring", 2001
patchwork technique, embroidery
1010x1470
"Paris in Spring", 2001
patchwork technique, embroidery
1010x1470
Needlewomen know. But many have only heard of what kinusaiga is. Unfamiliar Magic word actually means the art of making paintings from silk scraps. A kind of patchwork, only without a needle. This type of needlework was born in Japan. At the origins of Kinusaiga was Setsu Maena, a professor at a Japanese university. Over time, kinusaiga spread beyond the borders of their homeland and European craftswomen immediately adopted this technique of creating beauty with their own hands. How can you pass up creating amazing things from scraps and remnants of silk fabric? Simply put, European needlewomen acquired the art of creating masterpieces while saving on expensive materials.
At the origins of Kinusaiga was Setsu Maena, a professor at a Japanese university.
Kinusaiga or patchwork without a needle: details about the technique and tools that are needed
The kinusaiga technique does not involve the use of a needle as in the patchwork technique, but is based on making a sketch on paper, which is then transferred to a wooden board.
A slot is made along the contour of the sketch - a recess. After that, the picture itself is made using scraps of silk. The Japanese women took these pieces of silk from old kimonos, which the thrifty Japanese never threw away - silk, after all.
The shreds are laid out on the cut elements of the sketch and the edges of the shreds are pressed into these same slots. At correct selection The colors and colors of the paintings turn out to be of unique beauty. And it would seem - scraps of an old kimono! We can say that the natural economy of the Japanese became the parent of this art - kinusaiga.
Gallery: kinusaiga (25 photos)


Kinusaiga: master class (video)
How to make a painting on polystyrene foam from fabric with your own hands: a master class for beginner needlewomen
How to make a painting in style New Year in patchwork for children? New Year's patterns always look beautiful and festive. We can talk about the art of kinusaiga for a very long time. But it’s better to see how to make at least a small masterpiece with your own hands. Below is a technique for creating a painting on foam plastic for beginners.
What you will need to start the master class:
- foam sheet (thickness not less than 1 cm;
- scraps of fabric of different colors;
- scissors;
- stationery knife (scalpel);
- nail file (for threading fabric into foam);
- sketch (your own or you can take any ready-made one);
- carbon copy.
The fabric should be selected to be non-stretchable and thin enough. The edges should not fray.
First, look at what is in stock: old scraps, leftover fabrics that were not thrown away after sewing some wardrobe item. Everything will go to work. If checking the storerooms does not give any results, then you will have to take whole pieces and cut out the elements of the planned picture from them.
Process:
First you need to decide on a drawing. For the first time, you should not choose something complex, with many elements. Let it be easy geometric figures. And from them you can already build a small cute house.


Using a sheet of copy paper, you need to transfer the sketch onto a piece of foam plastic.

Using a knife or scalpel, make a cut along the contour of the sketch to a depth of about 3 mm.

Cut the selected fabric into shreds, the right size. Using a nail file or something more convenient, tuck the pieces of fabric into the foam sheet. Thus fill the entire “picture”. The edges of the fabric should fit tightly into the slits.

Cut off the excess edges of the foam with a scalpel or a stationery knife.

Next, the resulting panel can be framed. It can be purchased, or you can make it yourself. If there are suitable materials. You can simply make an edging using decorative tape, which needs to be secured with beautiful push pins. These buttons are sold at any office supply store. Buttons in bronze or gold colors look beautiful.


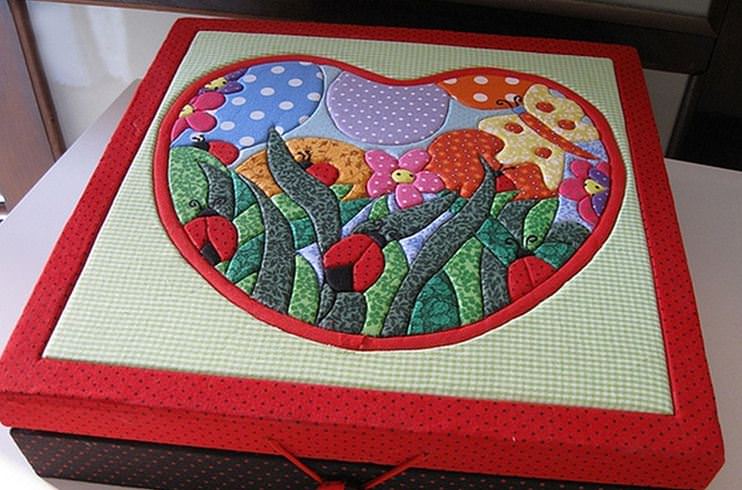
The kinusaiga technique is often used to decorate lids for boxes or boxes (for example, for sewing accessories or cosmetics).

Amazing Christmas decorations and crafts are made using this technique.

Kinusaiga: simple patterns and their execution
Kinusaiga allows the use of any scheme that is at hand. You can buy templates, or you can make them yourself. The easiest way is to use stencils. As an example, below is a Kinusaiga master class using a simple template.
To complete this craft you need:
- A3 size cardboard;
- A4 size cardboard;
- scraps of fabric of different colors;
- padding polyester;
- glue;
- nailfile;
- threads;
- needle;
- scissors;
- acrylic paints;
- thin brush;
- cord (soutache) of different colors;
- pins;
- frame.
Scheme for creating a painting:

In your work, you can use any scraps that you can find.
- The drawing must be transferred to tracing paper. Cut into component parts - parts.
- After the division is completed, you need to number the parts of the drawing. Then cut out fabric elements using them. You need to leave a 3 mm allowance along the edges.
- Then prepare the canvas for the future painting. For this purpose you need to take a sheet ceiling tiles. The thickness should be half a centimeter. Glue the sheet onto thick cardboard.
- Glue the second copy of the drawing, which was printed in advance, to the foam. Cut a groove in it, the depth of which should not exceed 2 mm, along the contour of the sketch.
- Apply glue along the cut grooves with a glue stick. When performing this Japanese handicraft for the first time, it is recommended to apply a glue stick to the entire surface.
- Next comes the process of creating the appliqué: the edges of all parts prepared from fabric must be pushed into the grooves so that the edges plunge into the grooves and are tightly fixed there.
Some ideas and patterns for decorating a kitchen using the Kinusaiga technique
Below are sketches and diagrams for designing and decorating the kitchen with Kinusaiga paintings.


This whole application is not done quickly, but the result is worth spending time on. Embroidery with needles takes much longer than paintings made using the Kinusaiga technique. When the basis of knowledge of the Kinusaiga technique is fixed, you can take on more complex panels and paintings that will definitely decorate the house and become a great gift for any holiday.
With the spread of the art of kinusaiga throughout the world, specialized stores began to open, which began to sell tools for this type of needlework. Special sets of fabrics also appeared on sale (not every European has an old kimono at home that can be used for scraps).
In addition to fabrics, you can also purchase in such stores combination sets, which includes tools, fabrics and drawings - sketches varying degrees difficulties. Such sets are designed for both beginning needlewomen and those who have been practicing this art for several days.
Here's what these sets look like:


Methods of patchwork sewing in home handicrafts.
The simple handicraft of our grandmothers from the remaining scraps of fabric has now turned into a whole section of folk arts and crafts called patchwork. Various techniques connections of multi-colored, varied or correct form pieces allow you to create unusually beautiful and extraordinary products. Very often, patchwork is used for interior decoration.
Patchwork for beginners: different techniques
The first steps in mastering patchwork should begin with the simplest techniques:
- Traditional. The basis is a fabric cloth, onto which wrong side stitched patches are applied. A drawing made up of pieces is front side products. Most often, potholders and thin blankets are decorated using this method.
 Bedspread decorated with shreds
 - Quick squares. The easiest way. Prepared multi-colored square patches formed into a specific pattern. It all depends on the imagination of the needlewoman.
 A very simple way of patchwork for students
 - Stripe to stripe. Variegated strip cuts are connected in different ways: in spiral or zigzag shapes, in horizontal or vertical directions
 Soft pillow hand made
 - Magic triangles. When taking your first steps in work, it is better to use isosceles triangles. It is very easy to build any pattern from them.
 Triangle Quilt
 Bargello technique in patchwork: patterns for beginners
 Schematic drawing
  We prepare 6 pieces of different colors, selected length and width (depending on the desired size finished canvas)
 We distribute the cuts according to tones
  We sew the strips first in pairs from the wrong side, then into one whole fabric
  Cut off uneven edges
  Sew together: the first and last strip
  Cutting straight bargello strips
  We fold the strips according to the pattern, then sew them together. We rip out the excess seams on the cast-on strips. Making the edging finished product tape
  If everything is done correctly, we get a beautiful blanket or cape
 Patchwork technique in patchwork sewing: patterns for beginners
 Example 1
  Example 2
  Example 3
  Example 4
  Example 5
  Example 6
 Pizza patchwork technique: patterns for beginners
- Very convenient option, since it does not require any specific scheme
- Made from pieces of fabric of any size
- We place scraps on a piece of fabric of the selected size of the finished product. The drawing is completely arbitrary
- Apply a layer of organza on top
- Let's iron
- We put another drawing from scraps
- Cover again with organza
- Quilting the entire template on a machine
 Quilted patchwork option
 Crazy technique for patchwork jeans: patterns for beginners
- An ideal opportunity to create original products from old jeans that have fallen into disrepair.
- Since this technique involves the use various shapes figures, decoration with buttons, beads, rhinestones, ribbons, lace and other unpredictable elements, labels, pockets, ready-made stitched seams present on old jeans will be used.
- The absence of requirements for any plan or plot allows you to create very unpredictable and useful products.
 We decorate the interior with patchwork craftsmanship
 We make handbags from frayed canvas pants
  Used: frayed edges, pockets, stitched zippers and other decorative elements of old jeans
 Boro technique in patchwork: patterns for beginners
- Ethnic fashion in the Boro style is a prominent representative of Japanese applied art
- This technique involves imitating darning with scraps of rags and scraps
- The work is very labor intensive as each patch is sewn on by hand
- Any product made using this technique turns out to be very unique and decorative.
- Transform an ordinary, boring bag into exclusive item wardrobe that even a novice needlewoman can do
 Sliced different shapes put rectangles on front side bags
  We sew each figure by hand
  An impressive product is ready
 Lyapochika technique in patchwork: patterns for beginners
The most common type of technology. Our ancestors also made carpet runners using this technology. Thin knitted strips are sewn onto the base. The more varied the color scheme, the more interesting the product.
 Decorative pillow in the style of a frog
  Traditional rug from scraps
 Beautiful patchwork sewing of clothes: diagrams, photos
- Creating clothes in the patchwork style requires a lot of time and patience.
- You can make it from pieces: outerwear, dress, blouse, and even boots and slippers
- Choose pieces that are approximately the same size
- With as many colors as possible, there should always be one dominant color.
- You can use scraps from old clothes, remains from new fabric
 Warm jacket from scraps
  Product formation diagram
  Fantasies of jeans
  Harmonious patchwork outfit
  Another type of outfit using patchwork technique
 Boyarka from pieces of fabric
  Cozy home slippers, decorated with patches
 Beautiful patchwork for children: diagrams, photos
 Template: chicken for a walk
  Ready-made bedspread made from a template
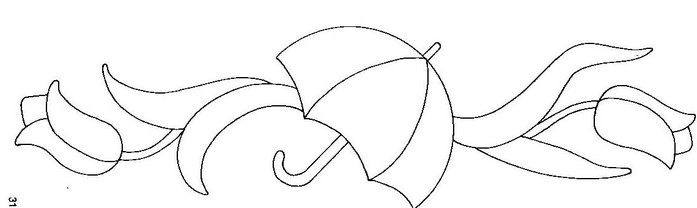
  Schematic image: creative chicken under an umbrella
  Children's blanket according to the proposed scheme
  Girl's handbag made of scraps
  Children's bib decorated with appliqué made from pieces of fabric
  Beautiful panel using patchwork technique
  Pillows for a children's room using patchwork techniques
 Beautiful patchwork sewing potholders
- A practical thing that does not require large expenditures when done in patchwork style can serve a wonderful gift For close friend and relatives.
- Potholders can be made in different shapes and sizes, this greatly simplifies the work for those who are starting to work for the first time. patchwork look handicrafts.
 Cat diagram for kitchen utensils made from scraps of fabric
  Ready-made potholders with a cat
  Mitten potholder option
  Funny owls in the kitchen interior
  Leaves from shreds on oven mitts
 Bright Christmas trees for the hostess in patchwork style
  Another option for potholders made from pieces of fabric in the shape of leaves
 Video: Potholder made from scraps of fabric
Beautiful patchwork bags
One of the options patchwork needlework bags discussed above.
Apply this view folk art Can be used for all types of bags.
 Exclusive version of the bag with your own hands
  Great design in shreds
  Delicate creative model using patchwork technique
  Execution steps unusual detail wardrobe
 Beautiful patchwork sewing from socks
Patchwork techniques are often used to patch holes in socks. But sometimes socks are used for unique homemade products.
 A bird made from old socks
  Fancy sock dragons
  Funny owls made from leaky socks
 Patchwork from fabric strips
Let's consider this technique using the following example.
- From a piece of fabric 1.5 m long, cut out two stripes of yellow color and the same number of stripes with blue flowers
 Preparatory stage 1
 - We cut using a ruler with an angle of 60 degrees or an ordinary one with a marking of an angle of 30 degrees.
- Place on the cut sections Blank sheet Whatman paper
- Matching the bottom ends
 Preparatory stage step 2
 - Cut the top of the sheet to fit the width of the strip
- To the point 30 of the degree marking on the ruler, we apply the side of the edge of the paper
- Bevel the top of the triangle a little, leaving seam allowances
 Preparatory stage 3
 - Draw a line along the intended line, cut off the resulting triangle
- We attach the ruler using tape, as shown in the figure.
 Preparatory stage 4
 Let's get down to the main work
- We fold strips of the same color with the wrong side inward
- Cut off the first triangular piece
- We got two identical triangular shapes, from which we will later create a beautiful napkin
- Cut it out In a similar way triangles for rug
 Stage 1
 - Next, with the inverted side of the ruler, measure the corner from the opposite part of the border
- Cut along the measured line - two more parts for the napkin
- Change the position of the ruler again, cut off the triangles for the track
- As a result, it is necessary to prepare two corners on one side of the strip for the rug and two on the other for the napkin.
- We do all the manipulations in a similar way from the other edge of the strip, but in mirror image
 Stage 2
 - We sew the blanks
 Stage 3
 - Fold a napkin into a hexagon shape
- Place a stitch between unstitched pieces
 Stage 4
 - We form the rug as shown in the figure
- Stitching
 Stage 5
 - We receive finished products
- Next, you can make a padding lining and ribbon edging
 The final stage
 Patchwork sewing of a knitted rug
- Optimal manufacturing option knitted rugs from scraps - using the lyapochika technique discussed above
- You can complicate the pattern by sewing pieces of knitwear in the shape of beaks.
Patchwork: magic triangles technique, napkins
 Decorate magic triangles napkins
 - One of the most popular techniques in patchwork sewing
- The use of triangles is very convenient for creating various patterns and ornaments
- Very easy to work with isosceles triangles
- The creative process is simple: the triangles are sewn together with the short side - a pattern is formed from the long ones multi-colored stripes, length - square patterns are obtained
Patchwork from squares
 Cozy pillow made of square pieces
 The affordable technique of patchwork made from squares is the optimal solution for beginners, as it is simple and easy. To create such a pattern, you can use the bargelo technique given above.
Patchwork products: photos
 Children's theme in patchwork
  Products made from quilted fabric - quilting and from scraps of fabric - patchwork
  Ornament made of patches on elegant bag
 Decorating chairs with patchwork elements
  We change the interior beyond recognition
 - Not always a simple, but very interesting subject of folk art; as you gain skills, it will inspire new ideas.
- Every needlewoman has individual approach to any of the available technologies.
- It is in this handicraft that it is almost impossible to repeat any, even the most simple idea, since the scraps, one in one with the original, are very difficult to pick up.
- This is why patchwork mosaics have special significance - this is uniqueness.
Video: Patchwork for beginners. “Well” technique

