Star news


Lily from Thomas Mk. Lily flowers from foamiran
Foamiran always produces delicate and natural flowers. Today we present master class on making lilies from foamiran.
To work you will need:
- foamiran (white or pale pink);
- iron or hair dryer to heat the material;
- scissors;
- a blunt knife or stack for applying veins to the petal;
- a foam mat or a towel folded in four for working with the petal;
— “Moment” glue or hot melt glue;
— wire 0.35 mm in diameter in a paper braid for the petals;
- acrylic paints;
- red permanent marker;
- stamens and pistil of lily;
- green tape.
Progress:
Using a pre-prepared cardboard template, cut out 6 petals from foamiran.
Using a knife or a stack, we make veins on the petal. Warm up the petals and add waviness to the edges of the petal.

In this way we process all 6 petals.

We strengthen the petals with wire from the outside, gluing them with superglue. We form the desired bend of the petal.

Now the petals are ready and need to be painted with acrylic or oil paint. First, paint the base of the petal with light green paint.

Next, apply pink paint in the center of the petal and shade it towards the edge.

We prepare the center of the lily, consisting of a pistil and 5 stamens. You also need to draw a spot on the petal with a red permanent marker.

Collecting a lily flower. First, we fasten 3 petals with tape and straighten them.
Good day, dear guests of my site.
Not long ago I became interested in a new interesting material - foamiran. And as a result of this, a new section was born - Products made from foamiran. Where I share some of my ideas and secrets. Today I will tell you, or rather, show you how I make a lily from this material.
When creating this flower, I used a variety of techniques. I combined all my knowledge of flower making in it. She used her skills in making silk flowers, flowers from satin ribbons, and standard heat treatment of the foamiran itself.
You can watch the lesson on how to make and.
Since the process of creating this lily is quite difficult to describe and show in photographs, I made a video master class, which consists of three parts:
Part 1 – Pattern and coloring of petals
Part 2 – Processing the petals
Part 3 – Assembling the flower
Materials:
1. Foamiran FoamEva
2. Glue gun
3. Crepe paper
4. Acrylic paints
7. Wire
Petal template length 7 cm, width 4 cm
Template for stamen 1.5 cm, width 0.7 cm

Copyright © ATTENTION!. This material is for personal use only. Copying content and posting on other Internet resources is PROHIBITED.
Excellent foamiran lilies: 13 necessary materials
You can make a lily from foamiran with your own hands: it will look very natural There is nothing difficult in creating a bouquet from foamiran, you just need a little patience and, of course, foamiran itself. First, let's get to know what foamiran is and where you can buy it. Foamiran, in simple words, is a plastic suede material; it easily remembers the shape no matter what it is given. You can get such a wonderful material at a fabric store, or at any arts and crafts outlet. The material is very accessible and inexpensive, the price ranges on average from 60 to 100 rubles.
How to make a white lily from foamiran: a master class for beginners
For beginners, the most interesting thing will be to make lilies from foamiran. To begin with, we will follow the step-by-step advice and conduct a master class for beginners in this matter.
To make a lily from foamiran, you will need:
- Foamiran sheets (white, brown, green);
- Small scissors;
- Wire;
- Foil;
- Glue (moment, second, hot);
- Pastel of different shades;
- Coffee;
- Tray tape;
- Brushes;
- Toothpick;
- Sponge;
- Acrylic paint of different colors;
- Iron.
 In order to make a white lily from foamiran, you need to prepare materials for work
These are the main materials; for sure, other materials will be required in the process of making a lily.
From foamiran you can make various toys, decorative elements for home or clothing, however, foamiran is gaining great popularity in making flowers, which Lilia Krenzler is engaged in.
After all, only from foamiran, flowers made with your own hands will look “alive.”
The necessary pattern for a lily from foamiran
First you need to make a pattern. To do this, we determine the size of the future lily. If we want a big lily, then, accordingly, the petals should be large.
For one flower you will need:
- 7 petals, of which 3 are large and 4 are smaller;
- 1 strip with dimensions 1 cm by 7 cm;
- Triangle with sides 2 cm.
These are the components of a simple garden lily.
 Pattern for a future lily from foamiran
But, for a water lily you will need:
- 3 large green leaves, resembling a tangerine slice in cross-section, about 12 cm in diameter;
- 7 pieces of white petals;
- 20 smaller pieces;
To get a lily bud, we need to decorate and connect all the cut out components of the lily.
We can decorate the lily’s petals in any color, however, if we strive for realism, the lily is usually white and pink with “freckles.”
This means that we decorate the white petals cut from foamiran in the middle with pink pastel or acrylic, as you like, do not forget that where the petals are attached to the bud, its color is light green.
What to make a template for a lily from foamiran
The foamiran lily template is a real live lily, but if it is not there, then you can use a simple picture of a lily. Having carefully examined a living lily, its shape, color and number of petals and stamens, we make a pattern from any paper that comes to hand. And then we apply the obtained templates, petals and leaves to the foamiran, outline and cut them out, and lay out the templates in such a way as to spend less foamiran, saving as much as possible.
Procedure:
- Freckles can be easily applied with a brown or bright red felt-tip pen or a thin brush dipped in brown acrylic.
- We cut out the leaves for the lily from green foamiran.
- However, such even leaves and petals of a real lily do not exist; to make them wavy and uneven, an iron is needed.
- Preheat the iron to medium temperature.
- We take the cut out leaves and petals, place a towel folded several times under them, and iron their edges with an iron.
 Templates for lilies can be made from any paper
Foamiran lilies are suitable as decorative elements in everyday life, for example, you can attach such a lily to a curtain clip, which will fit very nicely on the sides of the assembly.
Also, such lilies can be made in silver color, which can serve as a decoration for the New Year tree.
Such a lily can be glued to a postcard for March 8th to your beloved girlfriend, sister, or mother. Also, lilies made from foamiran are well suited for a hairpin or hairband. It’s easy to attach such a lily to a hairpin; simply, instead of a long stem, screw a hairpin with thin wires. And water lilies are easy to glue around the rim.
Making a lily bud from foamiran on your own
For the stamens you will need a thin wire, the ends of which can be covered with small brown pieces of foamiran, and for greater realism, dip the ends of the stamens in glue and sprinkle with instant coffee, leaving to dry for a while. When the stamens are dry, we begin to screw them to a thicker wire, perhaps it will be a variation connected from several thin wires. This will subsequently serve as the trunk of the lily.
In the middle of the bud you need to place one thick white stamen. It can be made by gluing foamiran around the same wire. Next, collect the lily flower. It is necessary to glue the petals around the stamens in a checkerboard pattern. At first there are small petals, then large ones.
You can glue them using tape or super glue.
We must not forget that a bouquet of living lilies contains unopened buds.
To create them you need:
- Make a base of foil on a wire in the form of an oval.
- Then we coat it with glue and cover it with white foamiran.
- We crumple the foamiran with our fingers to give it unevenness, like a real unopened lily.
- Then you need to paint with pink pastel or pink acrylic a little at the base.
- Glue green tape to the tip of the bud.
- We also glue green leaves along the trunk of the lily.
- The leaves are attached from the bottom, that is, we glue them with super glue to a thin wire, and then wrap them around the trunk of the lily.
- The wire can be covered with tape.
 A bouquet of lilies made from foamiran should contain unopened buds
Well, having made a couple of these flowers, the lily bouquet is ready!
To make a water lily you will need:
- 3 large green leaves with a diameter of 12 cm;
- 7 pieces of white petals and 20 pieces of smaller ones;
- 2 strips of white foamiran measuring 19 cm by 2.5 cm.
Using a toothpick, we scratch the veins of the leaf, and with a sponge we apply pigment or dry pastels of different green shades. We also cut out 7 small leaves with dimensions of about 6 cm, paint them green, and stretch them out on an iron, folding them in half. We cut out the petals from a white sheet of foamiran, paint the bottom of them bright yellow, and the top pink with pastel or acrylic paint. It is also necessary to scratch the petals with a toothpick to give relief. Two white strips cut from foamiran must be cut in the form of a fringe, decorating the bottom with bright yellow and the top with pink. Then you need to iron them so that the fringe sticks out in different directions. Then we make a ball of foil and cover it with white or pink foamiran, and then cover the resulting ball with fringed stripes. We bend the fringe in the middle so that the ball is not visible, and bend the fringe on the sides so that it later lies on the petals. Then we glue the petals in a checkerboard pattern, and glue the flower onto the large leaves that we made at the beginning.
A difficult, but very charming flower made from foamiran, we will make in this master class. Making a lily with your own hands is quite time-consuming and difficult, but the result is worth it. A lily made from foamiran is very similar to a living flower, especially if it is made from the thinnest marshmallow foamiran that has become fashionable recently. Lilies look great in bouquets with many flowers: roses, peonies, orchids, anemones, chrysanthemums, gerberas, etc. Lilies are also good as a decorative element of a wedding hairstyle, so I decided to attach this flower to a hairpin.
This master class will consist of several parts:
Master class on foamiran: lily sprig, photo step by step.
- We will also make a lily flower from foamiran on a barrette/hairpin;
- and in conclusion I will show you how to make a water lily from foamiran.
- a lily flower from foamiran, which we will make below;
- white and green foamiran;
- orange stick for manicure;
- thin and thick wire;
- hot glue, as well as universal or instant glue;
- oil and dry pastels in pink and green shades, wet wipes and a sponge;
- tape.
- white and brown foamiran;
- mold;
- iron;
- pink dry pastel and wet wipes;
- hot pink acrylic paint;
- thin brush;
- thin white wire (for litons);
- glue (instant or universal) and PVA;
- ground coffee;
- white tape;
- white, green and yellow foamiran and a small piece of pink;
- yellow, pink and several green shades of oil pastels, as well as a sponge for shading;
- clematis mold;
- foil;
- second glue;
- scissors;
- acrylic gloss varnish optional;
- white and green foamiran,
- white crepe paper,
- a little thin wire 0.4 mm - for the stamens and 0.8 mm - for the pistil,
- cotton pad,
- white tape,
- semolina painted with yellow acrylic paints,
- toothpick,
- green pastel chalk,
- wet wipes,
- transparent universal glue “Moment”,
- iron,
- scissors,
- Polish for hair,
- hairpin.
- foamiran (yellow);
- paints (I use pastel and acrylic);
- floral wire No. 26;
- floral mold;
- art brush (No. 1);
- tape (yellow);
- hot glue;
- second glue;
- pliers;
- scissors.
 Foamiran leaves (white, brown, green).
- Small scissors.
- Procrastination.
- Foil.
- Good glue.
- Pastel of different colors.
- Coffee.
- Trap ribbon.
- Tassels.
- Toothpick.
- Sponge.
- Acrylic paint in different shades.
- Iron.
- Seven petals, of which three are large and four are small.
- One strip measuring 1 centimeter by 7 centimeters.
- A triangle with sides two centimeters.
- Three large green leaves that look like a slice of tangerine in cross-section, with a diameter of about 12 centimeters.
- Seven little white petals.
- Twenty pieces less.
- Two strips of white foamiran measuring nineteen cm by two cm.
 Make a base of foil on a wire in the shape of an oval.
- Coat it with glue and cover it with white material.
- Wrinkle the foamiran with your fingers to create irregularities, like a real unopened flower.
- Then you need to paint a little at the base with pink pastel or pink acrylic.
- Glue green tape to the end of the bud.
- Also glue green leaves along the trunk of the flower.
- The leaves are fixed from the bottom, glue them with super glue to a thin wire, and then wind them around the trunk of the flower. Benefits and harms of aloe juice for the body There are many medicinal plants, the beneficial properties of which have been known since ancient times. Aloe vera juice is widely used - its benefits and harms have been well studied by modern medicine. This plant can be grown at home – and you will always have […]
- Zamioculcas: home care, cultivation, propagation and replanting There is a legend that this plant brings wealth to the house. Caring for Zamioculcas at home is very simple, so it is not surprising that this bush has become loved by flower growers for its unpretentiousness and […]
- The garden lily is yellower, what to do The garden lily is a plant that was previously considered a royal flower, and today has become a favorite decoration for many flower beds. Thanks to the work of breeders, the exquisite and noble lily acquired a variety of shades, making daylilies a real “highlight” [...]
- Aloe injections in gynecology The anti-inflammatory properties of the plant in question are widely used in the treatment of diseases of the respiratory tract, gastrointestinal tract, eye and skin diseases. In this article we will consider the use of aloe injections in gynecology. Aloe extract […]
Lily bud from foamiran: master class with photos
What do we need in order to start making a lily bud and assembling a whole branch of this wonderful flower from foamiran.

To create a lily bud from foamiran, we first make a base like this out of foil. The size can be varied as desired. In total, we will need several of these bases for the buds, since we will then collect a whole branch of lily.

Apply three strips of hot glue to the foil base and let them cool.

Then you need to take a piece of white foamiran and paste over the base.

This is the bud we got. We tone it with pink oil pastels and treat the tip with tape.

These are the buds I prepared for my branches.

Cut out leaves from green foamiran. You can make them in different sizes. But calculate the number of leaves; 2-3 leaves should be placed near each bud and flower. Since I will be placing the twig in the bouquet, I will attach the leaves only under the buds. If you just want a sprig of lily, there must be leaves under the flower.

Using a stick we apply the veins of the leaf.

We take two types of oil pastels and tint the leaf with a sponge on both sides.

Then we stretch out the edges of the lily leaf a little, folding the leaf in half.

We glue litons all over the sheet.

Since the lily's trunk is not thin, and I don't have such thick wire, I use cocktail sticks. Well fixing the wire with the bud into it.

Before we start attaching the leaf, we lightly color the bud and sepal with green pastel. We make 2 - 3 turns of tape and apply the sheet. Then we wrap the sheet and after the sheet we make 2-3 turns.

Then we apply the second sheet and fasten it against the first sheet. We do 2-3 turns again.

So we continue to attach the lily buds. The number of them will depend on what kind of branch you would like to receive.

Then we attach the lily flower. The quantity depends on the size of your branch and your desire.

Well, this is the lily branch I got as a result of this master class. It consists of three lily buds and two flowers.
I also have an interesting master class for you on how to make a lotus from foamiran, which is often called a water lily.
Lily flower from foamiran on a hair clip: master class with photo
We begin to make an elegant lily flower from foamiran in white and pink colors.
First, let's decide on the source materials that we will need to make the lily.
Master class: how to make a lily from foamiran, step by step photo
First, I will show you the finished foamiran lily, and then I will post step-by-step photos with comments.

This is the color of the foamiran lily called “Ovelia” that we will make in this MK. Let's secure it to a pin. Of course, you can buy the stamens and pistil for this flower in advance, but I will show you how to create a flower entirely with your own hands from foamiran.
Lily pattern from foamiran

This is the pattern of a lily made from foamiran that we will need. For one flower we need only 6 petals, of which 3 are small and 3 are large. A strip of white foamiran 1 cm * 6 cm. A white triangle, for the convenience of forming a pestle, take 3 cm. And a drop of brown foamiran 1.5 cm * 0.5 cm.
Making lily petals from foamiran

We cut out the petals and pistil from white foamiran. The base for the stamens is brown. All is ready.

We begin processing the petals. We process all petals in the same way, first we heat them on an iron at silk-wool temperature and process them on mold. If there is no mold, heat the petals on an iron, fold them like an accordion, rub them a little between your fingers to thin the petals, and then straighten them and apply texture with a stick.

We tint the petals with a pale pink color: 2/3 of the petals on both sides. I tint with dry pastels using a damp cloth.

Then use acrylic paint to apply dots on all the petals. Can be applied with a thin brush or the tip of a toothpick.

Then we continue to iron all the petals again. We heat the tip of the petal itself, pinch it and pull it down a little. Then we heat the end of the petal at the end of the iron and make a small wave, as if tearing the petal, turning one side of the petal towards us, the other away from us.

We glue all the petals onto the litons, apply glue to the tip of the petal 1.5 cm from the front side and apply the liton, then clamp it.

We take the triangle blank and bend it like this.

Apply glue along the folds and clamp well.

We took a larger triangle blank so that it would be convenient to form the base of the pestle, and now we cut off the excess, like this.

For the pestle itself, we take 7-8 cm wire and a piece of foamiran 0.5 cm * 6 cm.

We coat the wire with glue and wrap it with foamiran. We trim off the excess foamiran and twist or roll the wire on the table so that the pestle stem becomes round.


On the blanks for the stamens, draw a stripe in the middle with a stick.
Making lily stamens from foamiran

Then we apply glue to this strip and glue the litons, pressing them well.

We take PVA glue and ground coffee (not instant coffee, I just have a jar for it). Dip the stamen heads in glue, then in coffee. Let it dry and then remove the excess.

We glue the stamens to the pistil, placing them slightly higher.
Collecting a lily flower from foamiran

First, we glue small petals in the form of a triangle, placing them above the stamens. All petals are at the same height.

Then, between the petals of the first row, we attach the large petals a little lower than the small ones, but at the same height as them. We got such a wonderful lily from foamiran. You can make several flowers and put together a composition or bouquet for the bride. But we will make jewelry for your wedding hairstyle - a lily on a stiletto heel.

We treat the bottom of the lily, the place where the petals and pistil with stamens are attached, with a 1.5 - 2 cm tape, in several layers (as if creating a lily sepal). We cut off all the remaining wires from the litons, leave only one from the pestle and take a large pin.

We connect the remains of the wire from the liton and one side of the hairpin, wrapping it with 2 cm of tape. Now the entire foamiran hair decoration is ready.
Water lily from foamiran: MK with photo
Let's start the master class on making a charming water lily from foamiran with a finished sample (see photo).

For this master class on foamiran I needed the following materials:
Foamiran water lily template

According to the pattern, we will prepare templates for making such a wonderful flower.

From green foamiran we cut out 3 leaves with a diameter of 10 cm.

Apply the texture of the leaf with a stick.

We apply tinting on the front side of the leaf, since the lily will be used to decorate a pond in the garden; the bottom of the leaves does not need to be tinted. For tinting we use several shades of green pastel.

We also cut out green leaves for sepals. Size 7 cm * 2.5 cm. Cut out 6 to 8 pieces.

For tinting we use several shades of green pastel, since our foamiran has a very bright color.

Then we iron the leaves at silk-wool temperature, fold them in half and pull them out with a boat.

We cut out the flower petals from white foamiran.

We tint the bottom of the small petals with bright yellow oil pastels on both sides.

Then we apply texture to the small petals with a stick.

We tint the top of the petals with slightly pink pastel. We apply tint on both sides. We also tint the end of the petals.

We process large petals with an iron at silk-wool temperature and squeeze them well on the mold.

Then we lightly tint both sides with pink pastels.

We take two strips of white foamiran 18 cm * 3 cm and one strip with a thin fringe, the second with a fence.

We tint the stripes with bright yellow pastel on both sides, leaving the tips white. Then we tint the ends of the fringe and the fence with pink pastels.

Then we iron the strips so that the ends are slightly bent.

Take a piece of foil 10*10 cm and form a ball for the center of the flower.

Take a piece of pink foamiran and tighten it.

We cover the ball with covered foamiran.

Then we cover the ball with stripes. We glue the fringe at the same level.

Glue the fence a little lower, 2 mm, also with glue at the same level. Glue the fence so that the eyelashes look outward.

Then we glue small petals to the base. We glue the first row of 7 pieces, glue them next to each other. The second row is between the petals of the first row. And the third one between the petals of the second row.

Glue large petals to the bottom of the base in a circle.

Then we glue the sepal leaves, also in a circle. One next to the other.

We collect the leaves next to each other and glue them together. And glue a flower into the middle of the leaves.

Here is a flower called a water lily that we created for you.
White lily from foamiran
Since you can make flowers from foamiran of all varieties and types, let's try to create an incredible and very delicate lily, which can become a wonderful decoration for your hair.
There is absolutely nothing difficult in creating it and you will definitely succeed.
Let's get ready for a new master class!
Today we can do just fine without a glue gun!
We will need:

Step 1: Stamens and pistil.
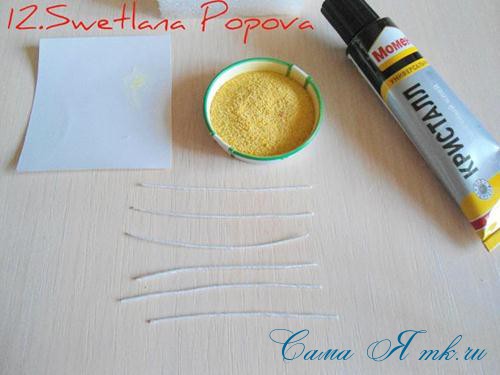
For the stamens and pistil, I already wrapped the wire in white crepe paper.

We will need 7 letons, 6 letons for the stamens - 0.4 mm wire, 1 - for the pistil, a little thicker, 0.8 mm.
Take a cotton pad and separate it into two halves.

Cut the half into 2 more pieces.

We begin to wrap it around the leton very tightly.

This is what happened!

Take white tape. Since the tape is wide, we cut it lengthwise.


We wrap the workpiece, retreating approximately 3-4 mm from the top edge.

Now you need to dip the cotton tip into the glue.

And in semolina painted with yellow acrylic paint.
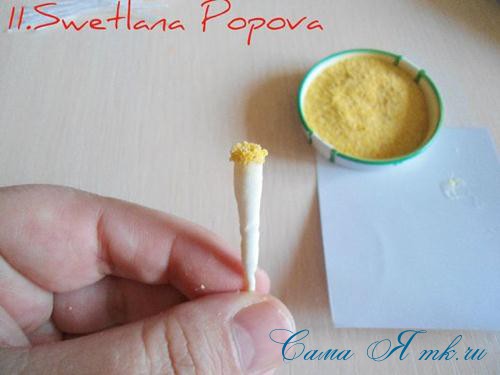
Now let's make the stamens.
We bend the letons to form approximately the letter “T”.

Dip it first in glue and then in semolina.


Step 2: Petals and leaves.
We cut out 6 petals of the desired size from foamiran in the form of an ellipse, but with pointed ends.
The template is presented in full size and can be copied, printed on an A4 sheet and printed.


Glue the letons to the petals, retreating 5 mm from the edge.


From green fom, randomly cut out 4 leaves.

Starts tinting.
We will tint using the “wet” method.

Dab a damp cloth over the pastel chalk.

Using a green-toned napkin, paint all the petals on both sides.

This is how they turned out, very tender!

Heat treatment: only apply the edges of the petals to the iron!
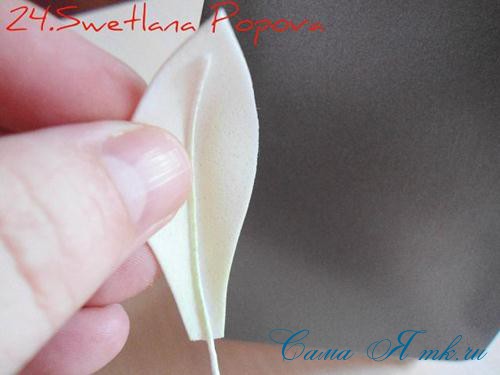
We bend the petals with our fingers and curl the heated leaves!

We also tint the stamens and pistil with green pastel.


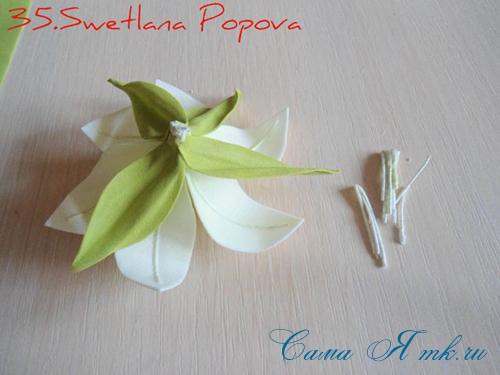
Step 3: Collect the finished white lily flower.
Wrap the pistil and around the stamen with tape.

To the middle we add 3 petals, which are wider.


And 3 more in between the first ones.

Unfolds the petals so that they are one after the other.


We cut off the excess wire tails.
Cut out a square approximately 1.5/1.5 cm.
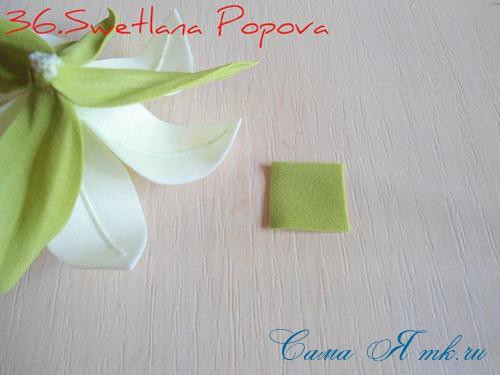
They dented it and twisted it.

They glued it to the “butt” of the flower.

Insert a pin between the petals.


Just a little spray of varnish will fix our tint.

The flower did not come out big, for a larger size you need to increase the cut.

Our Lily in all her glory!


Thank you everyone for your attention!
Creative success in creating flowers! I will be very glad to see photos of the work done in this master class!
I create detailed master classes with step-by-step photos and video instructions.
Handicraft workshops


Foamiran flowers, master class “Lily”
Flowers from foamiran. Master class “Lily”
This is the beauty we will get...
Subscribe to my blog: "Svetlana Popova's Flower School" and receive new MKs directly to your email!

Prepared for the master class. Today we can do just fine without a glue gun.

Here is a pattern of petals, you can use it.

For the stamens and pistil, I already wrapped the wire in white crepe paper. We will need 7 letons, 6 letons for the stamens, 0.4 mm wire, for the pistil a little thicker than 0.8 mm!

For the pestle, we take a cotton pad and divide it into 2 layers:

Cut the half into 2 more parts:

We begin to wrap the letons very tightly.

This is what happened.

Take white tape...

If the tape is wide, then cut it lengthwise.

We wrap the workpiece, departing from the top edge approximately 3-4 mm.

Now you need to dip the cotton tip into the glue.

Then we dip it in pre-painted semolina.

Now let's make the stamens.

We bend the letons with the letter “T”, as shown in the picture.

Dip it first in glue, then in semolina.

This is what the finished stamen looks like.

Trace the templates and cut them out.

Glue the leaves to the letons, retreating 5mm from the edge.


We cut out 4 leaves from the green paper in any shape.

Let's start tinting. We will tint using the wet method.

Draw a damp cloth over the pastel chalk...

Then use this napkin to paint the leaves on all sides.

This is the color it turned out to be, very delicate.

Heat treatment: apply only the edges of the petals to the iron.

We bend the petals with our fingers, and twist the heated ones.

Shade the stamens and pistil with green pastel.


We collect the stamens around the pistil and wrap the tape with tape.

Adds 3 wider petals to the middle.


And 3 more in between the first ones.

We unfold the petals so that they are one after the other.

Now let's move on to the leaves.


Cut out a square approximately 1.5 x 1.5 cm.

They dented it and twisted it.

They glued it to the “butt” of the flower.


We insert it between the petals.

Just spray it a little with varnish, fixing our tint.

The flower came out small, if you need more, just enlarge the pattern.

Here is our lily in all its glory! I wish you all creative success, your Svetlana Popova!
masterrukodelia.ru
Master class lily from foamiran

Good day, dear guests of my site.
Not long ago I became interested in a new interesting material - foamiran. And as a result of this, a new section was born - Products made from foamiran. Where I share some of my ideas and secrets. Today I will tell you, or rather, show you how I make a lily from this material.
When creating this flower, I used a variety of techniques. I combined all my knowledge of flower making in it. She used her skills in making silk flowers, flowers from satin ribbons, and standard heat treatment of the foamiran itself.
You can watch the tutorial on how to make a fabric lily and a satin ribbon lily.
Since the process of creating this lily is quite difficult to describe and show in photographs, I made a video master class, which consists of three parts:
Part 1 – Pattern and coloring of petals
Part 2 – Processing the petals
Part 3 – Assembling the flower
1. Foamiran FoamEva
2. Glue gun
3. Crepe paper
4. Acrylic paints
Petal template length 7 cm, width 4 cm
Template for stamen 1.5 cm, width 0.7 cm

children-mama.com
How to make a terry Fata Morgana lily from foamiran
These lilies are unique among double lilies. They are large in size, up to 16-17 cm, and they also have many petals, up to 12 pieces, and this variety of lilies does not have stamens, but only pistils. The petals are 1/3 dark red.
Making a pestle
Let's make a pestle. Take 3 pieces of wire, 8-9 cm each.
Using pliers, we bend small loops of 3-4 m from one edge, and bend the loops perpendicularly.
Let's fold the pieces of wire so that they look like a pestle. Let's twist it carefully.
Now take a yellow tape, cut it in half and wrap it around a wire, about 4.5 cm (the tape can be replaced with a 0.5 cm strip of foamiran).
Then we’ll make dry pastel pencil shavings (dark red and green) and tint the pestle: the bottom of the pestle is green, the top of the pestle is dark red.
Making petals
Now let's start preparing the petals. Cut out templates of petals 1,2,3,4 from cardboard. Dimensions of the templates: 1 - height 6.5 cm, width 3 cm; 2 - height 7.3 cm, width 3.5 cm; 3 — height 9 cm, width 4 cm; 4 - height 9.8 cm, width 4.5 (the size of the petals will depend on who, what diameter you want the flower; I ended up with a lily 14-15 cm in diameter).
Cut out petals from yellow foamiran. To make one lily we will need 3 petals of each type.
Take a green pastel and a damp cloth and draw all the petals at the base, on both sides.
Now let's process our petals using an iron and mold. We apply each petal to a heated iron for a few seconds, and quickly until it cools down to the floral mold, and press the texture with our fingers along the entire length.
These are the textured petals you should get:
Now take dark acrylic paint and the thinnest brush. Apply specks to 1/3 of the petal. We give it a little time to dry. We do this with all the petals.
Then we will stretch the edges a little, as in the photo and crumple the top of each petal. We will also curl the edges with our fingers, this is not even possible for all petals. And fold the smallest petals (No. 1) in half lengthwise and twist them a little.
Let's do this with all the petals.
Flower assembly
Glue petals No. 1 around the pistil, placing them evenly in a circle, slightly overlapping. We try to glue the petals as vertically as possible. We apply glue to the base of the petal (another little secret - it’s better to glue the first row with second glue, because it may not stick to the tape with glue from a glue gun, then you can use hot glue).
Then we glue petals No. 2, placing them in the spaces between the first ones, we also place them vertically, and of course, make sure that you like the position of the petal.
The reverse side of the flower, after gluing the petals No. 2:
Now we glue petals No. 3 and 4 in the same way. We glue the petals at the base, a few millimeters lower than the previous ones.
The reverse side of the flower, after gluing petals No. 3 and 4:
If you don’t need the wire for further assembly, then you can cut it off. Here is our terry lily “Fata Morgana” and it’s ready.
Patterns and applications
Receiving patterns is available only to registered users.
Lily from foamiran: master class
 From foamiran you can create various unusual crafts, jewelry and, of course, magnificent flowers with your own hands; they turn out very cute and interesting.
And now we will analyze a master class on creating a lily from foamiran. Such foamiran lilies will be the best present for any celebration.
 There is nothing difficult in making a bouquet from foamiran, you just need a little patience and, of course, the material itself. First we will find out what foamiran is and where you can buy it.
Foamiran, to put it simply, it is a bendable suede material, it simply remembers the shape no matter what you try to make.
You can find such unique material in a special fabric store, or at any point for working with creativity and handicrafts. The material is completely accessible and at an affordable price, it ranges from 60 to 100 rubles.
Gallery: foamiran lily (25 photos)
How to create a white lily from foamiran, a detailed master class
For beginners, the most exciting thing will be to create a flower from foamiran. To begin with, we will use step-by-step recommendations and perform a master class for beginners in this matter.
To create a flower from foamiran, you will need:
These are the main materials; for sure, in the process of creating a lily you will need other materials.
From foamiran you can make various toys, decorative items for the home or clothing, however, foamiran is gaining serious popularity in terms of creating flowers.
After all, only from foamiran, created with your own hands, will flowers look as if they were alive.
Special pattern for a lily from foamiran, master class

First you need to create pattern. To do this, let's decide on the size of our lily. If we want a voluminous lily, then, accordingly, the petals should be large.
For one flower we need:
These are the constituent particles of an ordinary garden flower.
But, for the water lily we you will need:
 To make a lily bud, we will need to decorate and attach all the cut out components of the lily.
We can decorate the lily’s petals in any color, however, if we want to achieve realism, then the lily is most often white and pink, with “freckles.”
Then we decorate the white petals cut from foamiran in the center with pink pastel or acrylic, as you like, do not forget that where the petals are attached to the bud, its color is light green. Here we have looked at the beginning of the master class.
What will we use to make a template for a foamiran lily?
A real ordinary lily will serve as a flower template from such material, but if you don’t have one, then you can get by with a simple picture of a flower. Having carefully examined a living flower, its shape, color and number of petals, stamens, create a pattern from any paper, which will be at hand. And after that, we will attach the already created templates, petals and leaves, to the foamiran, trace them and cut them out. We lay out the templates in such a way as to waste less material.
Operating procedure:
 It is easier to mark freckles with a brown or bright red marker or a thin brush dipped in brown paint. We will cut out the leaves for the lily from green material. However, such even leaves and petals of a real lily do not exist; to create waves and unevenness they will need an iron.
Let's preheat the iron to a certain temperature. Take the cut out leaves and petals, place a towel folded several times under them, and iron their edges.
Flowers made from this material are suitable as decorative items for everyday use; for example, you can attach such a lily to curtain clips, which will fit very elegantly on the sides of the arrangement.
Also, these flowers can be made in silver color, which can serve as a decoration for the New Year tree.
This lily can be glued to a postcard for the eighth of March for your beloved woman, sister, or mother. Also, crafts made from foamiran are perfect for a hairpin or hairband. Let's attach such a lily to a hairpin instead of a long stem, and fasten the hairpin with thin wires. And it’s easier to glue water flowers around the rim.
Making a lily bud with your own hands
 For the stamens you will need a thin wire, the ends of which can be covered with small brown pieces of foamiran, and for greater realism, the tips of the stamens are dipped in glue and sprinkled with instant coffee, leaving to dry for a certain time. When the stamens dry, we will begin to screw them to a larger wire, perhaps it will be a part created from several thin wires. This will subsequently serve as the trunk of the flower.
In the middle of the bud you need to place one large white stamen. It can be created by gluing material around the same wire. Next we will collect the flower. After this, we glue the petals around the stamens in a checkerboard pattern. At first small petals, then voluminous. You can glue them using tape or super glue.
For their manufacture required:
Foam floristry is the production of decorative flowers from plastic suede (foamiran). These flowers are so realistic that they perfectly replace real ones. They are used in interior decoration, compositions and hair decorations. Floristry is a very expensive activity. To create a realistic flower you need to have: paints, foamiran, molds, patterns, stamens and much more. But knowing some secrets, you can do without almost half of the tools. Today we want to show how to make a lily from foamiran without using mold.
Materials and tools for making lilies from foamiran:
- - white and olive foamiran;
- - white and green tape;
- - thin wire;
- — pastel (yellow, brown, orange, green, herbal greens);
- - second glue, for example, Cosmofen;
- - a piece of sponge from washing dishes;
- - semolina;
- - toothpick;
- - scissors;
- - iron.
If you look at a lily flower, in addition to six elongated petals you can see one pistil and six stamens. We will make petals and leaves from foamiran. Where can I get the stamen and pistils? - you ask. Of course, you can buy them in the store. But since we decided to do without unnecessary expenses, we will also make the stamen and pistils ourselves. And let's start creating the lily with them.
How to make stamens for lilies from semolina
Stamens. Cut six pieces of wire about 7 cm long. Take a narrow white tape and stretch it.

Wrap the wire tightly.

Bend one end (0.5 cm).

We retreat 0.5 cm from the curved end and bend the wire (in the other direction).

Now bend the long end at an angle of 90 degrees. For a better understanding of what we are doing, the photo shows the entire path with lines.

Pestle. Cut off about 7 cm of wire and wrap it with tape. First we wrap one end until we get a small ball, then we go down. When we go down three centimeters from the working end, we turn around and start wrapping the tape up towards the end (top). We reached the top, make a few turns and go down. What did we get? Where we made numerous layers with tape, a “head” formed, and the other end of the wire remained thin (without compaction).
At the top of the pestle, use the edge of nail scissors to make depressions (you will have to use force).

We give the stamens and pistil a yellow-greenish tint.

Pour semolina into a small container. Pour a drop of glue into another container. Dip the curved end of the stamen into glue and immerse it in semolina, take it out. We glue the semolina onto the pestle only at the very top.

Rub yellow pastel into the semolina and add yellowness to the wire.

Flower assembly
From white foamiran we cut out petals (6 pieces) of two sizes. The first three petals should be 9 cm high and 4 cm wide. The second three petals should be 10x4.3 cm.

Let's start coloring the petals. Shade the yellow pastel from the base of the petal to the top in a certain pattern. We distribute the paint in the middle of the petal and along the edges, as well as on the tip.

We make barely noticeable green highlights.

We paint the reverse side of the petals very lightly.

On both sides (the yellow stripe drawn in the middle) we apply orange pastel.

We make a yellow border.

We draw specks. We stick the end of the toothpick into the pastel chalk, transfer the piece of pastel that remains on the toothpick to the petal.

Use brown chalk pastels to draw on the stamens and pistil.

Heat up the iron. We attach the petal. We place the petal (lengthwise) between the index and middle fingers of both hands. We begin to bend. The central part remains intact, and the sides of the petals take on a convex shape.

On three petals, the size of which is 10x4.3 cm, cut off the tip and paint the cut with yellow.

In two or three places along the edge of the petal we make a weak wave.

We turn the petal over and see the convex central vein. Apply green pastel to it.

We connect the pistil and stamens with green tape.

Glue the petals with the cut ends first. Apply glue to the base of the petal 1 cm wide and glue it to the tape.

Distribute the petals evenly.

Glue the next three petals between the petals of the first row.

From olive or green pastel, cut out three sheets measuring 11x4 cm. Apply with a sponge first green pastel, then yellow.

We shape the leaves in the same way as we did the petals.

Fold the sheet in half, apply the bend to the iron for less than a second, press this bend with your fingers (the first sheet). After heating the edge, stretch it with your fingers. We get a wave (second sheet). We heat the tip and, pulling it out, scroll it, draw longitudinal lines with a stick (third sheet).

Glue the leaves to the lily.

This lily flower can be used to decorate a gift, a topiary tree, or a hair tie.

If you want to make a lily with a leg, then glue a thick wire while connecting the stamens and pistil.


