Star news


Bracelets made of different materials. Men's bracelets: ideas, examples, master class
On beautiful photos You can look at python skin bracelets for quite a long time. But such products are incredibly expensive.
Isn't it better to show your imagination and make an elegant accessory from scrap materials with your own hands?

Many people simply throw old zippers in the trash. But they can serve faithfully for several more years. Old zippers make fashionable and elegant bracelet. This bright decoration can be worn with casual clothes, and with an evening dress.
Let's try to figure it out: how to make bracelets with your own hands if you have several old lightning bolts at your disposal? First you need to look into your wardrobe and get old clothes. The zippers are carefully removed from it.

After this, you need to go to a special department where they sell sewing goods. In it you need to purchase inexpensive accessories used in making jewelry at home.
How to make a bracelet from unwanted lightning?
It's quite simple:
- First, the zipper must be cut into 3 pieces of the same size. They should fit securely around the wrist area.
- One edge of the pieces is clamped with a special fastener purchased in the department for needlewomen.
- Then the pieces old zipper slowly braided into a pigtail.
- After this, the second edge is fixed using a hardware fastener.
- A secure lock is attached to the clamps. If it is not at hand, the lock is replaced with a thin satin ribbon.

A stylish accessory can be of any shade. In the handicraft departments, zippers are presented in a wide range.

You can buy a product of the desired color and make a bright bracelet from it that will perfectly match your favorite dress.

An elegant bracelet from a boring bag
To make an accessory, you need to take a bag handle, fabric scraps, and rhinestones.
The sequence of actions is as follows:
- You need to cut a small piece from the handle. It should fit snugly to the wrist area without causing pain.
- A piece from the handle of the bag is applied to the fabric flap, and the necessary measurements are taken using a pencil.
- The piece of fabric is carefully sewn from the inside out and turned inside out. The seam remains on the inside. You need to insert a piece of the handle from the bag into it.
- The edges of the resulting product are folded and carefully sewn together. First, rings from the bag are put on them.
- Used to decorate the product various materials: rhinestones, beads. If the rhinestones differ in color, they should be used to make some interesting pattern. From beads different shades It can also make a stylish and bright decoration.
- The rings are then secured using various connecting elements. They should be taken from the handle of an old bag.

This decoration will create a complete look. It will become a great gift for the birthday of a friend or relative.

Beautiful bracelet made from scrap materials
A wrist bracelet can be made from multi-colored beads that differ in size. To do this you need to stock up wide elastic band and strong thread:
- Place the elastic band on your wrist and measure the required length. It shouldn't be too big. After all, if necessary, the elastic band stretches perfectly.
- Its ends must be sewn with white threads.
- The beads are sewn to the elastic in a random order using a needle. It is necessary to carefully distribute the beads along the entire length of the product.
- After all the decorations have been sewn on, you need to securely fasten the edges of the product.
Bright accessories are also made from other materials. For example, a beaded bracelet looks quite attractive.

Can be done chic decoration and from ordinary pins. They are purchased in a specialized department with goods for handicrafts. You can buy gold-plated pins that have a glossy surface.

You can also make a leather bracelet at home. To make it, old belts and small pieces of fabric are used. Metal buttons are usually used to secure products. During production leather bracelet Both natural and artificial leather are used.

Photos of DIY bracelets


Note!


Summary: DIY jewelry. DIY beaded bracelets. Weaving bracelets. Bead bracelets diagrams and photos. Thread bracelets. Bead bracelets. Master class bracelet.
Continuing the topic summer crafts, let's talk about how to make jewelry with your own hands. Bright bracelets, fashionable beads, unusual rings and other jewelry for summer outfits It will be interesting for girls to do it with their own hands. Of course, mothers will help them in this exciting creative activity. In today's article we will talk about how to make bracelets with your own hands.
We will teach you how to weave bracelets:
Beaded bracelets
Paper bracelets
- nut bracelets
- lace bracelets
Let's start with the easiest bracelets to make, which can be made even with preschoolers.
1. DIY bracelets. For beginners bracelets
It's very easy to make bracelets from wooden sticks for ice cream or medical spatulas. To do this, you must first soak them in water for 24 hours so that they become flexible. To speed up this process, it is sometimes advised to “cook” them for 15 minutes, but after this the sticks may darken.
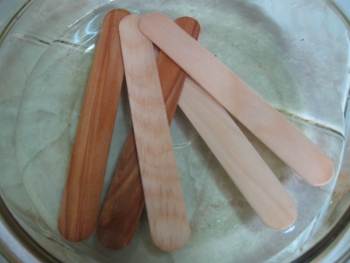
Now you need to take them out of the water and very carefully place them in a glass or cup of a suitable diameter so that the sticks take their shape.
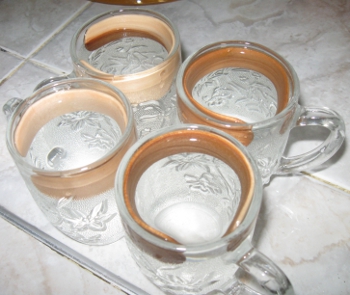
Leave them in this position to dry. Before removing the sticks from the cups, make sure they are completely dry.
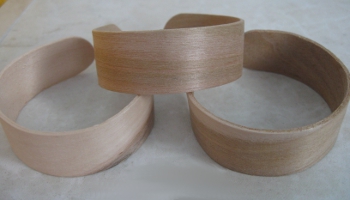
These are the blanks for bracelets you should get. All that remains is to paint the bracelets with your own paints, decorate them with fabric, paper applique

using decoupage technique, beads, buttons, etc. Helpful advice
: it is better to make a bracelet with a slightly smaller diameter than you need, because... When decorating a bracelet, in particular, when treating it with paint and glue, it may straighten a little and become larger.
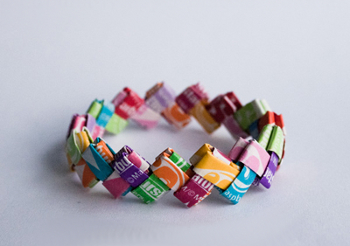
2. How to make a bracelet with your own hands. Paper bracelet It’s easy to make a bracelet with your own hands using the origami technique from candy wrappers. Detailed wizard for a class on making an origami bracelet, see the link >>>> If you don’t have the opportunity to collect so many candy wrappers, you can make an origami bracelet from colored paper. Detailed instructions
for making a bracelet, see our website at the link >>>> You can make more from colored paper difficult option
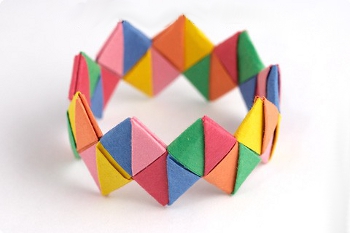
bracelet >>>>
3. DIY jewelry. DIY bracelets
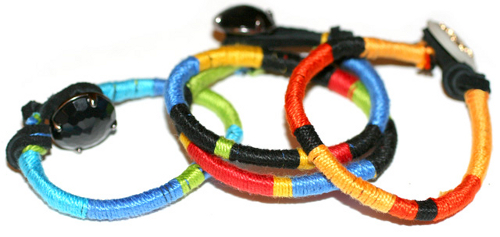
4. DIY thread bracelets. Floss bracelet
To make these bright bracelets from floss threads, you will need:
Leather lace - floss threads
- different colors
beautiful button
5. Bead bracelets. Thread bracelets
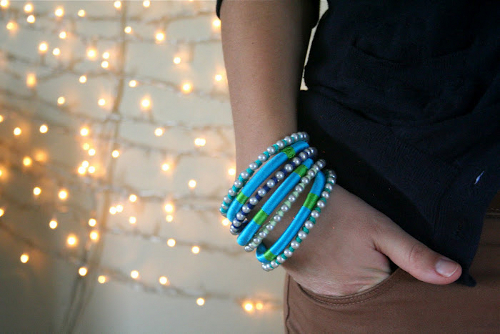
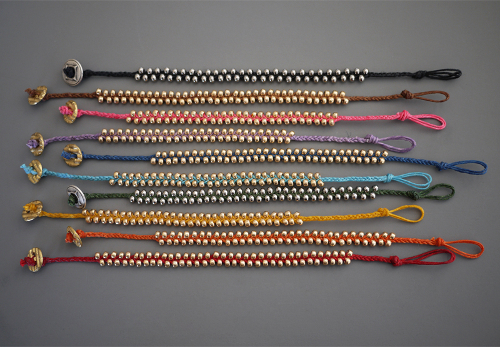
The easiest way to make an elegant bracelet from beads is to buy an inexpensive bracelet and cute beads in the jewelry department, and then “tie” the beads to the bracelet with colored yarn or thread.
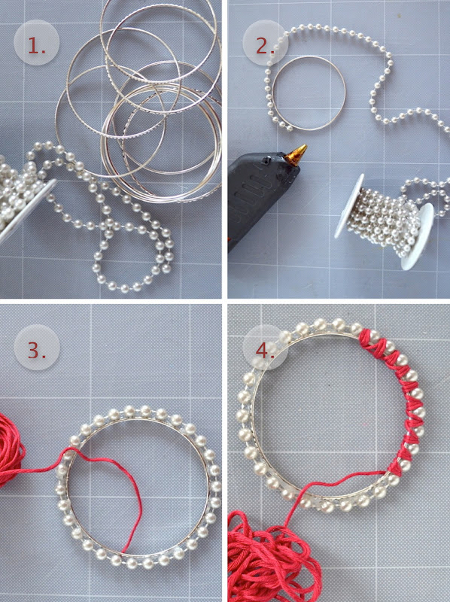
Making such jewelry with your own hands is quick, simple and inexpensive, so you can afford to have bracelets of different colors to suit different outfits. This is what the finished product looks like on hand.
Instead of a purchased bracelet, you can use a bracelet made by yourself from plastic bottle >>>>
Or you can “tie” store-bought beads to a leather cord.
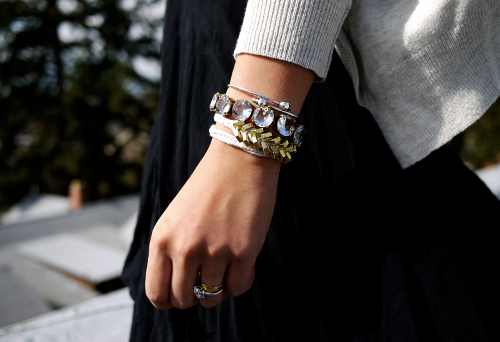
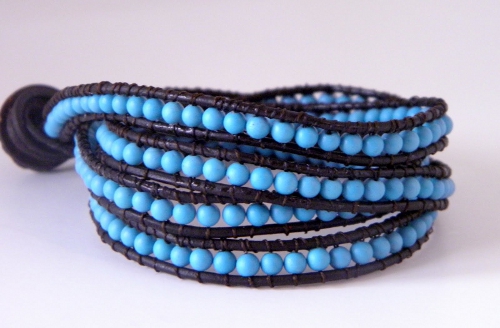
This DIY bead bracelet looks very stylish. It can be wrapped around your wrist several times. We looked at easy-to-make DIY bracelets that parents can make even with preschool-aged children. Now let's move on to more
complex master
classes on how to make a bracelet.
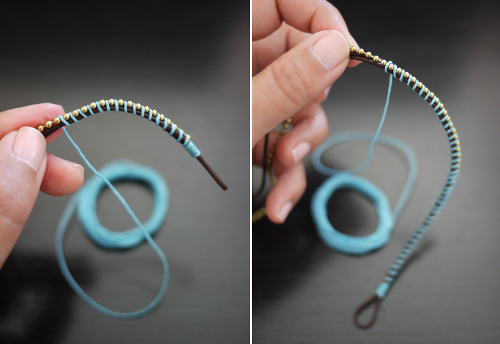
6. Beaded bracelets. Bead bracelets Now we will teach you how to weave bracelets from beads and beads in the simplest way, accessible even to those just starting to master the science of beading. Do you know how to weave?

regular braid
? If the answer is yes, then you can completely cope with the task of making such a bracelet from small beads (seed beads) and waxed cord. You will understand how to make such a bracelet from beads by reading the instructions at the link >>>> In a nutshell, you will simply need to sequentially weave the beads into a braid that is woven from a cord.
In the same way, you can weave a bracelet from thick rope and hexagonal nuts. Link >>>>
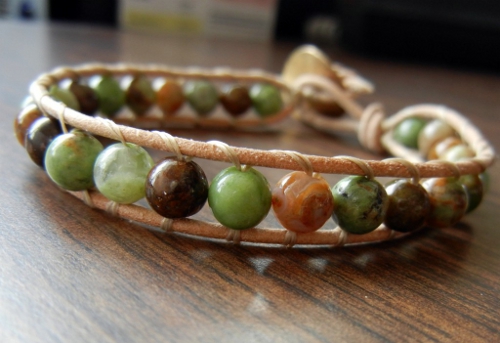
One of the most beautiful and stylish, in our opinion, bead bracelets, which even beginners in beadwork can make. See photo below. To make such a bracelet with your own hands, you will need: Any beads
- small size
(4-6 mm). The number of beads depends on how long the bracelet you want. Decide in advance whether it will wrap around your wrist once or several times. leather cord Durable threads suitable color. The threads do not have to match the leather cord; they can be
contrasting color . A prerequisite: the thread must be of such thickness that, folded in half twice, it can pass through the hole in the bead. Beautiful
button
for clasp
Needle, scissors, clip for attaching the bracelet during weaving Work plan: 1. Measure the desired length
2. Measure the thread of the required length, thread it through a needle, and tie a knot.
The thread must be double.
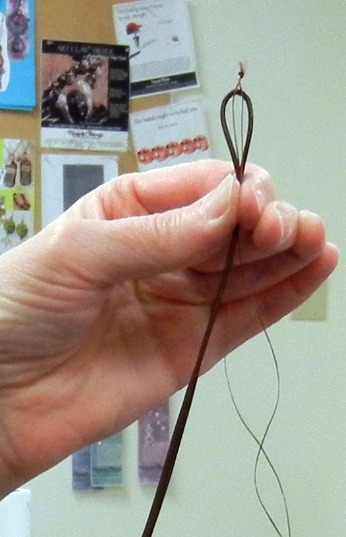
3. Fold the leather cord in half, attach the thread to it with the knot facing up, with the needle hanging at the bottom. Leave a small distance for the clasp loop and make a knot by tying the lace and thread together.
Before making a knot, make sure the fastening button fits through the loop.
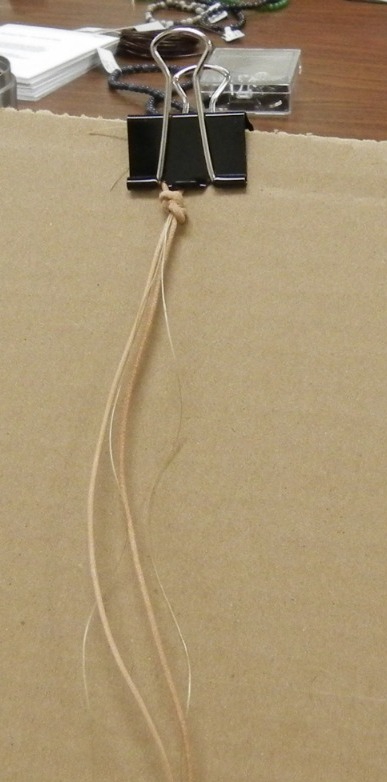
4. Attach the string with clips to a piece of cardboard on both sides for ease of use. There is no need to attach a thread. Now we proceed directly to weaving the bracelet.


5. First we will make a few stitches without adding beads. Pull the thread OVER the right end of the lace, now back UNDER it, then OVER the left end of the lace and back UNDER it. The stitch is shaped like 8. Do this 5-6 times.
6. Now let's start adding beads between the two ends of the lace. When the thread comes FROM UNDER the left end of the cord, add a bead. Now pass the thread OVER and back UNDER the right end, again through the bead, then OVER and back UNDER the left end of the cord. Now add another bead and so on. 7. Tie a button at the end for a fastener. Your DIY bead bracelet is ready!
Continuation of the article "How to weave baubles" >>>>
In the second part we will tell you how to weave baubles from floss threads.
Material prepared by: Anna Ponomarenko Other publications on the topic of this article: Bead bracelets- an inexpensive and accessible decoration that will complement a suit in any style. Beads are very diverse in shape and material from which they are made: glass and stone, plastic and wood, metal and bone - you can’t list everything. And if you use various additions: accessories, ribbons, lace, leather, etc., then the possibilities to create something beautiful and very individual become almost endless. Humanity made and wore bracelets with ancient times. But they did not immediately become decoration. Their first purpose is amulets, protectors from influences hostile to man. Somewhere this is still preserved if the bracelet is made of natural stones. After all, they
beneficial influence and energy are undeniable. But it is enough that you like the decoration and improve your mood. even a child can make them. And many, probably, made them themselves, having reached their mother’s reserves. Simply string the beads onto a thread. In general, this option has a right to exist even if you are no longer a child. If the beads are very decorative and the thread is elastic, then why not. Using accessories, departments of which can now be found even in small towns, you can complicate the design and add decorativeness. As a last resort, the range of online stores selling accessories for jewelry is very extensive. And finding ribbons, lace, cord, and chains is not a problem at all.

Bracelet made of beads and ribbon has many variations. For the simplest one, we don’t need anything other than a narrow thin synthetic ribbon and beads with a sufficiently large hole. We cut the end of the tape obliquely at an acute angle and lightly singe it over the flame of a lighter so that it does not fray. Don't overdo it - if you burn too hard, it will create sagging that will thicken the edge. Having stepped back from the edge of the ribbon opposite the melted one at a distance of 15-20 cm, so that you can then tie a bow, tie a knot, then put a bead on the ribbon close to it, make a knot again and repeat until the bracelet is completed. Finish the work with a knot. Align both ends of the tape and melt them. Your bracelet is ready.

Another way is to sew beads to the ribbon. The distance between them is equal to the diameter of the bead. Stringed sufficient quantity, gather the ribbon on the thread. We ended up with a very nice decoration. Instead of ribbon, you can use narrow lace. And if you triple the distance between the beads by making three stitches, then appearance decorations will become even more decorative.
For the third option, in addition to beads and ribbons, we will need accessories: huggers, pins, a carabiner and a pliers tool. From narrow tape Let's make roses. We put huggers on the beads using pins and make a loop with round pliers. From the wrong side, using invisible stitches, we sew the roses to the beads, alternating them with each other. We attach a clasp to the outer beads. The result is a glamorous bracelet. Its only drawback is that Bottom part flowers does not look very aesthetically pleasing. This can be easily fixed by using bracelet connectors, which can also be purchased in the hardware department - just circles with loops on both sides. Gluing roses on them using a glue gun or instant glue is not difficult. At the same time, assembling such jewelry will be much easier, it will look better, and it will be more pleasant to wear.

Bracelets made of beads and beads can be quite simple if you string beads and beads onto a thin silicone rubber band, alternating them with each other. More complex designs are made using weaving and require sufficient perseverance and skill. But it is not the gods who fire the pots; if you wish, you can learn everything by gradually making the products more complex.
The sequence of actions can be seen in the diagrams. If the assembly is done using silicone rubber, then you will not need a fastener. Jewelry with a clasp looks more elegant. Do not forget to properly secure the ends of the threads so that your product is not only beautiful, but also durable. You can hide the cut ends inside the beads, if the diameter of the hole allows. If not, cut them short and lightly melt them with a candle or lighter.

A very unusual bead pattern is obtained if you weave a net of small pink beads using ordinary monastery weaving and diagonally sew an “air” onto this net. How this very airy chain is made: take a thread or fishing line and string beads on it. Using a crochet hook, knit a chain from the fishing line using loose loops so that each loop of the chain contains 1-2 beads.
Together with beads, decorative beads can be included in separate loops larger size, pieces of crystals, shells, etc. For one bracelet, the length of the chain should be 5-7 meters. The hardest thing is to keep it all from getting confused. Attach the first loop of the chain with a pin to the pillow and, as you knit it, wrap the “air” around the pillow so that the turns lie side by side without running over one another. You can secure yourself with safety pins. When sewing, gradually unwind the chain, removing the pins.

To hem, sew the end air chain to the corner bead, string three or four loops of “airs” like an accordion onto a needle and attach them through 2-4 beads. That is, you string loops onto the needle that comes out of the bead and pull the fishing line through 2-4 beads. At the exit point, put the air loops on the needle again and pull the thread through the next beads. Move diagonally along the grid lines. Do not cast on more than two stitches at the edge. After going around the edge, move in the opposite direction along the adjacent diagonal line. Large beads of irregular shape can be included in the “air”, or you can sew them separately in any order or string them on a needle along with the loops of the air chain. When finished, attach the toggle clasp to the product on the chains along the edges of the bracelet. You can simply use a needle and thread or fishing line to make an air loop at one end of the bracelet, and attach a button or large bead of a suitable color to the other.
How to make a bracelet from beads

How to make a bracelet from beads and chains. We will need the following materials: about a meter of chain, beads of two colors (you can take contrasting ones - black and red or, on the contrary, choose a tonal combination), beads for the central row are slightly larger than for the outer ones, silicone thread with a total length of about 3 m, scissors and three needles We divide the chain into segments of 5 links.
We pull the thread into the needles so that it doubles and temporarily secure the ends of the thread. Further according to the scheme: first we string a large red bead onto the middle thread, then we thread the threads through the links of the chain: the outer ones through the first and fifth links, the middle one through the third link. Next step- we string small red beads onto the outer threads, put on a piece of the chain, again a large bead on the middle thread and behind it a piece of the chain. After this, we string small black beads onto the outer threads, followed by a chain. Thus, we alternate red and black beads on the outer threads after the large beads. We finish with a chain and tie the threads of each row, carefully tightening them so that there are no gaps between the beads. We hide the ends of the threads into the holes of the beads.
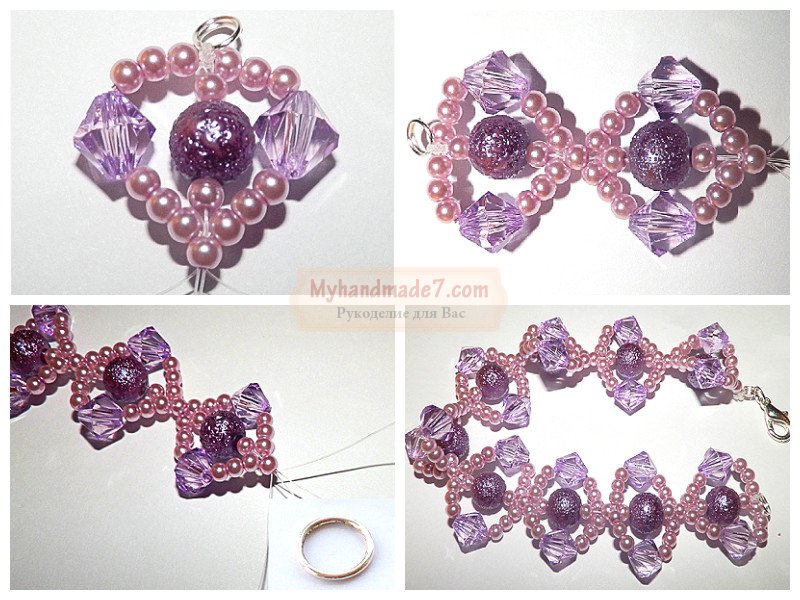
Bead bracelet master class

First, let's prepare the accessories: plastic purple beads with a textured surface with a diameter of 8 mm, artificial pearls 3 mm in diameter, pink-lilac shade, faceted transparent crystal beads lilac color, silicone thread or fishing line, 2 ring-shaped connectors and a carabiner. Cut two pieces of thread about a meter long and tie them in a ring so that 4 free ends of the same length hang down.
Of these, two ends will be a double middle thread and two will be single extreme ones. On the central double thread we string a pearl, a large bead, and a pearl again. On each of the side threads we string 3 pearls, a faceted crystal and again three pearls. We connect all the threads together and pass them through one pearl. We repeat this sequence of operations again until the product reaches the required length. Having finished the work, we tie a bunch of threads to the ring, cut off the excess and lightly melt the remaining ends. We attach a carbine to one of the rings.
Weaving bracelets from beads- exciting and exciting activity. And if you also use your imagination and use various auxiliary materials, sometimes completely unexpected, you can create original and unique products. Look what beautiful and feminine jewelry you get when using lace and beads together. Of course, you can’t create such a decoration in five minutes, but the result is worth it. Moreover, they are not that difficult to implement. We will need lace: machine or self made. It’s up to you to choose a base from synthetic or natural threads, but keep in mind that the fragment must consist of a whole number of motifs.
Synthetics can be fused around the edges to keep them from fraying, while cotton or linen may need to be basted in problem areas by hand or machine. Can be linked necessary basis crochet or specially using bobbins, then such problems will not arise. Once the base and matching beads are ready, first place the beads on top of the base without attaching them to find the best fit.
Only then sew them on. Some small beads or rhinestones, if they are also used, can be glued instantly transparent glue or glue gun. In the example, white lace and artificial pearls were chosen. This bracelet can decorate wedding dress. If you choose linen or cotton lace natural colors, then the beads are suitable from wood, bone or ornamental stone. To fasten, sew a button or bead on one edge, and make a loop on the other.

Goes well with leather beads. An elegant bracelet is made from beads and leather cords. It won't take much time to make it. This type of jewelry is unisex; representatives of both sexes can wear it, only the beads must be selected individually. Take about one and a half meters of leather cord, beads with a diameter of 8-10 mm, a strong thread to match the cord or, conversely, a contrasting thread. Fold the cord in half and tie a knot at such a distance from the edge that the prepared button fits into the resulting loop. Secure the loop motionlessly, for example, using a clip-clip on the sheet thick cardboard. To avoid damaging the skin, you can first wrap the loop with a cotton sponge.

Tie a thread to the bottom cord with a strong knot and 2-3 cm from the knot simply braid the cords so that the thread lies on top of the cord, goes around it and from under the bottom lies on top of the second cord. It turns out like a figure eight made of thread. Then start stringing beads. The thread tension should be sufficient, but not excessive. The thread must pass through the bead twice: first in the forward direction, then in the opposite direction. On one of the cords, you can make a fixing turn around the cord each time. When all the beads are strung, bring the loose ends of the cord and the end of the thread together and tie them in a knot. Pass one of the ends through the button and tie a knot from both ends and thread. Trim off excess. You can additionally secure the ends with glue. This bracelet can be made short for one turn around the hand or made long so that you can wrap the hand 2-3 times.

Sometimes a schematic drawing is enough to get the job done. Bead bracelet patterns very easy to find on the Internet. Look through the relevant topics in LiveJournal or on specialized resources. If you still have difficulties making a particular model, look for video bead bracelets, which can also be found in huge numbers on YouTube. having mastered various techniques, you will be able to make exclusive jewelry. Headsets made from bracelets and or earrings look very good. And you won’t have any problems with gifts for family and friends either.
Today we will tell you what materials, type, character and size modern men’s bracelets made by hand can be made from. In the master class we will assemble a men's bracelet, which will require cords, beads, a pendant, and also a little time.
To assemble a men's bracelet with their own hands, craftsmen use a variety of materials and come from taste preferences the future owner of the bracelet. The decoration may include cords, beads, pendants, dividers, etc. Let's look at a few ideas for such bracelets:
Examples of men's bracelets made of cords and beads, assembled in one or several rows:


Options for men's bracelets with elements of pendants and connectors:


Mens Bracelets from beads:


Braided men's bracelets:


Men's bracelets from the mix:


Men's bracelets consisting of chains, connecting rings or wire.


Men's Pandora bracelets, bracelets made of leather or polymer clay:


Master Class
Accessories:
Leather cord 25 cm
Pigtail cord 25 cm
Overlapping end caps 4 pcs.
Connecting rings 4 pcs
Wooden beads mix
Carabiner lock 1 piece
Suspension Starfish 1 PC
Tools: Scissors, pliers

Assembly:
We place each cord in the end piece with an overlap and clamp the side parts with pliers. The edges are decorated.

We string the end loops onto the large connecting ring.

We collect beads on a round cord in the order as in the photo:

Then we decorate the edges of the cords as at the beginning, using overlapping ends. We connect one connecting ring with a carabiner lock and fasten the bracelet.

We connect the bail with the pendant through a small connecting ring and the work is ready.

A fashionable bracelet is an indicator of the owner’s sense of style and taste. This accessory will complement any look and make it complete. The main thing is to choose the color and shape. After all, not every bracelet looks good on everyone. Therefore, you can make the most suitable thing for yourself with your own hands.
Fenugreek
The most fashionable bracelets now that you can make yourself are shambhala. Decide on a color that matches most of the clothes in your wardrobe and start choosing materials. What you will need for work:
- Three meters of waxed cord.
- Ten beads.
- Scissors.
- Colorless nail polish.
- Board and two nails. This is necessary for weaving. Drive nails into the board at a distance of 30 centimeters from each other, you get a machine. It can also be purchased at a craft store.
This set materials will suit for beginner needlewomen. Having learned to weave regular bracelet Shambhala, you will be able to master more complex techniques.
How to make a bracelet
- Tie the edge to one nail
- Pull it to another nail, leaving an extra five centimeters, cut it off.
- String the existing beads on it in in the necessary order, starting after ten centimeters from the nail.
- Pull the cord well and tie it to the second nail.
- Cut 2.5 meters of cord. Step back two centimeters from the nail and tie through the center of the cut nail. That is, the edges of the knot should be the same length.
- It should be so that the left part sticks out higher from the knot. We start weaving with it. Pass it under the main thread and over the right one.
- We draw the right part above the main one and under the left one.
- We tighten it. The result is a knot that will be used throughout the entire work.
- If you did everything correctly, then Right side sticks out higher.
- Now the right piece goes under the main thread and over the left side.
- The left part is above the main and under the right cord.
- We tighten it. We weave twenty knots according to this plan.
- You've almost learned to weave fashion bracelet fenugreek. Now we add a bead to the regular knot. Let's braid it.
- After three basic knots there is one more with a bead.
- Continue doing this until you run out of beads.
- Weave another fifteen basic knots.
- Remove the bracelet from the machine. Stepping back five centimeters from the base knots, weave two simple knots on the main cord. Cut off the rest.
- Lubricate the last knots with the prepared varnish.
- To make a convenient adjustable clasp, you need to close the edges of the main cord into a circle. We direct the ends of the cords with knots towards each other. Using the ropes that were used to do the main work, we make five basic knots.
- On the remaining cord, do simple knots, cut off the rest. Lubricate with varnish.
You have learned how to make a simple version of a shamballa bracelet. Experiment with bead diameters, colors, and even the number of rows.
Fashion trend
Fashionable ones are very relevant now. Don't be afraid of them large quantity, wear on both hands, but make sure that the accessories match each other in shape, texture or color. Use big sizes. How to do it? You will need a regular plastic bottle for the base and available materials for decoration. This can be fabric of different textures, rhinestones, threads, paint, varnishes, brooches.

Progress:
- Cut a bracelet four centimeters wide from a plastic bottle.
- If the bottle is colored and you are going to work with transparent material, then cover the base
- Take a fabric with a pattern that suits you. Cut a flap that is one and a half centimeters larger than the base on each side.
- Cover the bracelet with it.
- Use masking tape to line the inside of the bracelet.
- Cut another strip of fabric and glue it inside.
- Sew or glue beads, stones, rhinestones.
A lace or guipure accessory will look very delicate. There is no need to add unnecessary details to it. This fashionable bracelet is notable for the fact that it requires minimal money and time. Each dress can have its own unique decoration.
Ethnic style
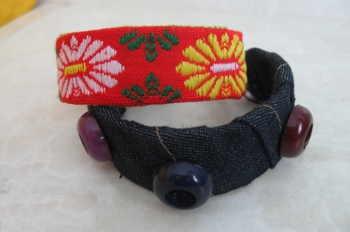
Which bracelets have been fashionable for more than one season? In ethnic style. They are easy to make from felt and floss threads matching it in color. Typically used are red, black, yellow, orange, burgundy, brown, white. As an example, take the felt of the last three colors and matching threads.

Progress:
- Measure the circumference of your wrist and add three centimeters. This is the length the product should be.
- Draw patterns for the circles on paper. Two will be 4 centimeters in diameter, four will be 3, they are used for the base. Only half will be visible, the rest are needed to hide wrong side. And cut out several smaller circles for decoration.
- Embroider the pattern on the smallest parts, thereby attaching them to the middle ones. These can be stitches and zigzags.
- Now connect the middle parts with the largest ones in the same way.
- Assemble the bracelet. A photo will help with this finished product. Fold pairs of circles and connect them with a decorative stitch.
- Fasten the parts on the sides.
- For the fastener you will need two burgundy rectangles and a white one. The last one is a little shorter, make a hole in it for a button
- Sew on a button.
The work is finished. You can make it up different variants execution of this bracelet, changing the shape of the felt.
Polymer clay
Polymer clay is an excellent material for making a bracelet in an ethnic style. Here you can use any colors, patterns and shapes. To work, you will need plasticine stacks and available materials. Twist the ropes, make circles, squares, semicircles, leaves. Try any size. The bracelets turn out to be thin, so you need to make several of them at once and wear them together. The material is comfortable and pliable, takes shape well, so working with it will not be difficult. It can harden in an oven or on its own.

Men's accessory
Fashionable, made with love, will be a gift for young man, friend or father from a girl. After all, the stronger half is not interested in needlework. You can make such a thing using a technique already known to us, used in weaving a shamballa bracelet. Just don't use beads. For men will do wider bracelet.
Materials:
- Lace or rope. You need to calculate this: per centimeter of bracelet 13 centimeters of cord. That is, for a 20-centimeter wrist, 2.5 meters of material are needed.
- Scissors.
- Buckle.
- Lighter.

Progress:
- Tie a knot at one end of the buckle so that different sides the cord from it was the same length.
- We thread the ends into the second part of the buckle. The cord should be as long as the man's wrist.
- Bend the edges of the cord so that you can weave it like a shamballa bracelet.
- We pass the left part of the lace under the main threads and over the right part.
- The right thread is above the main thread and under the left one.
- Continue until you reach the second part of the buckle.
- Use a lighter to solder the ends to the product.
Leather bracelet
To please your man, learn how to make fashionable bracelets with your own hands. MK will help with this. Take a piece of leather and stationery knife. Progress:
- Cut a rectangle 3 centimeters larger from the leather required size products.
- Apply the design with a utility knife.
- Draw simple parallel lines that will later form the weave.
- Cut the pattern into the leather about a third of the way through.
- Cut the strips along the entire depth.
- Intertwine them together and secure with a stick.
- Punch holes along the edges for fastening.
- Place the bracelet on the jar for ease of use.
- When finished, boil the bracelet along with the jar. At this moment, the accessory will take the required shape, and the pattern will look like a carving. Cooking lasts three minutes.
- Cool the product, correct any defects. Wrap the protruding sides of the skin with fabric.
- Polish the bracelet sandpaper and coat with shoe polish of a suitable color.

Basic techniques
The simple techniques described above will help you create a unique fashionable bracelet for yourself and your boyfriend. If you creative person If you have time and good imagination, then be sure to try making an accessory with your own hands.

