Star News


New Year's balloon with your own hands. What to make from a foam blank and fabric? Schemes for collecting voluminous New Year's balls from paper
Soon New Year and everyone wants a fairy tale, a holiday, joy, so that the house is cozy and beautiful. And what is the New Year without a Christmas tree, New Year's toys and balls.
Today we will offer some creative ideas how to do christmas balls with your own hands.
How to make a Christmas ball out of fabric
Each house has bright fabric patches, ruffles, ribbons. First you need to make a base. We take different rags (you can use old socks) and make a tight ball out of them. You can also take a foam ball. And then - the flight of your imagination. You can sew the shreds to the ball in the form of a ruffle, or first we give the shreds the shape of triangles, rectangles and sew them tightly to the ball. As a result, we got interesting skewed balls.


We take strong threads, PVA glue, small balloons, sequins.
First, we inflate the balloon to the size we want our balloon to be. We tie with a thread. We smear the rest of the thread with glue and wrap our balloon. We cover the thread with sparkles and wait until it dries and becomes hard. Then we burst the ball and carefully pull it out of the middle with tweezers. We have a beautiful openwork ball.


We can also apply lace and cover it with glue just like a thread.


DIY Christmas balls from foam


For the basis of toys, you can take foam. It can be decorated with multi-colored soft felt, beads, sequins, paper products, ribbons.
Interesting ideas for DIY Christmas balls
When you have a huge tree, you want what would be on it more toys. Let's make balls from a floral sponge that can be cut out in the form of any figure and pinned with pins small toys flowers, branches.
For those who love vintage things, you can make the appropriate Christmas balls. We take the lace, paste it on the toy and apply paint with a brush or sponge.


You can also decorate discs.


It's funny when toys in the form of a sweet treat hang on the Christmas tree. It is very easy to do this. We roll a foam ball covered with glue in sparkles, glue a thread on top for which we will hang a toy. Glue a berry for zest. Then we put our ball into a special mold for muffins pre-anointed with glue.

Original DIY Christmas decorations
IN new year's eve I want everything to sparkle and shine. Let's decorate our balls with beads, beautiful stones, jewelry, faux pearls, fragments from old glass, New Year's toys, bright shiny sequins.There is no such thing as a lot of glitter in the New Year.


Christmas decorations made from natural materials


Also decoration can be cones, fir branches, rowan berries.
Using paper for decoration is inexpensive and creative.


Knitted Christmas toys
For those who know how to knit or crochet, you can use bright, beautiful threads tie the "outfit" into balls.
Edible Christmas toys
Those who love sweets can make balls of sweets, cookies, peanuts - it's not only interesting, but also delicious. Your kids will love this idea.
With such toys, the New Year will be joyful, cheerful and happy.
DIY Christmas balls video
The Christmas ball is one of the great classic symbols of the New Year. Creating such jewelry with your own hands in Lately especially popular, this activity allows you to give the festive atmosphere an exclusive unique look and comfort.
Do-it-yourself Christmas balls were made by our grandmothers at a time when factory decorations were not available. They were made from papier-mache, cheap glass blanks, cardboard and other improvised materials. And now, taking out old toys from the shelves, you feel the warmth of the hands of relatives. Do you want your children to keep those precious memories the same way? Dedicate New Year's Eve to organizing a unique workshop in which members of the whole family will participate, creating their own fantasy New Year's balls.
Decorating blanks
One of the most simple ways create your own Christmas tree decorations - decorate blanks that are sold in all craft stores and are inexpensive. As such devices, you can buy cheap simple balls.
Prepared balls from different materials:
- polystyrene;
- plastic;
- glass or ceramics;
- cardboard;
- tree;
- fabrics and padding.
Foam blanks are perfect for decoration with special pins and sequins, beads and beads. Such needles are easy to stick into soft foam, laying out any ornament.
Styrofoam ball and sequins
Plastic balls can be pasted over with a variety of materials: cloth, paper, sequins, beads, twigs, cones, dry leaves, varnished or painted. This is a wonderful and affordable option for decorating.

Jewelry made from natural materials
Glass and ceramic blanks are ideal for decoupage, coloring with paints. Some glass balls can be decorated from the inside, which means filled with gel, water, created inside the ball beautiful composition with a plot (for example, a New Year's ball with snow), put tinsel or other decorative material there. Ceramics is a stylish and expensive option for coloring.
Like glass, you can use transparent plastic balls. It will be cheaper, but no less beautiful and safer.

Christmas ball with glass snow
Cardboard blanks are often used for children's crafts. Any parts can be easily attached to them with glue.
Wooden toys are painted with special paints, varnished. Before that, you can cut a fantasy pattern on them. Decoupage technique, burning and, of course, gluing with various materials - also good idea for such preparations. In the photo below, a wooden New Year's ball is decorated with a dense thread.

Wooden blank decor
Christmas toys-balls can be sewn independently. Taking a piece of matter and putting a filler (cotton wool or synthetic winterizer, foam rubber) in the middle and making a kind of bag, you can get a convenient blank on which it is easy to sew any decorations.
Decorating a glass ball with beads
An exclusive Christmas tree decoration can be made in a couple of minutes if you have a plastic or glass blank, beads, lace ribbon and all-purpose glue. This craft does not require special skills, you just need to be careful.
Following the photo below, we apply glue to the New Year's ball and evenly distribute it with a brush. Then, until the glue has dried, sprinkle the workpiece with small beads, pressing each detail a little and ensuring that the beads fill the entire surface.
It remains to thread an openwork ribbon into a loop and let the toys dry.

Making a glass ball with beads: applying glue

Glue must be spread over the workpiece

The blank with glue must be covered with beads

Ready-made Christmas balls (photo)
This method of decor also has a minus - the beads can crumble over time. This can be avoided by sticking it from the inside - fill the transparent ball with glue and pour light beads or sparkles into it. enough. Then you need to properly distribute the beads, rolling the ball. Having fixed on the glue, the beads will decorate the transparent walls from the inside and will not crumble later.

We decorate a transparent ball with beads from the inside
We keep memories in New Year's toys
Winter holidays are traditionally considered family holidays. great idea- to make several toys every year, symbolizing the changes that occur with loved ones in time.
While your kids are still small and their feet can fit on the balloon, make prints of their feet on paper and transfer their image with paint to the decoration, so that later you can remember how small and cute they were.

Christmas tree toy with the image of the legs of a child
Another idea is to place a photo of your loved ones inside a transparent blank, surrounded by tinsel or other decorative details. You can also use the photo to glue the ball on top, complementing this design. beautiful ribbons as in the illustration below.

Photo ball
Christmas ball decor with cloth and paper
Decorating Christmas balls with cloth and paper is one of the easiest ways to decorate such toys.
You just need to wrap the toy with a cloth or wrap a blank in it and fix it. The main thing is to find a unique and interesting stuff, since it is he who will play the main role in such a design.

Christmas tree decorations made of fabric

The ball should be placed in the middle of a piece of fabric

Then secure the fabric with tape.

Decor is ready
Decorating with paper is even easier. interesting way such decoration is presented in the photo collage below. The workpiece was pasted over with newspaper tubes, and then the entire surface was painted over with gold spray paint. An elegant ball for the Christmas tree is ready!

Decor for a paper ball
A great option is to make jewelry from threads. If you know how to knit (crochet is best), it will be easy to do: you just need to knit it according to one of the patterns, and then starch the product, after putting it on a balloon right size(instead of starch you can use sugar syrup).

Crocheted toys for the Christmas tree
You can make Christmas balls, the photo of which is posted below, by simply winding the threads around the ball and smearing it with PVA glue. When the toy is dry desired shape, the ball must be removed and decorated with glitter varnish.

Ball for the New Year from threads
Coarse twine can be wound around the workpiece, after applying glue to it. This decoration in country style looks very relevant.

country style balloon
Decoupage toys
Decoupage of Christmas balls is one of the most sophisticated ways to decorate blanks.
The specific technique for performing this decor depends on the base material for the pattern. It is best to choose glass, ceramics or wood for this.
We will use the following components:
- napkins for decoupage with the image of a map of the world;
- scissors;
- decoupage glue and finishing varnish;
- blank for a foam ball;
- ribbon and eyelets for Christmas decorations;
- brush.

Christmas balls (master class): materials
Manufacturing:
- We make a hole in the foam blank to secure the loop.
- Cut out the image of the desired size from napkins.
- We apply glue to the workpiece, apply napkins and carefully level it so that there are no “bubbles” of air. Let's dry.
Add ribbon and necessary accessories.
Our ball is ready!

Making a hole for the tape

We prepare drawings from special paper

We apply glue to the surface of the workpiece

Carefully glue the paper, and the ball is ready!
Thus, it can be applied to Christmas decorations almost any drawing. Most popular among children New Year's Smeshariki. Paper with these characters is not difficult to find, but the toy will become the most popular with your child.
Christmas balls, a master class for the manufacture of which you could see among our photos, is not only wonderful craft for the whole family, but good gift created by your imagination and souls. Fill your home with things that have true value, and therefore are a real gem, after all joint creativity does not lose its relevance over the years, but gives memories a special entourage!

Decorating paper balls

Rustic or country style jewelry

Master class on decorating balls with lace

Ball made from natural materials

Decoupage toy

Simple decoupage of a cardboard blank
Comfort to your home!
Good afternoon. Today we will make Christmas balls with our own hands (and children's too). I'll show you how to decorate simple Christmas balls turning them into beautiful New Year's crafts. In one article I collected SOME techniques at once- so that you yourself can choose the version of creativity that you like best ... it seems easier ... or for which you have the right material and idea. I did very large selection ideas ... and I will not only give you photos (they say, figure it out for yourself how and what is done) ... but I will give INSTRUCTIONS for creating all the ideas I find with my own hands.
Today I will tell -
- what can be made from a TRANSPARENT Christmas ball (six ideas at once) ...
- several ways to decorate Christmas balls with GLOWING POWDER…
- decorate the New Year's ball with semolina and SAND WITH SHELLS ...
- how to paste over a ball with BEADS AND rhinestones ...
- what can be made from FOAM BALLS (and where to buy them) ...
- how rubber STAINED GLASS PAINT can decorate a designer Christmas tree ball…
- how to make a VINTAGE ball WITH LACE.
- how to decorate Christmas balls with PLASTIC (and bake them in the oven)
- how to make a Christmas ball with a MIRROR MOSAIC with your own hands.
So, let's get started and start decorating balls for our Christmas tree.
FILLING into transparent balls.
Our first idea for decorating Christmas balls with your own hands is simple. You must have often seen for sale TRANSPARENT Christmas balls. They are made of transparent plastic or glass and have little wider NECK, than standard balls. This was not done in vain - the manufacturer implies that you want to put something into such a ball ... a shiny brooch ... a scattering of buttons or glass ... rhinestones with sequins ... sweets in bright candy wrappers ... congratulatory notes or others. Here in the photo below we see sweet caramel options.
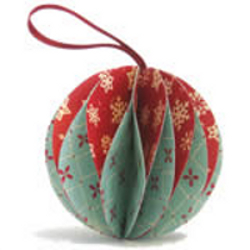
And most importantly - The SURFACE of the ball can also be decorated... can be drawn snowflake paint(or nail polish) ... and top it off with glitter nail polish or glitter sprinkles.
Or maybe glue such a ball with elegant pieces of tape... (as on the red-green ball below) ... and glue rhinestones and sequins to the ribbon.

Can this ball fill with white(cotton wool or airy sweet marshmallows). And then such a ball will turn white ... and the painted eyes, mouth and nose of the SNOWMAN will stand out well on a white background.
Is it possible to fill such a transparent ball happiness wishes notes... or just print on any printer New Year's rhyme... cut his lines into strips…and load it all inside the Christmas ball. First-graders will be happy to read scraps of such a New Year's poem.

Another one great idea is that it is possible in such a ball drip a PUDDLE OF PAINT- and rotate the ball with your hands to let the paint spread in a fancy pattern…
Then, when the first color dries, repeat the procedure with other paint colors. As a result, we will get a very bright multi-colored New Year's ball of the author's work. Your kids will love this Christmas tree craft.

Here ... these were ideas for transparent balls ... And now I will show you too interesting technique for balls solid color(that is, balls without patterns, and we will draw patterns on them ourselves).
GOLD POLLEN + GLUE - as a way to decorate a Christmas ball.
This is very simple technique... We need a ball, a tube of pva glue, and gold sprinkles or sparkles.

- Christmas ball need one color(best MATTE)… i.e. non-shiny, no gloss… dim colors.
- PVA glue is better to take in a jar with a narrow spout(because it is with such a spout that it is convenient to apply patterns to the ball). Or you can use a brush.
- Gold Sprinkle can be obtained in three ways: FIRST - buy in those departments of the store where sets for children's creativity... SECONDLY - buy a manicure powder for nails ... THIRDLY, you can buy a fluffy shiny garland-panicle for the Christmas tree and finely cut the fringe from this garland with scissors, so we get a huge amount of sparkles.
And now that you have all this, you can start decorating the New Year's ball.
Glue straight from the tube draw a line resembling a Christmas tree(photo below) ... and immediately, while the glue is fresh, sprinkle it with golden pollen, count up to 10, shake off the remaining pollen from the ball (just let the pollen fall on a sheet of paper) ... and leave the ball to dry for 1 hour.

You can choose any pattern (not just a Christmas tree) ... a star ... a snowflake ... an inscription ... the initials of the author of the craft ...
To shiny topping spent sparingly. There is one simple trick.
We shake off the pollen on a sheet of paper (which we first folded in half, and then unfolded). This is convenient because then from such a sheet it is very convenient to RETURN the extra sparkles back to the JAR. To do this, we simply fold the sheet with the dressing in half again (along the fold line it already has) and all the dressing is collected in the fold groove ... and flows straight down this groove in an even stream back into the jar of dressing.
The topping looks beautiful matched to the color of the ball ... for example, gold pollen on a matte gold ball ... or silver pollen on a metallic gray Christmas tree ball (as in the photo below).

And by the way you see simple ideas how to draw a snowflake on a simple ball lines and dots. You see (you don’t even need to be smart) just splayed lines ... and at the ends of the rays we slap dots (see photo with a golden ball above)
And you can also add to the GLUE RHINES ... and a beautiful stylish a pattern in the form of a cell and a hanging teardrop-ice(see the photo with the silver ball above). You can repeat the same patterns on the ball that frost draws on glass ... stripes and curls.
Can be simply done islands of sparkling powder... dry them ... and then draw on top of the island more strips of glue in the form of a snowflake... and sprinkle them topping ALREADY ANOTHER COLOR(this is how we see in the photo below red sprinkle snowflakes against the background of gold sprinkles).

So what ... if your children do not get it right… Don’t even think of scolding them… And carefully save these masterpieces… twenty years later when the grown-up varmint brings the bride into the house ... you once for a family New Year's table show all this New Year's collection of crooked stars, shaggy snowflakes and fat-assed horses that he painted on balloons at 4 years old ... it will be so cute ... it will cause a lot of smiles ... and funny banter from "kind" friends like ... "well, already in early years, he understood that a good mare should have a good ass))) ...

SANDING MATERIAL - beads ... rhinestones ... sequins ... groats
And you can also use semolina as a topping ... it looks great against the background of blue balls ... it turns out an imitation of crumbly snow ...

IT IS POSSIBLE TO MAKE beautiful STYLIZED BALLS… with a simple pattern in the form of FLOW-STRIPS... as if carelessly applied to the ball ... Only each strip is sprinkled with ITS sprinkles ... or small beads.
Or you can just put drops of glue on the ball - and put a sequin or rhinestone on each drop
GLUE FOR BEADS AND RHINES is needed more seriously than PVA ...
Here it is better to use SHOE GLUE - it holds well and does not stink as much as the Glue Moment - even children can work with it without harm to health.
Or you can use a glue gun.

AND E. As a topping, you can use RIVER SAND ... fragments of shells ... mother-of-pearl ... and beads with the same color as sand. Against the background of a blue or turquoise ball, this decor looks very beautiful ... like a piece of beach on the background sea water(photo below with a blue Christmas ball)
And you can also buy large rhinestones and stick them on a Christmas ball (strong glue, shoe glue or a moment) ... Wait until they stick - and then put fear around the CIRCLES of PVA glue ... and fill these circles with sparkling sprinkles ... you get a ROYAL Christmas ball (photo below with golden ball

Balls can be pasted over with small beads ... sprinkled sequins ... beads and even glass beads (bugle beads are long transparent tubes).

CHRISTMAS BALL - from a foam blank ...
And here is an idea for you to create a New Year's ball from scratch. That is, we take as zero foam ball blank.
You ask: where to get it? I answer - you can buy it in a craft store - type in Google a FOAM BALL to buy in your city - and you will immediately find a bunch of addresses where you can find such a ball. And you can also order such foam balls on the Internet with home delivery - for example, they are always available on the ALI-EXPRESS website (one ball costs a couple of cents) for a dollar you can buy a whole pack.

Most fast way decor foam balls – this is the BUBBLE METHOD... we take decorating tinsel ... it can be BUTTONS or carved flowers FROM FELT.
And just pin it all with pins-studs. In a chaotic manner. We get a bright decorative Christmas ball with our own hands.
In the sewing departments of the store you can find a lot of textile flowers. If you buy pins of the same color (for example, red) and buy white flowers ... you get a very beautiful New Year's ball.

You can also use SMALL FOAM loose balls-beads for this decorating purpose. They pierce easily. then the beads can be painted directly on the ball.
Or you can take plastic beads (they already have a hole) and dot the whole ball with them.

Or you can go to a hardware or hardware store - buy special decorative nails for furniture upholstery(or for upholstery of a leather door) and stick a foam ball with them. Let's get a beautiful Christmas tree ball in the spirit of hi-tech.

And it is possible from crepe paper(it is sold in stationery in rolls - for a dollar per roll) - make those little roses. And you can simply stick the roses on a foam ball ... in some places you can add a rhinestone or a bead to spice up the decor.

And also such foam balls can be decorated with the SAME SPRING that we used in the previous paragraph of our article. We coat the ball in PVA glue - and sprinkle it with sprinkles (finely trimmed "rain-garland" from the Christmas tree) ... or sparkling nail powder ... or a special one bought in a store.
If large elements are planned on the ball (rhinestones or cord trim) then FIRST we glue these elements on a good glue (shoe or moment) ... dry ... then fill the rest of the space with a coating of PVA glue and sprinkle with shiny sprinkles.

Can be used on a ball thin braid (left photo below) ... or large oblong rhinestones. Can be glued beautifully OBSOLUTE - sequin tape… And metallized cord(photo with a blue ball below). You can find among the decorative Christmas items beaded small cord... and braid part of the ball with them.
CHRISTMAS BALL DECOR– CHILDREN'S STAINED GLASS PAINTS
For this method, we need children's stained glass paints ... (not adults). Children's paints for stained glass crafts, when dried on polyethylene, easily peel off from it ... and then easily stick to the glass of a window or mirror ... and just as easily peel off from it. And adults stained glass paints in iron tubes, these are already indelible and not washable (they do not fit).

ESSENCE OF THE METHOD- stained glass droplets (for example, white + red) are mixed on a plate - after drying ... remove these stained glass cakes from the plate (they become like rubber and easily peel off). And we put these cakes on a Christmas ball - they are sticky and easily stick to it. Finally, you can varnish the product (acrylic for crafts or hairspray).

Any child will be happy to do this work with their own hands. It's simple and interesting.
DIY Christmas ball
in LACE technique.
You can also make a Christmas ball with beautiful elements lace. Lace is so simple paste on a ball... or pull-sew like a cobweb... that is, first cut the lace into elements ... then sew each element back to each other ... but with the LAYING OF THESE ELEMENTS AROUND THE BALL ... (that's it, without glue, the lace is laid on yellow balloon with photo below).
Another option is to buy an ELASTIC LACE - one that stretches like a stretch ... And pull a strip of lace over ROUGH BALLS (as on bottom photo red and pink balloons). The lace stretched close to the ball .... and the fact that the balls have a non-slip rough surface prevents the lace strip from slipping off the New Year's ball).

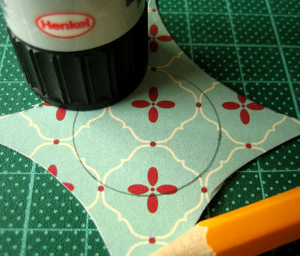
And here's another one I found for you MASTER CLASS on creating a VINTAGE Christmas ball.
To do this, we need to buy beautiful lace in the store (preferably RELIEF, it will look textured). With PVA glue, glue the lace onto the ball ... let it dry and, if desired, apply PAINT to the lace with a BRUSH ... AND IMMEDIATELY wipe off excess paint with a SPONGE or SPONGE ...
We get a beautiful VINTAGE EFFECT - a New Year's ball, stylized antique.

DIY Christmas ball WITH MIRROR MOSAIC.
And these balls look very nice - with mirror fragments. Such a ball can be made very simply - and you don’t even have to break the mirror.

All we need is simple diskCD. We cut it with scissors (it is easily cut) ... you can into triangular fragments ... you can cut it into squares (first into long strips... then chop the strips into squares).
And when we get our mirror cut tiles. All that remains for us is to put it on the glue. This is where shoe glue can come in handy... or glue gun(the gun is sold in hardware stores costs 7-10 dollars).


Here are my ideas for today. But that's not all - I have found for you a bunch of other ways to make a Christmas ball with your own hands. And so we will continue this topic in our next articles.
And in continuation…
Good luck with your New Year's crafts with Christmas balls.
Olga Klishevskaya, especially for the site ""
If you like our site, you can support the enthusiasm of those who work for you.
Happy New Year to the author of this article, Olga Klishevskaya.
Summary: Christmas balls on the Christmas tree. Making paper Christmas balls. How to make a Christmas ball with your child with your own hands. Schemes of Christmas balls made of paper, photo of Christmas tree decorations.
1. DIY Christmas ball (option 1)
To make this Christmas decoration, you will need colored paper, thin wire, a stapler, and glue. The ball that you see in the photo above was made from paper three different colors(pink, blue and blue).
Work plan:
1. Take a small glass or glass (glass) and circle it on paper with a simple pencil 12 times. You should have 12 circles (4 circles of each color). Cut out the circles with scissors.
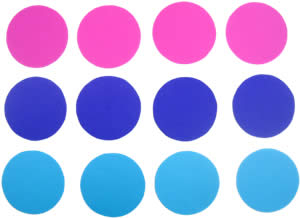
2. Fold each circle in half and stack them together as shown in the picture below. We use paper in three colors (A, B and C) to make this Christmas ball. Stack the circles in the following sequence - ABBCCAABBCCA. If, when making a New Year's ball, you used paper of two colors (A and B), then in this case the circles had to be folded in the following sequence - ABBAABBAABBA.

3. Fasten the circles of paper together with a thin wire, wrapping it around them along the fold line. Twist the ends of the wire together. If you do not have wire, then you can fasten the circles with a regular stapler.


4. Spread the circles and glue the adjacent halves of the circles to each other. Each half must be connected to one adjacent at the top, and with the other - at the bottom.
2. DIY Christmas balls (option 2)

Cut out three circles of the same size from colored cardboard or thick paper, but different color. In the first of them cut a cross (fig. a), in the second circle make a horizontal cut in the middle and perpendicular to it two cuts in the direction from the circle to the center of the circle (fig. b), and in the third - four cuts in the form of a cross, also along direction from the circle to the center (Fig. c). Pass the circle "c" into the circle "b". In circle "a", bend the corners formed as a result of its incision; you get a square hole. Pass the circles "b" and "c" into it, having previously folded them. Then straighten the corners again (fig. d). Attach a thread to the resulting ball.
3. Christmas paper balls (option 3)
From old postcards or colored paper, you can make these cute Christmas decorations- Christmas balls. Detailed instructions for the manufacture of this New Year's decoration can be found at the link >>>>

It is not necessary to make a large, complex ball; you can make a small Christmas ball with fewer parts.


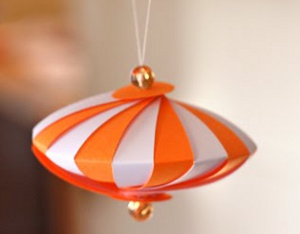
5. DIY Christmas ball (option 5)
To make these wonderful Christmas lanterns you will need to cut colored paper into strips of the same length and width. The length and width of the strips depends on the size of the flashlight you want to make. To make one paper lantern you will need an average of 14-16 strips of paper. Detailed New Year's master see the class at the link >>>>

When making Christmas balls, you can use strips of paper of different colors and beads to decorate Christmas toys with your own hands. See link >>>>

If the strips of paper are bent in the middle, then you get such a New Year's decoration. Link to the New Year's master class >>>>
6. How to make a Christmas ball (option 6)
We suggest you make such a cute and easy-to-make New Year's craft from old postcards with your child.

1. Using a small glass or wine glass, draw and cut out eight identical circles.
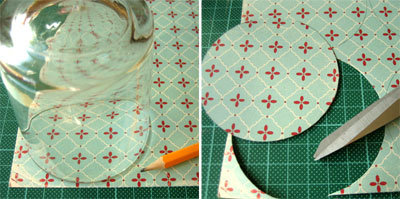
2. Using another object with round base, but of a smaller diameter, draw and cut out two small circles.
3. Fold each large circle in half, and then in half again. See photo below.

4. Glue four folded large circles on one small circle, the remaining four on the other. As a result, you will get two halves of your future Christmas ball.
It is very IMPORTANT to correctly place the quarters of the large circles on the small circle. Try to carefully straighten the "pockets" of the folded circles and in advance, before gluing, estimate the correctness of their location. At the same time, focus on the very first photo, which shows a finished ball.

5. Now you just have to glue the two finished halves together and, when the glue dries, straighten all the pockets. Christmas ball is ready!

7. paper balls do it yourself (option 7)

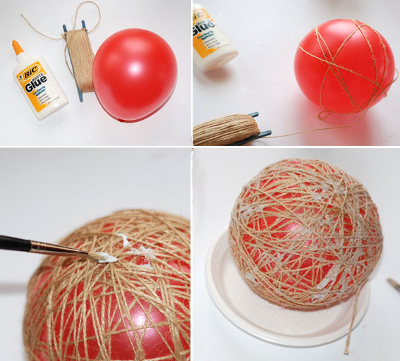
Making balls from thread:
1. You will need: scissors, balloons, fat cream (Vaseline), any yarn, PVA glue, a bowl.
2. Dilute PVA glue with water, approximately 3:1.
3. Inflate the balloon to the desired size, give it round shape, tie with a thread.
4. Rewind required amount yarn, put it in a bowl and leave for 5 minutes.
5. We spread the ball fat cream and wrap it with yarn, for starters leaving a large distance between the thread.
6. Gradually reduce the distance between the threads until the whole ball is wrapped with yarn and resembles a cocoon.
7. Cut the thread and glue it to the ball. Leave it to dry (at least a day).
8. Gradually untying balloon, gently blow it off, after which we remove it from the thread cocoon; tie a rope to the thread ball on top for fastening.
9. The balloon is ready!
When making a ball, you can use yarn (threads) of any color or paint with any paint or sparkles (spray). Especially for the New Year, you can decorate this thread ball with tinsel and stars. Hang small balls on the Christmas tree, decorate the room with large ones. Fantasize more!
If you are unable to wind the glue-soaked thread around the ball, you can wind the dry thread, and then carefully soak it with glue with a brush or sponge.
Instead of glue, you can use sugar syrup or starch paste. To prepare the paste, take 3 teaspoons of starch per glass cold water mix thoroughly and bring to a boil. Instead of a thread, you can take a thin copper wire and also wind it around the ball.
9. New Year's do-it-yourself. New Year decoration
Old Christmas balls can be updated by wrapping each of them in a piece of beautiful fabric and tying it with a ribbon.

Christmas balls are an integral part of decorating a Christmas tree. Of course, you can always buy Christmas balls in the store, but you must admit, DIY Christmas balls are something special! In addition, if you have time and desire, you can easily make your unusual New Year's toy in the form of a ball, and we will show you several ways to make a Christmas ball with your own hands.
 
To begin with, let's make a reservation that in order to make a New Year's ball you will need a base: it can be an old New Year's glass ball, plastic ball, foam ball, styrofoam ball, or even a papier mache ball. True, in the latter case, you will have to tinker, but I will not dwell on how to make a papier-mâché ball. Let's agree that you already have the base and talk about how you can decorate / change the old ball or make a new one from transparent glass (plastic) balls.
DIY Christmas balls master class
Everyone has old Christmas balls - therefore, we start with them. The easiest thing to do with last year Christmas ball- is to tighten it some beautiful cloth, tie a thread for hanging, then at your request: tie with a ribbon, add some more decorations (spruce branches, berries, snowflakes, lace - whatever your heart desires). It turns out very beautiful New Year's balls, and most importantly, the next one, you can remove all the decor and do something new.


And you can use not a single piece of fabric, but strips or ribbons. And in this case, again, you can use the old New Year's ball or any other round base.


New Year's balls pasted over with round fabrics look good.

Or even Christmas yo-yo flower balls. By the way, they are made very simply. We cut out a circle template from cardboard, circle it on the fabric, cut out the circles from the fabric. We sew our circles of fabric along the edge with a thread (photo No. 3), then tighten the thread - the seam should be in the center, fix it and cover it with a piece of fabric and a bead. Finished yo-yo flowers glue to the ball. We decorate the top with twigs, cinnamon sticks, roses, etc.

In addition, beautiful multi-layer Christmas balls are obtained from the fabric. True, in this case, you need a foam ball and tailor's pins. The technique for making such balls is shown in the photo. In principle, nothing is difficult, and most importantly, you can create different color combinations.


In addition to fabric, you can also use a lot of materials to decorate Christmas balls. You can glue them with sequins, threads, acorn caps, pistachio shells, buckwheat, buttons, pieces of old CDs, strips of paper and even tree leaves.


And you can make charming New Year's cupcakes from old balls, as shown in the photo below.


Or from a foam ball and large sequins.

Christmas balls with snow
Christmas balls with snow - of course with artificial snow are just great! Don't know how to do artificial snow with your own hands? In fact, everything is simple, in order to make artificial snow with your own hands you will need: semolina, white paint and glue. We mix everything together and the artificial snow is ready (experiment with the proportions, because there are no comrades for the taste and color). With the resulting mass, we cover the balls in whole or in part, let them dry, decorate from above with sparkles, beads, ribbons, etc. It turns out original Christmas - New Year's balls.


A similar effect (not so textured, but still) can be achieved using the usual white paint- just apply it with a sponge - in several layers.


Decoupage Christmas balls
Decoupage is always beautiful, and decoupage of Christmas balls is doubly beautiful. We glue “background” pieces on the ball, then the main pattern in the first photo is: an angel in front, and flowers in the back. Then we apply glue on the ball in places (on the top, in the center of the flowers) and apply the leaf, “press” it with a piece of cotton fabric. Next, with light movements of the brush, we brush off the potal from the areas not covered with glue, at the end you can varnish the ball. And, of course, we attach a beautiful loop.

Decoupage of New Year's balls can be done in different ways: using not only the potal, but again artificial snow or even coarse salt - unusual New Year's balls are obtained.


Another idea that deserves attention: not just decoupage, but decoupage with voluminous contours. In the first case, a napkin is glued, and then on top of the same flower, previously glued to thick paper(cardboard). Then, with the help of glue and sparkles, we create more voluminous bright accents - it turns out cute.

In the second case, we use volumetric lace. Cut out necessary details. We apply soil to the ball. Then glue the pieces of lace. After the glue dries, paint the ball white acrylic paint. Next is the most difficult: on the palette, mix the wax and oil paint dark brown. Apply colored wax to the surface of the lace with a brush. Then we rub the wax into the voluminous surface with a foam sponge or sponge, thereby revealing the relief. With a cloth with a solvent, remove excess wax, brightening the surface gaps between the lace and the protruding parts of the lace. Next, rub your finger into decorative surface a ball of colored wax patina, giving an even more aged look to the product.
Now let the patina dry for a few hours. If desired, the surface can be protected with an alcohol varnish. The varnish must be applied in two layers, allowing each to dry properly. The varnish will allow you to wipe the surface with a damp cloth. Ready ball decorate with ribbons and admire the result!

Decoration of transparent Christmas balls
Transparent balls are no less interesting to work with. Firstly, glass balls you can just fill it with what? Anything! With threads, strips of paper, pebbles, berries, cones or even sand with shells - you get an original sea ball.


And you can glue them on the outside. The palm print looks original; it can be made with paint or pure sparkles.


It turns out in an original way if you apply glue to the ball, let it dry, then wash it off - you get a slightly pale glass (frosted).

And you can paint them from the inside, and make a painting on the outside.


Those who have detachable balls can only be envied. You can make it difficult to paint Christmas balls, but work hard and do it inside unusual composition- a three-dimensional image, as was done before when decoupage balls. Reuse gold leaf, artificial snow, beads, etc.


Styrofoam Christmas ball decoration
Shown above are beautiful layered fabric balls paired with tailor's pins. Using the same pins, you can beautifully wrap the balls with threads, ropes, twine.

The beauty of styrofoam balls is that they are “soft” in them you can stationery knife make slits into which to insert fabric or paper with a nail file. You can immediately press paper or fabric without a preliminary cut. And then glue the seams beautiful lace, ribbons or beads. By the way, using this technique, you can make images on the balls: stars, Christmas trees, cakes, etc.


And if you make a small basket of cardboard or wire and attach it to the ball, it will come out adorable toy in the form of a balloon.

By the way, a New Year's toy: a balloon can also be made from glass balloons.


