Star news


DIY Christmas tree decorations: bright and soulful angels made of beads. Bead toys
We continue the theme of creation New Year's crafts with your own hands. In general, it would be very interesting to know how often people buy or make their own new Christmas decorations? Probably someone who once bought a set of beautiful New Year's balls, and decorates his Christmas tree with them year after year. There is nothing shameful in this (well, it looks beautiful!), besides, we only see the Christmas tree a couple of months a year (I’m not tired of it yet)). But for those who really love change and new things, “Cross” gives new master class on creation Christmas decorations with your own hands! This time, together with us, you can weave an Angel from beads, which, however, can become an excellent New Year or Christmas gift for your guests.
To create an angel we will need:
- %D0%9B%D0%B8%D0%BA%D0%B0%20%D0%9B%D0%B5%D1%89%D0%B5%D0%BD%D0%BA%D0%BE%20(% D0%BE%D1%87%D1%83%D0%BC%D0%B5%D0%BB%D1%8B%D0%B5%20%D1%80%D1%83%D0%BA%D0%B8) %0A%20%C2%AB>%D0%B1%D0%B8%D1%81%D0%B5%D1%80%20%20%D1%82%D1%80%D0%B5%D1%85%20% D1%86%D0%B2%D0%B5%D1%82%D0%BE%D0%B2; %0A
- 1%20%D0%B1%D1%83%D1%81%D0%B8%D0%BD%D0%B0; %0A
- %D0%BF%D1%80%D0%BE%D0%B2%D0%BE%D0%BB%D0%BE%D0%BA%D0%B0%20%D0%B4%D0%B8%D0%B0 %D0%BC%D0%B5%D1%82%D1%80%D0%BE%D0%BC%200.4%20%D0%B8%D0%BB%D0%B8%200.3; %0A
- %D0%BD%D0%BE%D0%B6%D0%BD%D0%B8%D1%86%D1%8B%20(%D0%B8%D0%BB%D0%B8%20%D0%BA% D1%83%D1%81%D0%B0%D1%87%D0%BA%D0%B8); %0A
- %D0%BB%D0%B8%D0%BD%D0%B5%D0%B9%D0%BA%D0%B0; %0A
- %D0%BB%D0%BE%D1%82%D0%BE%D0%BA%20%D0%B4%D0%BB%D1%8F%20%D0%B1%D0%B8%D1%81%D0 %B5%D1%80%D0%B0%20(%D0%BD%D0%B5%20%D0%BE%D0%B1%D1%8F%D0%B7%D0%B0%D1%82%D0% B5%D0%BB%D1%8C%D0%BD%D0%BE). %0A%0A
%D0%91%D0%B5%D1%80%D0%B5%D0%BC%20%D0%B7%D0%BE%D0%BB%D0%BE%D1%82%D0%B8%D1%81 %D1%82%D1%8B%D0%B9%20%D0%B1%D0%B8%D1%81%D0%B5%D1%80%20%D0%BD%D0%B0%20%D0%BD %D0%B8%D0%BC%D0%B1,%20%D0%B1%D0%B5%D0%BB%D1%8B%D0%B9%20%E2%80%94%20%D0%B4% D0%BB%D1%8F%20%D0%BA%D1%80%D1%8B%D0%BB%D1%8C%D0%B5%D0%B2%20%D0%B8%20%D0%BA% D1%80%D0%B0%D1%81%D0%BD%D1%8B%D0%B9%20%E2%80%94%20%D0%B4%D0%BB%D1%8F%20%D0% BF%D0%BB%D0%B0%D1%82%D1%8C%D1%8F%20(%D0%BC%D0%BE%D0%B6%D0%BD%D0%BE%20%D0%B2 %D0%B7%D1%8F%D1%82%D1%8C%20%D0%BB%D1%8E%D0%B1%D0%BE%D0%B9%20%D0%B4%D1%80%D1 %83%D0%B3%D0%BE%D0%B9%20%D1%86%D0%B2%D0%B5%D1%82).
%0A
%0A
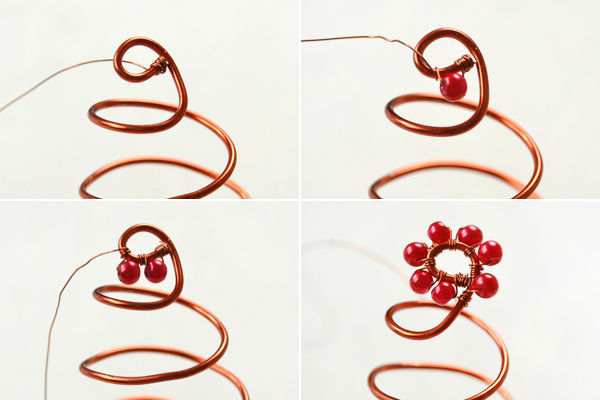
%D0%9D%D0%B0%D1%87%D0%B8%D0%BD%D0%B0%D0%B5%D0%BC%20%D0%BF%D0%BB%D0%B5%D1%81 %D1%82%D0%B8%20%D0%B0%D0%BD%D0%B3%D0%B5%D0%BB%D0%B0%20%D0%B8%D0%B7%20%D0%B1 %D0%B8%D1%81%D0%B5%D1%80%D0%B0%20%D0%BF%D0%BE%20%D1%81%D0%BB%D0%B5%D0%B4%D1 %83%D1%8E%D1%89%D0%B5%D0%B9%20%D1%81%D1%85%D0%B5%D0%BC%D0%B5.%20%D0%9E%D1% 82%D1%80%D0%B5%D0%B7%D0%B0%D0%B5%D0%BC%201%20%D0%BC%D0%B5%D1%82%D1%80%20%D0% BF%D1%80%D0%BE%D0%B2%D0%BE%D0%BB%D0%BE%D0%BA%D0%B8%20%D0%B8%20%D0%BD%D0%B0% D0%B1%D0%B8%D1%80%D0%B0%D0%B5%D0%BC%209%20%D0%B1%D0%B8%D1%81%D0%B5%D1%80%D0% B8%D0%BD%20%D0%B7%D0%BE%D0%BB%D0%BE%D1%82%D0%B8%D1%81%D1%82%D0%BE%D0%B3%D0% BE%20%D1%86%D0%B2%D0%B5%D1%82%D0%B0.
%0A%0A%D0%9E%D0%B1%D1%80%D0%B0%D1%82%D0%B8%D1%82%D0%B5%20%D0%B2%D0%BD%D0%B8%D0%BC %D0%B0%D0%BD%D0%B8%D0%B5%20%D0%BD%D0%B0%20%D0%BC%D0%BE%D0%B9%20%D0%B1%D0%B8 %D1%81%D0%B5%D1%80,%20%D0%BE%D0%BD%20%D0%BA%D1%80%D1%83%D0%BF%D0%BD%D1%8B% D0%B9.%20%D0%95%D1%81%D0%BB%D0%B8%20%D0%B2%D1%8B%20%D0%B2%D0%B7%D1%8F%D0%BB %D0%B8%20%D0%BC%D0%B5%D0%BB%D0%BA%D0%B8%D0%B9%20%D0%B1%D0%B8%D1%81%D0%B5%D1 %80,%20%D0%BF%D1%80%D0%BE%D0%B2%D0%BE%D0%BB%D0%BE%D0%BA%D0%B8%20%D0%B2%D0% B0%D0%BC%20%D0%BF%D0%BE%D0%BD%D0%B0%D0%B4%D0%BE%D0%B1%D0%B8%D1%82%D1%81%D1% 8F%20%D0%BC%D0%B5%D0%BD%D1%8C%D1%88%D0%B5%20%D0%B8%20%D1%81%D0%B0%D0%BC%20% D0%B0%D0%BD%D0%B3%D0%B5%D0%BB%20%D0%B1%D1%83%D0%B4%D0%B5%D1%82%20%D0%B1%D0% BE%D0%BB%D0%B5%D0%B5%20%D0%BC%D0%B5%D0%BB%D0%BA%D0%B8%D0%B9.
%0A
We thread the wire parallel to the last, 9th bead. It looks like X.

Tighten to the middle of the wire. The result is a circle of halo.

We take a bead and, folding the ends of the wire together, thread it as in the photo.

Pull the bead to the halo. The bead is the head of an angel.

We collect 1 red bead. We weave the wire in parallel.

We tighten it. The result is the first row of the dress. After the first row of the dress, we begin to weave angel wings from beads.

We collect 9 white beads on one end of the wire. Having passed 1 bead at the end, with the same end of the wire we pass through the 2nd bead and tighten it, pulling it towards the red bead.


The resulting wing should look like this:

We do the second wing in exactly the same way.

Let's start weaving the arms. At one end of the wire we collect 4 red beads and 1 white bead. Passing the white bead, we pass the wire through the red ones.

And tighten it, pulling it towards the wing.

We do the second hand in exactly the same way.

We collect 2 red beads. We weave with parallel weaving.

We tighten it.

One bead is added in each subsequent row.

So we weave to the desired length. I have 11 rows (there are 11 beads in the 11th row).

With the remaining wire we strengthen the sides of the angel like this: we count the rows from the bottom, between the second and third rows we pass the wire, then between the third and fourth, and so on throughout all the rows. We do the same on the other side.

Cut off the rest of the wire. Our angel is ready!

If you want to weave others New Year's toys from beads, then watch the weaving master class Christmas ball from Svetlana McDaniel:
Beaded figures on New Year will help you decorate your Christmas tree beautifully and originally. Beading is fun and interesting activity. Try to make a New Year's craft with your own hands, and our lesson will help you.
New Year's craft from beads - Christmas tree
Today we will tell you how to weave a Christmas tree from beads according to the pattern. The master class is suitable even for beginners, as there are no particular difficulties in the process. The main thing is to prepare everything you need and strictly follow our step-by-step instructions.
In the end, you will end up beautiful christmas tree, without which it is impossible to imagine this wonderful winter holiday!
Here's what we need:
- beads green, golden, brown;
- dense brown wire;
- alabaster and stand;
- bugles;
- colored pebbles;
- glue.
 So let's get started.

Here are a few more diagrams of different Christmas trees. New Year decoration made from beads will add even more sparkle and lights to your holiday!
- For this product you will need yellow, blue, red, green and yellow beads. According to the diagram, count the required number of beads and start weaving.

- This structure is perhaps a little more complicated than the previous one. Stay focused and stick to the plan. Only green and yellow beads are needed.

- But here is a completely unusual and stylish Christmas tree from felt. Decorate the fabric with beads and sew it as in the photo. The toy is ready! Fast way do original decoration for the holiday. Such a tree can even be placed in the center of a festive table.

- This scheme is not suitable for everyone, but only for more advanced craftsmen. However, if you figure it out, the process will not be so difficult.
 For wood, prepare beads of the following colors: white - 900 pcs, green - 218 pcs, red - 80 pcs, brown - 20 pcs, dark green - 40 pcs. The craft has 30 columns and the same number of rows. As planned, the Christmas tree should have a top and a garland.
 - This scheme is the most complicated, but it will turn out to be the most bright toy. Christmas tree It turns out not simple, but supplemented with figures of people: a boy and a girl. Make decorations with your children, they will definitely love it.
 You need beads:
- green - 203 pcs.
- brown - 10 pcs
- coffee with milk colors - 18 pcs
- red - 18 pcs
- white - 30 pcs
- blue - 46 pcs
- black - 10 pcs
- yellow - 9 pcs
- blue - 5 pcs
- purple - 14 pcs.
- gray - 6 pcs
Weave the same way as shown in the diagram.
Below you will find a video about what else you can make from beads for the New Year.
Try making decorations with your own hands, it’s so nice to feel like a real creator! Show your imagination and ingenuity and surprise your guests with your skills!
 Bead crafts for beginners: making animals
 DIY beaded snowflakes for the Year of the Goat
Content
We all once went through a period of weaving baubles and various keychains from beads. It's simple, beautiful and original. Now we invite you to remember your skills and try to do something for the New Year. Maybe it will be a garland or separate decorations for decorating the room and the Christmas tree. Let's quickly see what we can create and try to do it ourselves. At the very bottom of the article you will find a list of materials necessary for this type of activity and useful tips.
New Year's compositions for beginners
The simplest option is to create snowflakes, for which we need:
- beads;
- wire;
- round nose pliers.
The set is not very large and the process of creating snowflakes is also quite fast, but exciting. From wire you need to create a frame for the future snowflake. It’s better to make a snowflake of 5 rays or even more, then it will turn out more beautiful. Beads and beads can be used in different sizes and colors.
Such snowflakes can be hung using thin satin ribbons and even curtain the window, hang it on the cornice, on the Christmas tree, on the wall.

Snowflake: a more difficult option
The next option is slightly different from the previous one; you will need glass beads and regular beads.

Prepare the necessary materials: glass beads, beads, threads, needle, rope or thin rope. Approximately 7 pieces of beads need to be strung on a thread and left a few centimeters.
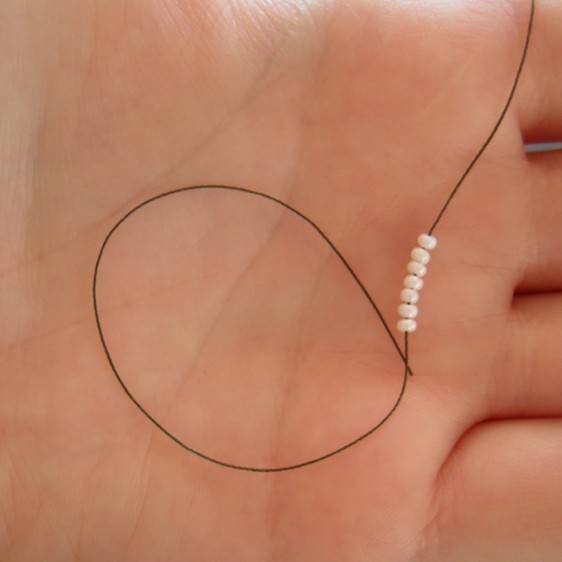
Now the edge of the thread needs to be threaded through the first bead.

Now you need to add a bead of a different color, and then thread the thread through the white bead as in the photo:


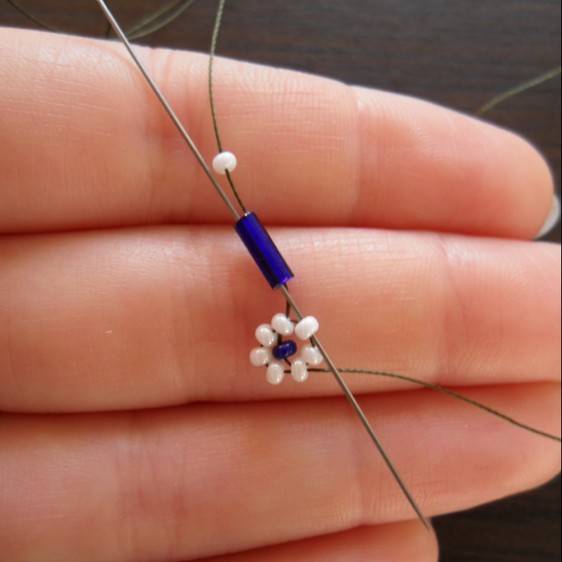
This manipulation needs to be done 7 times to get something similar to a snowflake.

As a result, you should end up with a circle like this, onto which you will later string glass beads.

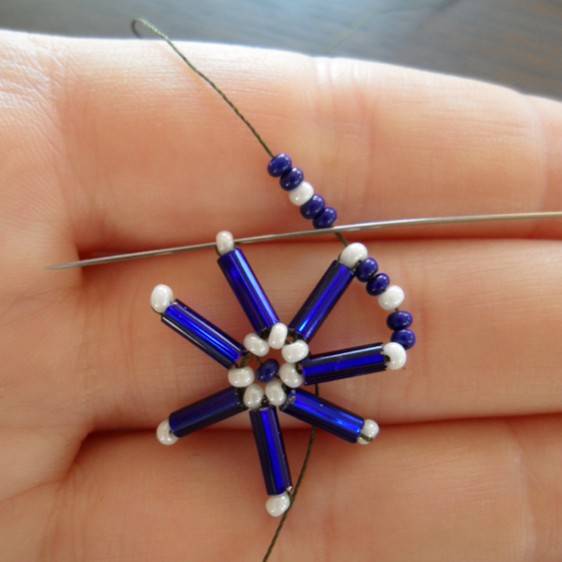
Now string not one glass bead, but two, and between them you need to place one white bead.
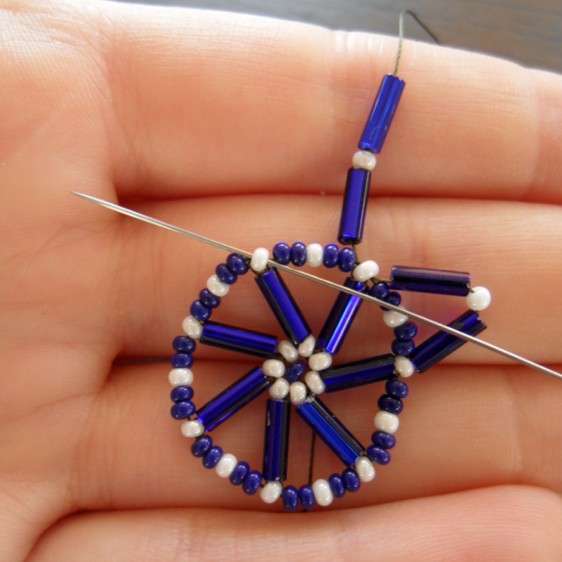
When you have created all the “petals”, you can further decorate them using blue round beads.
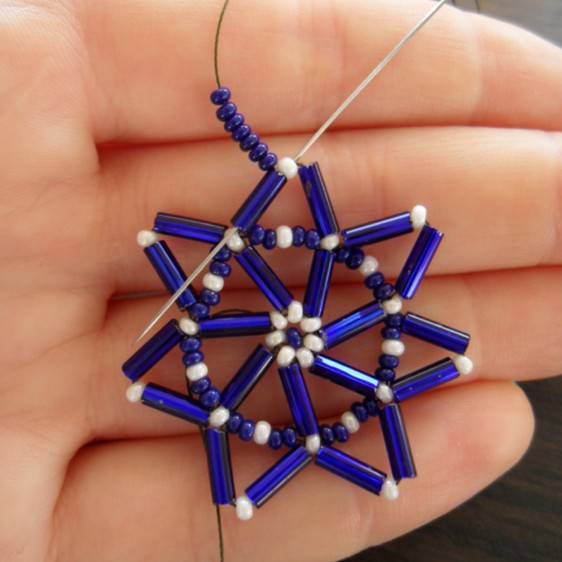
You can decorate the top of each triangle, or you can leave one eye for a rope.

New Year's decoration is ready! You can use various other colors. By the way, such a snowflake can be used as a pendant on the neck or as a additional decor New Year's suit.
New Year's composition
It is not necessary to create any complex snowflakes, can be done beautiful decoration using wire and beads different color, shape and size.
You need to use thick wire as the frame of the future product. Bend it into the desired shape and secure.
You need to attach a thinner wire to the ends of this frame, on which you will string different beads. Now you just need to wrap the skeleton of the product with thin wire with beads. You can add a couple of large beads or pearls. All that remains is to make a hook from thick wire and hang the product on the Christmas tree.
And once again I would like to say that such products can even be used as a pendant or earrings. It turns out very stylish! We offer several beautiful options:


The frame does not have to be completely filled with beads; large beads can be used different colors in limited quantities.
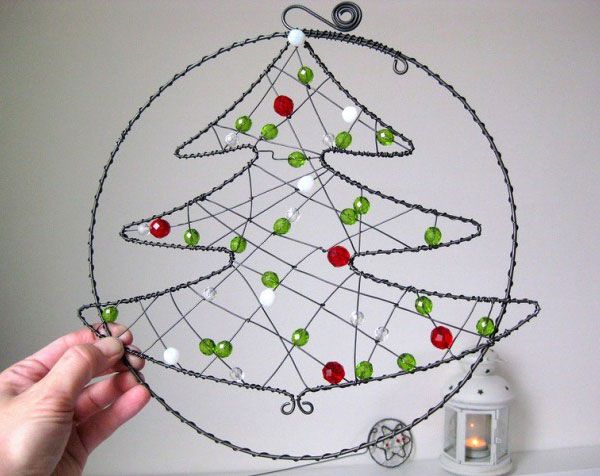
You can use wooden beads (or, more precisely, wooden beads) and string them onto a frame that is made in the shape of a Christmas tree.
And a few frame ideas for future decoration:

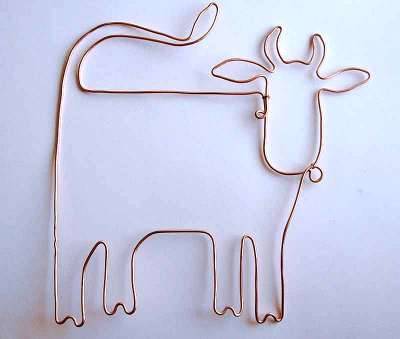


Christmas trees made of beads
Another simple option for creating a Christmas tree. It turns out cute and can be safely decorated New Year's table. Such trees can be made large or slightly smaller to be placed near each guest. These trees can be taken home as a New Year's souvenir.
First you need to twist the following frame from wire:
Then, using thin wire and beads, you need to wrap the frame to make a beautiful Christmas tree.
Use your imagination and try to build something like this composition:

Using the principle of a frame Christmas tree with beads, you can make New Year's earrings as a present:

The brighter the beads are, the more there are, the more beautiful the composition will be.
New Year's ball
You can make a lot of things out of beads! For example, a luxurious Christmas ball. Use mother-of-pearl beads, you can use Czech beads different sizes and any other decor that suddenly appears in your head.
For these balls you will need:
- beads, beads;
- glue gun;
- scissors;
- glue stick;
- ribbon;
- foam blank in the form of a ball;
- decorative needles.
You need to string beads onto decorative needles in the order you like and leave some part of the needle unused. Now the tip of the needle needs to be lubricated with a glue gun and inserted into the ball.

Prepare many similar needles with beads and beads so that you can completely cover the ball.

A small space will need to be left for the ribbon, with which the ball can be hung on the Christmas tree.
New Year's figures made of beads
But now you just need to remember how various baubles and beaded keychains are created. For the most simple toys you will still need a diagram. You can weave Santa Claus, a snowman, an angel and the symbol of the New Year 2018 - a dog.

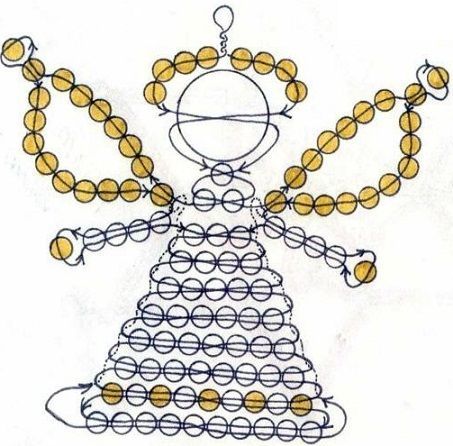
We offer a diagram for such an angel. Use beading wire and beads of any size.
The pattern and technique of weaving Santa Claus looks like this:

And this is a pattern for weaving a snowman

The snowman can be flat, or it can be voluminous.

And here is the symbol the coming year- dog. Weave your most loved one and devoted friend. By the way, the color that will accompany 2018 is yellow. Keep this in mind when creating beaded compositions.

And creating the next dog is as easy as shelling pears:

You will need thick material, beads of the required colors, a needle and thread.
From dense material you need to cut out the template and just sew beads on it. The dog can be used as a brooch, applique or even as a decoration for a Christmas tree or wall.
Here are some more ideas for similar decorations:


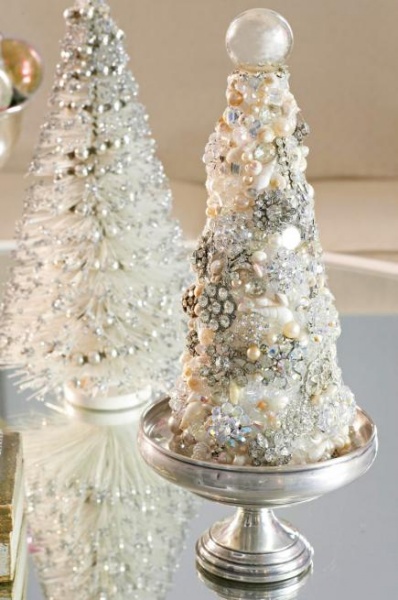
Christmas tree made of beads on a foam base
To do this you need to use a glue gun. You will also need a foam base, a lot beautiful beads and a stand.
As you may have guessed, we will glue the beads onto a foam base. You can, in principle, use cardboard as a frame. If you don’t want to use a glue gun, because the beads are quite small and it’s quite difficult to work with them using this technique, then you can try gluing them with PVA glue or “Moment”.
Beads as a filler
Now we'll tell you what it's about we're talking about. We will need glass bottles cone-shaped, many bright beads, tapes.
You need to pour our base material into the bottles in rows, close with a cork and decorate with ribbons. It turns out very modern and unusual.

Basics of working with beads
Working with this material is quite painstaking. You need to get used to it, have good lighting, and the right tools. We invite you to familiarize yourself with the list necessary materials and tips for work:
- beads of different sizes, glass beads;
- thin needle with a long eye;
- beading wire;
- thick wire;
- simple pencil;
- colored pencils (for the diagram);
- squared paper;
- glue gun;
- different foam bases;
- bobbin threads;
- fishing line;
- wire cutters, round nose pliers;
- various accessories;
- ribbons, bows;
- additional beads, pearls.
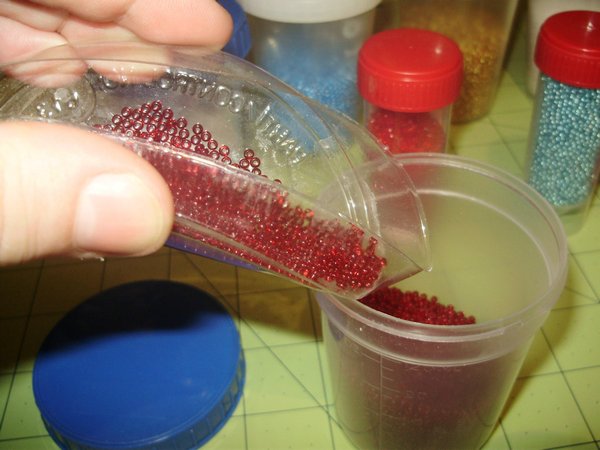
To work with beads, you definitely need a spacious place, a table, good lighting, i.e. you will need desk lamp. For convenience, you also need to use containers for beads so that they can be sorted by color or size.
You also need to know that there are different manufacturers of this material. It is believed that Czech beads are the most beautiful and smooth. It is used to create earrings, bracelets and brooches.
And now we invite you to see how an angel is created from beads. We have already provided you with a diagram of its weaving, but the video master class may better reveal the essence and technique of beading:
On New Year's Eve I want to decorate my house. We offer to make decor from beautiful and available material- beads. Toys made from multi-colored beads will complement the decoration of the spruce tree and illuminate the branches with sparkle when the garlands are lit. And working on crafts will bring a lot of fun!
Simple toys made of wire and beads
You don't need any weaving skills to make these!Even those who have never worked with the material can make jewelry from beads. To try the pen you will need:
- thin and dense wire;
- beads;
- beads and glass beads of one, two or all colors of the rainbow.
Fold the base of the toy from thick wire, and put beads on thin wire. You can leave some free space between them. Wind a thin wire around the base, secure the ends and wrap the toy with wire without beads.
Christmas ball made of beads and beads
 Homemade from thin wire and colored beads
 To make a round ball with beads, prepare:
- beads of several colors and shapes;
- long thin wire;
- inflatable ball;
- wire cutters
Inflate the ball to the size of a Christmas tree decoration. String beads onto the wire and wrap it around the ball, leaving a little for the hanging hook. Skip this step if you are going to hang the toy on a ribbon. Secure the wire, punch the ball and remove it from the wire frame.
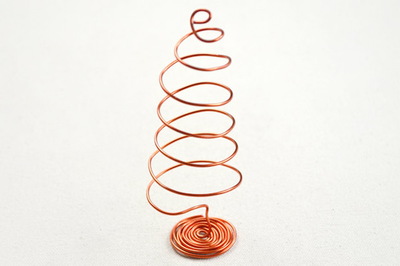
Herringbone spiral made of beads
 A beaded Christmas tree will be an excellent keychain or home decoration
 A spiral Christmas tree is a fun souvenir that you can make in ten minutes. Prepare:
- a small sheet of cardboard (format – A6);
- wire;
- red and green beads;
- thread or ribbon for hanging.

Fold the cardboard into a cone and wrap it with wire in a spiral. Pull it by the end and you will get a Christmas tree. Bend its ends so that the beads do not fly off. Then put the beads on the wire and hang them on a ribbon or thread.
Bugle bead snowflakes
 Step-by-step instruction how to create snowflakes from blue beads
 The New Year does not always bring snowdrifts and snowstorms. But we can arrange it ourselves by making it from beads and decorating the house with them! To make the toys look impressive, take shiny glass beads in silver, blue, blue, lilac and azure shades, as well as transparent beads. Combine details different sizes and shapes to achieve variety.


Beads are often strung on fishing line and nylon. But for toys it is better to take thin wire, which serves as a more reliable frame and keeps its shape. Experienced needlewomen They will quickly make snowflakes according to our patterns. If you haven’t had time to get your hands on it, use the step-by-step instructions above. To create your first snowflake, stock up on translucent blue beads at least two sizes, wire and wire cutters.
Christmas ball made of beads
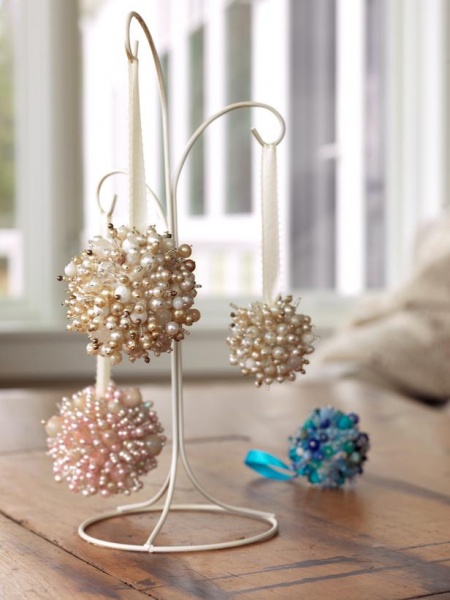
 Sparkling Christmas balls made of crystal and pearl beads
 Multi-colored beads are an excellent material for decorating finished toys made of plastic or fabric. Simple and stylish decoration can be made on the basis of a ball (tennis, Christmas tree or special foam blank). Also prepare:
- beads or beads of 2-3 shades that match well;
- thin satin ribbons;
- strong glue;
- fishing line or thread.
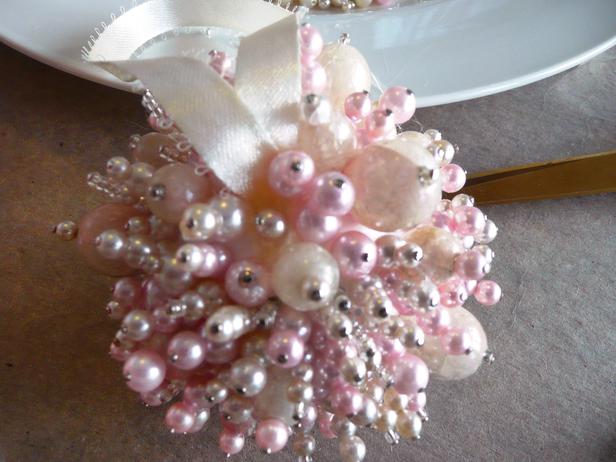
 Step-by-step instructions for creating a Christmas ball from beads
 Place beads of different colors on a thread. Secure their ends with a couple of large knots. Glue the beads to the ball, starting from the middle of its bottom. The first row consists of three to four beads. Fasten the second thread to the ball, moving in the opposite direction. When there are three to five rows of beads left to make, cut a piece of ribbon, fold it into a loop and attach it to the ball. After that, return to the beads. Decorate the loop fastening with a bow made of openwork ribbon. In addition, beads can be glued individually.
Christmas angel
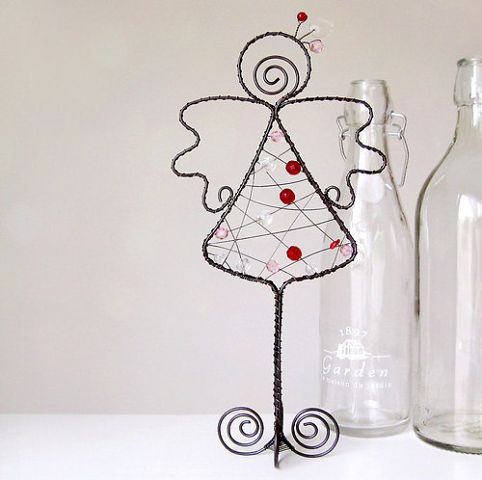
 Pattern for weaving a Christmas angel from beads and seed beads
 Snow-white figurine - great decor For New Year's tree or . The craft is made in parallel technology wire weaving. The following materials are needed for work:
- mother of pearl beads;
- large mother-of-pearl bead for the head;
- mother of pearl beads;
- “spark” beads (golden and silver);
- thin wire.
Start weaving the angel's body. Collect six beads, thread both ends into five beads, crossing them. Pass the ends through the four beads again. Continue this pattern until only one bead remains. Make angel hands. Place eight mother-of-pearl beads and one gold bead on the ends of the wire. Unfold the end of the wire and pass back through the mother of pearl beads to cross the wire into one of the body beads.
Form an angel's neck and place a large bead on it for the head. Make a halo using 15 golden beads and return the wire to the neck, wrapping it once. Move on to the wings. String 30 silver beads on each, secure the ends of the wire around the neck and hide them with back side. Use the remaining material to make a hanger, through which you pull a thread-suspension.
golden star

A toy made of sparkling beads will add a touch of luxury to the decoration of your tree. To create it, take:
- beads silver color and two tones of gold;
- thread of a suitable shade;
- a needle;
- foam;
- thin decorative tape.
Place four silver beads on a thread and enclose them in a ring. Between every two beads, weave two more. Alternately add one or two gold beads between pairs of silver ones. Weave two beads at the corners of the resulting figure. According to the pattern in the picture, make the last two rows using the third (darkest) shade of beads.
Make four more of these squares and bend them in half. They will become the rays of a star. Connect the parts together, starting from the tops, leaving a loop on one for fastening in the form of a ring of beads. Before sewing on the last square, fill the star with foam. Pull the glitter thread through the loop and hang the ornament on.
Beaded wreath

– a new, but already loved element winter decor. Imitation spruce branches and ribbons can even be made from small beads. You will need:
- green, red and golden beads;
- bicone beads;
- fishing line;
- needle;
- decorative bell for decoration;
- thin ribbon or satin thread for hanging.
Collect five beads and lock them into a ring. Work with both ends of the line. On one, place a bicone and three beads, on the other, only a bicone. Cross the lines in it towards each other, as when weaving in a cross. Repeat the steps three times, and the fourth time, string a bicone on both sides of the fishing line and cross them through three beads so that the material comes to the top.
Then weave according to this pattern: string a bicone and a bead on one end of the ribbon, and only the bicone on the other. Cross the ends of the fishing line in it. Finally, pull the line through the braided beads and pull it off. Collect all the details into a wreath. Decorate it with a bell, add a loop of gold beads and thread a ribbon through it.
Christmas tree made of beads
 Step by step weaving spruce branches from green beads
 Experienced needlewomen can easily create a miniature spruce tree from beads and wire. Prepare for work:
- green felling (or white - for a snow-covered tree). When choosing the first option, also stock up on yellow beads that will highlight the edges of the branches.
- For covered with snow For fir trees, take a light wire; for a green beauty, use copper wire.
- find large silver and gold colored beads for the top.
Weave using the “loop with twist” technique, as shown in the photo. Each piece includes six green beads and two yellow. Pick up three green, two gold and three green again, twist the wire and move on. The upper branches consist of three elements. Their tips can be decorated not only with green, but also with silver beads.
 Instructions for creating a wicker Christmas tree on wire
 The closer to the base of the tree, the more magnificent the foliage becomes and the more weaving needs to be done. Wind the finished branches onto the wire stem in a circle. Decorate the top and base of the Christmas tree separately. The work is not difficult, but it requires concentration and takes a lot of time.

New Year is a wonderful time when magic penetrates into our home and into the heart of every person. For this holiday it is customary to make various crafts. Craftswomen use a wide variety of materials for this occasion. But, if you love working with beads, then in this article we will offer you New Year’s crafts from beads, which a master class with step-by-step photos will allow you to create.
What crafts can you make from beads for the New Year?
Christmas tree made of beads.
Every craftswoman can make a huge number of crafts from beads. These crafts can be simple to make. You can also find other crafts that will be a little more difficult to complete. To make a Christmas tree take:
- small green beads in the amount of 50 grams,
- small brown beads in the amount of 5 grams,
- copper wire,
- two pearl beads,
- colorful pebbles,
- bugles,
- alabaster and glue “Moment”,
- stand.
Progress:
Your future craft - the Christmas tree will have 10 tiers. Each tier will have 4 branches.
First of all, you should make the top of the Christmas tree with the first tier. So, we take a wire 45 cm long and string a bead onto its middle golden color. Then we string a white bugle bead, a gold bead, a silver bead and a green bead. The second end of the wire from * to * must be passed through as in needle weaving.


Now place 4 green beads on each end of the wire. Twist the ends of the wire together 4 turns. Make a loop on one of the wires with 4 green beads. Pick up 2 more brown beads. Then collect 4 more green beads. Repeat these steps on the other side of the wire. Twist 2 turns and make a couple more similar loops.

Next, we begin to create the second tier. At this stage you take 4 pieces of wire that are 25 cm long. You will need this wire in order to make four branches that will have the following bead set: 3 green beads, 2 brown beads, and 3 more green beads. Twist the wire from loop to loop 5 turns. And from the last loop you need to twist 3 turns.


After creating the second tier, we begin to create the third tier of the Christmas tree. In your work you will need 4 pieces that will have a length of 30 cm. Make 4 branches from them that will have 5 loops. The first three loops must be made in the same way as the loops of the 2nd tier. In the other two loops, instead of three beads, 4 green beads are collected.


Have you completed the 3rd tier? Then start making 4. In the work you need to use 8 pieces of wire, which are 30 cm long. From them you will have to create 8 branches with five loops. The first 3 loops of the branch should be done in exactly the same way as the loops of the second tier. In the remaining two loops you need to collect 6 green beads. After the last loop is completed, you need to twist the wire down 5 turns. After which it is worth collecting one branch from two such branches. Twist it into a spiral 4 turns.
In order to make the 5th tier, you need to take a wire 33 cm long, from which you need to make 4 branches with seven loops. We make the first three loops in exactly the same way as the loops of the second tier. In the remaining loops we collect 6 green beads.
To create the sixth tier, 8 pieces of wire 30 cm long are used. From them we will make 8 branches with five loops. These loops are created similarly to the loops of the 4th tier. Then you need to collect one of two such branches. Use in this work an additional piece of wire 20 cm long. Wind the additional wire 12 turns from the last loop. It should be wound in a spiral. Then twist the second branch 15 turns with a spiral.

The seventh tier is created from four pieces of wire, which are 60 cm long. In the middle of the wire you need to cast on the first loop. Then cast on 6 more loops at the same end. The loops are created in the same way as the loops of the 6th tier. Leave the other end of the wire long. After creating the last loop, twist it 7 turns. On long end wire you need to dial 7 loops. Using additional wire, twist the branch 8 turns downward in a spiral.


To create the 8th tier, you need to take 4 pieces of wire, which are 60 cm long. You will also need 4 pieces of 30 cm each. You need to twist branches from the long pieces, as for the 7th tier. From a short wire we twist branches that will have 5 loops. Next, from two branches you need to collect one branch. We screw them with a spiral. First, we start the spiral 15 turns on a branch with two ends. And then screw a small branch with 15 turns.
To create the ninth tier, we repeat all the actions that were necessary to form the eighth tier. However, in this case you must increase the number of turns from 15 to 18 pieces.

