Star news


Decor from glass bottles. DIY bottle decor - turning unnecessary containers into decor
Old bottles are an excellent basis for creativity. Bottles can be decorated in an original way with your own hands. This craft will be a wonderful interior decoration or will add the necessary notes to your holiday decoration. There are many options for decorating bottles, but you can always show your imagination and come up with something new. The photo shows a variety of ways to create such home decor, and the videos will help you in your work.
Step-by-step instructions for decorating bottles at home
Master class on decorating a bottle with salt and paint
You can decorate the bottle in an original and stylish way with ordinary salt and white paint. To be used for decoration:
- white paint;
- clean and dry transparent bottles without labels;
- glue;
- Bath salt white;
- elastic band with a thickness of at least 50 mm.
On a note! If your imagination suggests that other decorative materials will fit organically into the decor, then take them too.
Step-by-step instructions will allow you to create an original craft that will become an exquisite accent in the interior or complement the decoration of the holiday.
Step 1– An elastic band is wound randomly around the bottle. It should touch the glass tightly. It is important that the material does not tuck in certain areas.

Step 2– Now you can move on to coloring. It is optimal to do this work outdoors, but you should choose an area protected from the wind. This will prevent dust and dirt from getting on the surface of the bottle. You should put the old one under the bottom shoe box. When all preparatory work are completed, you can proceed to the paint application stage. The bottle is then left until completely dry paints.

Step 3– Next, the surface of the bottle needs to be coated with glue. Now white salt is poured onto the paper. You need to roll the bottle over it several times. All that remains is to let the bottle dry thoroughly. When the glue hardens, you need to remove the rubber band from the bottle. By the way, you can use it instead decorative tape. This must be done very carefully so as not to damage the salt and layers of paint.


Master class on decorating a bottle using decoupage technique
Do-it-yourself bottle decor can be made using decoupage technique. Such creativity will be interesting and will not cause any particular difficulties. Using the instructions, create original decor for home or holiday decoration will not be difficult.
To work you need to use:
- glass bottle;
- PVA glue;
- chintz;
- acrylic lacquer;
- scissors;
- pink and white acrylic paint;
- brush No. 12;
- foam sponge or sponge;
- napkins for decoupage;
- white marker;
- stained glass paints;
- deep cup for diluting glue.


Step 1– First, the bottle is cleaned and its surface is degreased. Labels can be removed from containers by simply soaking them overnight. Then the paper is easily removed with a hard sponge. Residues of glue can be removed with any solvent, including acetone. After the bottle has dried, you can begin to form the composition. Prints with roses, like the one on the napkin below, always look stylish and sophisticated.

Step 2– You need to tear off the drawing with your hands along the edge and attach it to the bottle to roughly imagine what the composition will look like. The future location of the napkin is outlined with a marker.


Step 3– Working with fabric. Chintz should be cut into random strips. It’s great if the material is old and a little shabby. This fabric is very thin and flexible to work with. It will allow you to create sophisticated and elegant folds. Drawing in in this case does not matter, since it will have to be painted over later.

Step 4– A strip of chintz is soaked in PVA glue. For ease of use, it is recommended to pour the liquid into a deep container. You should not use very thick glue. It can be diluted if necessary with water in a 1:1 ratio.

Step 5– The fabric strips need to be slightly wrung out, after which they are fixed to the bottle. To make decoupage stylish and beautiful, you should create folds with your hands. There are no rules here - you have to act arbitrarily. But the place marked for the drawing does not need to be pasted over.


Step 6– We need to let the bottle dry. This is a lengthy process and may take several days. When the container is dry, paint the fabric with white acrylic paint. To do this you need to use a brush. To thoroughly paint over the folds, you should take a sponge or foam sponge. If necessary, the product is painted in several stages. The main thing is that the glass does not show through.


Step 7– When the paint is thoroughly dry, you need to fix the design from the torn decoupage napkin with glue. Its top two layers must be removed. Only the part with the pattern remains. The desired area is smeared with glue, and a napkin is placed on it.


Step 8– The surface of the napkin is treated with glue. It needs to be distributed from the center to the edges. In this case, the image is slightly smoothed with a brush. The main thing is not to deform the paper.

Step 9– Now you need to lightly brush the pink paint over the surface of the bottle. You should act lightly, barely touching the folds.

Step 10– Then 2-3 layers are applied acrylic varnish. After each treatment, the product must dry.

That's all! The bottle using decoupage technique using fabric and napkins is ready.

Master class on decorating a bottle with threads
Even beginners in this type of needlework or children can decorate a bottle with their own hands.
To bring this master class to life, you need to prepare:
- threads of any thickness and shade;
- a bottle of any shape;
- scissors;
- PVA glue or double-sided tape;
- any decor (dry leaves, beads, feathers, shells, etc.).
Step 1– Glue is applied to the surface of the bottle. If you decide to use tape, then wrap the container with it.


Step 2– Now we need to start winding the thread around the bottle. It’s best to start working from the top, from the neck itself.


Step 3– When the container is completely covered with threads, it should be decorated. You can decorate the bottle according to your own taste and desire. Fabric designs or stickers, rhinestones and beads will look great on it. The decor is best secured with glue.

That's all! A simple DIY bottle decor is ready!

Master class on decorating with ribbons
- about 3.5 m satin ribbon;
- a bottle of champagne;
- scissors;
- glue “Moment Crystal”;
- 1.5 gold brocade ribbon;
- feathers, beads, lace.
Step 1- Take a bottle of champagne. The tape is applied to it and measured. Required amount needs to be cut off. To decorate, you need to put glue dots on the container. A piece of decor is wrapped around the base, touching the glue dots. You need to fix it carefully so that the edges do not move away or become brittle.

Step 2– Following this principle, you need to fix the second layer of decor. You can decorate the bottle in a pattern that resembles a pigtail. Further decoration is carried out in the same way (layers 3 and 4).

Step 3– Now you need to decorate the base brocade ribbon. It is also measured, cut and fixed with glue. But it is worth remembering that rigid material is extremely difficult to stretch. 2 rows are created from this decor.

Step 4– From the level of the neck to the bottom, a gold ribbon is run, which is also pre-measured. It is very important to monitor the condition of the seam. All that remains is to disguise it and fix it additional elements decorations. As you can see, decorating a bottle with your own hands is quite simple. The photo will help in your work.

Video: how to decorate bottles with your own hands
Take up this type of needlework and make a few original crafts Photos and videos will help.
Make it special appearance Any housewife can own her own home. To do this you need to decorate the interior original things made with your own hands. And everything you need, as a rule, is at hand: old scraps of fabric, shells, leftovers ceiling tiles... But you never know the items that are in in capable hands will become a work of art. A little imagination, and the idea comes to life. And now you become the owner of things that bring uniqueness to your interior.
Decoupage
Decoupage is translated from French as in "an object that is cut out." In needlework, this word was originally used to describe the method of applying elements cut out of paper onto an object. For greater strength, these glued elements were later coated with varnish, and the surface took on the appearance of painting. This is how poor peasants in China decorated furniture, and this is where this technology for making decorative items with their own hands came from. This article will talk about how to decoupage a glass bottle.
Different ideas: what happens
For such crafts, as a rule, you take a bottle unusual shape. Most often these are containers of expensive branded alcohol. It is interesting in itself, but after decorating it generally turns out a real masterpiece, but only on condition that the decoupage is done with high quality.
You can give a new look to the bottle different ways. Having appeared at the end of the seventeenth century, this technique of decorating objects has been improved. Today, these types of decoupage are widely represented in needlework.
- Volumetric (creating 3D images from scrap materials).
- Classic (applying a picture directly to an object).
- Artistic (creating a single full-fledged canvas using different effects).
- Reverse from the reverse side).
- Decopatch (work using patchwork style).
Today there are several DIY methods. This is decoration toilet paper, tights, napkins, semolina, various types of paper.
Method 1: toilet paper
A common way of decorating is to decoupage a bottle with toilet paper. The master class offers step by step instructions making such a craft.
You will need toilet paper, paints, paste, brush, and pencil for decoration.
At the first stage we make the base. To do this, apply glue to the bottle and glue the paper, forming small random folds.
At the second stage, when the base is dry, we make a drawing (for example, a tree). It's better to start with simple sketches with large details. Once this technique has been mastered, you can then move on to more complex compositions.
We continue to decoupage the bottle with toilet paper. The master class offers the third stage of work. Now we glue the paper according to the drawing, forming individual parts of the tree. This is done like this: tear off a piece of paper, twist it into a flagellum, dip it in glue and apply it to the drawing. The trunk and branches of the tree are made of flagella of different thicknesses. You can also make stones, water, grass. Upon completion of the work, it must be thoroughly dried.

At the last stage, we move on to coloring the workpiece. This is done with paints and a brush. Apply paint in a thick layer to add volume. Your imagination will tell you how best to decoupage a bottle with toilet paper; we reviewed a master class on how to make it.
Method 2: tights
Now let's look at how decoupage is done, let's take the most common vodka bottle. This craft is called " Bunch of grapes". Step by step work This craft will clearly demonstrate another way to decorate a bottle with your own hands.
First, wash and degrease the bottle.
At the next stage, soak the nylon stocking in PVA glue diluted with water in a 1:1 ratio. Now let’s put the nylon on the bottle, secure it to the neck and gently press it against the walls of the bottle, forming random folds. Let's leave it to dry. When it dries, the folds will tighten up a little.
At the next stage, we cover it with acrylic paint of the desired color, then varnish, and dry it again for 24 hours.
After that, use a regular sponge to tint to highlight the folds. This will give a special effect to our product.
Now we take the pebbles and form a bunch of grapes. We make leaves from paper, and antennae from wire. We shape the brush and tint. And our wonderful bottle is ready. Other designs are also possible.

other methods
This amazing art is decoupage. Creative ideas allow you to make wonderful models.
Let's see how you can use napkins to decorate bottles. To do this, we first make a base on a clean bottle: we use acrylic paints, decorate the bottle with them, choosing a color that matches the shade of the main paper motifs. Using decoupage glue, glue a design cut out of a napkin onto the dried paint. Let it dry, then draw lines along the contour of the drawing to shade the applique. In addition, it will give a voluminous effect. Next, at your discretion, you can decorate the neck of the bottle and finally cover the design with varnish. This method is easier to perform than decoupaging a bottle with toilet paper, a master class on making which was presented above.

And here is the decoupage of the bottle with paper. We take newspaper as the basis for the decor. You will also need acrylic paints, PVA glue and varnish. Wash the bottle and dry it well; the label does not need to be removed. We apply glue to the bottle, tear off pieces of paper from the newspaper, crumple and seal the bottle. Press the paper tightly so that there is no air left under it. We form folds in random order. When dry, paint and varnish. You can do another option. Before applying paints from newspaper flagella, we lay out an impromptu frame on the bottle. Then, when everything is covered with paints and varnish, you can add a picture or photograph here.

A fun activity
Decoupage of bottles is a very interesting and also in demand activity. Very often ordered at weddings and banquets. This is an expensive service. Therefore, you can master this technique yourself and save money if you need such bottle design. Moreover, this exciting activity, which allows you to prepare things with your own hands that can be used as an original gift.
Bottles, even of a very simple shape, can be beautifully decorated and turned into a decorative item in your home. It's easy to do it yourself. Before starting work, bottles should be washed thoroughly with dishwashing detergent. Be sure to remove all stickers and labels. Then wipe the bottle and dry it. In this article we will look at how to transform bottles using ordinary twine or thread, as well as lace and fabric. Before starting work, prepare all the materials and tools that you will definitely need:
- bottles
- scissors
- colored threads or twine
- braid
- lace, fabric, matting
- beads, seed beads and cabochons
- artificial flowers
- glue gun
- PVA glue
The main task when decorating bottles with twine or colored threads is to carefully wrap them around the bottle. For this glue gun Apply strips of glue from the neck to the bottom of the bottle and wind the threads quite quickly. the distance between the glue strips is approximately 2-3 cm. The threads are quickly glued and a background of the bottle is created on which other decorative items can be attached.

You can also glue colored threads onto a bottle or jar using a brush and PVA glue.

When the bottle is already wrapped with threads, we begin gluing the decorative parts. It can be anything: beads, cabochons, braid, fabric flowers, buttons and much more.

Bottles are like a declaration of love, how do you like that? But each of us can come up with something interesting.

Although a simple twine looks attractive and harmonizes well with simple wildflowers: daisies, cornflowers and bluebells. Such bottles are suitable for interior decoration in, as well as.

The muted and faded colors of the threads with which these bottles are wrapped allow them to be used in country interiors.

It is not necessary to wrap the entire bottle with threads from top to bottom. Bottles decorated with materials of different textures and shapes look attractive. So the classic combination is twine and lace.

Bottles decorated using ordinary twine and lace are so homely and cozy; they go well with walls covered with decorative plaster or embossed wallpaper for painting.

Bottles decorated with twine, “handicraft” lace, and natural fabrics are in perfect harmony with natural materials.

Don't forget about the matting. This fabric carries home comfort and warmth, taking us back to the past and, as it were, establishing a connection between times. After all, our great-great-grandmothers used this natural fabric. For us, matting in this case is just a decoration to which additional decorations are added: flowers and bows.

Drop a garland of small light bulbs into a bottle decorated with matting and it will become a decoration for the room.

Remember that you know how to knit. It is not difficult to knit fabric from leftover yarn, which any housewife always has, from which you can make “clothes” for bottles.

You can decorate bottles without twine, but only with lace or fabric. The lace itself is already beautiful, you just need to carefully glue it to the bottle using hot glue from a gun. Such bottle vases will look appropriate in the interior.

Cut out fragments from tulle or lace: flowers, butterflies, etc. and glue to the bottles. Complete with lace stripes.

Against the backdrop of harsh threads simple twine Decorations made from artificial flowers and glass “grapes” look irresistible.

Simple strands of twine can be dyed any color and give the bottle a thematic twist. For example, the photo below shows examples of decorating bottles by applying a design to pre-painted twine.

A bottle covered with PVA glue should be wrapped in a piece of fabric and the fabric should be gathered into folds and wrinkles to achieve greater decorativeness. Before this, a piece of fabric must be measured the right size and generously lubricate the bottle with glue.

When the fabric is well dry and sticks to the bottle, apply metallic glitter with a brush and distribute well over all folds of the fabric. A bottle decorated with fabric is usually decorated artificial flowers, for example, the poinsettia symbol.

Patterned fabric is also easy to decorate simple bottles. Make the pattern to make the most of the design.

Bottles can be decorated using two or more types of fabric. You just need to learn how to combine them effectively.
Bottles original form can be turned into chic home decor using one of the techniques or combining them with each other.
If you don’t dare throw away empty glass bottles, then give them a second life by turning them into beautiful and fashion decoration. There are many accessible and inexpensive techniques that make it easy to decorate bottles with your own hands. Ready-made crafts can be used in the interior of the house, for gifts and even for sale, providing yourself with a good additional income. Choose your decorating method, or even better, try several options!
Filling a bottle with colorful salt
Simple decor of bottles with salt is ideal for joint creativity with children and does not require special artistic talents and skills, so it is worth considering first. The decoration principle is simple: a transparent bottle beautiful shape wash well from the label and dry. Then prepare multi-colored salt - you can color it with chalk or gouache.
Gouache is added to dry salt and mixed well, and then dried. To speed up the process, a baking sheet with salt can be placed in the oven for about an hour. In the case of chalk, small portions of salt are poured onto the sheet thick paper and rub with colored crayons. This method is convenient for small batches. It is better to take coarse salt, you can use sea or Himalayan salt.

Next comes the most important process - you need to pour colored salt into containers as carefully as possible, using sheets of paper to direct the stream. You cannot shake the dishes, otherwise you will get crooked contours. To get beautiful stains, you need to tilt the container in different sides. Beginners can try with parallel strips - although it will not be as impressive, but it will be neat.
Decorative canning - kitchen decoration
This method cannot be called simple, but the result is worth the effort. Decorating bottles with canned vegetables is somewhat similar to winter preparations, but the difference is that stronger substances are used for canning. Please note right away that you cannot eat such canned food - they are suitable only for decorative purposes.
You can preserve red peppers, dwarf tomatoes and cucumbers, carrots, zucchini, and capers. Acetic acid, glycerin or other embalming solutions are used as preservatives. We have already talked in more detail about this technique of decorating bottles with our own hands - if you are interested.

Decoration with cereals and legumes
This method of decoratively filling bottles is somewhat similar to decorating with salt, but beans, peas, dried corn, colorful cereals, coffee, and dry unground spices are used as decoration. In appearance, such decorations resemble decorative canned food, but they are much easier to make, since they do not require filling, and can be stored at any temperature without fear of “explosions.”

Separately, it is worth mentioning the filling of containers with semolina - it is glued to the surface, creating elegant patterns that look like delicate lace. To obtain the perfect design, stencils are used to help apply glue to the dishes with high precision. Beginners can use double-sided adhesive bases.

Decoration with fabric and leather
Out-of-fashion dresses, worn jeans, knitted items, and jackets are suitable for decorating bottles with fabric. The fabric is either glued, tightly covering the container, or beautiful reliefs are created from it. The second method is more popular because it allows you to get original textures. Moreover, it does not require beautiful materials– even old pillowcases will do.
Thin fabric is cut into strips, soaked in PVA glue diluted in different proportions with water, then lightly wrung out and glued to a glass container, giving the desired relief. After the glue has dried well, the surface is painted with water-based paint in the desired color.

Burlap is ideal for country style - a rough material that in the hands of needlewomen becomes elegant and delicate. The bottles are covered with burlap, and then the craft is decorated with lace, braid, and flowers, which are also made from burlap. Read more about the capabilities of this material.
A budget solution is to decorate bottles with tights. Pantyhose are cut off bottom part, moisten it in PVA and decorate the glass container with wet nylon, creating volume. First, the bottle is threaded inside the stocking, and then reliefs are created. You can additionally make knots, bows, flowers. Ready vase painted and varnished for durability.
Leather is a luxurious raw material that turns bottles into interior vases and solid gifts. For work they use not only natural, but also artificial leather, but natural raw materials are more convenient to work with. Go through the things in your closet; most likely, there are unnecessary jackets and skirts taking up space there, which are ideal for creating beautiful clothes. Below look for links to step by step lessons.
Twine for transformation
It’s quite simple to decorate bottles with twine, but such a vessel looks very impressive and is suitable as a gift not only for women, but also for men. This technique pairs perfectly with coffee bean jewelry, so it's worth combining these two hobbies to enhance the excitement of the result. Instead of twine, linen threads or braid are used - this creates decor in an ethnic style.

The easiest way is to wrap a rope around the base, soaking it in PVA glue. You can decorate the resulting vase with burlap, ribbons, as well as buttons, coffee beans, and shells. This technique does not require careful preparation of the surface of the bottle, but it is better to remove the label.
Decoupage - new from old
Coloring for a new life
Fans of drawing will love the decor of bottles using the painting technique, and novice artists will enjoy turning unnecessary containers into original vase. To begin with, the glass container is washed well, wiped and degreased with acetone, nail polish remover or alcohol. If it is not necessary to paint the entire surface, but to create the effect of stripes, then cover everything that should remain transparent with masking tape. The same principle is used for a multi-color pattern.
Next, acrylic paints or spray cans are used - matte ones look impressive, but for those who like gloss, there are varnishes. You can decorate a painted surface using stencils, brushes, volumetric elements, and glitter. To get spectacular water droplets, the bottle is wetted and spray paint is quickly applied to the surface covered with droplets.

Dishes with a textured surface are difficult to paint with a brush, but there is one secret - textured containers need to be painted from the inside. This is very simple to do - pour paint into a bottle and shake it well. The product should be dried with the neck down. You will likely need to repeat the process to ensure the second coat perfectly covers all the gaps.
Unusual eggshell effect
Eggshell is a valuable material with which it is easy to obtain items in an aged style or imitation snakeskin. To decorate a bottle, its surface is first primed with PVA glue, and the shell is crushed into pieces of the desired size, but it should not be crushed. It's important to release inner surface film shells.
The technique of decorating bottles with eggshells is simple - the glass is smeared with PVA glue, a piece of the shell is applied and pressed. In this case, the material still cracks and, if desired, these elements can be moved apart with a needle. After drying, the work is inspected and too large gaps are filled with small parts.

The finished product is painted with acrylic interior dyes of the desired tone and varnished. In the end it turns out very beautiful vase With fashionable effect crackle Read about other possibilities of eggshells on our website " Women's hobbies».
Pasta and buttons - budget luxury

Beautiful decor of bottles with cognac.
High-quality and expensive cognac can be a wonderful birthday present, New Year, February 23 and even the anniversary. True, in order for such a gift not to look banal, you need to try to decorate it beautifully. Our article will tell you how you can quickly and originally decorate a bottle of cognac.
How to beautifully decorate a square bottle of cognac for a military man in a military uniform, policeman, hussar: ideas, design, photos
Photo No. 1 Photo No. 2
 Photo No. 3
 Any man will probably like it if you decorate a bottle of cognac so that it visually resembles a policeman, military man or hussar. Initially, it may seem that only a real needlewoman. In fact, all you need to do is correctly and securely fix the sewing tape on the bottle.
So:
- To start, buy approximately 10 m of black tape and 1 m of white.
- In addition, for the final decoration, you will need small steel buttons and stars.
- On initial stage you will need to cover the cognac bottle with cardboard paper
- It must be completely covered; only the neck can remain open.
- The neck will need to be carefully wrapped with white tape and its edges securely fixed with special glue.
- If you plan to make a bottle in the shape of a policeman, then at this stage you will need to cut a tie from black ribbon and fix it on the neck
- Next, we cut the tapes into pieces and begin to form the shoulders of the future military or police officer
- To do this, take the tape in your hands, apply it to the neck of the bottle and form the cutout of the future uniform
- Re-secure everything with glue and wait until the tape sets
- After this, you can begin to fix the remaining ribbons
- They will need to be overlapped, straightening them out as well as possible.
- After the entire bottle is covered with ribbon, you will need to decorate it with buttons and stars
- In addition, you will need to make a black circle out of paper and glue it to the top of the neck
How to beautifully decorate a square bottle of cognac for a man in a tuxedo: ideas, design, photos

 Ribbon tuxedo
 Master class on making a paper tuxedo
 Ready-made tuxedo
 Recommendations for making a flower for a boutonniere
 As for such decor, it can be done in two ways. If you wish, you can do the same as we told you a little above. You will also need to take white and black tapes and cover the bottle with them.
You can quite easily follow the same algorithm, just at the initial stage replace the tie with a bow tie, and at the very end decorate the bottle of cognac not with steel buttons and stars, but, for example, with small black buttons and a boutonniere made of artificial flowers.
You can see how to make a flower for a boutonniere in a special master class. If you need to do everything as quickly as possible, then simply make a tuxedo out of paper, and then use glue to fix it on the bottle. The back can be covered with plain black paper.
How to beautifully decorate a bottle of cognac for a man with a photo ideas, design, photo

 Photo No. 1
 Photo No. 2
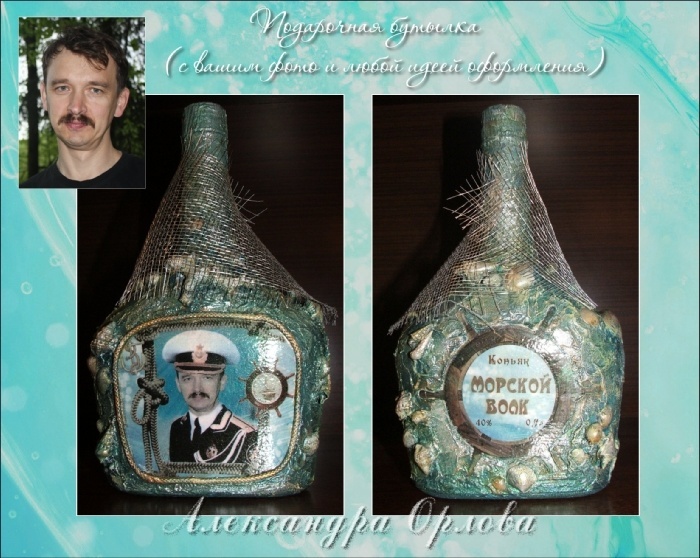
 Photo No. 3
 The easiest way to decorate a bottle of cognac with a photograph. All you have to do in this case is choose the most good photo, adjust its parameters to the size of the bottle, and use glue to fix it in the most visible place. Concerning further actions, then everything will depend on your patience and imagination.
The rest of the bottle can simply be decorated with paints, and the photo itself can be highlighted with a frame made of paper, ribbon or medium-sized beads. You can also use lace, threads of different thicknesses, shells, pebbles and pieces of fabric to decorate the bottle.
How to beautifully decorate a bottle of cognac for a man with ribbons ideas, design, photos
 Photo No. 1
 Photo No. 2
 Satin ribbons are an excellent material for decorating bottles of alcohol. Moreover, this method of decoration is very simple, so anyone can do it if desired.
So:
- Buy satin ribbons in the desired color
- Apply the tape to the neck of the bottle just above the characteristic flare
- Measure a piece of such length that the ends of the tape overlap each other when gluing
- Cut a piece from the main part of the tape and secure everything with glue
- Wait until the glue dries a little and start gluing the bottle further
- To do this, simply lightly overlap the edge of one tape over the other.
- If you want to end up with a pattern in the form of a spikelet, then fix it in the same way as on the neck
- If you want to do it perfectly straight lines, then fix the tape in a horizontal position
How to beautifully decorate a bottle of cognac for a man with sweets ideas, design, photos

 Photo No. 1
  Photo No. 2
 Photo No. 3
 If your husband, brother or close friend If he is the type of man who loves sweets, he will probably like cognac decorated with sweets. In this case, it is best to choose high-quality chocolate candies, having the shape of a hemisphere. As practice shows, they are easier to attach to the bottle and do not require reinforced fixation. A similar design is made by the most in a simple way. You will need to lubricate the wrapper of the candy with glue, and then carefully fix it on the bottle.
The word carefully means that you need to press the chocolate in such a way that it does not deform and that glue does not get under the wrapper. Candies can be glued in rows, in a spiral, or to imitate a bunch of grapes. Once the bottle is covered, all you have to do is decorate the top. This can be done using a satin ribbon, simply tying it in a lush bow.
How to beautifully decorate a bottle of cognac for a man with a bouquet of sweets: ideas, design, photos
 Photo No. 1
 Photo No. 2
 Recommendations for making flowers
 In case you want to surprise your loved one even more, then present him with cognac, decorated with a bouquet of sweets. Yes, such decor requires more time to produce, but the end result is a very original present.
- First, decide what will play the role of a stand (cardboard, a piece of plywood or just a flat stand plate)
- Next, take a piece of corrugated paper and carefully wrap it around your chosen stand.
- At this stage you can lightly encode it with small beads or paper bows
- At the next stage, start creating a bouquet of sweets
- First, make the candy buds yourself, the leaves for them, and only after that assemble the bouquet itself
- Next, take a bottle of cognac, grease its bottom with glue and fix it on the supply
- Do the same with the bouquet.
- After the glue has dried, bend the leaves and buds so that the composition looks as beautiful as possible
How to decorate a bottle of cognac with your own hands for a woman?
 Photo No. 1
 Photo No. 2
 Photo No. 3
 It’s probably not even worth mentioning that women love everything beautiful and original. That is why, in order to decorate a bottle of cognac for a representative of the fair sex, you need to show maximum imagination. For example, you can decorate a bottle with the same bouquet of sweets. But in order to make it clear that you made a present for a woman, you can additionally make a small decorative hat and make an imitation of a royal red robe.
You can see an example of such decor in the picture located a little higher. One more a win-win option are thick bright threads. In this case, you will need to apply a thick layer of glue to the bottle, and then wrap it with thread as carefully as possible. After all this has dried, all you have to do is further decorate the surface.
How to decorate a bottle of cognac for a fisherman man?

 Photo No. 1
 Photo No. 2
  Photo No. 3
 Only a sea or river theme can please a fisherman. That is why it will be better if you use shells, small river pebbles, mesh, fish hooks and bright silicone bait to decorate a bottle of cognac. All this beauty will need to be fixed on the bottle, while creating a composition pleasing to the eye.
If you want to do something as original as possible, then buy the so-called structural paste and apply a thin layer over the entire surface of the bottle. Next, take transparent glitter and use it to imitate fish scales. Once it's dry, all you have to do is paint the bottle the color you want and you can decorate it with shells or even dry grass.
How to decorate a bottle of cognac for a man on February 23?

 Photo No. 1
 Photo No. 2
 Photo No. 3
 Since February 23rd is special holiday for men, then in this case it is best to abandon the decor in the form of flowers, bows and various beads. If you want to emphasize the importance of this present, then make it in an army style, for example, sew an army raincoat and fix it on a bottle of cognac. Also you can take corrugated paper and cover the bottle with it, imitating a ceremonial uniform. You can see how to bring all this to life a little higher.
How to decorate a bottle of cognac for a man on his wedding anniversary?

 Photo No. 1
  Photo No. 2
  Photo No. 3
 Decoupage style decor is ideal for a wedding anniversary. This type finishing is considered budget-friendly since in this case you will only need to buy two-layer napkins with the pattern you want and glue. Yes, and it doesn’t have to be a wedding theme. You can use any drawing that your loved one will surely like.
So:
- Try to understand how the design on the bottle will ultimately be positioned, and cut out the motif accordingly
- Separate the very top part of the napkin from the main mass
- Set the part with the pattern aside, and in the same way prepare several more of the same blanks
- Squeeze some PVA glue into a bowl and dilute it lightly with water
- This must be done, otherwise you will not be able to evenly distribute the pattern on the surface.
- Next, take any brush and apply glue to the bottle
- Carefully apply the design to the greased area and smooth it out using a brush dipped in water.
- Glue all the other blanks to the bottle and let the glue dry
- After drying, the gift can be tinted with acrylic paints
How to decorate a bottle of cognac for a man’s birthday?

 Photo No. 1
 Photo No. 2
 Photo No. 3
 In principle, you can decorate a bottle of cognac for a man’s birthday in any of the ways that we have already introduced you to. If they all seem very complicated to you, then try decorating it with plain paper or fabric. You can see how this can be done in the pictures posted a little higher.
Yes, and remember that you are not required to decorate your gift as shown in the pictures. If you wish, you can add some element of your own, the main thing is that it fits perfectly into the overall color scheme and matched the structure to other materials.
How to decorate a bottle of cognac for a man for the New Year?

 Christmas tree from cognac
 Photo No. 1
  Photo No. 2
 The easiest way to decorate a bottle of cognac for the New Year is to make a Christmas tree out of it. True, remember, in order for the gift to visually resemble forest beauty, the container must have suitable form. This means that you will need to find alcohol that is bottled in a flat bottle that expands at the very bottom.
After the cognac is purchased, all you have to do is wrap it as carefully as possible in fluffy New Year's rain and decorate all this beauty with small Christmas decorations and snowflakes. In addition, we bring to your attention a few more design ideas. New Year's bottle cognac
How to decorate a bottle of cognac for a man for a wedding?

 Photo No. 1
 Photo No. 2
 Photo No. 3
 We are accustomed to thinking that a wedding present must be decorated with flowers, ribbons and hearts. In fact, on wedding celebration You can present a bottle of skate to a loved one, decorated in a special way. Try to show a little of your imagination and paint it with paints.
Draw whatever you like, the main thing is that in the end your surprise looks bright. Yes, and if you want the newlyweds not to throw away the empty bottle later, then after the paint has dried, be sure to cover the entire surface with colorless varnish.
How to decorate a bottle of cognac for a man’s anniversary?
 Photo No. 1
  Photo No. 2
 Photo No. 3
 The anniversary is important event for every person. That is why for this holiday it is best to present not just a beautifully decorated bottle of cognac, but an entire composition on a stand. All you have to do is secure the bottle of alcohol on a sturdy stand, and then decorate it with whatever your heart desires.
Chocolate, small marshmallows or marmalade will look great on such a composition. If you want to emphasize the brutality of the gift, then make a bouquet of dried fish and attach it to the stand.
How to decorate a bottle of cognac for a man on Valentine's Day?
 Photo No. 1
  Photo No. 2
  Photo No. 3
 As a rule, men have a rather cold attitude towards such attributes of Valentine's Day as hearts. Therefore, if you paint a bottle of cognac with them or paste them over it, it probably won’t make him very happy.
In view of this, it will be better if you do something more original, for example, a surprise using the terra technique. In this case, to decorate glass containers you will need eggshell, glue, ordinary rope and a couple artificial stones different shapes.
So:
- Degrease the bottle with acetone and start applying glue to it
- Apply it in small areas and immediately cover them with pieces of eggshell
- Decorate half the bottle this way
- Next, cut the kraft paper into small pieces and moisten it with water
- When it softens, dip it in PVA glue for 1 minute.
- Remove the paper from the glue and, forming small folds, distribute it over the top of the bottle
- Wait for everything to dry, and then decorate everything with rope and artificial stones
Video: How to decorate a bottle of cognac? Bouquet of sweets

