Star news


Crafts from painted cones. Master class on making “Men”
Hello, friends!
Autumn is just around the corner! This means that children in schools will soon be given an assignment to create something original from natural material. It's good that this material natural autumn a dime a dozen. Literally lies under your feet:
- sticks and cones;
- twigs and leaves;
- chestnuts and acorns;
- pebbles and feathers.
Create, as they say, I don’t want to. But we are not lazy! And we really want to! Today, for example, we will make crafts with our own hands from pine cones and plasticine on the theme of fairy tales and cartoons.
We didn’t even have to go get pine cones; last year we harvested a very rich harvest, so we’re using the reserves. Here they are, our treasures, in the photo)

By the way, we talked and showed how to prepare cones for work.
Or unusual, very atmospheric?
Don't forget to subscribe to blog news and join to our VKontakte group so as not to miss anything useful and interesting)
Happy creativity!
You can create a huge number of crafts from cones. Cones are a natural material and also have a pleasant pine aroma. In this article we will look at how to make crafts from pine cones with your own hands.
You will need: open pine cones(from 50 to 300 pieces), wire, glue gun or superglue, varnish.
Master Class


You will need: cones, gray and black plasticine.
Master Class
- Blind from gray plasticine hedgehog body.
- Form an elongated muzzle.
- Make eyes and nose from black plasticine.
- Attach to the muzzle.
- Attach the cones to the hedgehog's body tightly to each other.

You will need: cones, brushwood, acrylic paint different colors, brush, colored paper Green colour, scissors, glue gun, vase.
Master Class


You will need: cones, glue gun or superglue, 2 black buttons, scissors, white fleecy fabric, scarf.
Master Class
- Pick up the pine cones required sizes: 3 elongated for the body, 1 large round for the head, 2 round and 2 elongated for the paws.
- Glue 3 cones together to form a body.
- Glue the head to the body.
- Glue the paws.
- Glue on the eyes using black buttons.
- Cut out circles for the paws from fabric, then glue them on.
- Cut semicircles from fabric for the ears, then glue them on.
- Cut a circle of fabric for the face with a hole in it, then glue it on.
- Decorate the bear by tying a scarf.
The pine cone bear is ready!
To create chic crafts, you need to paint the cones with paints and decorate them with glitter. Watch this video for a very convenient way to decorate pine cones!

You will need: cones, cardboard, glue gun or superglue, decoration elements coniferous branches, tinsel...
Master Class


You will need: pine cones, rope, glue gun or superglue, spray paint and glitter if desired.
Master Class


You will need: long pine cones, glue gun or superglue, small paper snowflake or lace, decorative elements.
Master Class
- Glue the bottom sides of the cones together.
- Attach lace to the center of the snowflake.
- Decorate to your taste.
Christmas wreath made of pine cones

Before making a wreath, think carefully about its design and color scheme. It can be ordinary, made from only pine cones, or it can be festive. Follow simple master class and be guided by your own imagination. Also check out the photo gallery of pine cone wreath ideas!
You will need: pine cones, cardboard, glue gun, spray paint (optional), decoration elements, beads, glitter, flowers, satin ribbons...
Master Class


You will need: cones, a foam ball, ribbon, wire, hairspray, glue gun or superglue, glitter if desired.
Master Class


You will need: cones, polymer clay, PVA glue, brush, superglue, hairspray, glitter, thin wire, ribbon.
Master Class

Santa Claus made from pine cones is ready!
You can make a wonderful snowman out of cones. Detailed master class watch in this video!
Crafts made from pine cones will perfectly decorate the decor and become a great gift, which cannot be found in stores. This natural material can be collected in parks, forests and plantings. It is worth noting that before the process of making crafts, you need to thoroughly clean the cones. If you have collected unbloomed cones, after cleaning, cover them with wood glue, since in a warm environment the cones may bloom and your craft will deteriorate. Imagine and create with your own hands!
Hello dear blog readers Life Hand Made ! Autumn is the ideal time to master the art of creating different compositions from natural gifts. You can make crafts from leaves, from cones, from acorns, from vegetables such as, for example.
There are also options for crafts made from leaves and flowers. September is very rich in colorful free materials for this.
In general, the only limitation can be our imagination, so look at all the different options and maybe you, too, will want to create such beauty with your own hands.
This is truly Hand Made!
And children really like this kind of creativity, not to mention its benefits for the development of all possible aspects of the personality.
Preparing leaves for crafts
Any crafts require preliminary preparation natural material. How to properly dry leaves?
Before choosing a drying method, you need to decide for what purpose you will use them.
The easiest way is to dry the leaves on outdoors. You can simply tie them into a bundle and hang them somewhere in a well-ventilated, bright place.
Then the edges of the leaves will curl, so material dried in this way can only be used for bouquets of leaves and flowers.
Additions of bright red berries go well with such bouquets. Berries can also be dried by hanging them straight in clusters somewhere in the fresh air.


If you need flat leaves for creativity, then you can prepare them with old in the old-fashioned way– put it in a thick book and press it with something heavy on top.

Or put them in newspaper and simply iron them with a not very hot iron.
And now that the preparations have dried, you can give free rein to your imagination and come up with something on the theme of autumn or the past summer.
Crafts from leaves and flowers
You can make real flowers from leaves! I already wrote about this in.

Below I will show you what masterpieces you can create from leaves in combination with flowers.
A little more labor-intensive, in terms of preparing the material, will be the process of creating paintings and compositions from flowers and dried leaves.
Flowers, like leaves, must first be dried.
I know only one of the options for drying flowers, thanks to which flat shapes are obtained.
On the Internet, I found an option with which you can save not only the color, but also the volume of flowers.
For the flat drying option you need (I already wrote about the old-fashioned method of drying leaves):
- A book that you don't feel sorry for. The paper in it should not be glossy. Otherwise, it will not absorb juice from plants.
- A sheet of plain white paper. This is necessary so that the font does not imprint on the petals.
To dry while maintaining volume you will need:
- Fine salt.
- A cup, glass or some other container.
There are several rules to ensure that dried flowers retain their color and can delight you when making compositions from them.
- It is necessary to collect material in dry weather.
- Dry immediately after collection. So that the petals do not wilt.
- Dry more than necessary. Because not all samples will turn out perfect.
Flat drying flowers
Everything is simple here. This option is suitable for most wild and meadow flowers.
Pansies will delight you with their bright colors on cold winter evenings!

Collect flowers, cut off the excess, lay them out on a sheet folded in half and place them between the pages of a book.
You don’t need to do this on every page, but skip a few.
Moisture from the flowers will be absorbed into the pages and in order for the flowers to dry and not rot, a layer of several pages between them is necessary.
On top of the book with the drying herbarium you should put a press and several other books.
It is better to fill the entire book and put it away out of sight for a month for final drying.
But if you need craft material for school or kindergarten, then you either need to stock up on material in advance (hardly anyone will do this) or simply choose a different material for the craft.
Volume drying option

For flowers, such as chrysanthemum or rosehip buds, and maybe bells excellent option there will be drying while maintaining their volume.
To do this, you need to place freshly cut flowers in a container and carefully add fine salt in layers. Another option with semolina is possible.

And on one of the sites I found an example with volcanic sand for chinchillas.

This is the first time I’ve heard this name, but they write that flowers placed in a bowl with this sand perfectly retain their natural color and volume.
They also clean off perfectly after they are taken out of the container after drying.
Salt, semolina or sand will absorb moisture from the flowers and after about a month you can remove the beautiful, volumetric flower, almost as if it had just been picked, but was no longer subject to withering.
Although it may crumble.
Try it, experiment, and then share with me!
For me, such creations are still a theory, but if my boys and I build something similar, I will definitely tell you.
In the meantime, I propose to look at other people’s options for creating beauty from leaves and different options dried flowers.


DIY crafts from tree leaves - applications
The easiest way is to make applications from dried leaves.
It could be a butterfly, a peacock - anyone!


Or maybe a fish?

Or a hedgehog?

What about the fox?

Or the fabulous firebird?

No matter who you choose as the main character of your composition, you will in any case need glue and a landscape sheet for the base.
If you want to do everything quickly and beautifully, use felt-tip pens to complete the look!
For example, wings for a butterfly can be made from leaves, but antennae and a head can simply be drawn on it.
Or take pieces of grass or fragments of leaves. Let your imagination run wild and good luck!

You can even draw a clearing for a butterfly on a piece of paper - just glue a few dried flowers to it.
Flowers, like leaves, can be pre-dried with an iron for speed. But the result may not be ideal. But you don’t have to wait a whole month!
And from oak leaves you get beautiful antlers for elk.
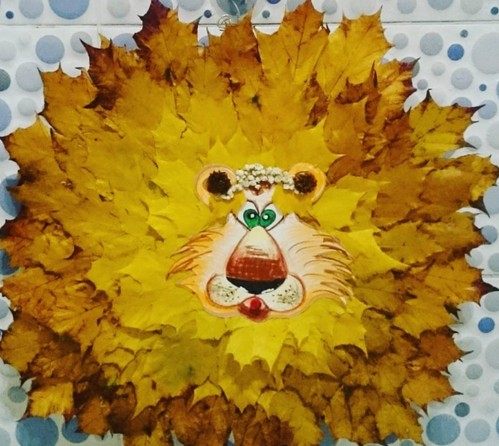
A mane for a lion is made from a maple leaf. You can also draw the face on yellow paper.
Such simple crafts, of course, are not for schoolchildren. It's more like kindergarten.
But you can make the task more complicated. How do you like the pine cone bird?
Birds and hedgehogs made of cones and leaves
Cones are an excellent material for crafts; their shape makes them look like different ideas compositions.

If you attach a couple of leaves to the cone on both sides, it will immediately look like a bird, don’t you think?
All that remains is to make her head from a circle of paper with eyes and a beak.
Can you make tail feathers from leaves?

You can make a very cute hedgehog from the cones. Without leaves, but using plasticine.

You can complicate the task and make a larger hedgehog.
The cones need to be glued onto the bottle - this will be his fur coat. And the muzzle will come out of the neck of a bottle if you cover it with straw and attach eyes.
The hedgehog turns out to be quite large.
Make a bedding for it from dry yellow leaves - and it’s ready. autumn composition to kindergarten or school!
Or you can experiment and create a porcupine. How do you like this miracle of nature?

Or angry owls, who can also rest on a bed of dry autumn leaves

Crafts using plasticine and leaves for kindergarten and school
Small leaves and acorns make great flies!
Acorns must be picked from the tree while they are still green.
Make a fly body from the acorn itself.
Attach small leaves to the body on plasticine - these will be wings. And from two caps from a green acorn you will get just characteristic big eyes green fly!

Or make eyes out of plasticine!

What human imagination is not capable of is mind-boggling! This interesting craft is perfect for primary school!
You need lungs and original options volumetric crafts to a kindergarten?
Using chestnuts you can make beautiful snail houses.
Only the slug itself needs to be molded from plasticine.

But the baby will cope with this just fine.
You can also make a wonderful caterpillar from chestnuts! Which chews delicious autumn leaves!

If you want not the simplest craft, but the most memorable one, so that you can impress the jury members on the spot autumn competition, then a snail can be made from, as I already wrote in the previous article.
What is talash? Crafts on the theme of autumn from unusual materials
This is the name given to the leaves around the cob of corn.
What are they needed for?
They make amazing artificial flowers!


I can’t believe that anyone can create such beauty with their own hands!
Only here there is a little trick in preparing the priceless material that autumn gave us.
The corn leaves must first be boiled a little, and then begin to dry. That is, after boiling corn for dinner, just don’t throw away the leaves from the cob - we have a waste-free production!
Dry them, and you will have natural material at hand for quite a long time for original and beautiful crafts.
And when you start making the craft, the leaves need to be slightly moistened so that they do not break.
Crafts from leaves and acorns
Acorns, beloved by all children, can serve as an excellent addition to a composition of leaves.
You can build anything you want out of these little barrels.
Admire for yourself what interesting crafts can be created without much difficulty.


That's how many beautiful things can be made from ordinary autumn leaves and simple auxiliary materials!
It’s interesting and simple, and most importantly, it unites the whole family in a useful activity.
Write in the comments what crafts you can do?
By the way, very soon I will publish an article in which I will offer you various options !
Stay in touch!
Sincerely, Margarita Mamaeva
P.S. And in order not to miss the release of the next article, play it safe and subscribe to blog updates and be sure to share the article with your friends on social networks
 If you love tinkering exclusive gifts and souvenirs made from scrap materials - crafts made from pine cones will help you expand your creative horizons. Fir, pine and cedar cones are great for making New Year's, children's and home crafts. Original form cones allows you to tinker New Year's wreaths, candlesticks, garlands, various figurines of animals, elves and do-it-yourself angels.
 Cones are a very affordable, simple and, most importantly, environmentally friendly material. They are used to make toys and souvenirs for children, crafts for kindergarten and to school. A craft made from an ordinary pine cone and plasticine will interest a child and make him want to create something new, interesting, and unusual. And then they expect you photos of stylish, original and simple crafts
from cones for adults and children of any age.
Cones are a very affordable, simple and, most importantly, environmentally friendly material. They are used to make toys and souvenirs for children, crafts for kindergarten and to school. A craft made from an ordinary pine cone and plasticine will interest a child and make him want to create something new, interesting, and unusual. And then they expect you photos of stylish, original and simple crafts
from cones for adults and children of any age.
The beauty of pine cones is that they lie literally under our feet. When you go for a walk in the forest or to the nearest city park, look around - you will find materials for your future crafts.
 The bump itself already looks very beautiful. If paint some pine cones different colors
, sprinkle with sparkles or beads, you will get incredible decoration on New Year and other holidays.
The bump itself already looks very beautiful. If paint some pine cones different colors
, sprinkle with sparkles or beads, you will get incredible decoration on New Year and other holidays.
 Photos with New Year's crafts made from ordinary pine cones look very unusual.
  And then New Year's holidays the child will happily “recycle” everything that is left of the Christmas tree. This porcupine looks very creative, and making it is as easy as shelling pears.
 Christmas tree made of pine cones It looks very stylish in the interior, as do laconic decorations and pendants made of ribbons and burlap.
 Cones also produce beautiful flowers, paintings and decorative ornaments for home.


Autumn crafts from pine cones
Autumn is not only the time bountiful harvest, and also time to make crafts from pine cones with your own hands. In addition to cones, you can use other materials in your work: acorns, dry leaves, flowers, chestnuts, berries.

 From autumn leaves, flowers and fruits, modern craftsmen have learned to make amazing bright wreaths, bouquets and decorative compositions
.
From autumn leaves, flowers and fruits, modern craftsmen have learned to make amazing bright wreaths, bouquets and decorative compositions
.

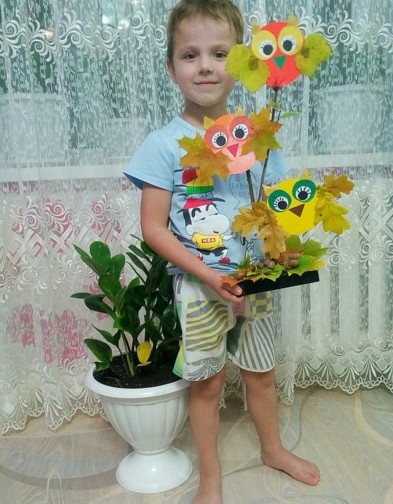
 Together with your baby you can make a cute autumn bird from cones - cockerel or owl.


Autumn theme generates new ones creative ideas for interior and decor.
If you want to try making something with your own hands right now, we are at your service detailed instructions for making a forest elf. 
Prepare for work:

Crafts from pine cones for school and kindergarten
In kindergarten or school, children often make crafts from natural materials using creative techniques and varied decor. Cones are an ideal material in this regard. They are actively used in the manufacture of little animals, people, birds and incredible mythical creatures.

 If your child needs to do something interesting, creative and not very complicated, and you are not a big handicraft expert, we suggest take a master class on making birds from small pine cones.
Prepare everything you need:
- cones;
- corrugated cardboard;
- table tennis ball;
- toothpicks;
- brush;
- paint;
- glue;
- tinsel;
- wire.

 You can also make a whole composition, using not only cones, but also Ashnuts, acorns, dry herbs.
 Children's crafts made from pine cones look very bright and creative, especially if they are add “purchased” elements– eyes, colored feathers, plastic fruits, etc.
Hello subscribers!
It's bad weather outside, but maybe the sun is shining? Doesn't matter because there's something ahead of us unforgettable time of the year. It will be in colorful colors and with many surprises, because autumn always presents us with its gifts. But, besides this, it also reveals its natural riches to us. That is why in schools and kindergartens they immediately make crafts from natural materials, together with other components. These can be vegetables, as well as paper or plasticine, and many others. other.
Kids just love everything like this creative work, because they get different funny toys that they can then play with.
Besides all this, you can even take autumn leaves and from them put together masterpieces or bouquets and insert them into or make something. Well, that's not all, cool souvenirs come from ordinary cones. So, if you are interested, stop for a minute and scroll through the entire note from beginning to end. I'm sure you'll find a lot interesting ideas what can be made from natural materials.
Well, if you have your own thoughts on this topic, please share below the article and write your reviews and comments.
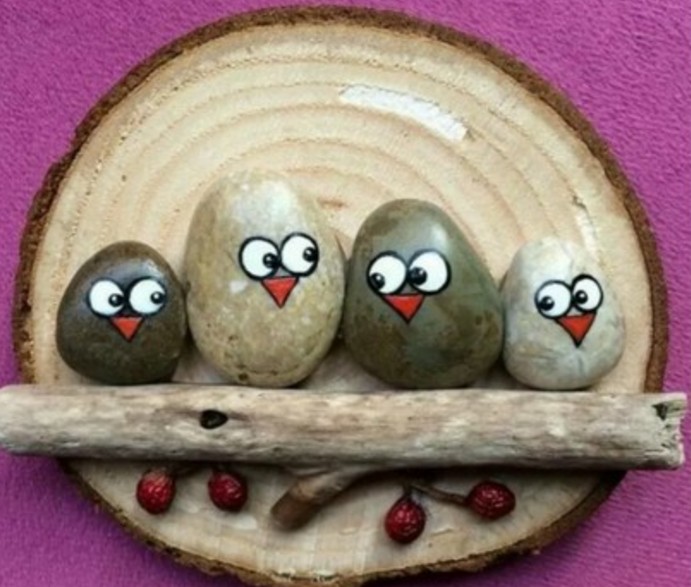
I would like to start this conversation with the fact that you don’t even mean and can’t imagine that everything is much simpler than you think. It turns out that to make masterpieces you can take the most ordinary sticks, twigs, or maybe you have pebbles or shells. In general, we always have all this at hand, so why not take advantage of it.
I suggest focusing on stone products, which are always available in any area. If you were somewhere on vacation, you could bring these with you. It is advisable to take, of course, smooth pebbles. Take a log or plank and carefully use glue gun glue the intended composition. Here you can make flowers, for example. To make the craft brighter and more aesthetically pleasing, paint it using acrylic paints.

A product in the shape of a hedgehog is quite popular, take a look. In my opinion, there is still not enough mushrooms or autumn leaves. So it's easy to fix, take it colored paper and cut out the desired image.

You can decorate a whole picture, make such a cheerful family in the form of birds on wood. As you can see, regular sticks are also involved here.
Oh, and by the way, do a still life.

For the youngest children, take the following composition as a basis. Draw on a sheet of cardboard or A4 Maple Leaf or any other and then decorate it with multi-colored stones.

And if it’s even simpler, then choose a minimalist picture like this. Which don’t forget to decorate with colorful paints.

A straw bird's nest could be a great idea. You need to cut a circle out of cardboard.

And twist a flagellum out of straw.

And then twist a nest out of it along the diameter of the circle and secure the ends with threads.

In this way, wind it in a spiral so that you end up with a cup-shaped bed, and glue the straw onto the glue.


Then fill the souvenir with down or feathers and place eggs and pine cones.

If you are a fan of pumpkin or sunflower seeds, then you can create something absolutely fantastically beautiful. Take a quick look at this photo. It was awesome! The author took and decorated the hedgehog, and its thorns with ordinary seeds and painted autumn.


But here we used pumpkin seeds, by the way, you can come up with a lot of all kinds of masterpieces from them. I have already shown you several such works. Now I'll show you this one. Who knows, the seeds are painted with paints, gouache or acrylic, and then glued.

Here the artist did not use glue, but placed everything on plasticine. The tree trunk is made of buckwheat grains.


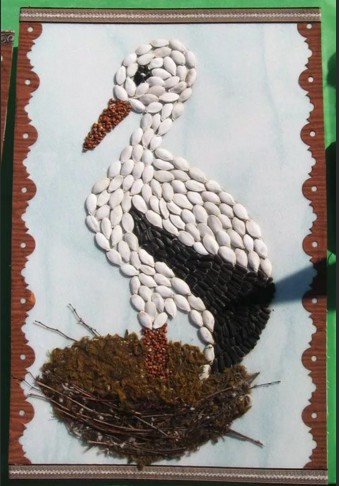
From pumpkin seeds They also make a stork, it turns out to be a panel like this, or hang it on the wall like a painting and admire it.
I was shocked by another amazing and cool crafts, I mean the chicken from which the author performed different seeds. For this masterpiece you need pumpkin and sunflower seeds, as well as plasticine.

1. From plasticine, sculpt the base, that is, the head and body of the bird.

2. Then start decorating the chicken by sticking seeds one by one, as shown in the picture. First there will be the wings.

3. And then the ponytail. It already looks funny.
Do everything carefully and take your time, it is from your efforts that success will await you.


5. Make the crest from red plasticine, and the beak from yellow.


I also really liked these trees made from beans and watermelon seeds.

You can also combine several types of natural materials to create a pattern. For example, how oats are also used here, and the rim is made from corn kernels.

Do you remember when you were a child they used to fly airplanes, so I also recommend making souvenirs from them. I mean maple ones.

This also includes crafts made from dry materials. The sun is so radiant.

Or a clearing and a forest.

Above all, use straw or acorns.

You will get not only pictures, but also people and insects from chestnuts.

At school, I remember they always made people like this during labor lessons.

Well, if you have a handful of pistachios, or rather peels, lying around, then imagine you can become a real decorator. Make a topiary like this.

Well, or a vase and insert dried or fresh flowers into it.

Well, in conclusion to this chapter, I want to amaze you. I found a fun pattern that you can easily make. All you need is a board, nails and woolen threads.
Trace a maple leaf on the plywood and drive in nails along the outline.

Follow the outline with an orange thread.

Then begin to confuse them in a chaotic manner, as if you were drawing patterns, a spider’s web. Great, did you do it?

I also like this funny story, in which the author took ordinary logs and laid out these birds.

These friends are somewhat reminiscent of snowmen.

Crafts for elementary school “What autumn gave us”
Of course, to make compositions on this topic, it is enough to have everything you need at hand. This means you need natural material and available means. Plus your desire, imagination and of course fantasy. If it’s really difficult and inspiration doesn’t come, then take these ideas and create.
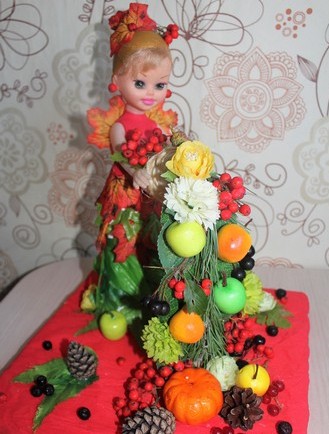
I suggest the girls take their favorite doll and decorate her with such a golden outfit.

This is how it turns out you can go to the park and pick up dry leaves and you are already a magician).


Brilliant, isn't it? Such a queen came out of an ordinary toy.

Do this work using physalis.

Or, for example, build an alarm clock or a clock from twigs.

A sprig of rowan and pine cones will help you decorate.

Well, last but not least, probably the most popular will be a craft using seeds. I always see such creations at exhibitions in kindergartens and school competitions.


Everyone knows that autumn is rich, so make wonderful masterpieces.


By the way, decorate your classroom amazingly by making garlands of acorns, chestnuts and rowan berries.

Or this idea.

Make a web and bring it to school.

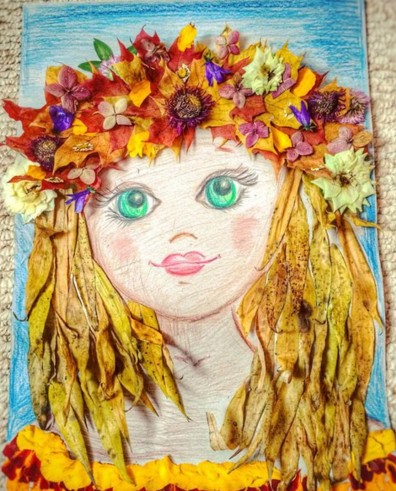
Probably the most enchanting thing will be this beauty, well, a real symbol of this time of year in all its glory, this is the girl’s face. Take any flowers, plants and create.


You can make a portrait like this. I think elementary school students and even preschoolers will cope with this work with a bang. Well, really high school especially.


A gift like this looks super, these are roses, but unusual, and made from maple leaves.

You need to learn how to roll leaves correctly, here is the sequence of actions. Watch this short master class:
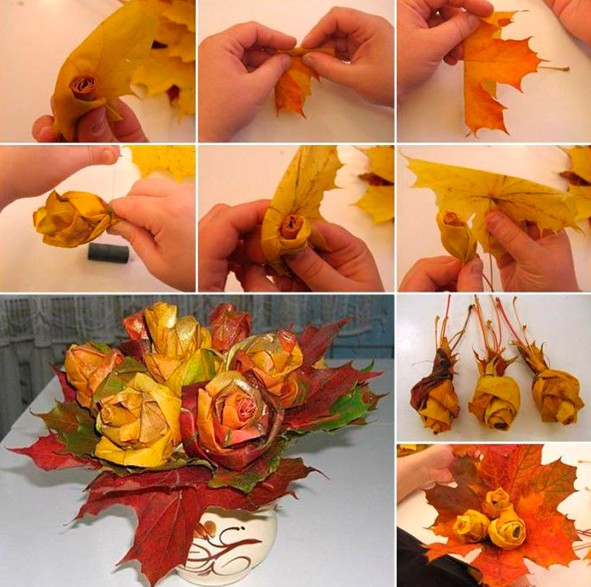
On this topic, how to create such a bouquet, I found this video on the Internet on the YouTube channel. Maybe it will be useful to you too. Enjoy watching.
You can decorate a wreath beautifully.


Don't forget that from spruce branches It won’t be very difficult to build a lot of creations.


Which cute owl I came out and couldn’t take my eyes off it.

You can build an oak tree, look how wonderful it turned out.

Here's another idea, take note.

Autumn work in kindergarten from natural materials
I think the kids will like the work called applique. Cut the leaves into squares and stick them on a landscape sheet in the form of any character.

An unusual tree like this might also be a good idea. I would say magical, on one side there is winter on it, snow or frost, and on the other there is foliage.

You will need to make a trunk out of plaster, like a stand, and stick the collected branches into it. Let your little one decorate it now as shown in the picture above. Make a snowball from cotton wool, and greens from dry grass, leaves, and flowers.

Or you can make spiders or a hut on chicken legs with Baba Yaga. After all, children love fairy-tale characters very much.


Do you want to go the non-traditional route and use shavings from simple pencils or colored pencils as a basis and create such beauty.

Also create figurines from walnuts in the form of a bear.

And this little mouse.

Here are a couple more mice.

A panel using rowan berries also looks great.

Can be taken as a basis next option, make the leaves from paper in quilling style, and glue the rowan.

This funny kitten will clearly lift everyone’s spirits.

I also want to invite preschoolers to make a smart owl.


It is easy to build the following from tree cuts.

Or make a lion cub or a lion.


Also be happy to stop at simple models, which are cut as follows.

You can also draw, take dry tree leaves as a basis in the form of stencils and simply dip them in paint and make prints.

Or you can design a picture with birch trees like this.


Next job, draw an image of a woman or girl, and ask the child to do the hair.
Use your imagination and build little animals.

It’s interesting to design a boat.

Or make a peacock or firebird.

Toys and souvenirs made from pine cones: fast and beautiful
Well, now I present to your attention all the most interesting things from acorns, cones and probably plasticine. Because it is this component that will help recreate new toys and souvenirs.
Here is a picture that is made using paints, a background is drawn and colorful pine cones, which are also painted with acrylic paints.

The next work is such a cute topiary, from all that was in the forest. There are Christmas tree branches, cones, berries, even acorns.

If you love Masha and Misha from the cartoon, then you will like the next idea.

On this topic, I found this year’s new items for you in this video from the YouTube channel. So don't miss it!
Well, a couple more ideas that you can turn into reality.
These could be birds such as an owl or a swan, or a basket of pine cones.

It's easy to make an angel in the form of a doll, or a pendant.

They even make squirrels, but in addition to plasticine, felt fabric is also used.


In addition to all this, you can also take any fruits and vegetables and arrange any composition using natural materials.

Original crafts from leaves on the theme of Golden Autumn
If you have absolutely nothing to create from, then take and collect foliage in the parks and you won’t believe it, you can make such creations from it. Even kids 2-3 years old can handle it. Well, schoolchildren even more so. I have one child who lives in our house and studies in the third grade, so he painted the collected leaves like this.

And my son, who is already 5 years old and will almost soon be 6, will do such a miracle. This is the butterfly, he chose the second one, which one do you like better?

To be honest, I also really liked the hare and the fox. Look, even the bark has been adapted.


What kind of bird is this? Peacock, her ear and tail are beautiful!

Well, the following composition in the form of an aquarium and fish can also be a great idea.


In addition to all this, you can easily and quickly create insects.

But probably the most beautiful and charming craft will be in the form maple leaves, they are folded in an unusual way, in the form of roses. Here are instructions for making such beauty. Repeat all steps as shown in this picture.
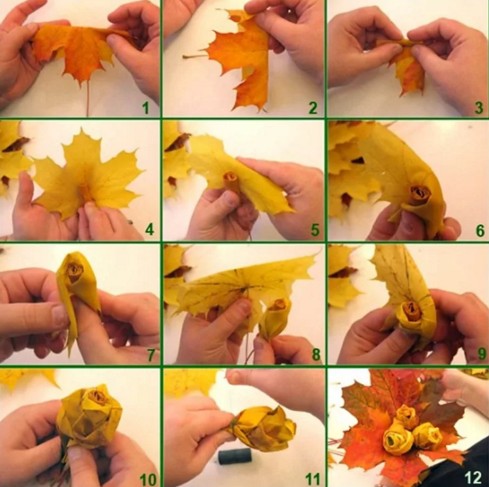
This is what should come out in the end.

You can make flowers from any type of leaves. This video will help you with this, watch the master class.
In addition, take an ordinary vase and place dry branches in it and decorate with foliage.

And also any photo frame can be presented in an unusual way.

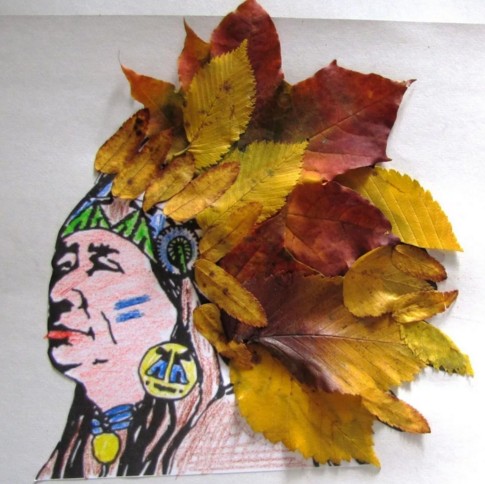
Well, give the boys who love Indians a leader.
And here are a few more cool ideas on the topic of what you can come up with and do from leaves. These are children's creations.


As you can see, there is so much to see here. A turtle, a snail, a helicopter and even a mischievous parrot.


Or post the fabulous Petya the Cockerel.

Besides all this, you can go a non-traditional route and make paintings.

And if you don’t have enough sunshine, then here’s an idea for you.

For interior decoration, and even for an exhibition at school or kindergarten You can also bring a vase of maple leaves. How to make it? You will need PVA glue and balloon.
In short, you can look at these steps and build such a creation right today.

Or consider these stages of work.
1. Inflate a balloon, apply PVA to it with a brush and immediately apply the leaves.

2. This is what should happen.

3. Also apply glue on top of the leaves sparingly.

4. Now let the workpiece dry completely, and then pierce the ball with a needle. Now fill it with fruits and vegetables and get ready for the holiday.

I think that after reading and viewing this note, you no longer have questions about what can be made from natural materials; I think I have found enough ideas. Just take it and do it.
All the best and positive wishes to everyone. Bye!
Best regards, Ekaterina

