Star news


Lesson plan on technology (4th grade) on the topic: Application from cut threads “Dandelion. Application from threads on cardboard: making a cat and a rowan branch
Embroidered, woven, knitted patterns are created from threads. Make masterpieces from wool or yarn scraps using the sizing method.
DIY flocking

As mentioned above, paintings can be made using various techniques. Even if you only have small scraps of yarn left, don’t throw them away, look at how to create a painting using similar waste material. This technique is called flocking.
To implement this plot, take:
- thread trimmings;
- scissors;
- sheet of cardboard;
- brush;
- a simple pencil;
- frame;
- organizer
Now you can proceed in two ways. Cut the threads with scissors, placing each color scheme in a specific cell of the organizer. If you want, pull the threads out of the unwanted piece of fabric, then shred them as well.

Apply glue to small fragments of the picture, attach threads of a certain color here, lightly tapping with your fingers. You can use a lot of glue, but you don’t need to make a layer of threads that is too thick.

When the general background of the thread painting has been created, proceed to the design of the image. So, on the red head, create several black and light spots, decorate the inner parts of the ears.
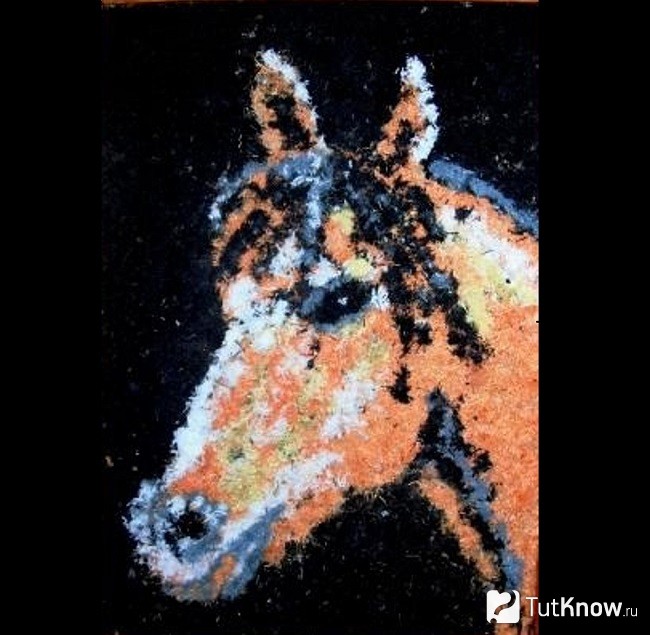
This is such a wonderful picture, but first you need to frame it.

To prevent uneven thickening on the canvas, tap the newly glued pieces of thread well with your finger. Apply glue not from a bottle, but with a brush.
By using flocking, children can also create beautiful canvases. The following set of materials and tools is suitable for this:
- multi-colored woolen threads;
- foam slats;
- ceiling tiles;
- PVA glue;
- scissors.

Cut the foam slats at a 45° angle. Lay them out on ceiling tiles, glue it to it and in the corners.

Measure out 21 pieces of thread (7 of each color) to create a rainbow. The rest of the yarn will need to be finely chopped with scissors.

Draw the outline of the future design onto the flat surface of the tile; if it is corrugated, at the stage of attaching the frame, glue a sheet of cardboard onto it.
For each color of the rainbow, you need to take three of the same color thread to make the braids. Now we glue them to the marked place of the rainbow, pay attention to the location of the color scheme.

We use flocking, for this we coat the circles on the base with glue, put scraps of yellow threads here, the butterfly can be made from the remains of pink yarn.

The next stage is the formation of greenery, the last stage is the creation of a blue sky.

This is such a picturesque picture. It is made from waste material, fast, but looks cheerful and even chic.

Knitted thread paintings - master class
Such canvases also turn out to be voluminous. They can be created using crochet or embroidery.
To implement next job you will need these fluffy threads, because we will create Christmas trees for the New Year or simply to decorate the apartment at any time of the year.

For this we take:
- fluffy threads;
- hook;
- frame;
- whatman;
- colored paper;
- wide silk braid.

When you reach the top of the tree, fasten the last loop, tighten, cut the thread. Glue a frame of colored paper onto a rectangle of whatman paper or cardboard. When decorating the background, glue strips of white translucent lace here, then the picture will look even more elegant. Having made three Christmas trees, attach them here. Admire how wonderful the picture made from threads is.

Even if you have never embroidered, now you will quickly master this science. To create the next canvas you will need to become familiar with only three seams. Well, let's start in order, first prepare this:
- canvas on stretcher;
- a simple pencil;
- tassels;
- acrylic paints;
- Titan glue;
- acrylic and wool yarn;
- floss threads;
- small and large gypsy needle;
- scissors.

Do with a simple pencil sketch of a future masterpiece on canvas.

Take a brush in your hands and apply the main colors with acrylic paint using careless strokes.

When this layer dries, apply clarifying strokes, and then draw silhouettes of birds soaring in the pre-sunset sky.

While the paint is finally drying, get acquainted with the three types of seams that you will use to decorate the painting. See how the stalk is done.

Making a chain stitch is also easy.

To make small circles for small panel fragments, you will need to learn how to make french knots. As you can see, three turns of thread are wound on a needle, then the front side, the needle comes out inside out, securing the resulting circle.

By applying the acquired skills, you will be able to create embroidered paintings. Thread an acrylic or wool thread in one fold, there is no need to make a knot, just hold the tip, and at the end of the work, secure it with wrong side glue.
First, we will make the trunk of the plant using a stem stitch.

Form its inflorescences using French knots using white thread.

Using three stitches for embroidery, make other vegetation on the right side of the picture.

Fold the floss threads 3 times, embroider white ears of corn on the canvas with them.

Create other plants using threads, after which the picture can be considered complete.

Thread painting for March 8
Although this holiday is not coming soon, let the child practice the technique of creating paintings from threads in order to congratulate the women of his family in the spring.

To create this small masterpiece, your child will need:
- photo frame without glass;
- polymer glue;
- colored paper;
- cardboard;
- glue stick;
- wool threads.
- thin twigs or wire;
- glue;
- brown threads;
- fork.
Make a lot of flowers from pink and white threads, glue them to twigs or to wire, from which you will create the same base.
Glue a sheet of blue colored paper onto the rigid base of the frame.

To make the letters even, you can cut them out according to a template, for example, take it from the Internet or draw one yourself. Attach the template to the cardboard, cut out the number 8 and the necessary letters from it.

Now they need to be wrapped with thread and the ends glued on the back side.

The child can do all this himself, if he knows how to read and write, then he will arrange the letters correctly. If not, let adults help him with this.

Place the made twigs with thread flowers on the picture so that they extend slightly beyond its borders.

Create several additional colors, let the baby decorate the panel with them. After presenting the work to your mother or grandmother on March 8, such a painting will become a source of pride for women; they will certainly hang it in the most prominent place, admire and be proud of the child’s work.

Wool paintings for beginners
A child can also create such crafts, but with the help of adults. The basis of such work is still the same, but the wool here is not spun. You can buy this at a craft store.

In just an hour the child will have something like this furry friend. To do this, create together with your baby and prepare:
- photo frame;
- wool of different colors;
- tweezers;
- glue stick;
- scissors;
- for the base - a rolled household cloth or non-woven fabric.
If you are making a picture out of wool on non-woven fabric, glue this material to the rigid base of the frame using an iron. If you start using a rolled cloth, then attach it to paper base glue.
For this work, environmentally friendly wool was taken for felting, which is also called combed tape. You will need scraps of different colors. The photo shows which one.

Draw a hedgehog on the backing with a pen.

Pull out the combed tape Green colour, to make it into background grass. Start with the top row, gradually place pieces of the second on it so that the backing does not show through the wool.

Using pieces of blue yarn, make bells that peek out from the grass.

To create a natural shadow in the corners of the picture, mix combed ribbons of green and black colors and apply on this side.
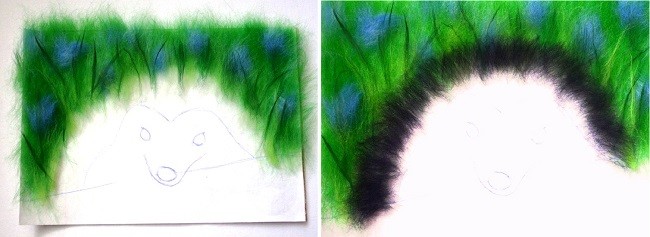
Using black yarn, lay out the borders of the hedgehog's needles, which are located near the grass and near his face.

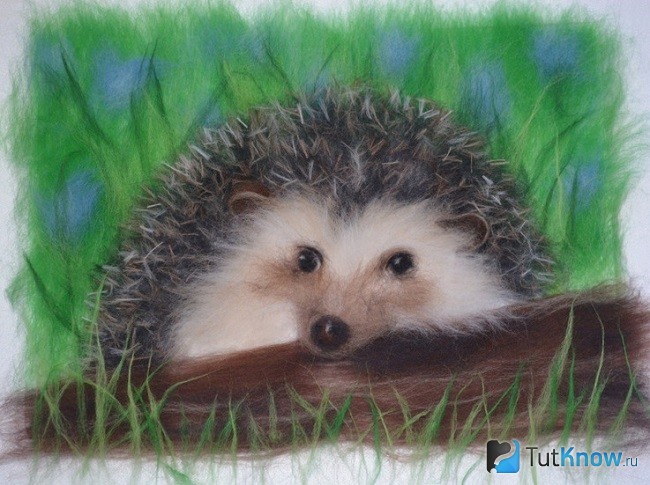
To make the needles themselves, pull several threads from a combed sand and chocolate color, roll them into flagella. You will need a lot of such blanks. They will need to be cut into 8 mm fragments and laid out on the hedgehog’s coat.

To shade dark needles, make the same ones from the hairs of sand and white, attach them to your fur coat. Use a sand comb to fill the hedgehog's face. Form its ears from sand and chocolate-colored yarn; these fragments need to be twisted in an arc. Add to face forest dweller some white yarn.

Using chocolate-colored ribbon and some black and white fibers, form a log with the hedgehog lying next to it. Yarn of chocolate and sand color will become the basis of his face.

Cut black yarn, make the eyes and nose of the animal from it, and use pieces of white yarn to create highlights on its pupils.
In the foreground, make grass from green wool fibers, and a moth from blue wool.

Add a body to the insect and a couple of circles on the wings using black yarn. After which the wool painting is almost ready.
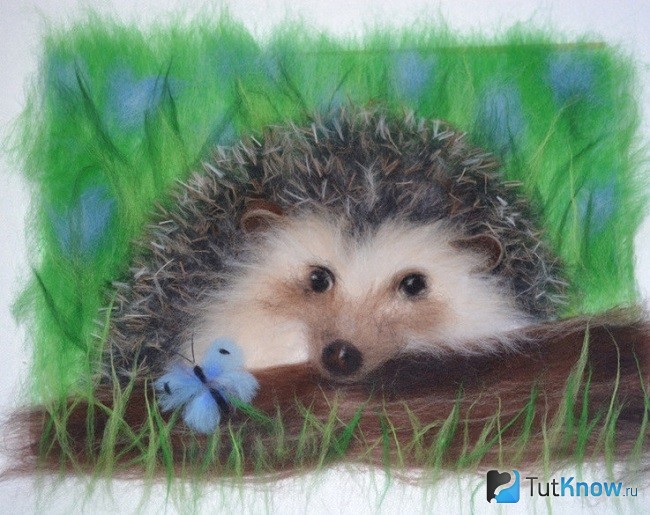
Now you need to press down all the elements with glass from a photo frame and frame your work.
DIY panel on frame
Exist special devices, helping to create paintings like weaving ones. This set also includes a comb, with the help of which the next row of threads fits well to the previous one. There is also a wooden needle with a large eye through which the thread is threaded.

If you do not have such a set, then use a sheet of cardboard, the top and bottom edges of which are slightly cut. Strong threads are secured in these grooves. Consider the patterns that are used to create such home masterpieces. Once you master them, you will move on to more complex options.

See how to make a thread panel using various colors. As you can see, the sketch of the future painting is depicted on cardboard.

You can fill not the entire frame with a picture, but only part of it. The work will turn out tender and airy.

To quickly make a panel, you can use thick roving threads, creating knots and braids from them.

Here's an example three-dimensional picture when the braids are not made symmetrically.

Weaving panels can be made not only on rectangular frames, but also on triangular, round, and irregularly shaped ones. You can still create the painting of your dreams, even if you only have:
- 2 wooden sticks;
- threads;
- needle.

Such masterpieces will decorate a modern apartment and become a highlight of the decor.

If you want to learn more about how to make a panel from threads of this type, then take:
- spear;
- white threads;
- colored yarn;
- scissors.

Now across the base, choosing the suggested patterns or using your own, create a beautiful weave.
If the craving for creativity is great, but at hand only Matchbox and threads, this still shouldn’t stop you. Wind plain threads horizontally around the boxes, and then decorate them vertically with yarn of a different color.
In this way, the emblem of a team, a city, or any other panel is created.

If you want to get creative, use whatever you have on hand, be it a foam tray and a plastic knife or a plant guide. The last element acts as a flat needle if you make a hole in it with a hot nail into which the thread is threaded.

I use weaving technique, combining yarn, you can make it appear on the canvas bright flowers or berries, there were birds or animals.

A passionate gardener can be given a painting depicting growing vegetables. If you don’t want to embroider, then make them out of fabric and glue them on.

In conclusion, we invite you to admire a few more paintings made using weaving techniques on modern style. Looking at them, you will feel unity with nature and the desire to create the same paintings.

To organize your knowledge, watch the story about a weaving frame on which you can create rugs and panels from threads.
See how professionals make wool paintings. After familiarizing yourself with this plot, you can create the same bright and fluffy New Year's cockerel.
Doing something with your own hands is always pleasant and interesting. When you want to do something unusual and quite bright with your own hands, and also spend quality time with your child, then great idea will become knitting own painting from wool threads.
We can’t argue with the fact that creating such an applique is quite exciting and fun. A little patience, imagination and tools are all that is required for this craft.
The first thing to say is that the skill of drawing with threads is usually called threadography. This technique was invented quite a long time ago by the Indian Huichol people, who lived in the western and central parts of Mexico. Their main craft was weaving and embroidery, so it was they who stood at the origins of thread printing.
If you take a serious approach to creating a picture from threads, then you can have a great time and learn something new, but make great gift for friends or family. People who might call themselves impatient will be happy to try appliqués using knitting threads because it is Nitography is an excellent endurance training.


Main types of crafts made from threads
Exists several main types of applications:
- standard thread applique;
- iso-thread using small nails and, of course, threads;
In this article we will analyze each of the above-described species using the example of dandelion and kitten.
As mentioned earlier, creating thread appliques is great for both children and adults. The situation is such that what more people engages in this craft, the more his endurance and imagination are trained. And this, as we know, is perfect for any person. Moreover, by doing this you can not only improve yourself, but also make an excellent interior element or gift.
Standard method of appliqué with threads of different lengths
 If you follow the statements experienced needlewomen who know their business, you can be convinced that drawing with threads is so easy and interesting that it can give odds to standard drawing with pencils. Creating crafts using patterns with cats or dandelions is perfect for children.
The first step is to prepare all the tools, which may be useful in this method, namely:
- the base on which the design will be applied (a sheet of fiberboard is best suited);
- the frame in which the finished painting will be placed;
- PVA glue or any other durable glue of your choice;
- brush, as well as cotton swabs;
- pencil for sketching (simple);
- scissors;
And, of course, how can more threads. Which threads to choose is not so important. Depends on the desire of the creator. Most often, when working with children they use wool threads.
Once all the tools are prepared, you can begin. First of all, you need to draw a sketch of the future drawing with a pencil. For the first time, dandelion or kitten are perfect.
The next step is to select the thread colors that are most suitable for the selected pattern. It is also important to know the following: if you are a beginner, it is best not to use shaggy or curly threads. Of course, they make more interesting drawings, but they are difficult to work with. Therefore, leave them for more experienced times.
When all preparatory work finished, grab the glue and scissors and start creating. Apply glue to a brush or cotton swab and draw a line of glue on the base strictly along the contour. After this, press the threads to the canvas with your finger. First lay the material along the contour, then inside and outside.
On at this stage It is very important to place the threads correctly on the base, press them tightly enough to each other and avoid any voids. If this technique will be ignored, the final drawing will be, to put it mildly, weak.
Once done, leave the image to dry for several hours. Once you are sure that the glue is completely dry and the materials lie tightly enough on the canvas, you can steam the whole thing using an iron. This will help the threads become smoother and more beautiful.
By the way, in the future you can vacuum the painting without any problems without fear for your work.
Method involving the use of nails
 As you might have guessed from the name, this method involves a radically different technique for creating a drawing. So we will need following tools:
- again, the base (wooden sheet or wall);
- threads and scissors;
- small nails and a hammer;
In general, this method is much easier than the standard one. The main thing is to understand the essence of this technique and understand its implementation, after which you can create your own crafts without any problems. Let us remind you that it is best to train on light drawings: dandelions and cats.
As in the standard case, first of all we select a pattern for the drawing and apply it to our base. After this, we hammer nails along the entire contour and pull the threads on them.
It is best to first secure the thread to the first nail with a strong knot, and then pull it to the next nails one by one. It is best to come up with a diagram of the order of placement of threads on nails yourself. At this stage, you will realize that this technique is so exciting that it will not let you stop.
Conclusion
In principle, there are still enough ways to create appliques from threads. In this article, the most basic ones that are best suited for learning have been mentioned. As soon as you master these methods perfectly, you will immediately be able to create any paintings of this type without difficulty. Don't be afraid to experiment.
APPLICATION FROM THREAD. MASTER CLASS.The technique of drawing with threads is called threadography. Drawing with threads is the same as drawing with a felt-tip pen, only the line needs to be glued to the base.

We take a very thick sheet of cardboard or, even better, a sheet of fiberboard and put a drawing of our future cat on it.
We select threads. We attach special importance color scheme future work. You can use any thread: leftover yarn for knitting is quite suitable, acrylic thread bright colors will fit very well, floss in several folds will also work, the main thing is that the threads are approximately the same thickness.
For beginners, you should not use threads with a non-smooth structure. Threads that are too shaggy or curly can produce wonderful effects, but are more difficult to work with.

When the threads are selected, take glue, scissors and a toothpick - this will be our simple tool.
I use construction glue for gluing foam baseboards.
You can use any polymer waterproof glue, there are many types, and I advise you to choose less odorous ones.
If you are making pussy with small children, you should carefully read the instructions about ventilating the room on the bottle of glue you choose.
We spread the glue on the line on the cardboard; to spread the glue in a thin layer, use a toothpick or any thin stick. A brush is not suitable for this. In the future, it is convenient to spread glue with a stick into hard-to-reach places between the glued threads.
Glue the thread onto the wet glue. We press it gradually with our fingers, laying it out according to the pattern. We cut off the end of the thread with scissors after gluing it to the place where a sharp, impossible turn of the thread is required, or when a different color is needed.

First we glue along the contour of the large pattern, then we fill the space inside. And for small parts on the contrary, first inside, then along the contour.

We glue the threads as tightly as possible to each other so that there are no gaps left, then your work will be of high quality and beautiful.

When we glue a cat part, we are absolutely sure that it will be exactly the color we decided. But if after the sticker we definitely decided that it should be a different color, and this color does not suit it at all, then we thank the creators of multi-layer thick cardboard or fiberboard, which we took as a basis.

Let's see how I made the red tongue orange in the middle. Using a paper knife, I cut along the desired contour the surface whose color I want to change, and tear it off from work along with the top layer of paper. And in this place I glue threads of a different desired color. In this work, therefore, I changed not only the color of the tongue, but also the color of the pussy's muzzle. This operation can be repeated several times until the cardboard layer becomes completely thin.

Our glue sticks tightly, holds well, and won’t come off without the top layer of paper. But even with further use of the work, you can vacuum it, wash it with a damp sponge and soap, and not be afraid that the threads will fly off.

When making the edge of the work, you should not trim each thread separately. This won't save much material. You can extend the threads beyond the boundaries of the work, and then cut them immediately with a whole line. These shaggy edges of our work are easily hidden in a frame under a baguette.

And finally, a little secret: if finished work steam with an iron through a wet rag or gauze, then the threads will press against each other and look smoother.
Good luck with your creativity!
Http://elleplatz.ya.ru/replies.xml?item_no=5386
Drawing with children has become not as exciting as creating beautiful pictures using scrap materials, because their use gives a special charm to such crafts. Surely, in kindergarten, your child took part in a master class on the topic “Appliqué from threads on cardboard.” In addition, home decoration and gifts become more valuable when they are made with your own hands!
The method of creating paintings with threads is becoming popular. There are several types of such paintings:
- appliques from cut threads for children and fabric scraps;
- applique using nails and threads;
- applique of finely chopped threads on knitting cardboard;
- thread embroidery;
- embroidery using isothread technique on cardboard.
As you can see, there are many ways, which makes this type of needlework accessible to both beginners and experienced craftswomen and masters. Also among the advantages can be noted huge selection various colors of threads, ease and safety of use.
In addition, the threads are perfectly combined with various materials, which allows children to work with them. After all, a child’s imagination is capable of things that an adult could never even dream of!
Crafts made from wool threads
Making an applique from wool threads with your own hands is very simple. To do this, take woolen threads different colors. In this master class we will make a “Hedgehog” applique from cut woolen threads, so we will need threads in black, yellow, green, gray and brown colors. Scissors and glue will also come in handy. And, of course, prepare cardboard for the base.
Preparation
All threads, except black ones, are finely chopped.
We try to cut as small as possible; work made from threads that look like fluff will look more interesting. Don't throw away the threads; they may be useful to you for other projects.

We draw a sketch of the future hedgehog on paper or print out the finished picture and transfer the template onto paper.

Decor
Now we need to draw the outline of the pattern with black threads.


Filling
There is no need to lubricate the entire design with glue at once, because otherwise the glue will dry quickly before you have time to apply the threads to all areas, so we lubricate only the area that you are working on at a particular moment.


You can use a nail file or any other flat stick. This is necessary so that the threads fit closer to each other and there are no gaps between them. After all areas are “painted” with threads, the painting needs to dry for about 10 hours.
You can leave it overnight if you are doing the appliqué at home. If you are conducting a master class in a kindergarten, then it is better to do it in the morning, so that by the end of the day the children can take the work home. Or you can also leave it overnight so you can finish it in the morning.
Finishing touches
After the work has completely dried, you need to carefully check whether everything is glued well and remove excess threads that have not stuck. If necessary, glue the missing ones and leave the painting to dry for another couple of hours.
When everything is ready, if desired, you can cut out our hedgehog along the contour of the black threads and glue it to the base cardboard.


“Autumn” using the winding technique
Applications on the theme “Autumn” made from threads turn out to be very beautiful. Especially if you do them using the winding technique. For this you will need:
- Thick cardboard, polystyrene foam, cork board or wooden block;
- Small carnations;
- Scissors;
- Threads of different colors. It is best to use acrylic threads; you can also use floss, but it is worth noting right away that you will need quite a lot of threads.
This application can be done in one of two styles: radiation or completely . In the first method, the threads act as fan rays that emanate from one point in different sides and overlap each other in a thin layer. The second method involves randomly winding threads around nails.
It’s up to you to decide whether to fill the inner space of the drawing or make only the outlines with threads and leave the middle empty.
Progress
First, you need to mark the outline of the future design on cardboard or other working surface with a pencil, and then carefully, so as not to damage your fingers and material, nail in small nails. The nails need to be nailed at a distance of approximately 1-1.5 cm from each other, always at an equal distance.

The figure shows the beam method of winding thread on nails.

The winding process is very exciting. You can use multi-colored threads. For autumn picture Suitable colors include red, orange, burgundy, green and yellow.

Cute kitty
One of our favorite pets is the cat. And many children adore kittens, so we suggest making a thread applique with a cat with your child.
For this craft we need to take cardboard for the base, glue, and threads.
First of all, you need to draw two circles on the cardboard - one larger (this will be the cat’s body) and one smaller (this will be the head), and also complete the rest of the details.

Then, starting from the middle of the body, you need to glue the thread in a circle very tightly. Trim when the circle is full. Do the same for the head.

Next you need to glue the tail, paws and ears with scraps of thread. The muzzle can be glued directly to the threads, or it can be glued on a separate circle of paper and only then glued to the head with glue. Make a mustache and eyebrows from threads.
The thread cat is ready!


You can also make an applique in the shape of a cat using any of the thread techniques presented above.
Video on the topic of the article
And if you have a genuine interest in this topic, watch specially selected videos on the topic of thread appliques.
Author: Chernikova Natalya Valentinovna, teacher of MBDOU d/s No. 24 of the combined type “Polyanka”, Kstovo, Nizhny Novgorod region
The master class is designed for children 3-5 years old
This master class will be of interest to teachers and parents.

Tasks:
- arouse interest in appliqué using cut threads;
- develop fine motor skills hands, artistically - Creative skills in children
There was a white house
Wonderful house.
And something knocked inside him.
And he crashed, and from there
A living miracle ran out, -
So warm, so -
Fluffy and golden!
(chick)
To work you need:
Applique from threads Horse. Master class with step-by-step photos
Thread applique for kindergarten
Author: Pritula Marina Anatolyevna – teacher of MDOBU “ Kindergarten general developmental type No. 9 “Yolochka”, Arsenyevsky urban district, Primorsky Territory, Arsenyev The master class is intended for older children preschool age and teachers.

Thread appliques are rare works. Although it’s a shame, thread works are very interesting for both adults and children. After all, such works are not only beautiful and exciting, they are also incredibly simple.
For such work it is very simple and available material. Crafts like this look very original. To work you will need multi-colored threads depending on the picture.
Thread applique. New Year's horse
Master class on making a picture from woolen threads.
Author: Fetyukhina Larisa Viktorovna, teacher MBOU Dubovskaya secondary school x. Dubovsky Uryupinsky district Volgograd region Purpose: interior decoration, gift.
Technique: embroider without a needle.
The master class will be of interest to educators and teachers primary classes, parents who, together with their children, will make a picture from woolen threads and will be able to please their loved ones with an interesting craft.
Thinking about what new Year gifts“put under the Christmas tree”, it is necessary to take into account not only the wishes of relatives and friends, their hobbies, interests, but also the fact that the New Year 2014 is the year of the blue wooden Horse. Eastern legends say that if a gift contains an image of the symbol of the year, then it will undoubtedly bring good luck and fortune to its recipient in the New Year. Therefore, the most common gifts in 2014 will be souvenir figurines in the form of a horse, paintings, figurines, panels, clothes, toys, keychains with the image of this animal. For your home or office, you can give a painting with a picture of a horse. Which is what I suggest you do with your own hands.


