Star news


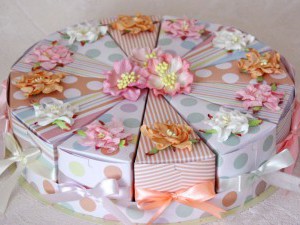
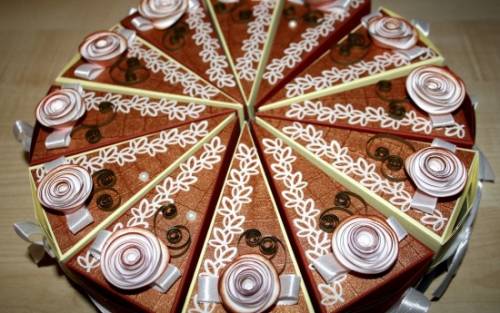
Paper cake on a postcard. Master class on creating a cardboard cake with surprises
I made two of these cakes, one as an advent calendar for children.
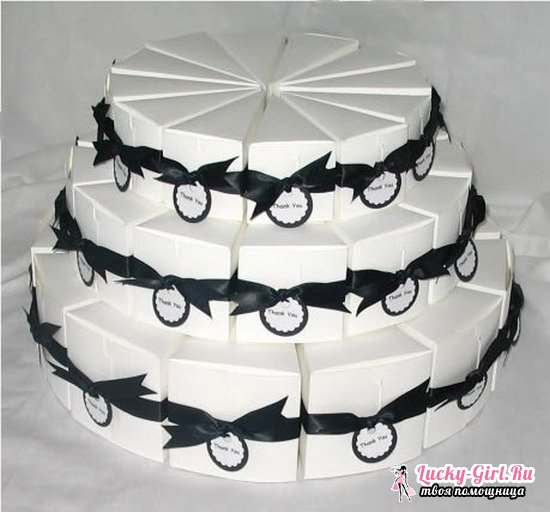
The second one is for a wedding for our friends.
And now MK itself:
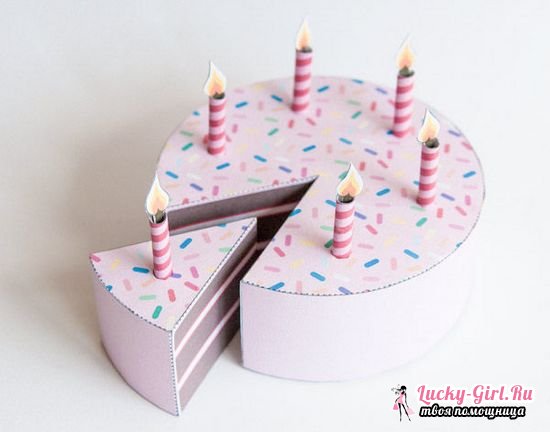
MK: SURPRISE CAKE WITH WISHES
This cake can be presented to New Year. It can be made from 6, 10 or 12 parts. If the company is large, then the cake can be multi-tiered.
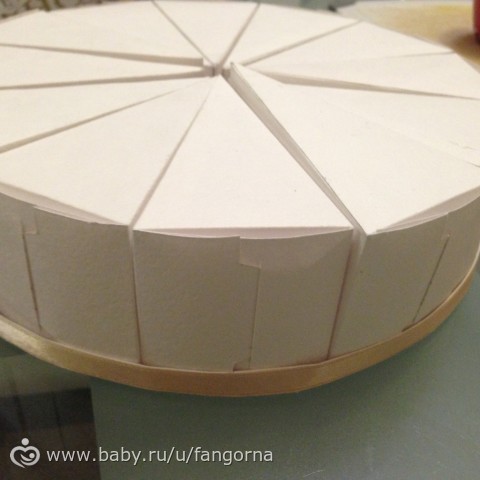
In this master class we will have a cake of 12 parts, if you need to make it into 6 or 10 parts, just change the angle in the pattern.
You can also make this cake for a birthday or as a wedding gift.
We will need:
- cardboard, you can use watercolor paper, you can also make it from printing paper, but then it will not be durable
- scissors
- glue
- a tool for bending cardboard (you can use any hard stick
- ribbons and other decorative elements
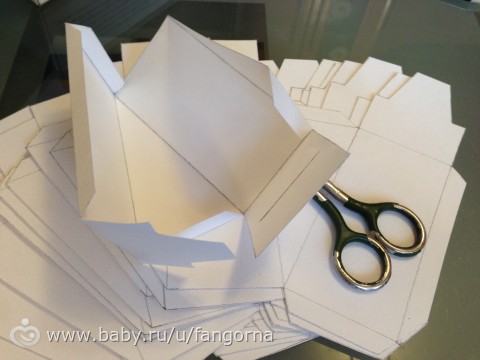
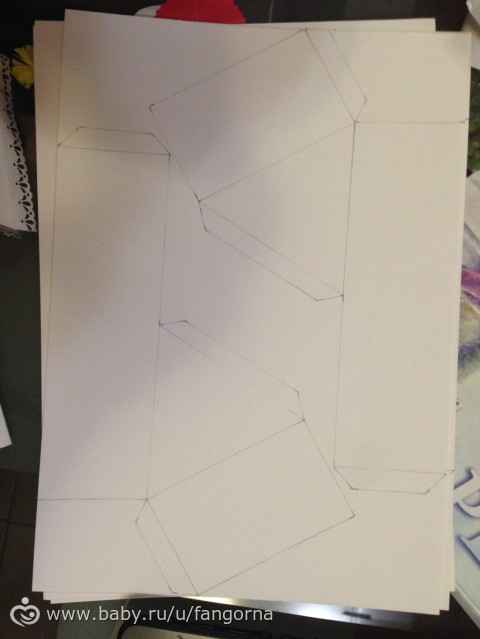
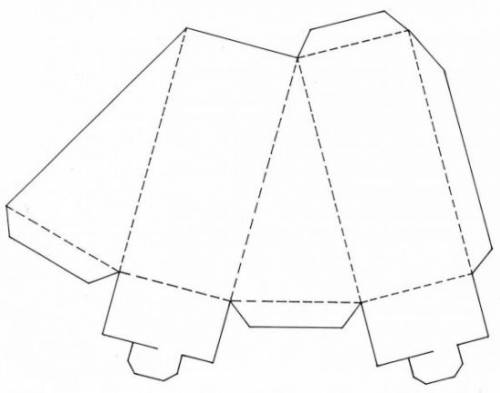
1. Make a pattern according to the attached template
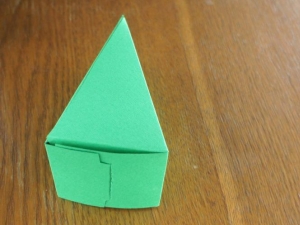
2. Cut, fold and glue the boxes. In order to bend the cardboard, draw a rigid stick along the fold line along the ruler. You can use a glue stick for gluing.
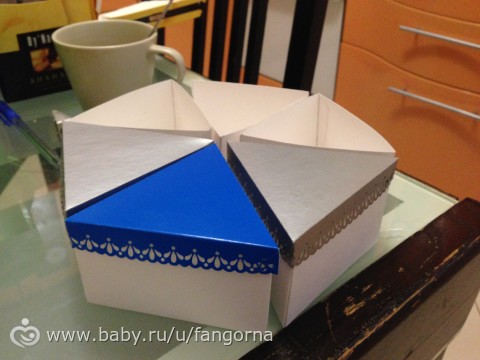
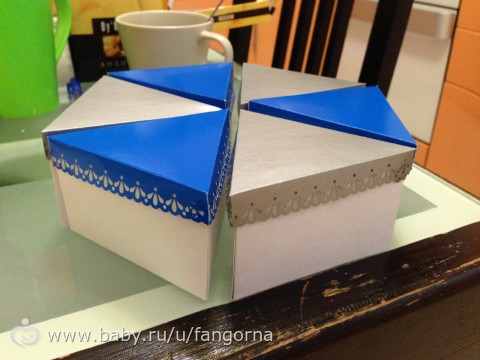
3. Use your imagination and decorate the cake pieces as you wish. IN in this case two types of decoration of the pieces were made, which alternate in the cake.
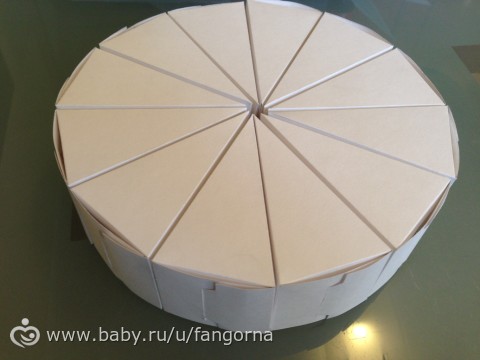
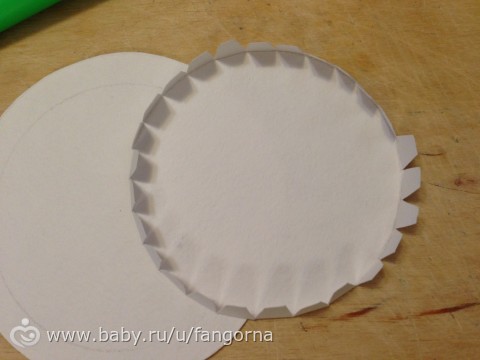
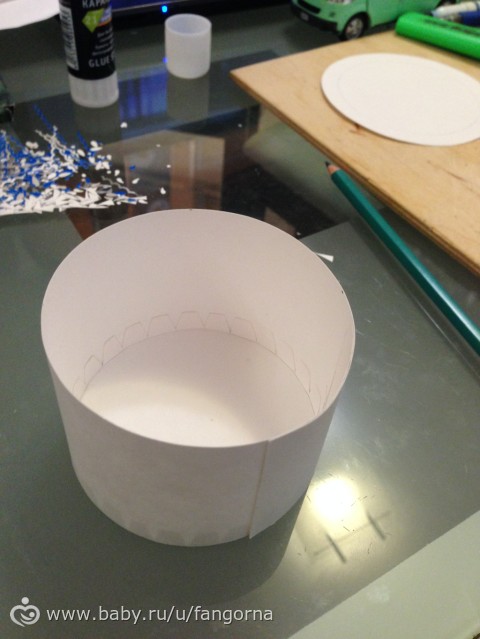
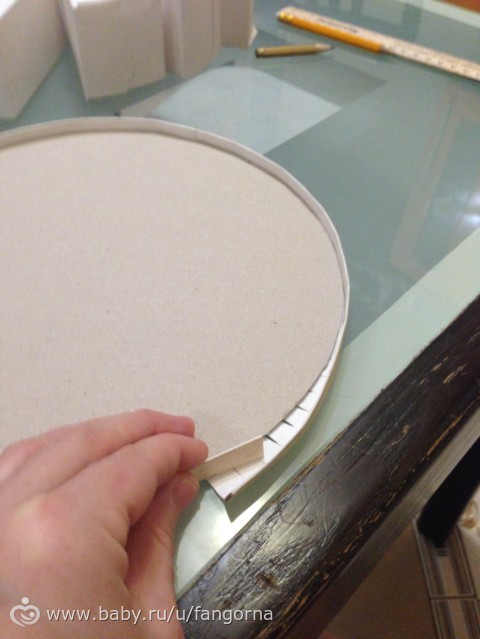
4. Make a pallet. To do this you need to cut a circle from thick paper(whatman paper) of suitable diameter. We cut a strip for the sides, step back from one edge by 1 cm (the height of the side), make cuts to glue it to the base.
5. Put a surprise with wishes in each box.
sweet life (candy)
energy (batteries)
vivid impressions (colored pencils)
love (heart)
good health (vitamins)
heat (piece of fur)
light (flashlight)
vigor (coffee beans)
6. Pack the cake in transparent paper.
Now let’s talk about how it turned out for me
For the first cake, I drew a box pattern on each sheet with a pencil and a ruler. And then I cut it out with scissors. I first drew along the fold lines with the same scissors (with the non-cutting side), and then folded them. For my cakes I used watercolor paper. It's quite there good cardboard, white on both sides.
For the second cake, I was already too lazy to draw by hand, so I decided to try running watercolor paper through our printer. He coped with the task quite well. It turned out much faster.
For the feather cake, I made two tiers of 12 pieces and another tier of 6 pieces with lids. There the pattern was different. I drew it myself, drew it with a ruler, measuring required sizes.

 I made the lids from colored cardboard, passing the edge through a special cutter.
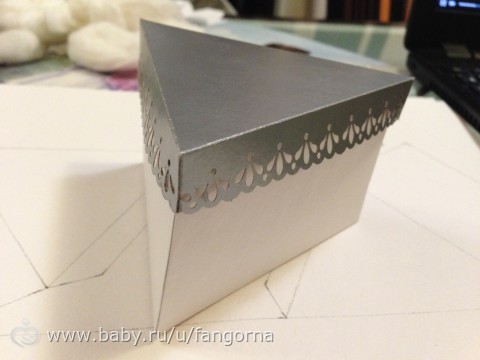


Well, I made the last box round. Looks like now I can make any box))))

For decoration I used ribbons and a flower cutter. A 12-piece cake takes about 7 meters of ribbon to cover each piece in a circle. 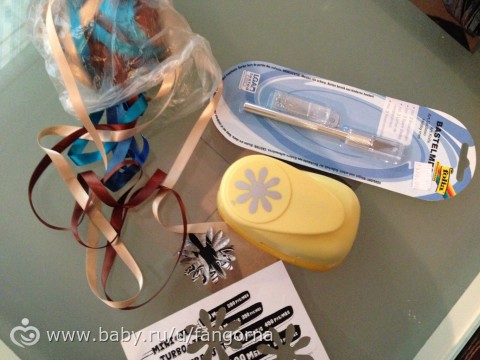


I put this cake on the top shelf and gave Andryusha a piece every day.
![]()

There was a letter for learning the alphabet. A toy wrapped in foil and a piece of cotton wool for the beard of our Santa Claus. Every day we glued a piece of cotton wool to Santa Claus's beard.

And now about the wedding cake.
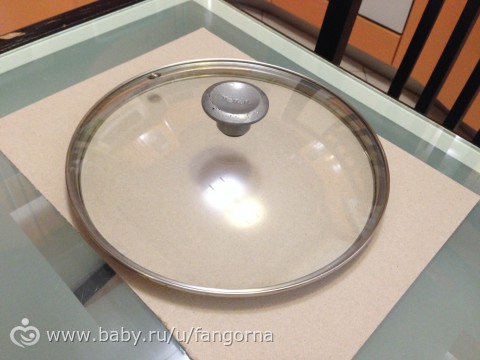
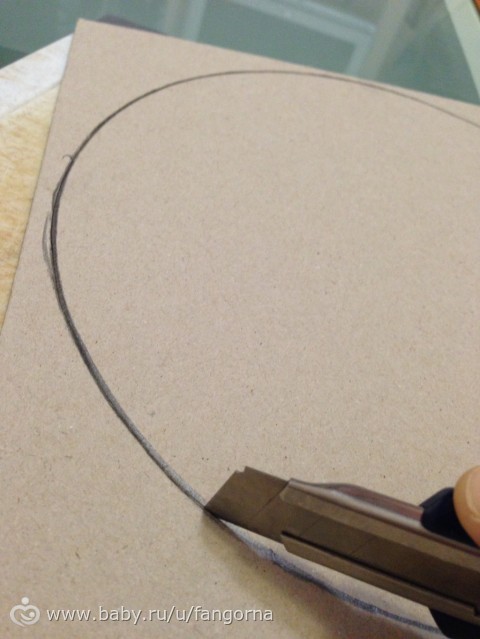
12 boxes were made in the same way as in the first cake. But then I decided to make a stand. My cake just fit into one of the lids. So I chose thicker cardboard, outlined this lid with a pencil, and then cut it out with a knife.
Then I cut strips from a sheet of A4 paper for watercolors. folded in two for greater density. 
I glued them together into one long strip.

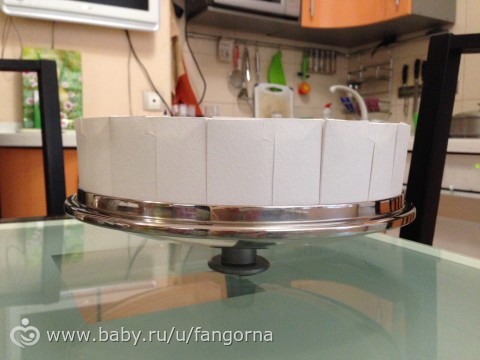
And then she glued it to her circle. I cut off the excess. I glued a pencil onto the glue. He was the best fit. I used to glue the pieces themselves together.
I pasted it around with more ribbon.
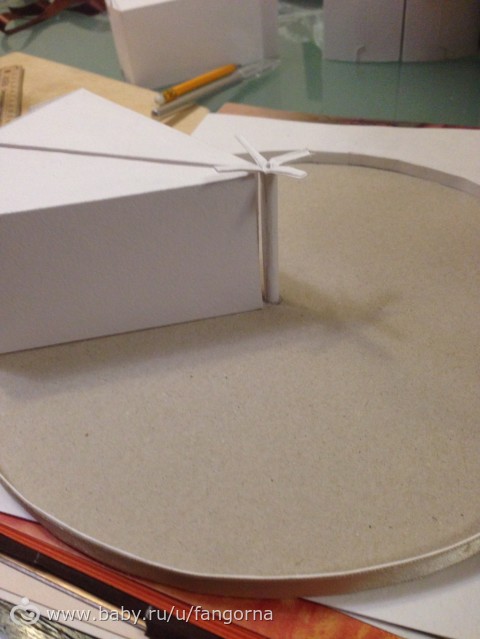
I made a hole in the middle and rolled the paper into a tube and inserted it into that hole. I glued the same to the base. To make a flower in the middle that would not fall when pulling out the pieces.

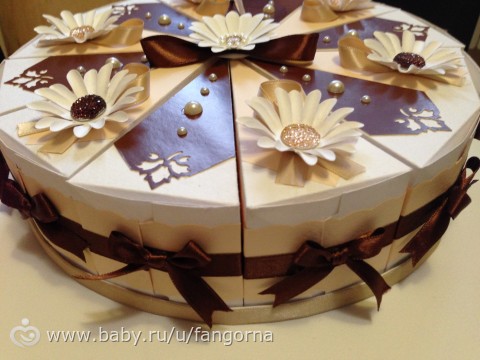

The outside was wrapped in transparent paper and tied with a bow. 
And now about the surprises for this cake.

Small souvenirs and wishes for them.
1. Big and pure love
Love is a wonderful gift of fate...
Dreams come true with her!
Always keep her in your hearts!
Live in love and joy!
(keychain with heart)
2. By car
So that they don’t stand still,
So that they would come to visit us,
I wish I could buy you a car,
The first payment is just for the tire.
(money machine)
3. Unforgettable trips
So that you can relax at sea,
And we flew to Paris more than once.
(shell)
4. For kids
So that the union is strong,
We urgently need a toddler!
Give birth to babies
Both girls and boys!
(pacifier)
5. Home warmth
May your home be filled with comfort,
Every minute will be bright!
(candle)
6. Good health
(ascorbic acid)
7. Sweet moments
(rafaelo)
8. Good mood
(smiley)
9. Ruble for a rainy day
We know the amount is not large,
But congratulating you on your Wedding Day,
I would like to tell you:
Know if the day is hard
Besides this ruble
will always support you in everything
Our friendly family!
(ruble)
10. Go on a romantic hike
in the movie theaters
(money)
11. Inexhaustible energy
On this holiday we wish
You have energy and strength,
So that every day at dawn
Only brought joy!
(bottariki)
12. Money
Let the money, huddled in a flock of birds,
They're flying towards you like a hurricane!
Let them surround and attack
And they reach into your pocket with impudence!
(money)
Paper cake with wishes - very unusual gift with a surprise inside that will bring joy and surprise not only a child, but also an adult.
It can be used instead of an envelope or card for a cash gift for a wedding or birthday.
You can make such a cake to congratulate colleagues on corporate party or present it on the occasion of an anniversary, the birth of a baby, for a housewarming, or for any other occasion.
DIY paper cake: materials and tools
Make paper cake It's not that difficult to do it yourself.
First you need to prepare everything you need for this exciting creative process.
You should think through the concept and design of a paper cake with wishes in advance - this determines what set of materials you will need for the decoration and internal filling of the boxes.
The basic set of materials is as follows:
Scissors;
Pencil and ruler;
Glue (PVA or other suitable for cardboard and textiles);
Double sided tape
Colored cardboard (not very thick so that it is easy to bend). Very beautiful designer cardboard with a variety of prints can be found in stores selling scrapbooking products. You can make all the pieces the same color or choose 2-3 options for a harmonious color combination;
Decorative elements: colored satin ribbons and thin ropes, paper lace, colored tape, corrugated paper, beads and rhinestones, small artificial flowers, toy figures, various stickers, contour paints;
Small colored papers for wishes: you can print blanks found on the Internet on a color printer, or buy ready-made ones.
Paper cake with wishes: methods of making
Option 1
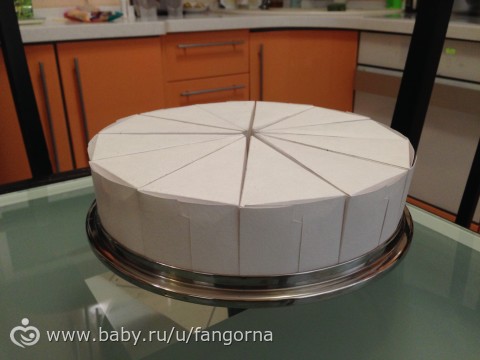
A paper cake with wishes consists of 10-12 separate “pieces”-boxes, in each of which they put a small souvenir and attach a note with a wish to it.
Step 1
We print the “pattern” of the piece on the printer. If you don’t have a printer at hand, you will have to redraw it manually. Cut it out and trace it on each sheet of cardboard. You can print the templates directly onto the cardboard sheets themselves.
One A4 sheet of cardboard is designed for 1 piece about 11 centimeters long. Depending on the desired size of the cake, the pattern can be slightly reduced or increased.
Step 2
We cut out each blank and fold it along the fold lines so that we get a triangular box. For convenience, it is best to mark the fold lines in advance and bend them using a ruler - then everything will turn out smooth and neat.
Step 3
All that remains is to apply glue to the seams and glue the box. First of all we glue the acute corner, then the side part. To prevent the future cake from falling apart, you need to press the glued parts together as tightly as possible. For better strength, the bottom of the box can be carefully glued with a strip of narrow tape.
The main part of the cake is ready.
Step 4
Now the most pleasant and creative moment: fill the cake with the “filling” and decorate it.
First, we fill the boxes with contents: you can add sweets, small souvenirs, magnets, and useful little things to the wishes rolled into a tube.
Suitable as a gift for a child small toys, stickers, air balloons, chocolate eggs with surprises.
You need to select surprises so that they somehow resonate with the theme of the wish - if we wish for prosperity, then in addition we attach money as a gift, etc. Here you can give free rein to your imagination and sense of humor.
To prevent the surprise from falling out of the box, it needs to be tied with ribbon, lace or braid - in this case, a satin ribbon can, for example, imitate the creamy layer of a cake.
The boxes can be decorated with small bows or flowers by gluing them with glue or double-sided tape. Bottom part cover with a strip of paper lace or wrap each piece with a paper lace napkin, just like a real cake! You can create an imitation of cream using contour paints or flowers from satin ribbons.
To prevent the cake from falling apart into separate pieces, they are placed together on a base and tied with ribbon, lace or string. The middle can be decorated with a candle or flower.
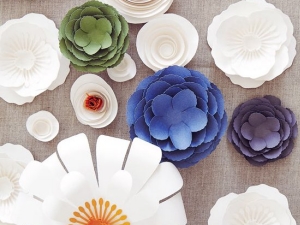
There is absolutely no need to decorate the cake. big amount multi-colored details- two-color cake from white cardboard with lace and small delicate flowers V pastel colors will look no less stylish and elegant.
A paper cake with wishes can be not only single-tiered, but also two- or even three-tiered - this will especially please little birthday people. In this case, you can put not only wishes inside, but also funny predictions or fun tasks and games for all invitees. To prevent the tiers from falling apart, they are glued with double-sided tape.
To wrap a gift, you can try to get ready-made packaging from a real cake or wrap it beautifully in cellophane.
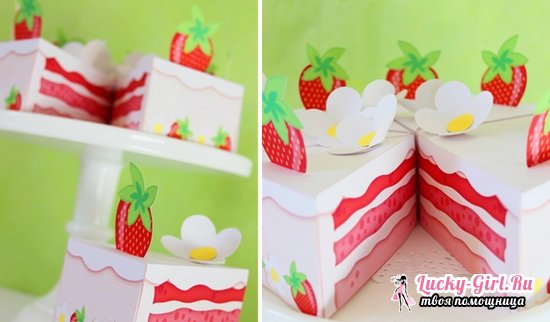
Option 2

Another option for DIY cake “pieces” looks a little different: this is a triangular box that has separate cover above.
This method differs from the previous one in that you will have to make two blanks - a separate box and a separate lid. Accordingly, you will either have to reduce the size of each piece, or take twice as much cardboard.
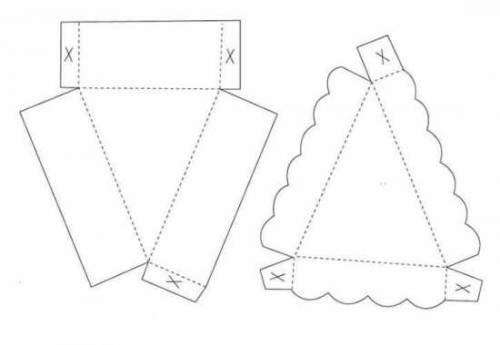
All other steps here are the same: transfer the template to cardboard, cut it out, fold it and glue it. After that, we fill the boxes and decorate the cake.
Such a gift will not bring less joy and more fun than a real sweet cake.
The larger the base of the triangle, the fewer “pieces” of cake you will get - you can make, for example, 6 wider pieces or 12 narrow ones.
For a multi-tiered cake, you need to reduce the pattern so that each next tier is smaller than the previous one. It is best to make the number of pieces in each tier the same.
The colors used to decorate the cake should combine well with each other and not have a sharp contrast. If in doubt, you can use special color combination tables.
Motley and bright design more suitable for children's day birth. For an adult, it is best to choose neutral, discreet tones that will give the gift a stylish and elegant look.
To make the cake look more realistic, you should keep a picture of a real cake in your head and create it in its likeness. To do this, you need to decorate the “pieces” not only on top, but also on the sides, taking into account what a real cake would look like in cross-section.
And finally, a few tips on “filling” the cake: interesting ideas for wishes:
You can add small multi-colored candies or colored pencils to your wish for a bright life;
Health - vitamins;
Find your way - compass;
Sweet life - candies or chocolates;
Love - figurines or magnets in the shape of hearts;
To the wish for prosperity and wealth, you can add a small model of a car, banknotes or a key to the apartment:
Good luck and luck - you can put dice or a casino chip;
Energy and vigor - battery or coffee beans;
Warmth and comfort - small knitted item, soft toy or a small candle.
A DIY paper cake with a surprise inside is... great gift for kids, teenagers and even adults. This cake looks very original, and in each individual piece the birthday boy and his guests can find a surprise, a souvenir, or a wish. A homemade cake will be appreciated not only by the hero of the occasion, but also by the guests gathered at the celebration.
It’s very easy to make a DIY paper cake with wishes and prizes. The main thing is to take required material and be patient. Below will be given step-by-step master class. So to make it out corrugated paper You need to prepare the appropriate materials with your own hands:
- colored paper, possibly with drawings;
- diagram and template;
- several toothpicks;
- glue stick;
- Whatman paper is white;
- flowers, sparkles, ribbons;
- stickers.
How to make a paper cake is described in the following step-by-step instructions:
- The first step is to make a template. It can be drawn with a marker or printed using a printer.
- It is better to make the cake itself from thick paper; you can use corrugated paper. It is better to translate templates on the reverse side.
- The template must be cut in a circle and bent at the folds so that the paper bends better. You can run the blunt side of the scissors along the fold lines.
- Next, the sheet must be folded in half and a piece should form.
- Then you need to glue it from the inside, but so that the back side remains intact. You will also need to put gifts with wishes there.
- Next, you can start decorating the finished piece.
To do a big cake, you need to glue 12 large pieces. You can make not just 1 cake, but according to the number of guests, so that each guest can receive a small gift with wishes. The most difficult moment is to tie all the pieces into a single whole with ribbon. The main thing is to take your time.
How to decorate the product?
You can decorate a decorative cake with the most different ways, the main thing is to turn on your imagination. There are a few original ways decorations:
- For example, make a cake with cream. To do this, you need to cut a circle from whatman paper along the diameter of the confectionery product, make holes along the edges and mark it on the surface. A layer of cream can be glued to each individual piece.
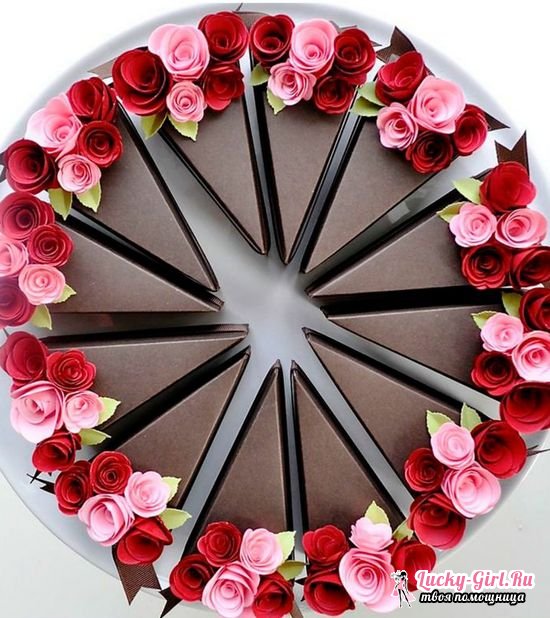
- 1 more original method decorations are satin flowers. Flowers can be purchased at textile stores, or you can make them yourself using satin, nylon, and velvet ribbons. The ribbons must be twisted and pulled together and secured in the center. And then decorate the cake with them.
- It is recommended to use various sequins, beads, and beads as decoration. You can create a glitter pattern on each piece. It looks very solemn.
- As a decoration option, small flower buds with paper leaves will look great. You can create entire compositions, light and romantic.
Should buy beautiful stickers, and stick them symmetrically on each piece. The decoration theme should be chosen according to the style of the holiday. If it's a children's party, then stickers with famous cartoon superheroes will do. Classic ones are good for adults. flower arrangements. Stars made of foil and hearts made of corrugated paper look good.
You can buy light ones plastic toys, figurines, flowers. They must be secured to each piece with glue.
When decorating a product, you must adhere to some rules:
- Each part must be decorated equally so that the cake looks harmonious.
- You can make each piece a different shade, but so that the colors are combined into the overall composition. Looks good if you have 4 pieces of the same color. Or make a rainbow version.
- Good to use when creating a product decorative paper with ornament. This way the cake will look stylish and neat. When using such paper, it does not need to be further decorated.
Before filling the elements with wishes and gifts, you need to make sure that the glue is dry. When the gifts and wishes are in place, each piece can be tied with a ribbon.
 For preparation you will need:
- 11 sheets of A4 cardboard;
- multi-colored paper;
- sample;
- ribbons and decorations;
- scissors;
- glue stick;
- double sided tape;
- hole puncher.
There should be 11 pieces of chocolate cake in one tier. The product must be made as follows:
- Print the item template.
- Transfer the template to cardboard and cut along the lines, bend it into a finished piece.
- It is necessary to glue all sides except the back side.
- In the ends that will remain behind, you need to carefully make holes with a hole punch. There should be 2 holes.
- You need to thread a beautiful ribbon through the holes and tie it around the entire piece.
- Then you can start decorating. We need to cut different ones beautiful details from cardboard, colored paper and stick on each part. The decoration should be the same on each piece.
- You should get 11 pieces, which need to be put together in 1 composition for a beautiful dish.
- The parts can be fastened together with double-sided tape.
- Next, you need to cut out bright strips from colored paper and make curls. Insert each into the hole in the piece from the back. This will wonderfully decorate the product.
- The cake can be made in several tiers, decorated with stickers, decorative butterflies, hearts, and flowers.
Templates can be different: there are pieces that open from the back, and there are pieces that are closed from above with a lid. Both options are successful and original.
A cake with a gift is cool and unusual idea. Each guest will receive a small gift and will be able to take it home.
With your imagination, you can create a masterpiece, a whole work of art that will create a real sensation at the holiday. A cake does not have to be presented only for a birthday. He will come to the court at any gala event or a simple family party.
If you don't know what to give for a birthday or Valentine's day, you should pay attention to this original souvenir like a paper cake. This is very interesting gift, because you can put small cards with wishes or another present inside. A surprise box in the form of a cake looks very interesting and unusual.
How to make a paper cake?
Paper cake can be easily packed various gifts and hotels. For example, you need to make as many “pieces” of cake as there will be people invited to the party. And inside each one place a note with sincere wishes.
- Ribbons - for decoration
- Beads - for decoration
- Long ruler
- Needle (large)
- Ready template
- Wishes on a small piece of paper or a souvenir
- Glue (can be replaced with double-sided tape)
- Scissors are sharp
- Colored paper (thick)
Instructions:
- We make a template of a piece of cake from thick paper, and then transfer it to paper (colored).
- To make it easier to transfer the template onto a sheet of paper, you should use a large pin. The point is that, unlike a simple pencil, the pin will leave no visible imprints.
- Using a needle and ruler, you need to draw all the fold lines.
- We take scissors and cut out the template - we make as many of them as there are pieces of cake. Typically, approximately 8-12 pieces are used.
- We fold all the cut-out blanks along the fold lines in the form of small boxes and glue them together.
- We decorate all glued parts with ribbons and beads - here you can completely surrender to flights of fancy and use all available means.
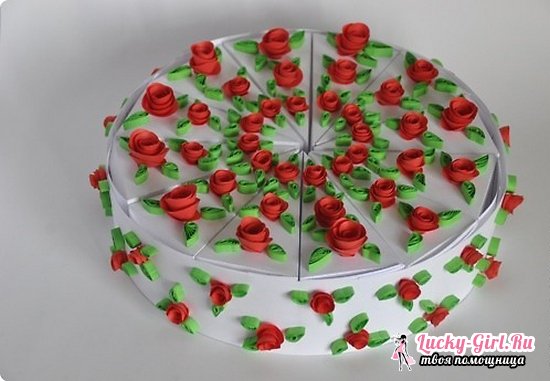
- Pieces of cake decorated with hearts, multi-colored beads, decorative rhinestones and flowers made using the quilling technique look beautiful.
- Inside each piece of cake we place a note with wishes or a gift.
- We form a cake from the pieces and tie it beautiful ribbon so as not to crumble.
- Place the finished cake on a beautiful cardboard tray. This dessert can also be colored (each piece of cake different shades) or plain, and use paper flowers and various figures for decoration.
It is possible to create a paper cake using another scheme. In this case you need to take:
- Hole puncher
- Ready template
- Paper glue
- Double sided tape
- Colored ribbons
- Scissors are sharp
- Paper (various colors)
- Multi-colored cardboard (A4 format) - for each tier of dessert you will need 11 sheets
Instructions:
- For each tier we make exactly 11 pieces.
- We apply a template to the cardboard. It is cut along the solid lines of the workpiece, then they are bent and folded in the shape of a triangle.
- We glue the nose, as well as the side edge of each piece.
- We first fold the short sides inward, and fold the long sides on top and fix them in the cuts made.
- We put the ends together and use a hole punch to make small holes.
- You need to stretch the ribbon through the hole, then wrap the workpiece with a ribbon in the middle. We pull the ribbon through the next hole, then tighten the edges into a bow shape.
- Each piece of cake is decorated with a variety of decorative elements.
- We take a stand-plate and place all 11 triangles on it, which we fasten together with double-sided tape.
- We cut out not very large strips from colored paper, and then screw them onto a pencil. Use the resulting curls to decorate the top of the finished cake.
- Using this scheme, you can make a single-tier or multi-tier cake. You can put some pleasant surprise inside each piece.
Paper cake with wishes: making
To make this cake, you will need the following materials:
- Scissors
- Rhinestones
- PVA glue
- Colored beads
- Lace
- Colored ribbon
- Colored paper - 13 sheets
- Wishes on colorful leaves
Instructions:
- First you need to make a template - the long side should be 10 cm and the short side 5 cm. You can print the template on a printer. Thanks to the prepared template, it will be possible to significantly reduce work time.
- Cut out the template and transfer it to colored paper, using a ruler we draw all the fold lines.
- Bends must also be made under the ruler, so that the created boxes will be beautiful and even.
- We connect the edges with glue - first we glue the acute corner, then the side one.
- Inside each piece of cake we place a note with wishes and some small souvenir. If the boxes are made of enough thick cardboard, then we simply bend the ends, and if it is made from plain paper, glue it together with PVA.
- Now we are making ribbon decorations - making small bows from ribbons and lace. Using glue we fix various decorative elements.
- Place all the cake pieces and tie them with a ribbon.
This souvenir is just perfect for a present on March 8th or romantic evening with a loved man. Inside the paper cake you can place:
- Inscription - I will bring hot coffee every morning, and pour in a few beans of aromatic coffee.
- The inscription - eternal luck and positivity. Place dice or a small horseshoe inside.
- Inscription - waiting for us sweet life, and inside you can put your favorite sweets or small chocolates.
- Inscription - I wish you a lot happy days, and pour paper emoticons.
- The inscription is limitless and eternal love, put a plush heart.
- The inscription - home warmth, put a scented candle.
- The inscription is a heavenly holiday, and place shells or mini glasses inside.
- The inscription is a luxurious and carefree life, place a toy limousine inside.
- The inscription says fabulous treasures, pour a lot of small coins into the box.
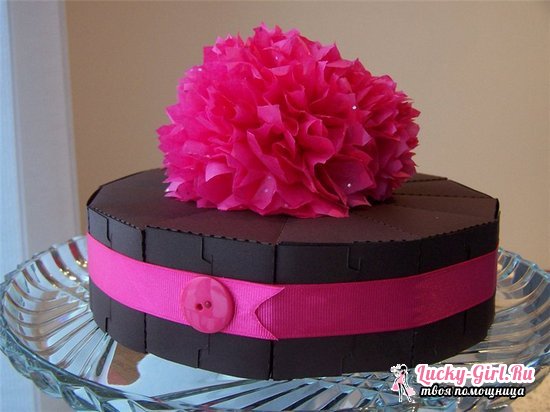
How to make a cake from corrugated paper?
To make such a paper cake, you will need the following materials:
- Decorative decorations
- Scissors are sharp
- Styrofoam
- Thread
- Compass
- Large needle
- Corrugated paper
- Double sided tape
- Brush
- Satin ribbon (must match the paper)
Instructions:
- We take foam plastic and draw a circle of a pre-selected diameter on it. Then a figure is cut out along the contour using sharp knife. In the event that it will be used thin material, then several parts are cut out and fastened together.
- You can replace the foam paper base, inside which a gift is placed.
- We take the workpiece and outline its outline on paper, cut out a circle of the required diameter.
- The resulting circle needs to be glued to the top of the cake.
- Cut out enough corrugated paper long stripes. The height of each strip should be 4 mm higher than the cake blank.
- Fold the strip and then unfold it. Then along the resulting line it is stitched with a basting stitch. The thread is pulled together and the paper is slightly gathered, then we secure it.
- Using this pattern, we make several strips and cover the entire side surface of the cake with them.
- Scotch tape is attached to the bottom and top, and frills are attached to it.
- The threads and all seams are masked with a satin ribbon, and on top we decorate the cake with a candle or other decorative elements.
To decorate a paper cake with a candle, you will need the following materials:
- Scotch
- Crepe paper
- White twine
- Paper glue
- White straws - 3 pcs.
Instructions:
- First, we take the straws and carefully cut them.
- The straws are folded and a not very long piece of twine is stretched between them. Then we fix everything together with tape.
- Take yellow crepe paper and make a fringe. Then it is carefully twisted around the straws and secured with a small piece of tape.
- The tubes are taken and wrapped with a blue stripe with fringe. If necessary, fix it with tape.
- We take an awl and make a small hole in the cake, pull one end of the twine through it, then fasten the candle.

A paper cake is not only holiday symbol. A craft like this could be great. original packaging for a gift, note and card with wishes or a small present. The birthday boy will definitely appreciate such a surprise, and your celebration will definitely be a success!
Hello mommies! I want to show you a master class on how to make a paper cake with surprises with your own hands, which I made for a friend for her birthday.
We will need: paper, glue, scissors and anything else you like for decoration.
This is why we cut out 12 pieces of paper using this template. You can download the template and make pieces of cake using the origami technique.
We make a cut on the lids and bend them along dotted lines, having first done a jogging, you can not writing pen or knitting needle.
Now we glue it in places, at the end and on the side. From another paper chocolate color I cut triangles to the size of the piece with curly scissors and glued them on top. The side glued seam should be on the bottom.
Here are 12 pieces of paper cake ready; you can do amazing things with origami.
Now let's get to the decorations. I will decorate the paper cake with braid and quilling flowers, rhinestones and ribbons.
I decorated with two satin ribbons sides, chocolate color, ribbon width 4cm. I glued the crystal onto the glue, measuring from one edge of the lid to the other along the entire piece.
The second ribbon is light green, 2cm wide. I cut it long to tie a bow. I also glued the crystal for a moment, but literally drop by drop in the folds and in the middle. Since it impregnates the tape and protrudes, it becomes noticeable. The truth went a little wrong with the color, I had to take it lemon color under the flowers.
I then hot glued the tape around the edge.
Braid 5mm wide. I glued it, first twisting it, so that one end remained under the flower.
Having prepared 12 quilling flowers, I glued them onto a piece.
I glued rhinestones onto the flowers and the second edge of the ribbon.
Now we will make an origami cake stand. You can, of course, put our cake in a transparent box from a real cake, it would look even more realistic. But I didn't find one.
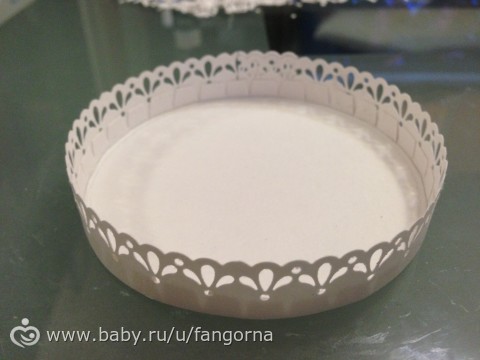
I cut out two circles from paper according to the diameter of our paper cake, punched the side of the paper with a figured hole punch, and cut it to the required width, taking into account the hem. And glued it to one circle, and then to hide the gluing of the side we glued the second circle.
This is the paper cake stand we made.
Now let's start filling the pieces, i.e. wishes. They can be very different, it all depends on who you are giving the cake to.
To begin with, I printed it on beautiful paper wishes on the printer, cut into strips with curly scissors, twisted the ends. And corresponding to every wish little surprise. We put a surprise with a wish in each piece and tie it with a bow.
Wish for the first piece of paper cake: New addition to the family - a doll.
Second piece: Sparkling fun - smiley face and balloons.
Third piece: Vacation at sea - shells and a keychain with shells.
Fourth piece: New car - model
Fifth piece: Incredible luck - cubes and a dog magnet.
Sixth piece: Pleasant surprises- Kinder Surprise
Seventh piece: Cheerfulness - coffee.
Eighth piece: Good health - ascarbine.
Ninth piece: Life in chocolate - chocolate
Tenth piece: Warmth and comfort in the house - an aroma candle.
Eleventh piece: Bright colors life - colored pencils.
Wish for the twelfth piece of paper cake: A lot of money - a cash gift.
Wishes and surprises in an origami cake can be very different, it’s a flight of your imagination. For example, instead of pencils, you can put nail polish or crayons. Good health honey in a small jar. Etc. whatever you want and come up with. The design can also be at your discretion and imagination.
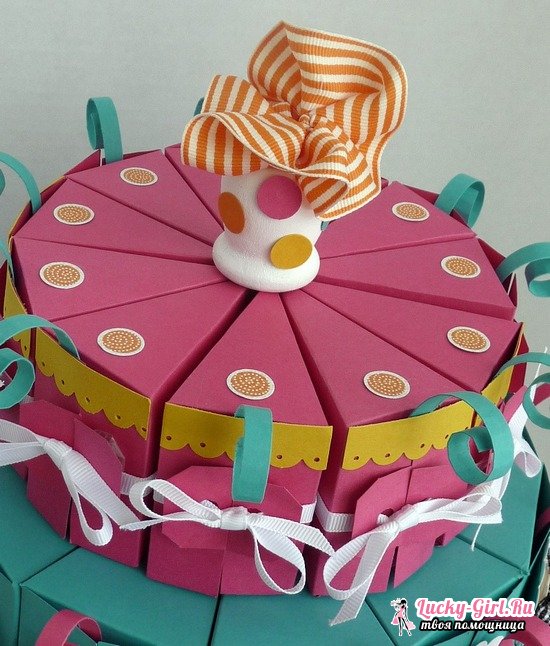
We place our handmade paper cake into the stand. I covered the middle with a flower made of watercolor paper, and made the edges orange. I attached it with double-sided tape. I packed everything in transparent film and tied it with a satin ribbon.
This is the cake I got. Of course, I don’t claim authorship; there are many options for such cakes on the Internet. But for the website Mom’s Page I decided to make a MK of my cake. The birthday girl really liked the cake, she was delighted, and I’m glad that she liked it and was able to surprise her and the guests present. It was somehow immediately decided to give money. Before leaving home, I told my husband that I would give him a donated amount of money, and he asked, did you make a card, and when I told him no, he was very surprised, and when I showed him the cake, he was even more surprised. My daughter also really liked the cake and gave it to her. The friend immediately began to unwrap it and look, but then the children of relatives gathered around and everyone wanted to open a piece. They opened a couple, but the kids were small and because they could just tear everything up, she decided to open it and look later with her son, by the way, he also really liked opening the pieces, because there was so much interesting stuff there.
Here is a DIY gift option that you can use to please your loved ones and friends.
Create, invent and congratulate.

