Star news


Simple gift boxes. Beautiful do-it-yourself candy box: step-by-step description, photo
After analyzing several MK packages, I found an option that suits me quite well for now. This way you can make a box of any size and color for a box, plate, etc. There is nothing new in the box design itself. The main thing that I “invented” for myself was making my own “designer” paper. It's hard to find nice paper in a small town, so here's what I suggest you do.
1. Materials:
- Whatman paper or cardboard,
- napkin or corrugated paper
- sheet of tracing paper
- PVA glue
- scissors
- ruler
- pencil
2. Determine the size of the box so that you can then draw a diagram.
Size of the bottom of the lower part: add 1 cm to the size of the product itself.
The size of the side parts is equal to the height of the product or slightly higher.
The size of the folds for the bottom part: 1 cm less than the size of the side part.
Cover size: 0.5 or 1 cm larger than the bottom.
I make the size of the side parts of the lid 3 cm.
The size of the folds for the lid is 2.5 cm (for a simple box you can do without them)
For example: the size of the box is 5X5X4. Box dimensions: bottom 6x6 cm; sidewalls 5cm; bend 4 cm. Lid 7x7 cm, sides 3 cm, bend 2.5 cm.
Now we determine the dimensions of the square, which will be the basis of our diagram. Add 4+5+6+5+4=24cm. This is the length of the square, which we will draw on whatman paper.
In fact, making all the calculations is not as difficult as it seems))) If you do it once and understand the principle, you will easily make them in your head without any papers or notes.
3. Draw a square on whatman paper, in our case with long sides = 24 cm. Cut it out.
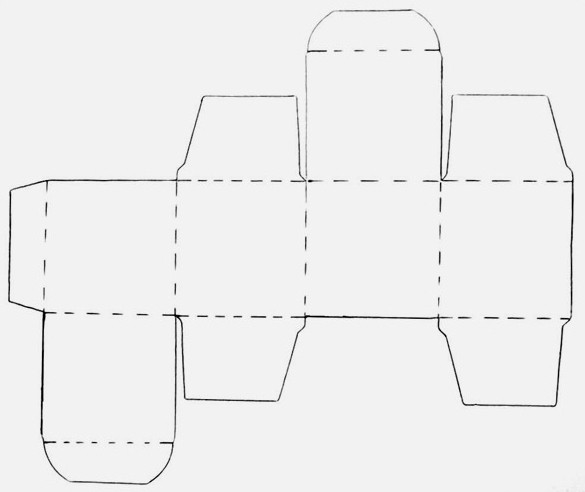
4. Now we mark the square on each side according to the scheme: 4cm - 5cm - 6cm - 5cm - 4cm. We connect all the points and get the following diagram.
Here are the shaded parts that we then cut off.
5. Now, actually, let's start making paper. To do this, you can use a regular napkin of a suitable design and size. Or corrugated paper, then the box will be plain. The square we cut out of whatman paper. grease with PVA. Here it is important to coat the entire surface well, especially the edges, but there should not be too much glue so that the napkin does not get wet.
While the glue dries slightly, iron the napkin with a hot iron so that there are no wrinkles. Corrugated paper does not need to be ironed. Then we place the napkin on whatman paper, cover it with a sheet of tracing paper and carefully iron it with an iron. I didn’t get it right the first time, it requires some skill))) This is what happens.
6. Now we cut off the excess parts of our square. We get such a figure.
7. Make cuts along the red lines.
8. Carefully bend everything using a ruler
9. We wrap the flaps and folds inward and get a nice box. More precisely, its lower part.
10. For the lid of the box, we repeat all the operations, only the dimensions of the square will be different. In our example, 2.5 cm + 3 cm + 7 cm + 3 cm + 2.5 cm = 13 cm
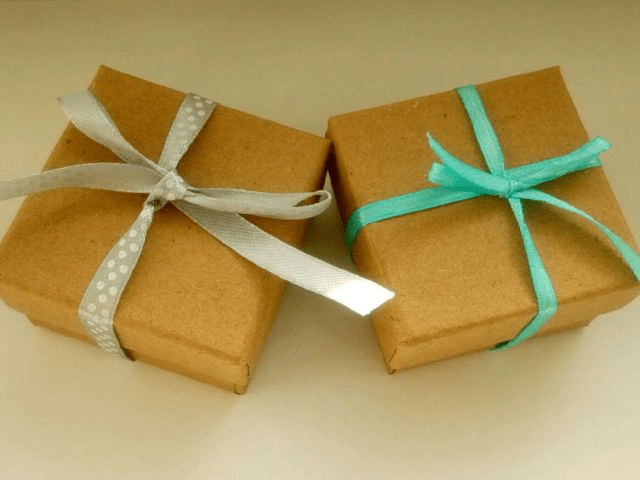
As a result of all the described manipulations, such a box appears
Everything is done quite quickly, in about an hour I did 6 of these things
And this is what the finished product might look like in beautiful packaging.
What kind of paper is needed for the box?
Paper with a thickness of 230 g is ideal for the box. If you choose matte and glossy, I recommend choosing matte. Glossy paper, unfortunately, cracks at bends, this is especially noticeable on colored rather than white paper.
Creasing (working out bends) is best done with a knitting needle, a simple pen refill that no longer writes, or a special bone.

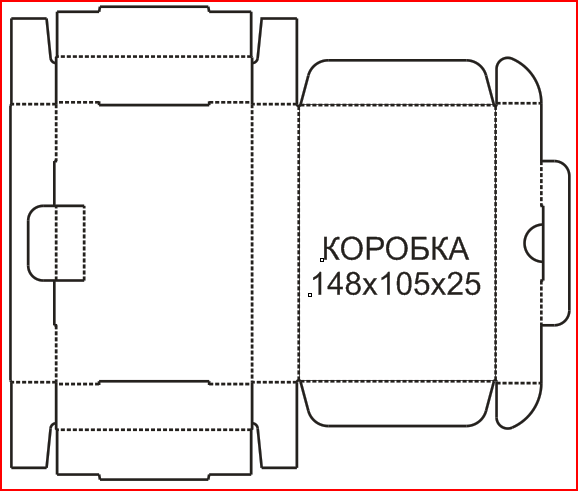
And here is the template for the box for 9 candies.


How to print a box template correctly
In the printer settings, check the box next to “Print with margins.”
There is no need to adjust it to the sheet size; the printer will display a message that part of the image will be cut off - this is normal.
That's all, now click “Print” and get the candy box template printed out.
Attention! These settings are for an inkjet printer.
The size of the box is 11.5x11.5 cm, thickness is about 2 cm. On the templates, dotted lines indicate fold lines.
And one moment. I recommend gluing the cover and side labels with double-sided transparent tape. If you use PVA glue or a glue stick, the paper may ripple, especially if you use regular office paper for labels.
And here are step-by-step instructions on how to glue a box for Bird's Milk candies. The master class was taken from craftswomen Irina.


Content
You can wrap a gift in a beautiful and original way with your own hands. The creation process itself will bring you a lot of positive emotions, and you will also save money and give a piece of your soul and love. To create a square box with your own hands from cardboard you will need very little effort, imagination, love and some tools and materials:
- cardboard (thin and corrugated);
- PVA glue, glue gun, office glue;
- tape (double-sided and regular);
- scissors and stationery knife;
- ruler;
- a pen that no longer writes;
- all kinds of decor.
Ready template
Every cardboard box starts with a template. Without it, it will be difficult for you to create beautiful and neat gift packaging. We have prepared several box templates for you that can be used not only as packaging, but also as a box for storing jewelry, threads, needles and other small items. There are a huge number of template variations; you can come up with a design yourself. Our advice to you: first try to build a box from newspaper or thick sheets of magazine, and then take on the final version.
The template needs to be enlarged to the size you want the box to be. Then you need to print it and transfer it to cardboard. The dotted lines are the fold locations. Use a non-writing pen or the thick edge of a pair of scissors to follow these lines and mark where the folds will be so that the cardboard will give in easily and bend exactly the way you want. Making a square cardboard box with your own hands is as easy as shelling pears, especially if you use designs that do not require the use of glue:
We offer several more cardboard box templates that can be created without a single drop of glue.
It's all about special "hooks" with the help of which the structure holds and does not fall apart. Well, now let's get to the decor.
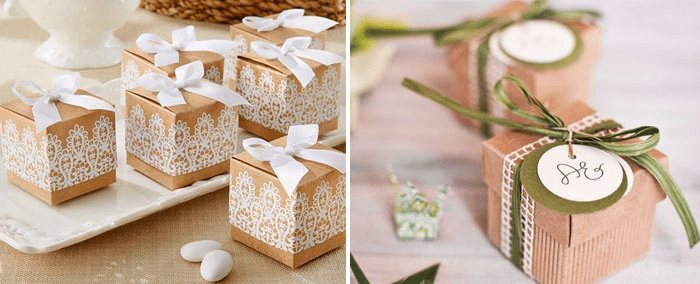
A square box made of cardboard with your own hands (especially if the cardboard is thick) can be decorated in a variety of styles and using different techniques. It could be decoupage, thick cardboard will withstand this technique, it could be a composition made using the quilling technique, flowers made of various materials. You can also use appliques, ribbons, beads, stones, rhinestones and other decor. Try to choose details in the same style so that the design does not look too rough and ugly. It is not necessary to completely decorate the box; sometimes just craft paper or the texture of the cardboard itself and an ordinary delicate satin ribbon are enough.
Don't forget to decorate the inside of the box too. Its finished appearance will depend on this. Inside the box you can put a soft satin pillow, decorate the inside with foil, wallpaper, gift paper and other materials.
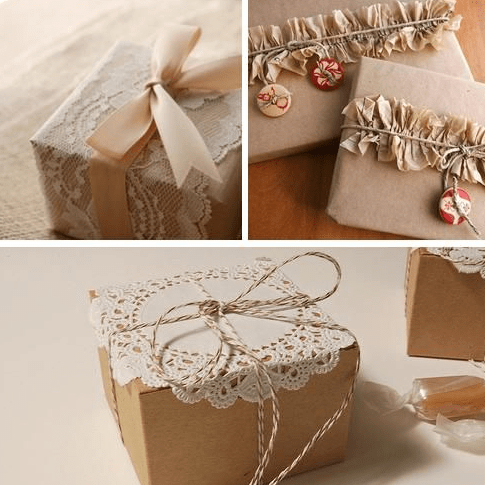
The lace material looks very beautiful in the design of the box - the packaging turns out to be in such a rustic or rustic style.
For decoration, you can also use burlap and thick wallpaper with an interesting print. Such boxes can be used to store things, small parts, and decorations. If you make partitions inside from cardboard, it will turn out to be a real organizer for jewelry, buttons and other small items, which can be presented as a gift.
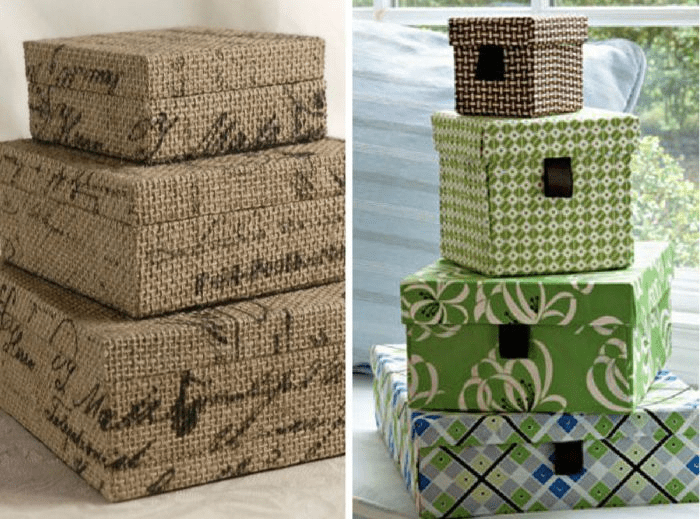
Think about the hobby that the person for whom the gift is intended is interested in. Maybe he loves traveling and the box can be decorated with stamps, he loves flowers, then use a floral theme, he is a lover of cars and technology, then use some details characteristic of this hobby.
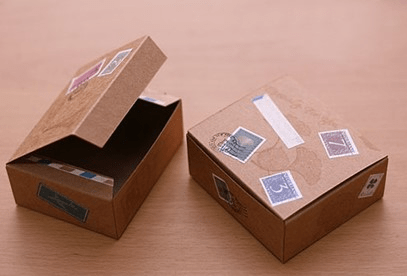
Even ordinary postage stamps can become an original design for a DIY cardboard box.

We create a template with our own hands
You can create a template for a square box with your own hands. To do this, you need to draw a square of the required size on a sheet of base material. Next, from each corner you need to draw straight lines as long as you want the height of the box to be. For the box you also need to make a lid that will be literally 2 mm larger than the packaging itself.

Use double-sided tape, PVA glue, or a glue gun to join the cardboard pattern pieces together. You can also use thin multi-colored cardboard if your gift is not too heavy.
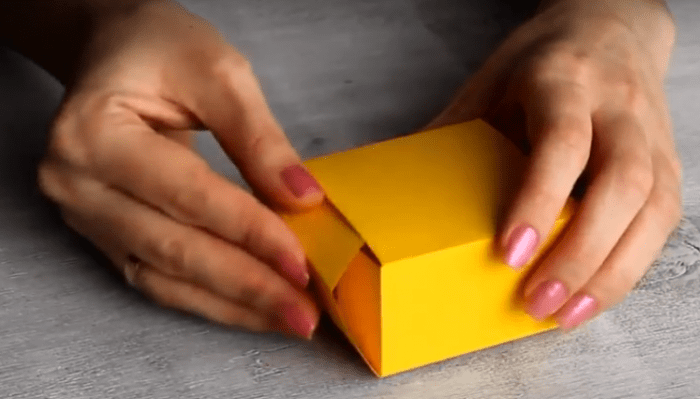
Cardboard box in the shape of a Lego piece
For this square box we will need fairly thin cardboard, which should be colored on both sides. Children will love this packaging; you can hide candy, designer toys, small children's jewelry, collectible cars and other souvenirs in it.
First you need to create a template, print it and transfer it to colored cardboard. By the way, the template can be immediately printed on colored cardboard.

Next, you need to use blunt scissors along the folds so that the cardboard bends beautifully. And then you can start creating interesting packaging. Use regular craft glue to join the pieces together.

Now you need to cut out four identical circles from the same cardboard from which you are making the box. By the way, the size of the box will depend on the size of your gift. You can even make a traditional design: a box within a box. The child will be interested in opening one box and finding a new one in it.
Now you need to take thick adhesive tape or thick double-sided tape on which we will attach our round pieces.
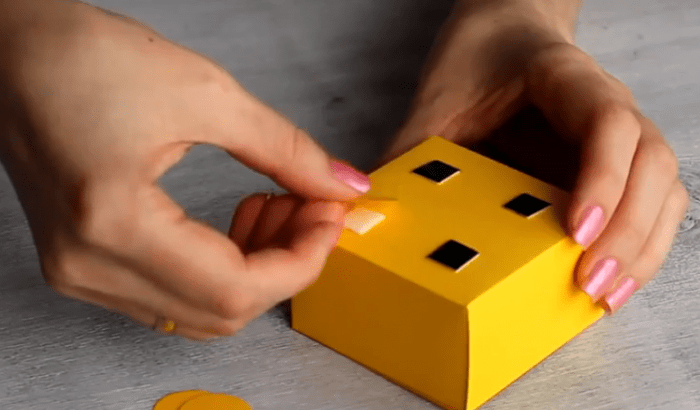
You should end up with such an interesting box in the form of a Lego constructor.

Quick box
If you need to arrange a gift very quickly, but do not have suitable packaging at hand, then you can quickly make it yourself. In this case, use thin cardboard - it is more convenient to work with and the packaging is more accurate.
First you need to cut out a square from cardboard and draw straight lines from corners to corners.

Now carefully assemble your box and secure it with glue. From a slightly larger sheet (about 5-6 mm), make a lid using the same principle.
All that remains is to decorate our packaging. If the gift is not too heavy, then you can attach a ribbon to the lid, by which you will hold the box and present the gift.
A universal selection of gift ideas for any occasion and occasion. Surprise your friends and loved ones! ;)
Greetings to all of you, dear audience. Holidays never end for us all our lives - as soon as Someone’s Birthday has passed, the New Year has already arrived, and then there are other winter-spring holidays... And for each of them we give gifts that we want to present at least interestingly. And what if not a DIY gift box will help with this?
I myself really like to congratulate my relatives in an original way. It’s very nice to see the smiles of those you congratulate. And cute boxes always contribute to this! After all, they are the first thing that catches your eye when presenting a gift.
How to make a gift box with your own hands
Gift packaging can be very diverse. But there is one rule - the cardboard or paper from which you want to make a box must be of the required quality. In this sense, classic children's cardboard is far from suitable.
Where can I get such cardboard or paper? First of all, in specialized stores for creativity or even scrapbooking separately. It’s good if there is such a store in the city, you say, but what if you don’t have one at hand or the prices are sky-high?
These leaves will be enough for you to make small souvenir boxes (for jewelry, sweets, toys, etc.). Your family will appreciate it
And now I suggest you proceed to the actual detailed photo master classes, which will also include a diagram for creating each individual box.
Master classes on creating boxes from cardboard and paper
Small boxes
First of all, I want to give you 5 designs with very cute patterns that will make this wonderful packaging:

The first one has red roses. If you want to impress your lover, then she is definitely for you.
Principles of working with templates:
- Print the layout you like on thick paper.
- Cut out the future box along the contour and cut in those places where there are straight lines (focus on the light scans - the location of the lines is the same everywhere).
- Fold the box along the dotted lines and glue it so that the parts with semicircular ends lie between the other two and the round ends point up.
- That's it, all that remains is to bend the lid properly.


And again roses, but more delicate.

And now there are two options for Birthdays - candies with balls and lollipops.


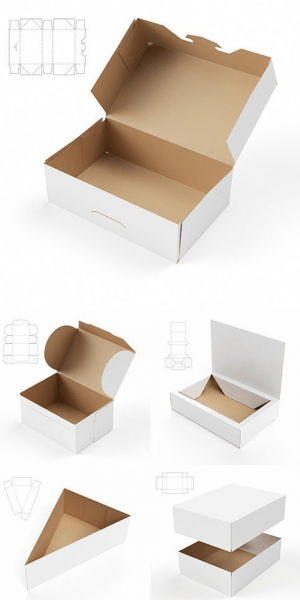
Large rectangular
This is perfect for large gifts (for example, wall clocks). You will need specialized binding cardboard to make the box really convenient. By the way, binding cardboard can also be purchased in specialized stores or on Ali.
The incision sites are marked in orange. The lid can be made the same way, but with slightly larger dimensions (2-3 mm).

For a man
If the gift is intended for a man, then I suggest choosing one of the following options.
Simple shapes are on trend - this is proven by the following 4 templates for creating strict, classic boxes. For these you will again need thick cardboard.


If the gift is intended for a loved one, then there should be more than enough romance ^^ There are butterflies, hearts, and all kinds of declarations of love. They can be made from thick cardboard or thick paper.

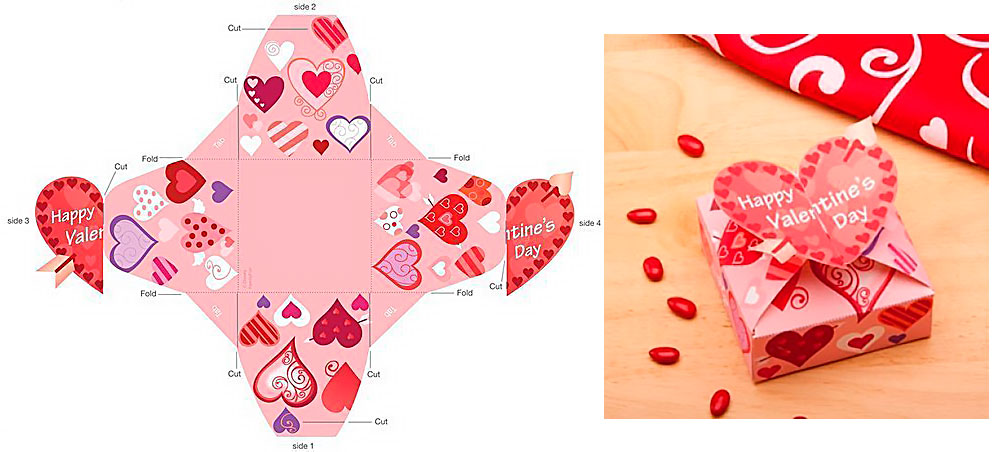

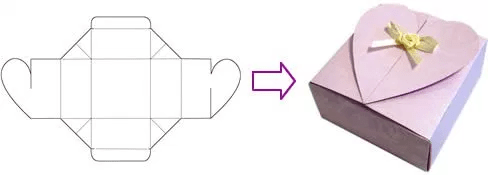
Heart
Heart boxes are very popular because you can use them to express your feelings. Or admit them


Cake
Are you getting ready for a party where everyone will need to be given a little surprise? Or maybe a wedding is planned? In both cases, cardboard pieces of cake will come to the rescue.
A beautiful and clear diagram is suitable for both the bottom and the lid.

Paper boxes
Boxes don't always need to be dense - sometimes it's enough just to create a beautiful picture. Then I suggest you use this convenient scheme of 6 different packages:

If you are going to a child’s party (or maybe you want to please your child), then make him a cute box in the shape of an animal.

Give such a boot to happy parents. Follow the traditions: pink for girls, blue for boys.

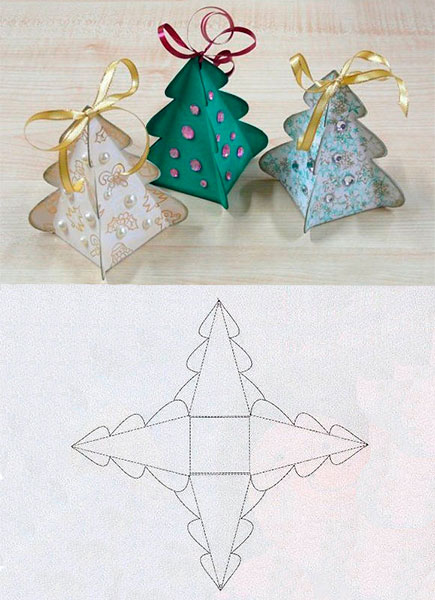
Boxes for the New Year
The mood can be created not only with the help of gifts) Just look at these 8 lovely boxes, each of which can also become an excellent New Year's decoration
This is especially necessary if for some reason there is no New Year's tree. The main thing in this packaging is to trim the edges beautifully and neatly.
Snowflake
Of course, this box itself is wonderful, but the silver paint on the tips of the snowflakes can add some zest.
Tip: Give something in this package to a girl who loves Frozen.

Bag
For giving a gift - one of the simplest options.

Box of sweets
For all lovers of beautiful New Year's favors and quick handmade items! Take a plastic cup with a smooth surface, cut the edge and cut the edge.
Fold the cut pieces inward so that they cling to each other. Place some goodies inside and cover the top with something cute.

Another option for candy packaging is a donut. It is a little more labor-intensive, but more effective.

And, of course, the candy itself.

A slightly more modest pyramid from which you can build a geometric Christmas tree. 
A few more boxes
Finally, there are 3 more boxes for you that did not fit into the previous groups.


How to decorate a box with your own hands
The design of the box can be very diverse - from simple shapes in the form of birds and hearts to intricate flowers and bows. I will write more about box decor in the future - don’t miss it.
In the meantime, subscribe and comment - see you soon!
Sincerely, Anastasia Skoracheva
On the eve of the New Year holidays, store windows are full of gift boxes, decorative bags, and wrapping paper for every taste. Smiling sellers helpfully offer to provide wrapping services for New Year's gifts. And all this seems great, because you must admit, it’s much nicer to receive a New Year’s trinket in a beautiful package. But on the other hand, the whole meaning of the gift is lost, the very gift that should be intended specifically for you.
The recipient of the gift will be doubly pleased if, in addition to choosing the gift, you spend a little more time on wrapping it. In this article we will teach you how to make gift boxes from paper or cardboard with your own hands. This is not at all difficult to do, because all the crafts presented with us are accompanied by ready-made diagrams, templates and step-by-step master classes. All you have to do is choose the appropriate box option, print out the diagram and glue the paper box together according to the instructions. By the way, some of the boxes we present are made using the origami technique, which means that you don’t even need glue!
So, before we get started, let's check if everything is ready. To make a paper gift box with your own hands, you will need: beautiful wrapping paper (you can get by with plain white paper and then decorate it), scissors, pencil, ruler, glue or double-sided tape, and a stationery knife. Everything is? Well then, let's create!
#1 Box “Herringbone”
A great way to pack a small trinket for friends or family is this New Year's themed box. By the way, it’s very easy to do. You'll need green paper and hole punchers (although you can do without). Well, any rhinestones, beads, sequins are suitable for decoration, in general, to your taste!
#2 Gift box “Mint Candy”
And here is another original version of a gift box, which you can very easily make with your own hands, especially with our step-by-step master class. You will need red construction paper (for the box itself), as well as white paper for decoration. You can make the upper part of the box with applique or simply color the white sheet with pencils or felt-tip pens. By the way, there doesn’t have to be a lollipop on top. You can get creative with a New Year's theme and decorate the box on top, for example, with a snowflake, a Christmas ball or red angry M&M's.

#3 Box with lid (diagram)
Well, if you don’t have the time or desire to tinker with the box for a long time, you can use a simple ready-made template. You need to download it, print it, cut it and glue it. Voila, the box is ready! Please note that we have prepared 2 diagrams for you: square (size 5x5) and rectangular (size 7x6x4).

#4 Cup with a gift
But here is a gift packaging option for those who want to surprise with originality - a gift box-cup. It's quite simple to do, but looks impressive! To create, you will need thick paper, scissors and glue. And of course our step-by-step instructions!
#5 New Year's box “Cake”
If the New Year's party is planned in a large company, for example with a large family, it makes sense to pack gifts for everyone in one large multi-pack box. The cake packaging box consists of 8-10 pieces, each of which is a separate paper gift box.

#6 Gift box with lid for muffins and other small items
During the New Year holidays, edible gifts are quite common: various sweets and baked goods. An original gift will be a muffin prepared with your own hands in a designer gift box.

#7 New Year's box “Diamond”
You can pack a New Year's gift in a diamond-shaped gift box. With our scheme, making such intricate packaging will not be difficult. All you have to do is print out the box template, cut it out and glue it according to the instructions. It's simple!

#8 New Year's packaging "Santa"
A very cute New Year's package will be made from a regular paper bag, decorated with a paper Santa. Download the Santa pattern, cut it out and glue it onto the bag. DIY Christmas packaging is ready!

#9 Boxes “Harry Potter”
Fans of stories about Harry Potter will be indescribably delighted when they receive a piece of their favorite hero as a gift. By the way, such a box with magic sweet beans can be a wonderful addition to a set of books about the adventures of a young wizard.

#10 Box “Gingerbread House”
The symbol of the Christmas and New Year holidays, well known to everyone from Hollywood films, is the gingerbread man. You can make a paper box in the shape of a gingerbread man's house. By the way, putting the gingerbread men themselves in such a house will be very symbolic, but if you also make them with your own hands, there is no price for such a gift at all! The “Gingerbread House” box is made according to a special pattern, which you can download below. Also below is a master class on making a box with your own hands.
New Year's time is coming - a time of miracles, when everyone can feel like a little helper...
#11 Box “Heart of four parts”
A cute package consisting of four boxes can be made using our pattern. Giving your loved one not one, but four New Year's gifts at once is a true manifestation of love. You can download the diagram with four boxes and the base for them below.

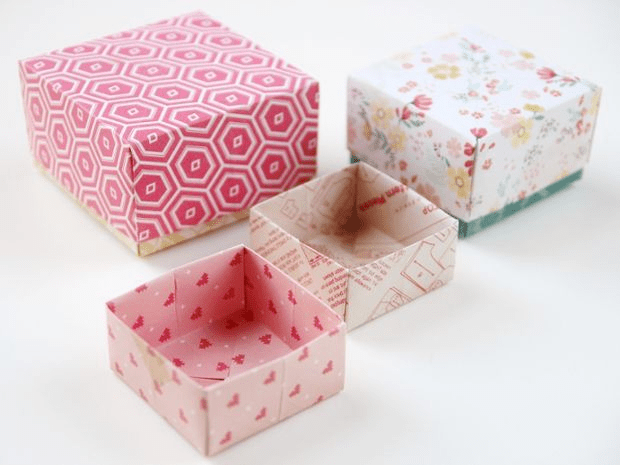
#12 Box made using origami technique
To make such a gift box you will not need a diagram or template. To make a paper box with a lid, you only need a sheet of paper. The main condition is that the sheet must be square. Strictly follow the instructions of the master class and in 10 minutes you will have the cutest origami gift box made by yourself.

#13 And another option for an origami box
This box is very similar in appearance to the previous one, but the manufacturing method is slightly different. To make this box you will need scissors, but you don’t need a diagram: just a square sheet of paper. Follow the instructions of the master class and you will succeed!

#14 Box using origami technique “Volume Triangle”
If you want to get confused and ready-made templates are not for you, then be sure to pay attention to this complex and very impressive gift box. You will need paper and patience. Well, then follow the instructions and everything will work out!
If you like to make gift boxes without templates, glue and scissors, but only with the help of the correct folds of paper, then you will appreciate this box.
#16 Closing box using origami technique
Well, another version of the box using the origami technique. It's quite easy to do, especially if you follow the instructions. By the way, the steps of making the box are described below in the photo instructions.
#17 Box “Cupcake”
An original gift packaging for a New Year's gift will be a box in the shape of a cupcake. It looks very impressive, but it will take a little work to create. In general, there is nothing complicated in creating this box; you just need patience and imagination! See the step-by-step master class below.

#18 And another "Cupcake"
And here is another variation on the theme of a gift box in the form of a cupcake. The manufacturing scheme is very similar to the previous one, but you might like it!
#19 Gift box for cookies
A ready-made diagram for making a cardboard box with your own hands. All you need is to use our ready-made diagram, which you need to print, cut out of cardboard, and then glue it together in accordance with the master class.

#20 Chinese style gift box
You can put anything you want in this handmade box. And most importantly, it is done quickly and simply. You can download the box diagram from the link below.
Download the diagram

#21 Gift box in the shape of a cup

Truly original packaged gifts are valued much more than gifts in a regular gift bag. Pay special attention to this charming paper box, which you can make with your own hands using our pattern.
How to make a cup

How to make a lid

#22 Box “New Year's Sweater”
This beautiful gift box can be made with your own hands. To do this you will need a diagram, which you can download on our website, scissors, glue and a little patience.

#23 Box with bow closure
Quite simple to make, but very original gift box. You will need a square sheet of wrapping paper, glue and instructions from the master class. 15 minutes - and your gift box is ready!

It’s very easy to make a cardboard box for a New Year’s gift, but for this you will need not only cardboard, but also scissors (a stationery knife) and glue or double-sided tape (for secure fixation). Below is a step-by-step manufacturing master class, following which you can quickly and easily make a cardboard box with your own hands.

If you want to give a delicious gift in the form of cupcakes or muffins, then a paper egg tray would be the ideal packaging for such a gift. Cut the required number of compartments, decorate the top of the box with decorative elements, tie with a ribbon and Voila! The gift is ready!

You may be interested in:
#26 Original box “Milk package”
Another incredibly cool New Year's box that will amaze anyone. You can pack a simple trinket in such an unusual box. It’s quite simple to make it if you use a ready-made diagram, which you can download on our website.

#27 Box with lid
Using our simple pattern, you can easily make a gift box with a paper lid with your own hands in just a few minutes. You can put anything in such a box as a gift: from a cute trinket to handmade sweets. You can download the box diagram below.

#28 Packaging box with flower clasp
A simple design for a cute packaging box with a flower clasp. Fast, beautiful, original. Please your loved ones with a handmade gift. You can download the finished diagram from the link below.

#29 Gift box “Petals”
You can make a wonderful box for a New Year's gift with a petal-shaped lid with your own hands. In fact, making such a charm not only won’t take much time, but will also delight you with its cutest quality.
#30 Gift box for New Year's cupcake
You can make a very cute cardboard box with your own hands. It will turn out no worse than store bought. You can make a special bottom for the cake in the box. By placing your little delicious gift in a special stand, you don’t have to worry that all the cream will remain on the box. To make such a cardboard box with your own hands, you need to print the template and follow the instructions of the master class.

#31 Gift box for children “Ice cream”
A New Year's gift should be packaged not just well, but with taste. In the “Ice Cream” gift box, your gift will be appreciated! With our scheme, making a delicious box will only bring pleasure!

#32 Packaging box “Candy”
Another option for “delicious” packaging would be a candy-shaped box. To create a New Year's atmosphere, the packaging can be slightly enlivened by adding eyes and a mouth. Download the diagram, print it and glue the box in the right places.

#33 Gift box “Cheerful Bunny”
You always want to give a special gift to your dear and close people. And it’s best when this gift is not only special, but also in special packaging that emphasizes the significance of a particular person. Making such a paper box with your own hands is not difficult if you download the diagram from the link below.
Download the diagram

#35 Box “Funny Frog”
Another very cheerful and positive box for New Year's gifts is “Cheerful Frog”. It’s done quickly and gives a lot of emotions! Download the diagram and please your loved ones with a merry New Year's box.

#36 Box with a face
You can also pack a gift in an original way in a box made of plain white paper, adding some details on it in the form of eyes and a mouth, thus bringing the gift to life. With our ready-made diagram, making such a box is not at all difficult. Just download the diagram, print and glue.

#37 Gift box “Birdhouse”
Let's start with, perhaps, the most unusual paper gift box. Making such a birdhouse is quite simple when you have a ready-made diagram. The diagram needs to be printed, transferred to suitable paper, cut out and glued in certain places. Complex and intricate at first glance, DIY boxes will be ready in 10-15 minutes. 
#38 Box “Apple”
A gift in a paper box in the shape of an apple will be original. With such a box, choosing a gift is quite easy - gelatin worms will come in handy. Making such a box with your own hands with the appropriate diagram is very simple, the manufacturing process will take no more than 10 minutes!

#39 Box “Christmas wreath”
There is no limit to your originality, we just give you direction, and then you create on your own. You can come up with many New Year-themed boxes, for example, in the form of a Christmas wreath. Very symbolic!
Well, what would a real New Year be without the Nutcracker and music from the famous ballet by P.I. Tchaikovsky? A great gift would be a bag of nuts with a nutcracker tag attached. You can draw the fairytale hero yourself, but if you have no inclination to draw, you can find an image of the Nutcracker on the Internet and print it, then cut it out and attach it to the bag.


