Star news


Smeshariki crochet applique patterns. Schemes and descriptions of crochet applications
Crochet appliques “Teddy Bear” 
Teddy Bear is one of the favorite children's characters. Girls especially love him. The soft toy Teddy protects the baby's sleep all night, but what about during the day? This is where our application comes to the rescue.
For work, we need to prepare: 50 g of blue and gray yarn (composition 40% wool, 40% acrylic, 20% bamboo), 4 black beads, hook No. 2.5, and a needle with a wide eye.
We collect a chain of 3-5 air. pet., close it into a ring and begin to knit in circular rows, as the diagram shows. 
In the first row we knit 10 single crochets, then connect them to the first half-crochet. In the second row we dial 2 air. pet., after which we knit with a double crochet. To form a circle, the number of loops must be increased. We finish the row again with a half-column.
The last circular row of the muzzle must be tied to the post. without a crochet, alternating 2 and 1 single crochet. Finish the half-column row.
Let's move on to knitting the ears. To do this, cut the gray thread and attach the blue one. We knit 4 single crochet stitches, then turn the product with the wrong side and make 4 more stitches. without a crochet. We fasten the thread and cut it.
We tie the ear with gray yarn in a single crochet. At the tops on the far left and right are blue pillars. Single crochet we knit 3 stitches. without a crochet. We do not break the thread, but knit 3 columns. without crochet over the head of the product.
We pass a blue thread through the loop and knit the inner part of the ear, then we tie it in the same way as the first one. Fasten the thread and then cut it.
The bear is almost ready. All that remains is to make the muzzle. We fold the blue thread in half and then thread it through the needle. We make 5 stitches where the spout should be. Mark the mouth with a couple more stitches. Sew the beads in place of the eye and that’s it, the Teddy Bear is ready. Now he will always be next to the baby.
Crochet applique “Owl”

The image of a small owl bird can decorate the clothes of both boys and girls. It's not at all difficult to knit.
So, we need to prepare: yarn of brown, yellow, black colors; a matching hook, a needle, and 2 small buttons.
We dial 4 air. loops of brown yarn, then close the chain into a ring. We will knit in circular rows, each of which ends with a connection. pillar. We tie the resulting ring with 2 pillars. Single crochet in each stitch.
We do the second row in the same way as the first.
In the third row and further, between the double pillars. without crochet we knit 1 column without crochet. Then we continue knitting the owl according to the pattern.

When the owl's body and head are ready, we make the beak with two stitches of yellow yarn, and then sew the buttons in place of the eyes. Now the owl can take its place on clothes or toys for children.
Crochet appliques "Ladybug"

“Ladybug” or simply “Sun” is a small insect that delights children. It can only be found in wildlife during the warm season, but as a decoration for clothes it will always delight a child.
For work you need to prepare: leftover yarn in black and red, a corresponding hook and black sequins for finishing.
We start knitting “Sun” from the wings. They, in turn, consist of two petals. The diagram shows how to knit a petal.

We fold the finished petals with their right sides inward and, slightly retreating from the edge, connect them on one side with a single crochet. We open the wings and, without tearing off the thread, tie the entire part in a circle, single crochet.
In the place where the head will be, we align the “Ladybug” applique with a pillar. double crochet and conn. pillar. with 2 yarn overs. We knit the head with a black column. single crochet, half double crochet and post. double crochet
To make a butt, attach a thread from the wrong side and knit 1 air. loop, 6-8 columns. double crochet in one loop and connect. pillar. in one loop. Decorate the wings with sequins. The ladybug is ready.
Crochet appliques “Anchor”
An anchor is an indispensable structure in the life of a real sailor. Every young sailor will definitely be happy if an anchor becomes an adornment of his clothes.
To work, you need to prepare yarn and a hook for it. In the pattern, the anchor is crocheted with a post. without a crochet, but in order for the product to be openwork, we will replace them with a connection. columns. 
The names of the anchor elements, they will be used later in the text. 
We make a sliding loop into which we knit the 6th post. without a crochet. Then, after 4 air. pet., knit 1 pet. lifting and 3 connections pillar. This will be our left armature rod.
Next we knit the spindle. We do 6 air. pet., then 1 pet. lifting and returning along the chain, 6 connections. pillar. Next from 3 air. pet. we knit picot.
Let's move on to the right horn. Do 6 airs again. pet., then a lifting loop and 6 connections. pillar.
We knit the anchor further - now we make the spindle again. We return along the chain, creating 6 connections. column., after which we move on to knitting the left stock.
We start it with 3 air loops, then knit a lifting loop, return along the chain and finish its connection. pillar.
When finishing knitting the product, we make a connection. pillar. into the chain in front of the ring, cut the thread and hide it on the wrong side
Crochet applique “Machine”
Every boy will always like a clothing accessory in the form of a car. Knitting consists, as usual, of chains.
What do we need to work? Leftover yarn of different colors and a hook for them.
To knit the main part we dial 13 air. pet., and then continue according to the scheme.
Knitting pattern for the “Machine” applique

When the main part is ready, we do not break the thread, but proceed to tying it around the post. Single crochet in each stitch. We make 3 pillars in the corners. Single crochet in each stitch. In arches made of air. loops in each of the air. We knit loops along the post. without a crochet.
Those. where 5 air. loops should be 7 columns. without a crochet, and where is 8 air. loops - 8 columns. At the end of tying, cut the thread and fasten it.
We knit the wheels according to the pattern and sew them to the main product.

That's it, the machine is ready!
Crochet applique “Dolphin”
The dolphin is a smart mammal. He is said to have intelligence. In addition to the fact that the dolphin can perform various tricks that delight children, it is also a healer for many diseases.It is this wonderful animal that we will try to knit. Following the pattern, you will get a charming applique that will become a pleasant memory for your baby or even a secret friend.
Crochet pattern "Dolphin"

As it turns out, crocheted appliques are much more beautiful than woven ones. It’s very nice to create them with your own hands and sew them on your baby’s clothes.
A selection of 20 application patterns


Do-it-yourself appliqué is one of the techniques that can change objects around us beyond recognition. Decoration of clothing, home textiles, accessories, creative leisure with children - all these categories of activities can be covered with just one application. Anything can serve as a material for it! The pages of our website contain a large selection of master classes, diagrams, decor ideas and crafts on this topic. Ozna
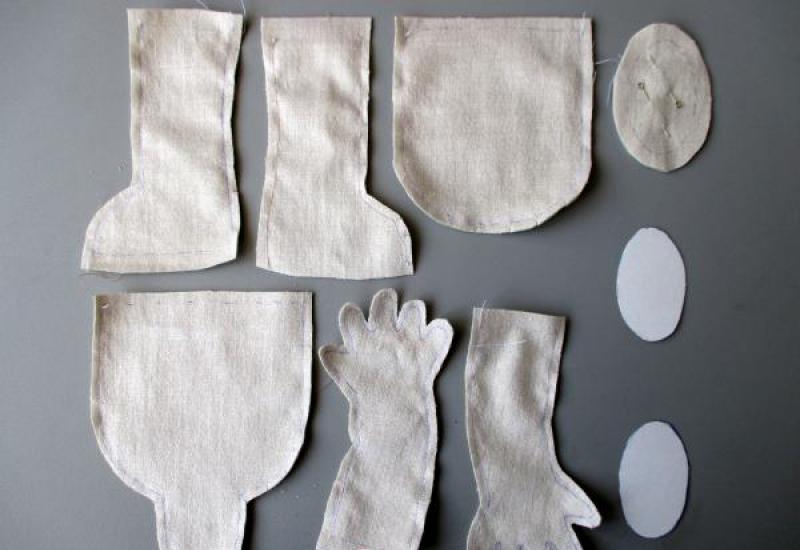
Do you want to make something cute with your own hands for Easter, but you realize that you are sorely short of time? Take advantage of the idea of needlewoman and designer Tuula Maaria and crochet a rabbit. How to tie a rabbit...
Knitted applique is incredibly good for decorating children's clothing. You can knit this very quickly using leftover yarn. Do you want to learn how to knit something like this? Welcome to the cat! Why do you need crochet applique? Uh...
Easter is wonderful! This is a holiday when you want to be purer, kinder, when your soul demands love and is ready to love everyone around you, when you share everything you have, give everything you have. Isn't it logical to prepare for this day...
Great Lent is a simple marker of the fact that very soon we will all be celebrating Easter - a holiday incredible in its warmth, comfort, warmth and joy. So that it leaves its mark on the soul, so that it is not just delicious, etc...
Do you have children? If so, then in addition to children, you probably have a couple of things that your offspring managed to get dirty, putting several stains in the most visible places. Sad and sad, but not hopeless. Exit es...
Crocheted or knitted fruits are decorative and appetizing! For example, a knitted cherry: a couple of berries will transform anything. Will decorate any clothes from hats to socks, become earrings or a hair tie, decor...
Summer! It cannot help but delight - look how the heavy heads of garden peonies nod to your right, how sparrows sing songs to your left, hiding in the thick cherry greenery, how tender flowers flutter right in front of you...
Appliqués are one of the best ways to decorate clothes. This is especially true for children. Clothing with a favorite cartoon character or just a cute little animal becomes a favorite, and the child wears it with pleasure. Suitable pictures can be bought in the store, but it will be better if you crochet the appliqués.
This article presents many models of appliqués that will find their place not only on children's clothing, but even on adult clothing. Knitting in this case mainly consists of chains that mostly go in a circle.
Crochet applique “Teddy Bear”
Teddy Bear is one of the favorite children's characters. Girls especially love him. The soft toy Teddy protects the baby's sleep all night, but what about during the day? This is where our application comes to the rescue.
To work for us needs to be prepared: 50 g of blue and gray yarn (40% wool, 40% acrylic, 20% bamboo), 4 black beads, hook No. 2.5, and a needle with a wide eye.
We collect a chain of 3-5 air. pet., close it into a ring and begin to knit in circular rows, as the diagram shows.
In the first row we knit 10 single crochets, then connect them to the first half-crochet. In the second row we dial 2 air. pet., after which we knit with a double crochet. To form a circle, the number of loops must be increased. We finish the row again with a half-column.
The last circular row of the muzzle must be tied to the post. without a crochet, alternating 2 and 1 single crochet. Finish the half-column row.
Let's move on to knitting the ears. To do this, cut the gray thread and attach the blue one. We knit 4 single crochet stitches, then turn the product with the wrong side and make 4 more stitches. without a crochet. We fasten the thread and cut it.
We tie the ear with gray yarn in a single crochet. At the tops on the far left and right are blue pillars. Single crochet we knit 3 stitches. without a crochet. We do not break the thread, but knit 3 columns. without crochet over the head of the product.
We pass a blue thread through the loop and knit the inner part of the ear, then we tie it in the same way as the first one. Fasten the thread and then cut it.
The bear is almost ready. All that remains is to make the muzzle. We fold the blue thread in half and then thread it through the needle. We make 5 stitches where the spout should be. Mark the mouth with a couple more stitches. Sew the beads in place of the eye and that’s it, the Teddy Bear is ready. Now he will always be next to the baby.
“Butterfly” application for beginners: video master class
Crochet applique “Owl”
The image of a small owl bird can decorate the clothes of both boys and girls. It's not at all difficult to knit.
So, we need to cook: yarn of brown, yellow, black colors; a matching hook, a needle, and 2 small buttons.
We dial 4 air. loops of brown yarn, then close the chain into a ring. We will knit in circular rows, each of which ends with a connection. pillar. We tie the resulting ring with 2 pillars. Single crochet in each stitch.
We do the second row in the same way as the first.
When the owl's body and head are ready, we make the beak with two stitches of yellow yarn, and then sew the buttons in place of the eyes. Now the owl can take its place on clothes or toys for children.
Owl for decoration: video master class
Crochet appliques "Ladybug"
“Ladybug” or simply “Sun” is a small insect that delights children. It can only be found in wildlife during the warm season, but as a decoration for clothes it will always delight a child.
For work needs to be prepared: leftover yarn in black, red, matching hook and black sequins for finishing.
We start knitting “Sun” from the wings. They, in turn, consist of two petals. The diagram shows how to knit a petal.
We fold the finished petals with their right sides inward and, slightly retreating from the edge, connect them on one side with a single crochet. We open the wings and, without tearing off the thread, tie the entire part in a circle, single crochet.
In the place where the head will be, we align the “Ladybug” applique with a pillar. double crochet and conn. pillar. with 2 yarn overs. We knit the head with a black column. single crochet, half double crochet and post. double crochet
To make a butt, attach a thread from the wrong side and knit 1 air. loop, 6-8 columns. double crochet in one loop and connect. pillar. in one loop. Decorate the wings with sequins. The ladybug is ready.
DIY “Bear” applique: video mk
Crochet appliques “Anchor”
An anchor is an indispensable structure in the life of a real sailor. Every young sailor will definitely be happy if an anchor becomes an adornment of his clothes.
To work, you need to prepare yarn and a hook for it. In the pattern, the anchor is crocheted with a post. without a crochet, but in order for the product to be openwork, we will replace them with a connection. columns.
The names of the anchor elements, they will be used later in the text.
We make a sliding loop into which we knit the 6th post. without a crochet. Then, after 4 air. pet., knit 1 pet. lifting and 3 connections pillar. This will be our left armature rod.
Let's move on to the right horn. Do 6 airs again. pet., then a lifting loop and 6 connections. pillar.
We start it with 3 air loops, then knit a lifting loop, return along the chain and finish its connection. pillar.
When finishing knitting the product, we make a connection. pillar. into the chain in front of the ring, cut the thread and hide it on the wrong side
Crochet applique “Machine”
Every boy will always like a clothing accessory in the form of a car. Knitting consists, as usual, of chains.
What do we need to work? Leftover yarn of different colors and a hook for them.
To knit the main part we dial 13 air. pet., and then continue according to the scheme .
Knitting pattern for the “Machine” applique
When the main part is ready, we do not break the thread, but proceed to tying it around the post. Single crochet in each stitch. We make 3 pillars in the corners. Single crochet in each stitch. In arches made of air. loops in each of the air. We knit loops along the post. without a crochet.
Those. where 5 air. loops should be 7 columns. without a crochet, and where is 8 air. loops - 8 columns. At the end of tying, cut the thread and fasten it.
We knit the wheels according to the pattern and sew them to the main product.
That's it, the machine is ready!
Machine for decorating the finished product: video mk
Crochet applique “Dolphin”
The dolphin is a smart mammal. He is said to have intelligence. In addition to the fact that the dolphin can perform various tricks that delight children, it is also a healer for many diseases.
It is this wonderful animal that we will try to knit. Following the pattern, you will get a charming applique that will become a pleasant memory for your baby or even a secret friend.
Crochet pattern "Dolphin"
As it turns out, crocheted appliques are much more beautiful than woven ones. It’s very nice to create them with your own hands and sew them on your baby’s clothes.
A selection of 20 application patterns

Every mother wants to decorate her baby’s clothes, so let’s look at how to use crochet appliqués with patterns.


Appliques are a wonderful decoration. Little children love clothes decorated with cartoon characters or fairy tales that are read to them. Increasingly, outfits from designer collections are decorated with crocheted appliqués. A knitted applique will come in handy if your child tears his clothes. It will be easy to cover the hole. But that's a side bonus.
Mothers knit all kinds of knitted appliques to decorate children's clothing based on the ideas that fashion magazines and the Internet offer them.
How, for example, can you decorate clothes for a boy so that he likes it? This is what the child is passionate about. Any boy will love a car.
Let's consider several schemes. Here is the first one:

Crochet a passenger car
In front of us is a passenger car. To complete this you will need threads of two colors (any kind you have) and two black buttons that will serve as wheels.
We knit a chain of thirteen air loops and three loops for lifting. We tie the chain with columns in such a way that we knit six columns into the outer loops for rounding. We knitted the lower part of the car, in the picture it is blue. Now you need to connect the cabin. Carefully set aside the thread of the main color and start working with the yellow one. White will also do, it will be a window. We start with the third stitch from the edge, tie a new thread to it and knit seven single crochets, an air loop for turning and again seven single crochets. The third row also starts with a chain stitch, but there are six single crochets. We unfold the work, chain stitch, single crochet, half double crochet, double crochet, half double crochet, single crochet. Cut the thread and fasten it, and then hide the tip. Now you need to return to the thread of the main color. Tie the top of the machine with half-columns. Cut the thread, seal and hide the tip. To make such an applique look more attractive, it needs to be steamed well with an iron.
How to crochet an airplane for a cap
We start knitting with five air loops, connect the first with the last, we get a ring. This will be the nose of the plane. We knit according to the pattern: three air loops for lifting and five double crochets in a ring of air loops. Reversal of work, again three air loops for lifting and six double crochets. Reversal of work, one chain stitch, two half-stitches, a double crochet stitch, a double crochet stitch, two double-crochet stitches. Now we begin to knit the body of the airplane: twelve air loops and one air loop for lifting. Unfold the work and knit three half stitches, three double crochets and double crochets, join the next three double crochets, three more double crochets to attach the nose, three chain stitches, a double crochet. Unfold the work, chain stitch, half stitch, double crochet, nine double crochets, five stitches. The nose and body are ready, let's move on to knitting the tail. Four air loops and one for lifting, connecting loop. half-column, double crochet, two double crochets (half tail is ready), four chain stitches, one lifting loop, connecting loop, half double crochet, double crochet, double crochet. Now you need to get from the tail to the place where the wing will be. To do this, we tie eight loops along the body towards the nose. We begin to knit the first wing: eight chain stitches, two for lifting, a turn, two stitches, two stitches with two crochets, four stitches with three crochets. Fasten the thread, cut it, hide the tip. (Bottom arrow). For the second wing, in the place of the unshaded arrow, we tie a thread and knit six air loops and two for lifting, three columns, two double crochets connected to each other, a double crochet stitch, a connecting loop. Cut the thread and fasten it, hide the tip. The plane is ready. Now you need to iron it and sew it onto either a cap or a jacket pocket.

Jewelry for girls
There are even more opportunities for girls. These are birds, and animals, and flowers, and bows.
A very simple applique is an owl. Below is an image of the finished owl and a diagram:

Knitting begins with four air loops, which are closed into a ring, one air loop and a ring of air loops are tied with eight half-columns, an air loop and twelve half-columns, an air loop and sixteen half-columns, an air loop and twenty-four half-columns. The body is ready. Let's move on to the head. Three chain stitches, two double crochet stitches, a double crochet stitch, a double crochet stitch, a double crochet stitch, two double crochet stitches, three chain stitches, two double crochet stitches, four half double crochets, one double crochet stitch and two double crochet stitches. There is an owl in front of us. You just need to sew on two white buttons that will represent eyes and embroider a mouth with red thread.