Star news


 My life and soul in Latin")
New Year's toys for the Christmas tree from scrap materials. A large review of children's crafts made from garbage for school and kindergarten. DIY New Year's toys made from garbage.
What could be better than homemade Christmas tree decorations, especially since you can easily make beautiful New Year's decorations from scrap materials (junk, in some cases almost from garbage).
What exactly can you make an unusual toy from? - look below.
Unusual DIY Christmas tree decorations from scrap materials
I'll start with the option that lies on the surface (for those who have children or still have their own toys). The idea is this: you need to screw a loop into an old toy in the shape of some animal (for example: a lion, horse, etc.) or a car, then paint the toy or cover it with glitter. Thread a thread through the loop and that’s it - the beautiful toy is ready.

Mosaic can also be classified as a handy material and can be used to make a good New Year's toy. You heard right from the details of the mosaic. Simply paint the mosaic pieces in the colors you want: red and white to create the lollipop and snowflake toys, or brown and white to make the deer's face. True, you will additionally need to glue a hanging rope, a bell, eyes and a nose.


If you have large mosaic pieces, you can draw an angel or something else on them.

Do you like to eat ice cream on a stick? - don’t throw away the sticks and you can use them to make a beautiful Christmas tree decoration. For example, such a cute snowman as shown below.

Or such an angel girl toy.

Speaking of sticks, you probably won’t have any difficulty finding twigs. Believe me, Christmas tree decorations made from branches deserve attention. Just cut the branches to the desired size and glue them into the desired shape: a snowflake, a Christmas tree or a star. The finished toy can be left as is, or it can be painted, covered with glitter or artificial snow.


In addition, you can make a large star from the branches that will decorate the top of the Christmas tree.

Is it a pity to destroy trees? - use straws for cocktails. Even if you don’t have them at home among the available items, you can always buy them in the store (they are not expensive). You can make a simple snowflake from the tubes or something more complex.

And here is an example for you to inspire a feat - a beautiful Christmas tree toy comes out of tubes, it seems that it is difficult to make it with your own hands. But as you can see in the photo, the instructions are all very simple. So experiment!

Another brilliant idea to make a Christmas tree toy with your own hands quickly and easily deserves attention. Use cookie cutters to cut out shaped cookies. Tie beautiful threads or ribbons to them and hang them on the Christmas tree. By the way, after the new year you will be able to use them for their intended purpose.

Or you can do a little magic on these molds: paint them white (or any other color of your choice) and cover them with beautiful electrical tape. Such molds, of course, will not return to the kitchen, but your stock of unusual Christmas tree decorations will be replenished.

A beautiful star can be made from ordinary wire, thread and paint. You can form a star out of wire with your hands (it’s better to take a thick wire), or you can drive approximate nails into some unnecessary board and use them to make a star, which you then wrap with thread and cover with paint.

Or you can string glass beads onto a thin wire and make a star - you will get an almost weightless Christmas tree toy.

Or wrap the wire base with a strip of sequins and thread. In addition to the star, you can make a Christmas tree in this way.

You can also make a beautiful star from cardboard: cut a star out of it and wrap it with thread or twine.

A crumpled sheet of paper plus leaves of some plant and you will get a beautiful snowflake.

I don't know about you, but I love snowflakes. In addition, a snowflake is perhaps one of the most logical New Year's decorations. In general, let's look at another original way to make a Christmas tree toy in the shape of a snowflake. You will need polystyrene foam (rummage through old appliance boxes), wire or regular toothpicks. You need to make several balls of different sizes from foam plastic (depending on what kind of snowflake you want to make); the edges can be smoothed simply by pressing with your fingers. In the center there will be the largest circle, into which we insert wire or toothpicks and string smaller balls. Spread the finished snowflake with glue and sprinkle generously with glitter - you must agree, the snowflakes turn out simply gorgeous. This toy will fit perfectly into any decoration.

A beautiful Christmas tree toy in the shape of a snowflake can be made from the handles of plastic disposable forks, spoons and knives. Glue together several cut handles and decorate the middle with a beautiful bead.

An equally beautiful snowflake is made from cut wine bottle corks. Cover them with glitter and ribbons and you can admire the result.

Well, a classic of the genre: a snowflake made from clothespins. Many of you may have already seen such snowflakes (as well as others in general), but I’ll post it anyway - it turns out to be a very attractive snowflake.

Let's talk about lids? Caps from plastic bottles, as well as glass ones in general, can be easily turned into original Christmas tree decorations. You can make Santa Claus, a snowman, etc.


Lids from regular jars will also work. You can glue a photo or rhinestones inside the lid, and beautifully paint the outside. Or cut out the middle and insert embroidery.


You can also use the lid as an auxiliary material: use it to carefully glue the nuts into an even circle.

A beautiful circle can be made from beads and wire.

Or you can roll the wire from the binding of a notebook into a circle.

Another find is the rings from the bar in the bathroom: wrap them with different threads, decorate them with some New Year’s mini toy (since we are talking about how to make a Christmas tree toy from scrap materials: use an old magnet from the refrigerator) and admire the result.

Still using non-dissolvable toilet paper? - this is good luck, cut thin circles out of it, paint it and glue some design cut out of paper inside.

Girls can donate old bracelets.

And from old beads and ordinary wire you can twist a beautiful Christmas tree toy that somewhat resembles a nest.

We will not immediately pass by such a thing as a ball of thread, made using a balloon of thread and glue. Still, despite the ease of execution, the result is pleasing to the eye, and please note that everything is made from available materials.

Everyone has thread spools: so decorate the Christmas tree with them. In addition, you can glue a piece of paper with a romantic message/New Year’s greeting to your loved one to the reel.


There is no shortage of egg cartons either. Meanwhile, you can make original Christmas tree decorations from them. Show your imagination!

The following selection is more suitable for guys who like to drink beer from cans. But still, what if one of them decides to decorate the tree in the dorm in an unusual way, or you are a young couple throwing a party for friends. And in general, some toys made from tin cans are also suitable for decorating a “home” Christmas tree.
Such as a star, an angel or a snowflake.


Well, to cheer up your friends, you can make toys from cans without depriving them of the outline of the can.


You can even build Santa's sleigh with his faithful assistants, the reindeer.

I also want to draw your attention to one winter hero - the penguin. Of course, contrary to popular belief, he does not live at the North Pole, but since it’s just like that... Moreover, you can make such beautiful Christmas tree decorations in the shape of penguins that it’s just wow. Use old light bulbs, plastic bottles, different paints, your imagination and you are sure to get a beautiful penguin.
Hello friends! Over the past three days, I have been persistently wandering the Internet in search of... garbage) Or rather, in search of crafts that can be made from it. And, you know, some crafts are so good that it’s hard to even imagine that they were made from something that could just be taken and thrown away.
In this article I want to present you with a large overview of “garbage” masterpieces. Crafts made from trash that are worthy of praise!
Lesson plan:
From empty matchboxes
They say that matches are not a toy for children! And that's right! But from boxes you can make not only toys, but even real educational games. See for yourself.
By gluing the boxes with colored paper and writing letters on them, we get the alphabet!

And inside we hide figures whose names begin with different letters of the alphabet. The result is an interesting developmental and educational toy. And multifunctional too! After all, a child learning the alphabet can:
- try to arrange the letters in order;
- make words from letters;
- place items in the correct boxes.
And this not only develops thinking, but also fine motor skills.
Tired of learning letters? No problem! You can also relax! You can always build something out of colored boxes.
Another version of the game with boxes is “Who eats what?”

I just want to say bravo to the author for such an idea. Here, on the outside of the boxes there are pictures of animals, and inside there are different places where they live. The boxes are being dismantled. Well, then you need to assemble them correctly. Are we developing our horizons? But of course! We also train our memory.
I think many mothers, when they were still girls and had two or three little dolls, had furniture made from matchboxes. I had it! I am sure that modern girls will also enjoy making it with their own hands and playing with such interesting doll furniture.

After all, there are so many shelves, so many cabinets. And you can hide so many things there.
Were you accidentally asked to make a math pencil case in kindergarten? We were not asked, but I heard about such a thing from friends of kindergarten parents. And it is made again from matchboxes. And it looks like this.

This pencil case helps children learn geometric shapes, counting, and colors.
If there is a needlewoman in the house, then she will certainly be pleased with such an organizer for all sorts of different handicraft little things.

And there is nothing complicated in making it. The main thing is to turn on your imagination!
You can also make puzzles out of boxes.

Just take one beautiful picture, cut it into rectangles, stick the rectangles on match houses and the puzzles are ready!
From toilet paper rolls
From matchboxes we move on to another popular material for making crafts. Let me introduce toilet paper rolls, which give almost unlimited possibilities to young craftsmen.
Let's start with a cool stationery organizer.

This is such a caterpillar. I think that if it settles on a first-grader’s desk, it definitely won’t be boring) The body of the caterpillar is made of bushings. They are covered with corrugated cardboard and look very good. Do you agree? It would not be a shame to take such a craft to school for a competition.
We continue our review with a sorting game for children.

10 colored sleeves. They have 10 numbers. And various little things, buttons, some figures, large beads in little bowls. The game will help you figure out colors and get acquainted with counting.
Strange as it may seem, bushings are used to paint pictures! You just need to cut them, and then make different flowers, leaves, and circles from the pieces. And glue it all in a random, beautiful order.

It turns out very tender and beautiful.
If you press the top of the sleeve a little, you get ears. And then animals with ears. The most different. And very beautiful.

Here are the heroes of various games.
Or you can try making animals like these.

It's a little more complicated, but the results are worth the effort.
These stands for felt-tip pens look interesting.

And the idea is simple. You need to take the threads and carefully wrap them around the bushings. Then build a decoration from fabric or felt. That's all! Original and pleasant to the touch holders of colored pencils are ready.
From egg trays
We also quite often throw away the trays in which eggs are sold, without even thinking that they can turn out to be very cute little things.
For example, these are such charming caterpillars.

Someday they will definitely become butterflies, but for now they stand, look, what else to chew)
Or these chickens. Probably laying hens! Just a couple of simple touches and the poultry yard is ready!

Or you can be original! Take a cardboard tray, cut it into separate cells, paint them in different colors, string them on threads, and then tie these threads to a stick.

Here is an interesting bright pendant that will please the eye and lift your spirits)
And the trays also make very beautiful flowers. You can make very simple flowers, like daisies, or you can make them more complex, like roses. There are a lot of options.

Well, you can decorate anything with these flowers. For example, a photo frame or a mirror frame.

You can also make beautiful flowers from plastic trays. But I think it's a little more complicated than the cardboard ones.

Well, now it’s not really a craft from a tray, but rather from what’s in the tray. From eggs. Or rather, from an empty eggshell. First you need to carefully remove the egg from the shell and leave it almost intact, removing only the top part. Then fill the shell with soil and plant the seeds of some fast-growing herb in it. Wait and water! And after some time, you will meet such funny herbalists.

Just so that they can wink and smile at you, you will need to draw eyes and mouths for them)
From empty juice or milk boxes
Do you like juice? Do you drink milk? Where do you put the boxes? You probably throw it away, but in vain! After all, in the soul, every box is not just a box, but a real person! With your own face and your own character. Don't believe me? See for yourself!

Large empty boxes can be used to make vehicles.
And land ones.

And air ones.

And even waterfowl.

Well, for those who like to grow something, we offer this option.

Vegetable garden in boxes. A very convenient way to grow different seedlings. It’s neat and you don’t need to spend money on special trays.
Now let's get serious. How to make sure there is always order on the table? Of course, install an organizer! You can, of course, buy it. But it’s much more interesting to make it yourself from the same irreplaceable boxes. And decorate to your liking.

From used disposable tableware
Well, now let’s move on to crafts made from disposable tableware. Let's start with plastic spoons. What interesting things could be made of them? Maybe flowers, and at the same time ladybugs?

Well, just like alive)
And a couple more representatives of the insect kingdom, only larger in size.

These bugs are made from paper plates. In my opinion, they are simply adorable!
How about this gorgeous hat?

It is made of two plastic plates. One deep and one flat. The middle of a flat plate is cut out and a deep one is glued onto it. Don't forget to paint your hat in your favorite color and decorate it. Here, by the way, flowers from egg trays, which were discussed a little earlier, would be suitable.
If you like to organize home theater performances, then plastic plates are ready to help you with actors. You can make the faces of different animals out of them, and then glue a small stick to each one. And the puppet theater artists are ready.

And if you cut out eyes in the faces, you will get masks. And you are guaranteed a fun children's masquerade. Then you will look at the photo and remember how great it was!
And now about the beautiful things. Look what a miracle it is.

This is a fan made of plastic forks. The forks are attached to an old unnecessary disk. The fan is decorated with ribbons, flowers and lace.
A real work of art that can decorate any interior!
And in this photo you see a fan of large and small spoons.

It's also very beautiful.
I also advise you to pay attention to the article about and from them.
That's all for today! I hope you liked the review, and you already want to create something with your own hands!
I wish you creative success!
Yours, Evgenia Klimkovich.
One of the main symbols of the New Year is the spruce tree. It is customary to decorate it with interesting and unusual toys.
Today, many shiny balls and angels are sold in decorative stores, but handmade Christmas tree decorations look much more interesting. They make the atmosphere special and are always able to surprise guests. We have collected many original ideas that everyone can repeat.
Elements of comfort
Knitted Christmas tree toys
Knitted decorative items are ideal for decorating a winter interior, and such toys will look very impressive on a New Year’s tree. Yarn for products should be chosen in traditional holiday colors - white, red, green. You can make small plain stars or circles depicting Christmas tree balls. If time allows, and imagination suggests interesting plots, then real works of art can be made from ordinary wool yarn. As an ornament, you can choose images of deer, stars or snowflakes. 
Simple knitted toys for the Christmas tree 
Unusual Christmas tree toys 
Christmas decorations that anyone can make 
Multi-colored Christmas balls made of yarn
Everything you have at hand
Christmas decorations from scrap materials
In fact, to create a New Year's toy with your own hands, you don't have to be a handyman or a jack of all trades. And you don’t need any special materials for this. You can use whatever you have on hand - lids, paper, road map, keys and even wooden blocks. The main thing is that the process itself brings joy, and the result gives a good mood. 
Christmas tree decorations made of paper 
Christmas trees made of wooden blocks and wire 
Original Christmas tree decorations 
Creative Christmas balls 
Christmas decorations made of multi-colored threads 
Unusual Christmas tree toy
Button to button
Buttons of different sizes and colors can be found in every apartment. They often lie idle, and sometimes a lot of them accumulate. They are perfect for the role of decorative material for creating New Year's toys. True, for this you will also need blanks in the form of balls (they are sold year-round in craft stores). 
Christmas tree decorations made from buttons
Felt crafts
Another material from which it is easy to make a Christmas tree decoration is felt. You can felt it and create all sorts of interesting figures from it. And if you take a blank ball, small felt flowers and stationery pins, then from this set you can get a wonderful toy for the Christmas tree. Even if you draw a winter character (a penguin or a snowman) on felt, and then cut it out and decorate it with embroidery, you will get a very interesting and exclusive Christmas tree toy. 
Felt crafts
For Lego fans
Christmas decorations can be made from the most unexpected materials, for example, from Lego. It is interesting to collect such decorations for the whole family, especially with small children. And such an unusual Christmas tree decoration will surely delight your guests! 
Lego deer on the Christmas tree 
Snowflake Lego
Do you like to do handicrafts? Then you will love making Christmas tree decorations with your own hands! This is a pleasant and exciting activity for the whole family that will not leave anyone indifferent - you will spend several evenings with pleasure making Christmas tree decorations with your own hands.
What do we use for the material?
What do you need to make your own New Year's decorations? You can use almost anything you can get your hands on. If you want, you can buy special supplies (sold in craft stores), or you can use what you have in any home. So what to prepare:- plain paper (good for making patterns);
- pencils and markers;
- regular cardboard, white and colored (you can use velvet);
- sharp scissors and a breadboard knife;
- glue (PVA or glue gun with sticks);
- threads and needles;
- yarn of different shades;
- various decorative materials - these can be sparkles, sequins, confetti, multi-colored foil, stickers and much more.
Simple crafts from scrap materials
Of course, you've probably seen how New Year's balls are made from thread and glue with your own hands, but why not expand the range? We make different Christmas tree decorations with our own hands.From yarn
This is a simple and at the same time spectacular Christmas tree decoration that can decorate any Christmas tree.
For production you will need:
- yarn;
- tailor's pins;
- plate or bowl;
- porous material (for example, a disposable tray);
- cutting paper;
- marker.

The template needs to be attached with pins (or ordinary toothpicks) to the porous material, and the design you need should be laid out on top - first the outline is laid out, then the interior decor. You should not cross the threads too often; the toy should be fairly flat. Once you are finished, dry the item and remove it from the pins and tie a loop in the eye. If desired, you can decorate with sparkles or rain.

From wire
How to make New Year's toys with your own hands in just a couple of minutes? Use wire!
To make toys you will need:
- two types of wire - thick and thin (thin wire can be replaced with bright threads, for example, floss. Pure white strong threads look very beautiful);
- beads, beads;
- colored tape;
- pliers.
The ends of the thick wire need to be twisted. You need to string beads and seed beads mixed together on a thin wire, tie the end of the thin wire to the future Christmas tree decoration, and wrap it randomly.

When the toy is evenly wrapped, you need to wrap the free tail of the wire around the toy and tie a ribbon in the shape of a bow - your toy is ready.
Another original idea:

Made from ribbon and beads
Who said that making New Year's toys with your own hands must take a long time and painstakingly? Not at all. In just five minutes you can create one that will decorate both the New Year’s tree and the interior.
You will need:
- beads;
- narrow tape;
- yellow, golden or silver cardboard;
- glue "Second";
- needle and thread.

Interior decor made in this way looks very attractive.
From cardboard - in a couple of minutes
Some New Year's toys made of paper or cardboard take a lot of time to make, but not in this case - here you really only need a couple of minutes to make an elegant hand-made New Year's decoration.So, you will need:
- ordinary cardboard;
- a little twine or thick yarn;
- glue;
- paints and brushes;
- napkin or cloth;
- varied decor.

Use a loose tail of twine to wrap the tree in different directions. After some kind of thread pattern appears on the tree, you can start gluing it with a napkin. You can tear the napkin into pieces, coat the tree well with glue, and seal it tightly with the napkin. This will give a nice texture to the future toy.

After the toy has dried, you can start painting - paint the Christmas tree green.

After the paint layer has dried, shade the texture of the toy using a dry, hard brush and white paint, and then decorate it to your taste.

From bright shreds
Here you will need a sewing machine, but if you really want to, you can do it without it. This is the best way to make Christmas toys from cotton wool and fabric - just choose fabric with a Christmas ornament, or use what you have on hand.
Prepare several paper patterns - for example, deer, stars, gingerbread men, bears, letters and hearts. Cut out fabric blanks with your own hands, sew them in pairs, leaving a small gap (for stuffing), and through this small hole, tightly stuff the toys with cotton wool or padding polyester. It is most convenient to fill with a pencil.
Patterns can be downloaded here:


By the way, don’t forget - we sew on a machine from the inside, but if you decide to make toys from thick fabric with your kids, then it is better to sew them with a decorative seam over the edge - a toy with your own hands will look simply charming and will be suitable for a home Christmas tree or for a kindergarten - Usually, for kindergarten Christmas trees, children make decorations themselves.
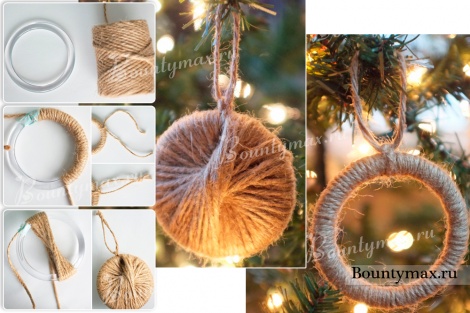
Made from twine and cardboard
New Year's toys made of paper and cardboard will be much more interesting if you add a couple of simple materials to them. To make such a toy you will need ordinary cardboard, simple paper or natural twine, a little felt or any other fabric, as well as ordinary paper, a pencil and ruler, and a drop of glue.
The star template can be downloaded here:

First, make a pattern on plain paper, and then transfer it to cardboard. Don't forget that the star must be double. You shouldn’t make the star too thin; it’s better to make it a centimeter or more. The tail of the twine is glued to the cardboard, then you need to gradually wrap the entire workpiece.

Place the thread as tightly as possible so that there are no gaps. To decorate the star, make a couple of leaves and berries from fabric and decorate one of the rays. Your decoration is ready.

From yarn and cardboard
Do you want to make original and at the same time charming Christmas tree decorations with your own hands? Then it's time to make small gift hats with your own hands from scrap materials. This is a wonderful Christmas gift that looks cute and will keep you warm all winter long!
To make Christmas tree decorations in the form of hats, you will need:
- a couple of toilet paper rolls (you can just glue cardboard rings together);
- remnants of colored yarn;
- beads and sequins for decoration.

The threads need to be cut into pieces of approximately 20-22 centimeters. We fold each piece in half, pass the loop through the cardboard ring, and pull the free edges of the threads through the loop. It is necessary that the thread is firmly fixed to the cardboard base. This needs to be repeated until the cardboard base is hidden under the threads.

All the thread tails need to be pulled through the ring so that our hat has a “lapel”.

Now we pull the loose tails tightly with thread and trim them into a pom-pom shape - the hat is ready! All that remains is to make a loop and decorate your Christmas tree toy with sequins and sparkles.

From beads
Making a New Year's toy in a minimalist style is easy and simple - you will need wire, beads and seed beads, a ribbon and a coin (can be replaced with a small candy, but it looks much more impressive with a coin). Try to make this Christmas tree toy with your own hands, the master class is very simple.
Make a loop on the wire and string green beads mixed with large beads on it - they will play the role of New Year's balls on our Christmas tree. Once the wire is filled, give it a herringbone shape by folding it in a spiral.
Once your tree has taken shape, bend the free edge into a loop.

We cut off a piece of ribbon, form a loop from it for hanging and pull it through the Christmas tree, and decorate the free tail with a coin (the easiest way is to glue it with double-sided tape). We tie a decorative bow on the hanging loop - your decor is ready!

Christmas balls
How to make a New Year's ball from threads? It’s as easy as shelling pears, watch our master class on spectacular lace balls for the Christmas tree.You will need:
- several balloons;
- cotton threads;
- PVA, water and sugar;
- scissors;
- polymer glue;
- spray paint;
- decor.

First you need to inflate the balloon - not completely, but according to the size of the future decoration. Mix two tablespoons of water, two teaspoons of sugar and PVA glue (50 ml), and soak the thread in this mixture so that the thread is saturated. Then you need to wrap the ball with thread randomly. The balls need to be dried for several hours. After the glue has completely dried, you need to deflate the ball and take it out, and carefully paint the ball of thread with spray paint and decorate it with sequins and sparkles.
DIY thread Christmas balls will turn out to be very, very impressive if you make them in different tones - for example, red, silver and gold. Try to make New Year's balls with your own hands using different techniques - you can sew or knit balls, make them out of cotton wool with your own hands, or, for example, sew them out of felt - you can never have too many of these toys.
From paper
New Year's decorations made of paper are very popular among both big and small admirers of the New Year's miracle - try making paper Christmas tree balls with your own hands.
A DIY paper Christmas toy is made like this: 
There is no additional need to decorate such a toy; it is already expressive.

Another ball option:

Or you can make a ball like this according to the master class:


From felt
DIY felt Christmas toys look very warm and cozy, and they are very, very easy to make. To make your own charming felt Christmas tree decorations you will need:- red, white and green felt;
- red, white and green threads;
- Crystal glue;
- scissors and needles;
- cardboard;
- a little satin ribbon;
- soft filler (cotton wool, holofiber, padding polyester).

First, make sketches for your future toys. It could be anything. Once the patterns are ready, transfer them to felt and cut them out. What is good about this material is that it does not crumble, you will not need to additionally process the edge of each workpiece.
Make identical decorative elements - for example, sprigs of holly (by the way, did you know that this is a symbol of joy and Christmas reconciliation?). The berries need to be glued to the leaf using glue, and then a decorative knot should be made - this will give the berries volume.
We sew each piece together in pairs. By the way, it is best to sew it with contrasting threads; it will be fun and elegant. How to make New Year's decorations voluminous? Stuff them with holofiber before sewing them up completely! Straighten the product well, so the Christmas tree toy will be filled more evenly. You can use the back of a pencil for stuffing.
Sew on the decorative elements and your New Year's toy is ready!


Try to sew felt decorations not only for the New Year tree, but also for your home - for example, a Christmas wreath decorated with felt toys looks very stylish. Look at the selection of DIY New Year's decorations, photos of master classes - and you will understand how many interesting things can be made from ordinary felt of two or three colors.

Master class on how to make a Christmas garland with your own hands from felt:

Below you can download templates and patterns of different Christmas trees for felt crafts.
Scientists claim that the tradition of decorating a Christmas tree for the New Year came to us from our pagan past. There are many disputes and debates on this matter. But for us, the descendants of those same pagans, by and large, it doesn’t matter where this tradition came from. The main warmth of the family hearth and such a bright symbol of a new era. New Year For many, this is the point in life that is sorely needed to be set. Mark the end and, accordingly, the beginning.
Both big and small love to decorate the green, fragrant beauty of the Christmas tree. Agree, there is something magical about this. We could not ignore this issue and offer you a selection of ideas for making New Year's toys for your crazy hands. Let’s not talk about value; a lot has already been said about this on our website, in particular.

Just read the article, you will surely be interested in one of the ideas. And if one of the crafts we offer takes pride of place on your New Year’s green or maybe not green beauty, it will be a holiday for us.
In this article we will talk about Christmas tree decorations that can be made from improvised means and which are beneficial to distinguish your Christmas tree from many others. So let's begin...

A snowman is one of the traditional symbols of the New Year and, as a result, the most popular Christmas tree toy. But how often have you come across snowmen made from iron bottle caps? No? Then meet: snowmen made from lids.
What you will need to create a funny snowman:
- Iron glass bottle caps (the kind you find on beer bottles and soda bottles in glass containers).
- Acrylic paints.
- Spray paint. White.
- Ribbons. Preferably not wide, up to about one centimeter.
- Hot melt adhesive
- Buttons.
- Scissors.
- Brush.
- Glitter or something similar for decoration at your discretion.

Using spray paint, paint the inside of the caps white. Before painting, bottle caps must be washed, dried and laid out as tightly as possible on one plane. It is advisable to paint outdoors. The paint should tightly cover the inside surface of the lid; if necessary, repeat painting.

Forming the snowman's body
Forming the snowman's body
After the lids have dried, you can begin assembling the bodies of the snowmen. Place three lids in a row, with the convex side facing you. Try on as many tapes as you need to secure all three lids together using hot glue. Cut a measured piece of tape, remember to leave some extra tape to make a loop for hanging.
Glue the cut tape, as mentioned above, with hot glue to the lids. You can first grab the lids together a little so that they stick better to the tape, so to speak, add rigidity to the structure.

Take acrylic paints and use a thin brush to paint eyes, nose, mouth and buttons on the painted side of the bottle caps. If you do not have a suitable brush, you can replace it with a toothpick. The edge of which needs to be stretched a little to get something like a miniature broom. After the paint has dried, you can add a little glitter.

Cut small pieces of colorful ribbons and tie them to your snowmen like scarves. In the places where you tied the scarves, glue a bright button. What do you think of the idea?
A burnt-out light bulb is considered garbage and people rush to throw it away. Well, in vain. In our business, exactly what should be thrown away will ideally serve as something new. Here's an idea for you to consider with funny penguins. These penguins will perfectly decorate the New Year tree and will delight your family.

So, what do you need to create a cute inhabitant of the polar ice floes:
1. Damaged incandescent light bulbs.
2. Acrylic paints or gouache.
3. Brushes. It would be good to prepare a few. Large ones are good for covering large areas, and thin ones are good for drawing small details of faces.
4. Ribbons, cords, threads or the like.
5. You can prepare hats in advance. A hat left over from a toy will do, or you can build something similar yourself.
6. Hot glue.

Damaged light bulbs should be cleaned of dirt and degreased. Then cover with black and white paints. Do you remember the colors of real penguins? That's it. The back is black, and the belly and muzzle are white. You can make a simple and slightly complicated coloring of the penguin. You can simply cover the light bulb with white and black paint, or you can also draw a little on the flippers and the arc above the eyes.
Light bulbs painted white and black need to be dried. Then paint the faces. Just use a thin brush to draw the eyes, nose and blush.

Tip: to make it more convenient to work, take a reel of tape or toilet paper, or something similar. Place the bottom of the light bulb in a round hole of suitable size, it will not wobble and thus it will be easier for you to apply drawings to the surface.
After you have colored the penguins and drawn their faces, you need to put on the cuties. Doll things are well suited for this purpose. And if you wish, you can build clothes yourself. Knit simple hats and scarves from leftover threads.

Yes, but let's not forget about the hanging loop. If your penguins will not be wearing hats, then simply use hot glue and apply the required amount to the very top of the cartridge and glue a loop of lace or ribbon. And in the case of hats, you must first leave a hole in them in order to thread the loop.

We put on our hats and scarves. Scarves can simply be tied to the penguins, or they can be fixed with hot glue. This is at your discretion and wish.
That's it. Cute penguins made from lamps are ready. Hurry up to hang them on the Christmas tree. Let the family be happy.

The fashion for knitted napkins is immortal. All the same, for several dozen housewives there will be one who will not fail to decorate the furniture with a knitted napkin or throw light lace over the monitor, in the manner of grandma’s decor. Yes, these are not extinct, they exist. Therefore, rummaging through your supplies or your mother’s, or even your grandmother’s, you can find a couple of openwork lace napkins. It's time to give them a second life.
The openwork ball can be used as Christmas tree decoration or as a New Year's decor for the room. Or even just leave it as a lampshade. There are many uses for this product.

- Lace. Leftover simple lace works great. Old knitted napkins.
- Inflatable ball.
- PVA glue.
- Brush.
First you need to dilute the PVA with water. The approximate ratio of parts is 2:1. The glue and water must be thoroughly mixed and poured into a container with a fairly wide neck; you can even take a plate for this purpose.

Tip: do not use any other glue, especially silicate glue. He has a quality that is completely out of place in this particular case. Once dry, this glue is known to turn into a substance vaguely reminiscent of glass. And it tends to crack and turn into sand due to mechanical stress. Which is absolutely inappropriate. And when it dries on the ball, it will burst. Experimentally proven.
Then you need to soak the lace and napkins in the resulting solution.
Advice: naturally, the material of napkins and lace should have absorbent properties. At least minimal.
Diluted glue can be applied to napkins and with a brush. Having previously laid them out on oilcloth.

Now you need to inflate the ball. It is ideal if you take a simple and strong round ball. Determine the size yourself.
Carefully cover the inflated balloon with glue-soaked napkins and lace. Try not to leave unfilled space between the material, but also do not apply it in a thick layer. After the ball is completely wrapped, you need to carefully hang it and wait until the glue dries completely and turn the napkins with lace into a kind of crust.
Next, the ball needs to be burst with a needle or something similar. The remaining ball must be carefully removed. Now, for greater stability, the openwork ball can be sprayed with hairspray. It was the hairspray that showed itself perfectly in this case. Proven experimentally.

Advice: do not use this design as a candlestick (there are such ideas on the Internet). An openwork ball can easily ignite and then the result could be a slap on the bottom of the firemen, rather than a fun pastime. Don't spoil your holiday!
Watch the video on the topic: New Year's ball made of threads
Although sometimes winter in our area reminds us of spring, and deep autumn, and then spring again, in a word, any season, just not winter with snow. But a warm knitted hat still remains a symbol of winter cold and snow. Take advantage of our idea and make funny, warm hats as toys for the Christmas tree. Original, and, importantly, practically made from garbage.

So what you will need:

1. Garbage. Or, more precisely, spools of toilet paper, cling film, or any other lightweight cardboard spool that you may be taking out of the trash can right now.

2. Remains of thread from knitting. It is desirable that they be approximately the same in texture and thickness, the latter is more important. The length of the piece can be taken from 25 centimeters.

3. Scissors.
4. Ruler.
5. A simple pencil or something you can use to make notes.
Let's start making:
Cardboard cylinders should be marked and cut into rings, like a cucumber. Choose the width of each ring yourself. This will determine what kind of cap lapel you want to make.

Advice: if you are planning to make wide lapels, then the length of the threads also needs to be increased.
The threads must be folded in half and loops made on cardboard rings. They must be constantly moved tightly one to another. The cylinder must be tied tightly.


Leave a few loose threads about a centimeter long; when you cut off the excess, they will form something like a pompom.

This will make the hat look more realistic and cute. A loop for hanging can be made from the same thread that you used to grab the top of the hat under the pompom.

Thus, when hanging, the cap will not hang straight, and this will give an asymmetrical appearance to the product, which will only benefit the appearance.


And again, the material for the future masterpiece is nothing more than garbage. At any other time the lemonade bottle would have been thrown away, but not in this case. We offer you the following idea, namely a snowflake from the bottom of a plastic bottle. This craft will fit perfectly with any other Christmas tree decorations. A snowflake is a traditional symbol for winter and the New Year.

So, what will you need to create a wonderful Christmas tree decoration:
- Plastic bottles. Standard transparent or blue/cyan.
- Stationery knife.
- Awl.
- Dye.
- Tassels.
- A thread or thin ribbon so that the toy can be hung.
- Sequins for decoration at your discretion.
Of the entire bottle, we are only interested in the bottom. Cut it off with a utility knife. Make it as low as possible. Heat the awl and carefully make a hole in the cut, through which you will eventually thread the thread for hanging.

Now apply a pattern of curls or lines to the cut bottoms. It can be either complex or simple, it depends on your imagination and wishes. You can add glitter to the drawing or mix it into paints. That's all, the New Year's decoration for the tree is ready.

Call the children! The proposed idea will simply honestly allow you to spend entertaining minutes, or even hours, together. Everyone is used to the fact that New Year's balls are round and convex. Well, no, but this absolutely does not affect the originality and beauty of the toys. Moreover, the manufacturing process is absolutely simple. Even a small child can handle it. It will even be better if the children help you in the manufacturing process. Since a certain awkwardness inherent only to children, let's call it charm, is required to stylize our decoration.

- Knitting threads, multi-colored. Better than medium thickness.
- Wire or twigs that can be easily bent and will hold their shape.
- Pliers.
- Beads with large holes.
- Fantasy.

Let's start making New Year's crafts
We take the wire and wrap it with a piece of dark fabric, or thread or dark-colored paper. This does not have to be done carefully; it is enough that the wire is hidden by 80%.

Use pliers to grab the loose ends and make a few turns. Make sure that the wire is fastened and the wrapping material is fixed. What came out was something like a not entirely even circle with antennae.

If you use twigs, secure them with thread to keep them in shape. Just make a few turns. And don't forget to leave long ends for a loop so your balloons can be hung.

Now we take multi-colored threads and wind them on an improvised frame. We do this not tightly, but also weakly. You can use up to three colors, preferably contrasting ones.

On the thread that you plan to wind last, string several beads, if desired. Fasten the thread to the “tail” of the frame.

That's it, your New Year's toys are ready. Extremely simple and at the same time extraordinary and eye-catching. Happy New Year!