Star news


 My life and soul in Latin")
How to make a paper rocket? How to make a rocket from a toilet roll.
Greetings, dear friends, readers of the blog “Family and Mom”. April 12 is approaching - Cosmonautics Day. So we decided to dedicate today’s lesson to this holiday and make DIY crafts with children: rocket applique, toilet paper rocket and cardboard rocket.
Before we started making crafts, the kids and I talked about who the astronauts were, what the name of the first cosmonaut was, and what they do. Don't forget about the solar system and rockets. And only after that we started making crafts with our own hands.
First of all, we decided to make an applique of a rocket (children really love to draw and make appliqués, so we do this very often and today was no exception).
In order to make the application, we need
- colored paper
- scissors
- a sheet of white A4 paper (we make crafts in each child’s own album - and it’s more convenient for kids to look through their past creations, show them to mom and dad and proudly declare “I did this myself”)))
DIY rocket applique:

The rocket applique is ready.
Craft from toilet paper rolls. DIY rocket.
To make a rocket we need:

Toilet paper rocket:
- We cover the toilet paper roll with colored paper or paint it with felt-tip pens/paints. We decided to cover it with colored paper.

- We glue illuminated windows onto our rocket.

- Next we'll work on the upper part of the rocket. To do this we need to cut out a circle. And make a cut on one side of the circle to the center of the circle, as shown in the photo. Next we form a cone.


- We cut out 4 strips measuring 1 cm X 4 cm - with the help of them we will attach the cone to the main part of the rocket.

- Glue the strips inside the rocket, leaving pieces of paper coated with glue sticking out outside. As shown in the photo.

- From above, to these protruding stripes, we attach the upper part of the rocket.

- Well, that’s the final part: making the support legs for our rocket. Let's get started)) Cut out three rectangles measuring 3*4cm

- We fold the cut rectangles across 4 times (as a result, we should get 5 parts when unfolded)


- Lubricate the outer parts with glue and form three-dimensional triangles (you should get 3 triangles).

- Lubricate one side of the triangle with glue and glue it to the rocket. As a result, the rocket should have 3 legs, on which it will stand.

Our rocket is ready with our own hands. You can give it, for example, to your dad
DIY cardboard rocket
Here we come to our last craft for today. This time we made our own rocket from cardboard, and not from toilet paper, as in the previous version. In addition, you can put an astronaut in this rocket - we drew him, or you can print and glue, for example, your favorite cartoon character, and let him fly in space. Lenya said to our cosmonaut that this is Yuri Gagarin and he is flying into space in a rocket)) Well, let's start making crafts.
To make a cardboard rocket we will need:
- Colored cardboard
- Colored paper
- Sheet of white paper
- Scissors
DIY cardboard rocket:
- We cut out the blanks: from blue cardboard (10*12 cm), from yellow colored paper (10*8cm), from white paper a rectangle (10*6 cm)

- In cardboard (this is the body of our future rocket) we cut out a round window

- On the back side of the cardboard we glue a rectangular white sheet of paper (which we prepared in advance). You only need to glue on three sides (they are marked in my photo with an orange line). The fourth side (it must first be cut in a semicircle, as shown in the photo) is not glued!

- This is how it should be on the front side (where the window of our rocket is)

- We roll the cardboard into a tube and glue it with glue. The result is a cylinder - the basis of our rocket.

- Let's start decorating the upper part of the rocket. Cut out a semicircle from yellow construction paper (which we cut out and prepared at the beginning). Then we connect the two corners of our semicircle so that they slightly overlap each other, thereby forming the cone that is needed for our rocket. We secure the resulting cone with glue (along the line where the sides of the semicircle connect).


- We will attach the cone to the base of the rocket in the same way as in the previous version, so we did not take photos of this process again. We cut out 4 strips measuring 1 cm * 4 cm - with the help of them we will attach the cone to the main part of the rocket. Glue the strips inside the rocket, leaving pieces of paper coated with glue sticking out outside. From above, to these protruding stripes, we attach the upper part of the rocket.

- And again, we make the support legs similarly to the previous option. Cut out three rectangles measuring 3*4cm. We fold the cut rectangles across 4 times (as a result, we should get 5 parts when unfolded). Lubricate the outer parts with glue and form three-dimensional triangles (you should get 3 triangles). Lubricate one side of the triangle with glue and glue it to the rocket. As a result, the rocket should have 3 legs, on which it will stand.

- The rocket is ready. But we need an astronaut. Let's quickly start making it so we can finally launch the rocket into space. We made the astronaut simply - we drew it on a rectangular sheet of paper. You can print out a suitable picture, or stick a sticker with your favorite character at the top of the rectangle. The size of the rectangle should be such that it fits into the window of our cardboard rocket. The upper edges of the rectangle are rounded.

- We carefully insert the finished astronaut into the hole that we left when making the rocket - between the cardboard and a sheet of white paper. Our astronaut must look out the window. The remaining sheet of paper can be folded inside the rocket - at any moment the astronaut can be pulled out of the rocket and sent for a walk on the Moon.

Your DIY cardboard rocket is ready. 
April 12 is a special holiday in our country. It was from the territory of our Motherland that the first manned flight into space was made. It is from our cosmodromes that almost all artificial Earth satellites are launched, without which many of the benefits of civilization would be unavailable. Satellites provide us with communications, monitor atmospheric phenomena, warning us in time about dangerous weather changes; powerful satellite optics are able to find the right person even anywhere in the world. Astronauts from all over the world work on our research space stations and make a lot of very useful discoveries for humans. The time is not far off when any person will be able to fly to the stars and take a tour of Mars or the Moon.
Dreams of space travel, as a rule, are born in childhood, and perhaps that is why with such pleasure and interest they make crafts with children on Aviation and Cosmonautics Day - the day when the stars became closer! We invite you to join us and make your own rocket, more precisely, the launch vehicle with the Vostok spacecraft, on which on April 12, 1961 cosmonaut Yuri Gagarin made the world's first flight beyond the Earth. And along the way we’ll learn a little about its design.
Materials and tools
We will need:
1. Tube from a roll of paper towels - 1 pc.
2. Tube of toilet paper rolls - 2 pcs.
3. Thick paper or cardboard.
4. Plastic ball - 1 pc.
5. Cell from paper egg packaging - 2 pcs.
6. Paper adhesive tape or masking tape.
7. Hot glue or “Moment” type.
8. Paints, preferably gouache or acrylic.
9. Foil.

Step-by-step job description
1. Let's manufacture the first stage of the launch vehicle. It consists of four parts. These side blocks contained jet engines that propelled the rocket into space. They will be the first to be disconnected from the rocket. So, take 4 cardboard squares and roll them into little bags. Secure with adhesive tape and trim the cuts. Cover the bottom with cardboard circles.
We glue the corners of adhesive tape to the blocks so that the rocket flies more smoothly along the given trajectory. We glue 4 nozzles onto each block, because the engines were four-chamber, which means there should be 4 outlets for the burnt fuel. We attach a cardboard “eye” to each block, with their help we will connect the first stage of the launch vehicle with the second stage.

2. The second stage is the central block. We will have it from a long tube. If the edges peel a little, secure them with adhesive tape. We also cover the bottom with a cardboard circle and glue 4 nozzles.

After all, the central block also has the same engine. Now we apply our side blocks and mark the places where the “ears” will enter the body. Let's cut through. This is how we connected the first and second stages of the launch vehicle.


3. We will make the third stage, in which the spaceship was located, from a short tube and one cell from an egg carton. We connect them using adhesive tape. The second and third stages of the rocket are connected by a huge, strong lattice (transition truss). We will make it by drawing it on half of the second short tube. In order for our parts to fit into each other freely, we will reduce the diameter of the cut tube with a lattice, simply cut it, fold it a little and connect the edges again.


4. All stages of the launch vehicle are ready. We make the spaceship itself. Of course, it’s not like in Star Wars, it’s the very first, real one. It consists of a very strong round “cabin” with a porthole, which is also a descent module, in which the astronaut will then fall to the ground at great speed. Of course, there is also an instrument compartment and other special units attached there. We will make the ship from a balloon, egg cells and foil.


5. Let's start the final painting. We used gouache, but if you have acrylic paints, it's better to use them. That's it, ours is ready!
Our launch vehicle with the first spacecraft was tested by a kindergarten! Now we will prepare a presentation for Cosmonautics Day, and the rocket will become a collapsible visual aid. It turned out that many people didn’t even suspect how everything worked with the missiles. Make crafts with your children and expand their horizons!
What other rockets are on our website:


And many other photos are on the competition page.
Did you like the product and want to order the same from the author? Write to us.
More interesting:
See also.
- Space shuttle
- Spacecraft"from the USSR"
- Spacecraft. Mars mission
Cosmonautics Day in the country that was the first to send its citizen into space is truly a national holiday. Children take part in it while still in kindergarten: they learn , prepare matinees, do crafts.
We have collected several ideas for crafts that even the little ones can do. And most importantly, there is material for them in any home!
Space shuttle
First of all, we would like to introduce you to a relatively fresh idea - to create not the usual needle rocket, but a space shuttle with “wings” for a manned landing. This is exactly how our Buran was designed, and the American shuttles, of course. It is not surprising that American “space crafts” look this way, in particular this one is presented in the book “Happy Handmade”.
As you can see, the idea is very simple: a cardboard base “wings”, to which a sleeve from a roll of toilet paper is attached - the “hull of a spaceship”. If you wish, you can put a “cosmonaut” from a Lego set there. And the main thing is to decorate the shuttle in accordance with the standards of your own space program!
Spaceship "from the USSR"
The familiar spaceship - the “igloo” - is also not difficult to make. Actually, to do this, you just need to cut out a cone for the nose of the rocket from colored paper and attach it to the sleeve.
How to cut a cone: the diameter of a standard toilet paper roll is 4.5 cm. To cut a beautiful cone, draw a circle with a radius of 5 cm on colored paper and cut it in half. Now glue the edges together to form a cone and make cuts on the outer part. They need to be coated with glue and carefully glued to the sleeve.


The lower part of the rocket can be decorated with “stabilizers” - you can make slits in the sleeve and insert a strip of cardboard (this will add stability to the craft), but you can simply glue triangles of colored paper. And, of course, don’t forget about the portholes - you can stick on mugs made of colored paper, or you can use photographs of your little astronaut!
The body of the “rocket” can be painted or covered with colored paper, but a special chic option is to wrap it in foil, then the rocket will look “like a real one.”
Spacecraft. Mars mission
For older children, you can make the craft more complicated. Actually, you can complicate it indefinitely, but for starters, instead of using a toilet paper roll, take a paper towel roll or any other cardboard cylinder of a suitable size.
- You can make portholes instead of appliqués. This will allow you to “send” toys into space, for example, Lego men.

Throughout the year, people spend a lot of toilet paper, especially in large families, and even with children. 🙂 But whenever a roll runs out, we often throw it in the trash, not allowing ourselves to be creative. It turns out that these empty bushings can be of much more use than we could have imagined.
"With my own hands" I have collected several practical applications for you. Next time before you throw away that toilet paper roll, try one of these ideas:
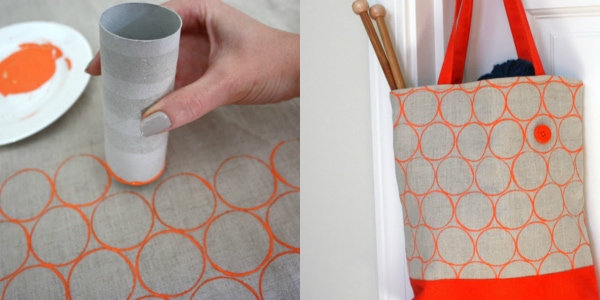
Decor

Using a sleeve you can make an exclusive design pattern on the fabric.
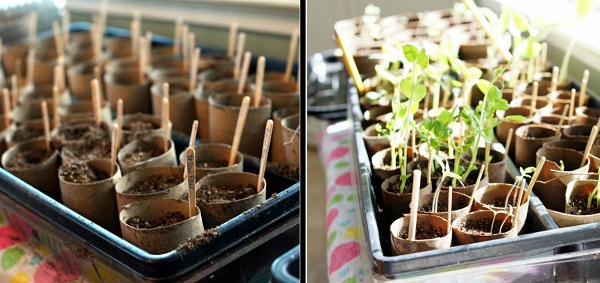
Containers for seedlings
Since cardboard degrades and breaks down over time, these sleeves make a great place for your seedlings.


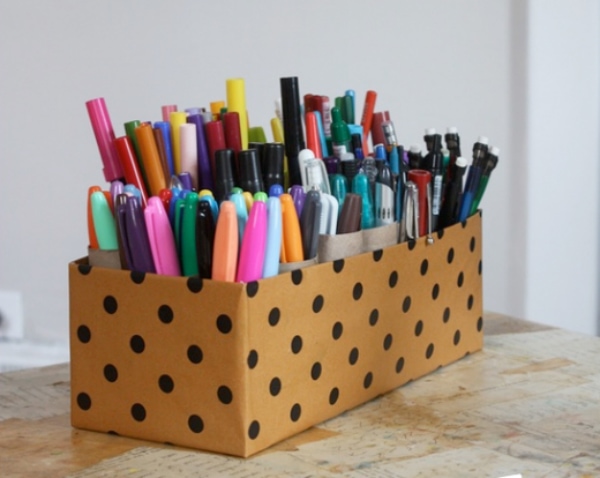
Office
If you need a place to store pencils, pens and other office supplies, you can make this neat organizer from toilet paper rolls. A can of spray paint plus a few sleeves glued to a piece of cardboard.


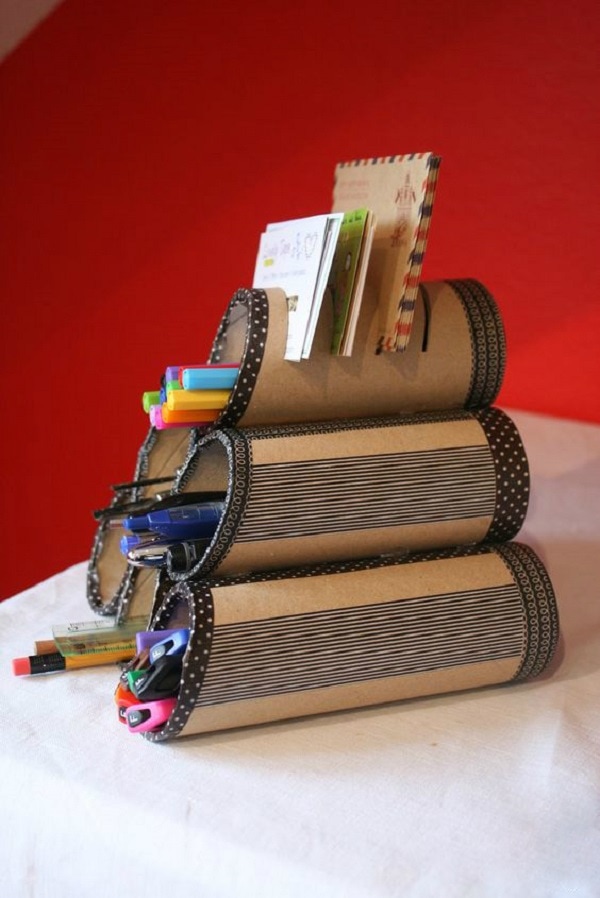
Organization of cells in a cardboard box
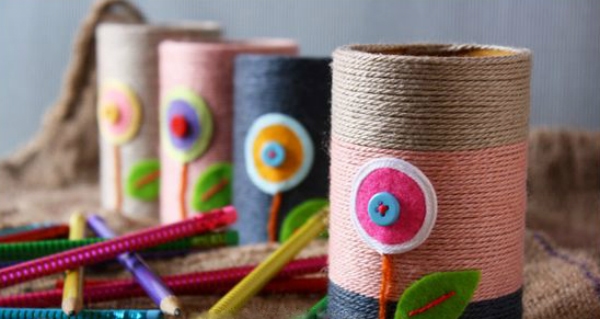
Designer organizers

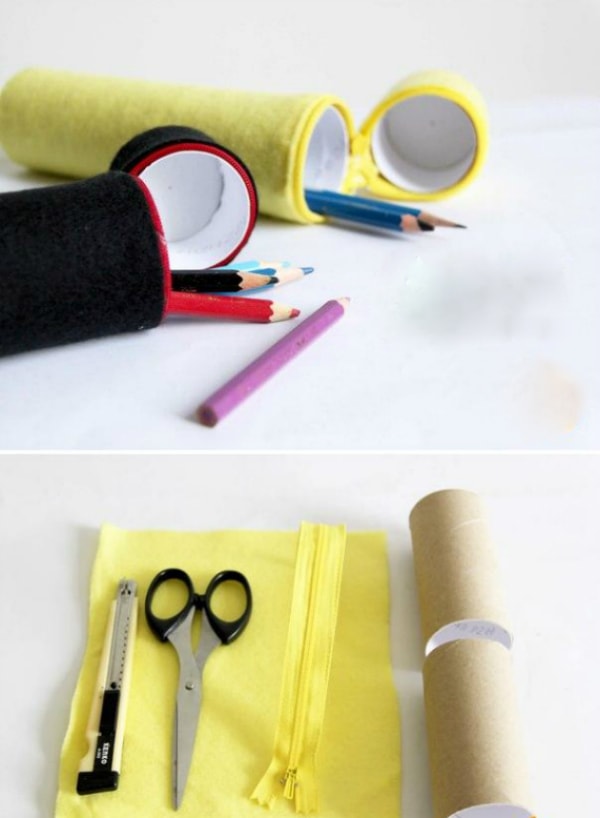
Pencil case
To make such a pencil case, you will need to work a little, but what a pleasure it is to use something made with your own hands!
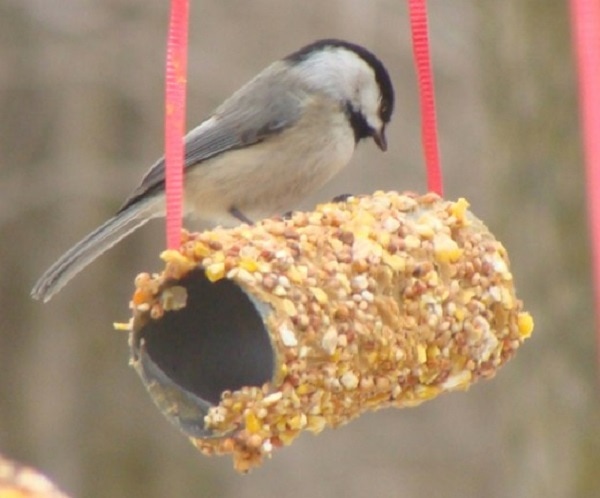
Bird feeder
Take care of your feathered friends by making a simple bird feeder. Spread peanut butter or something sticky on the roll, then roll it in the kernels.


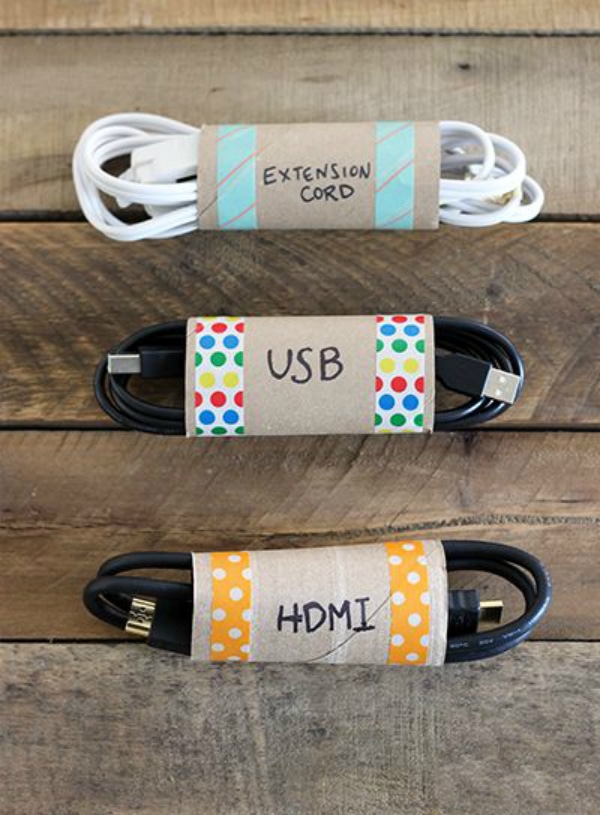
Storage
Cords
This way, you no longer have to untangle the cable to charge your mobile device.


Yarn

Scarves
Fold the scarf or handkerchief and place it on the roll. Then all the rolls can be placed in one box.

Wrapping paper or wallpaper scraps

Crafts and toys
Toy storage container
Are you tired of toys scattered all over the house? Perhaps such a garage will interest your child, and he will be happy to put everything in it.

Useful tips
Making a rocket is always interesting, especially with children.
You can compete or just play with a toy rocket and launch it into the air.
There are many different ways to make a rocket with your own hands, and we will tell you about some of them.
Option 1
How to make a flying rocket

You will need:
1 sheet of paper
Adhesive tape (electrical tape)
Scissors
Ballpoint pen large tube (for launching a rocket)
Glue gun (can be replaced with PVA glue, but it will take longer to dry)

1. Cut the paper into 2 halves approximately 5 cm wide.

2. Prepare a ballpoint pen and disassemble it to get a tube.
3. Attach a piece of duct tape to one of the paper halves. Flip this paper over and wrap it around the handle to create a rocket body.

4. Secure the curled paper with duct tape. You can use tape to completely wrap the body and then pull out the handle. You can trim some uneven ends with scissors.

5. Seal one end of the rocket body with duct tape.

6. Prepare 3 pieces of duct tape. They need to be folded so that they form tail fins for the rocket (stabilizers).

7. Take one piece of duct tape and fold it in half, but do not glue it completely. Using scissors, cut the tape at an angle of approximately 45 degrees to obtain a triangular stabilizer shape. You only need to prepare 3 of these things.

8. Attach the stabilizers to the rocket using the parts you didn't glue together. Attach them at equal distances from each other around the base of the rocket.

9. Take the other half of the paper and make a cone out of it, which can then be attached to the body.

10. Cut off the excess portion of the rocket nose and wrap the cone with tape to reinforce it. Pay special attention to the tip of the nose.
11. Fill the cone about 3/4 full with glue. Take the rocket body and insert it into the cone with the sealed part. Hold in this position for a few seconds to allow the parts to set.
To launch a rocket, simply insert a tube (disassembled handle) into its body, hold it with two fingers and blow hard! The rocket will fly even higher if you use a pump.
Option 2
How to make a rocket out of cardboard

A very good rocket can be made if you use a cardboard cylinder from cling film, foil or toilet paper.
Just prepare: a cardboard tube, colored paper and scissors.
1. Prepare colored paper and cut out a quarter circle from it.


2. Glue a cone from the blank. If necessary, trim it to size. Also make several cuts along the edge.
3. It's time to glue the cone to the tube.


4. Decorate the rocket. You can use colored paper, stickers or markers.
5. Your rocket needs wings. They need to be cut and glued. Also, do not forget about the valves for gluing, which must be left in advance.
6. Glue all the wings to the rocket.


Option 3
Origami rocket

This rocket model is very beautiful, and you simply must make it with your children. Everyone will have a lot of fun and everyone will be pleased with the end result.
Assembling such a rocket is not difficult, just do everything as shown in the video tutorial.
The assembly itself should take no more than 15 minutes. You can make it from colored paper.
Origami paper rocket
Another version of the origami rocket.
Option 4
DIY paper rocket

Such a rocket can be made for children. So that they play, dreaming of flying into space.
The most interesting thing is that such a rocket is launched if you blow.
Prepare a disposable deep plate (bowl) as a base.
Prepare a paper cylinder from foil, paper towel or toilet paper and use it to make a rocket as shown in.
Prepare thick paper and make a tube out of it.
Make a hole in the disposable plate, the diameter of which is slightly larger than or equal to the diameter of the tube.
Insert the tube into the hole. You can secure it with tape or tape.

All that remains is to launch the rocket - just put it on the tube and blow hard and the rocket will fly.
You can download the markup of all the necessary parts.
Option 5
Paper craft. Rocket.
To make this easy paper rocket model, you will need colored paper and colored tissue paper.
* The body and stabilizers are made of colored paper, and the parachute for its smooth descent is made of colored tissue paper.
* Prepare a sheet of paper measuring 170x250 mm and make a cone out of it as shown in the image.
1. Preparing the cone

The paper will curl more easily into a cone if you stretch it between the table and the ruler.
Apply glue to the edge of the cone and glue it together.
Prepare a template for the base of the cone. It can be made from cardboard or thick paper. It is worth noting that the template is needed because it is used to trim the rocket body.
Now you need to put the template on the finished cone, draw a line with a pencil along which you will need to cut with scissors to get rid of the excess.
2. We are preparing stabilizers.

Prepare 3 sheets of thick colored paper measuring 8x17 mm.
Each sheet needs to be folded in half lengthwise and placed on each according to a template (N1 and N2) and traced with a simple pencil.
Cut out the stabilizers.
You need to bend the edges of the stabilizers and connect them with glue.
Our rocket has three pairs of stabilizers (large and small). They are there to give the rocket stability during flight.

On the template, mark 3 points that are equidistant from each other (it's like dividing a circle into 3 equal parts).
Using a template and three marks, mark three points on the rear of the rocket and connect these points to the nose of the rocket.
Using the marked lines, begin gluing the stabilizers.
3. To make a parachute canopy, prepare tissue paper. Its size should be 280x280 mm.

Fold the paper several times as shown in the image and cut it. You have a dome.
4. Prepare slings from threads. There should be a total of 8 slings of the same size.
For the desired size, calculate 1.5 times the length of the parachute canopy diameter and add the length of the rocket body to the resulting value.
Now you need to glue the lines to the parachute canopy. Paper patches will help you. After this, fold the parachute canopy so that the lines along with the patches are collected one to the other.