Star News


How to make maple leaf quilling. Quilling Paper Leaves
Today we have a gift for quilling lovers. And fans of this technique every day is becoming more and more. After all, quilling is not only a way to have a good time and make amazingly beautiful things, but also a very useful activity for children. It develops fine motor skills and imagination.
English word killing comes from the word kill , which means "bird's feather" in translation.In Russian, this type of needlework is sometimes also called "paper rolling" and "paper filigree".
Today for you a master class on making a maple leaf using the quilling technique.
Rice. 1-3 We need a sandwich of three sheets of corrugated fiberboard, glue, a maple leaf template and transparent tape. Thanks to the tape, the sheet will not stick to the template.
Rice. 4-5 Prepare the following tools and materials:
- pins
- scissors
- tweezers
- strips of paper 3 mm wide (red paper - density 130 g / m2, yellow and orange - 80 g / m2)
Rice. 6-9
From red paper, make the "skeleton" of the sheet using a template, pins and tweezers.

Figure 10-12
From yellow paper, make the elements "eye" and "triangle" and fill the center with them. And from orange paper, make the edges of the sheet. Thus, the sheet will turn out light in the middle and bright at the edges. This makes it look like a real maple leaf.

Rice. 13 At the end, stick orange tape around the entire outline of your sheet.
Rice. 14-15
Color your leaf with ink and a sponge. The rule is the same - bright yellow in the center, bright and dark - at the edges.

Golden time Autumn- this is certainly the most colorful and vibrant time. However, even such golden landscapes that you and I can watch from the window cannot drive away autumn sadness and despondency from us. It’s rainy and cloudy outside, which means it’s time to go headlong into your favorite pastime, needlework.
There is an incredible amount of all kinds of needlework that helps you create amazingly beautiful things with your own hands: paintings, jewelry, figurines and much more.

In this article, the news portal "site" has prepared for you the magical beauty of the work made in the technique of quilling (paper rolling). The works are amazing, and you will not believe that you can handle the creation of such masterpieces! The quilling technique is so simple that everyone can master it. The main thing here is not to be lazy, to be neat and attentive.
And just as there is a golden autumn outside the window, we have selected creative works in the quilling technique on a topical topic.
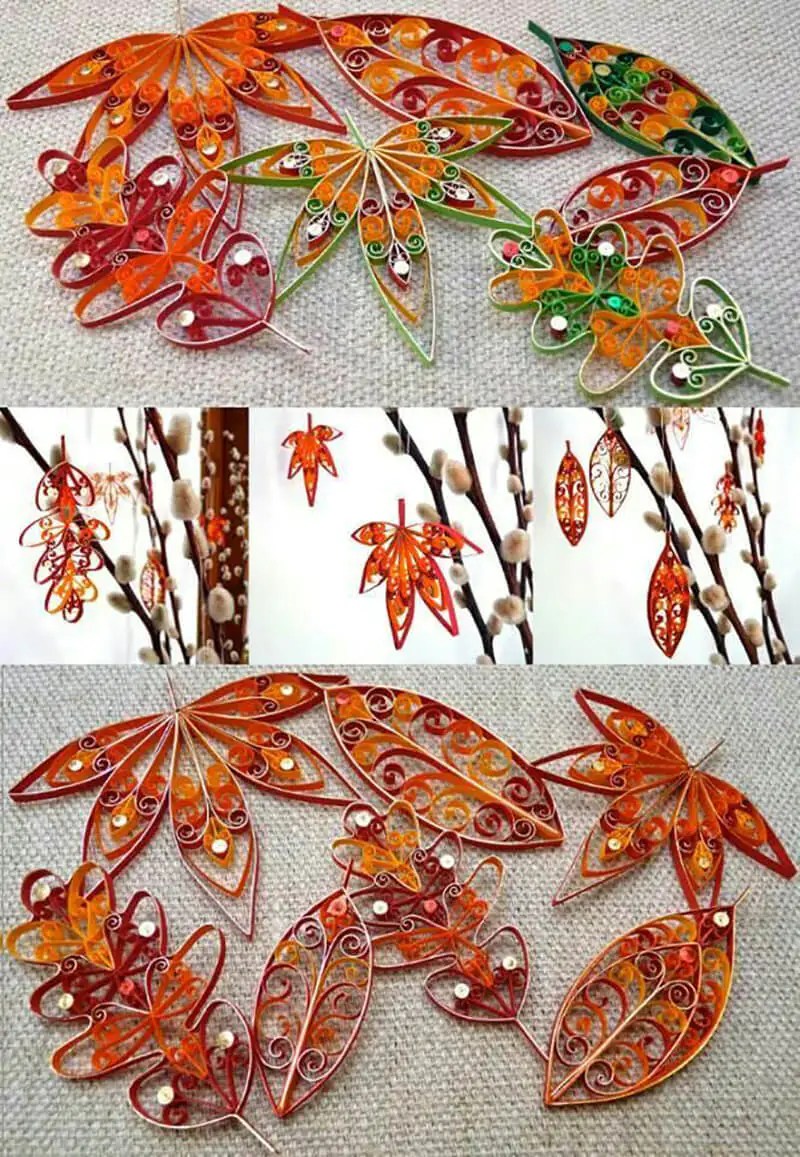
Quilling leaves

So what falls under the theme of Autumn? Of course, such bright and magically beautiful autumn leaves. You can place ready-made quilling leaves in frames and hang them on the wall, decorate homemade greeting cards with them, and even, you won’t believe it, quilling leaves can become earrings and a pendant!

We bring to your attention some original and beautiful ideas for making autumn leaves using the quilling technique. In fact, the work is not difficult, but you must admit that they are amazingly beautiful.


To create such works, you can use special quilling paper sets, or you can cut any decorative paper into identical thin strips yourself.
maple leaf quilling
Quilling Tree
Quilling autumn tree

Autumn is not only the leaves themselves, but also, of course, trees with lush golden crowns. Create voluminous works using the quilling technique and your walls can be decorated with such luxurious autumn gardens.
Greeting cards, decorated with autumn quilling scenes, will be a wonderful exquisite addition to any gift for any occasion in the fall!

Interior paintings and panels on the theme of Autumn will not only decorate your apartment or country house, but also a luxurious gift.

We wish you not boring autumn evenings in the company of paper stripes and your boundless imagination!
Outside the window is autumn, and it's time to resort to autumn quilling. Why not - what else to do on rainy autumn evenings, if not needlework. And if you involve younger family members in it, you can have fun and create cute crafts with your own hands that will decorate the children's room - or maybe move to a garden or school. To please others with bright colors and its unusualness. And mom will secretly rejoice: quilling classes perfectly develop fine motor skills, imagination and perseverance. Shall we try?
Autumn quilling, in my understanding, is a variety of leaves. They can be hung on ribbons to the window cornice - it will turn out warm and unusual. I will describe several options for creating leaves using the quilling technique in this master class.
To make leaves in autumn quilling you will need:
quilling tweezers (you can get by with a split toothpick);
measuring ruler for quilling (you can do without it);
PVA glue with a brush;
cut paper for quilling (you can cut ordinary two-sided colored paper with full coloring);
ordinary tailor's pins;
a sheet of paper for a sketch or live leaves for a sample;
thick bulky cardboard or an unnecessary box - to fix the work.


Autumn quilling: crafts leaves
I bring to your attention three options for different leaves made using the quilling technique. All of them are extremely simple, they can be easily repeated even by those who have never dealt with this needlework technique. Of these three, the most complex is the maple leaf, and the simplest is the rowan twig.
Module Basics
We cut the paper into thin long strips or buy ready-made cuts for quilling. The length and width of the stripes may vary - choose the option that you like best. We insert one tail of the strip into the crevice of quilling tweezers.

And we begin to turn the tool, winding the strip around the rod.

We twist to the end of the strip.

Lubricate the tail on the inside with PVA glue, but do not glue it yet!

We insert the tweezers with a paper strip wound on it into the hole of the quilling ruler (if there is, if not, then just loosen the winding a little).

We release the tail and give it the opportunity to unwind to the size of the hole in the ruler. If he does this reluctantly, we help him fill the space, and press with tweezers (without removing it) to the place of gluing so as not to deform the circle.

We take out the tweezers, and leave the circle to dry in the ruler.

We make a lot of circles of the main "autumn" colors, so that during the assembly of the sheet we do not have to be distracted by twisting the paper strips.


Maple leaf in quilling technique
You can draw a maple leaf template by hand, find a template on the Internet, or trace a real maple leaf! The last option seemed to me the most interesting.


We attach the template to the box on which it will work. This is a keyboard box for me, and I apologize in advance for its flickering in the frame. Handy handy tool.

We stick tailor's pins along the axes of the future sheet, piercing the template and the box. It is advisable to make a template from tracing paper or draw it on the glossy surface of the box so that the quilling elements do not stick to the work surface.

Making axes. To do this, fold the green strip in half, coat one part with glue from the inside, and glue it together, as shown in the next photo.

In the same way we make the lateral veins of the leaf.

Let's start assembling. We give each circle a shape with our fingers - it can be a droplet, an “eye”, a semicircle and more intricate shapes.

Having attached one figure, you will already see what the next one should be, so that there are no gaps between the figures or they are minimal. Glue is applied to the figures only at the junction with neighboring modules or leaf veins.


I started with orange, planning to move to yellow towards the edges of the sheet. Therefore, to begin with, I laid out the shape of the orange spot.

When I considered it sufficient, I “increased” the necessary shape of the maple leaf using the quilling technique with yellow modules.


To keep the sheet better, I glued it around the perimeter with a strip of paper that matches the color of the veins in color. Start gluing from the tail - so that the tail is as dense as possible, it was later used to hang the leaflet. Considering that it takes a lot of paper to create such a craft, the leaflet comes out very weighty.
Be sure to repeat the bends of the sheet, wrapping a strip of paper into the corners with the same tweezers with which I wrapped the spirals.


Please note that while pasting the pins, I still do not remove!

And here is the brother of our real maple leaf. Similar?


Oak leaves in quilling technique
I decided to make the oak leaves green. And in order to indicate belonging to the autumn quilling, the central vein and contour were made in contrasting, elegant, orange.
To begin with, I made a lot of green paper spirals of different diameters.

Then I stuck 2 pins directly into the box to hold the central vein, but I didn’t draw a sketch anymore, because it’s easy and impromptu to depict the contours of an oak leaf. I immediately made a vein - how to do it, I told above, using maple as an example.

From two small circles I made two semicircles.

I glued them at the top, around the central vein; This is my top sheet.

I made two drops from spirals of the largest diameter.

And glued under the first circle symmetrically on both sides of the vein.

The resulting space between the vein and the drops was filled with two more drops of the same size.


The final touch is pasting along the contour with a paper strip of the same color as the central vein.


Here are some oak leaves using the klilling technique that can be made very simply:

Rowan leaves in quilling technique
For rowan I made orange spirals in two sizes.

One immediately turned into a drop and glued to the central vein like this, as if planted in a cup.


I attached this whole structure with pins to the working surface in a way already familiar to you and glued the vein itself.

All spirals turned into drops.

And then I glued all the drops alternately around the central vein.

The upper and lower leaves of the branch are smaller, in the center - larger.
Finished the job by gluing the outline.

Here's what I got.


Continuing the theme of autumn needlework, we draw your attention to the slender.
Eva Casio specially for the site
The highlight of your postcard or scrap page can always be a quilling element. In this master class, I will show you how to make a beautiful autumn leaf.
1-3. To create the correct symmetrical shape of the leaf, I made this template: we make a "sandwich" from three pieces of cardboard smeared with glue and a maple leaf drawn (who to draw
Can not
he doesn’t like it, he can print the outline from the Internet), we glue it all over with tape on top. Scotch tape is required here, because otherwise the leaf may stick to the template.
4-5. Basic materials and tools: glue, paper strips (3 mm), tweezers, scissors, our leaflet template.

6-9. From strips of red paper with a density of 130 g / m2 we make the skeleton of our leaf. To keep everything firmly, we fix it with hairpins.

10. We form rolls from strips 6-12 cm long, and from them we make “eyes”, “droplets”, “triangles”, i.e. all those forms that can fit between the leaf veins and so gradually fill the entire plate.11 -12. We glue the "tail" to the sheet, and then two more triangles to give it a complete shape.13. We paste over the entire plate with paper tape. 14-15. With the help of ink and a sponge, we tint the sheet - I started from the middle, budding yellow, gradually rising higher, using a darker tone. That's all! Our leaf is ready!
Now it can be used as a decoration for pages, postcards, as an earring or pendant.
Other Master classes from the rubric
We bring to your attention a master class on making a panel "Sunflowers", made using the quilling technique. This panel will be a wonderful gift or decorate your interior. For example, such bright sunflowers will perfectly fit into the kitchen interior. Paper rolling (also quilling English quilling - from the word quill (bird feather)) is the art of making flat or voluminous compositions from long and narrow strips of paper twisted into spirals. Finished spirals are given a different shape and thus quilling elements are obtained, also called modules. Today we will learn how to make letters using the quilling technique.Autumn leaves are especially beautiful, and maple is not an exception, but rather a pleasant rule, it is the maple leaf that is an indispensable attribute of the most elegant bouquets. Any crafts, including quilling leaves, are surprisingly elegant in their transparency, because a leaf can have an openwork of any degree of complexity. I suggest you see how simple and easy it is to make a maple leaf of any color scheme step by step, especially since it is this tree that has the autumn riot of colors especially elegant.
To work, you will need the following materials and tools:
- multi-colored paper strips (width - 5 mm, length - 12-15 cm);
- PVA glue (choose a bottle with a thin “nose” to make it easier to work with);
- pencil;
- small tweezers;
- scissors with straight blades;
- tailor's pins with heads;
- foam sponge;
- acrylic paint scarlet, brown or red;
- quilling clip or thin wooden stick like a toothpick;
- maple leaf layout.
For work, I chose stripes of pale green, fluorescent yellow, lemon and green, as I like delicate tones more. More often, however, maple leaves draw attention with red-brown foliage, so you can choose the color of the stripes to your liking. You can use ready-made strips for quilling, or cut from colored xerox paper - this will slightly lengthen the work time, but will give you more options in choosing shades.
The total working time is 2.5 hours.
Description of work
1) Prepare everything you need to make a leaflet, draw / transfer the layout of the sheet onto thin white paper (at the end of the work, the paper can be easily removed and the leaflet will remain transparent and openwork).
2) It will take a lot of strips. Note: Ready-made quilling strips are somewhat thinner than xerox paper, so if you are working in the quilling technique for the first time, I would advise you to use xerox paper.

3) Circle the "veins" of the sheet with a simple pencil, cut out the sheet. Prepare a thick cardboard or foam plate on which the workpiece will lie.

4) Pin the sheet with pins at the corners of the main “veins” (the pins must be stuck in tightly, since a paper bypass tape will be stretched around them).

5) Pull the green long strip across the entire sheet, bend it around the pin. Apply glue droplets as shown in the photo

6) Pull the strip down the sheet, alternately gluing the parts of the strip in the places where the glue is applied. At the middle of the bottom of the sheet, fasten the strips with two pins.

7) To prevent your fingers from getting dirty with glue, use tweezers with which you can hold the strips smeared with glue until the final gluing.

8) Insert pins into the "veins" of the sheet coming from the main "vein". Glue the green strip first to the existing center strip, then circle the strips around the pins and glue the ends to the center strip.

9) We make rolls from multi-colored stripes: Split the edge of a wooden stick by about 6-7 mm, widen the gap, make it smooth. Place the end of the strip between the parts of the stick, firmly press one side of the strip with your finger and twist the strip around the stick.


10) As a result, you should get such a roll, one tip of which is free.

11) It took me about 130 rolls to fill a 13x13 cm maple leaf. The free end of the strip must be glued to the previous part of the twisted strip. As parts of the sheet are filled in, the rolls will need to be given a different shape (examples in the photo). “Droplet” - tightly squeeze one side of the roll with your fingers, “eye” - squeeze both sides of the roll, triangle - squeezing one side of the roll, make a dent on the other side with your fingers, “crescent” - an “eye” curved in any direction, etc.

12) We begin to fill the space between the main veins of the leaf, after which we immediately glue the side green strip. Lubricate the parts with glue and tightly insert them between the “veins”, fix the part on the side with a green edge strip.

13) We continue to insert additional pins, and fill the sheet with details. We give the rolls a different shape as necessary, I did not adhere to any clear structure for filling the leaflet.

14) After filling the entire leaflet, I decided to apply the tone on both sides.

15) For this you need to get a bright brown color, so I chose dark brown and red acrylic paints.

16) With a sponge, which I will apply the tone, I mixed the paints.

17) Pressing the sponge tightly in different parts of the sheet, applied a tone, dried the sheet.

18) The finished maple leaf looks like this. So that it can be used in a bouquet, in the process of working, you can insert a wire for crafts inside the central strip.


