Star news


Graphic dictation lion. Graphic dictations in kindergarten classes: how to teach a child not to be afraid of a school notebook
How and why you need to draw by cells
Graphic dictations are used in several developmental methods at once. However, the benefits (and joy!) they bring are often underestimated. Meanwhile, this is one of the most useful exercises Attention, not only for preschoolers, but also for teenagers!
What is graphic dictation? Essentially, this is just drawing in cells. Listening to the instructions of the teacher or mother, the preschooler marks with a pencil the route dictated by her: two cells to the left, one down, one to the right, three up... Everything seems simple, but in fact this simple activity requires full concentration: you cannot be distracted for a second!

Herringbone
2 up, 6 left, 2 up, 3 right, 1 up, 2 left, 2 up, 3 right, 1up, 2 left, 2 up, 3 right, 1 up, 2 left, 2 up, 3 right, 1 up, 2 left, 2 up, 2 right, 1 up, 1 left, 1 up, 1 right, 1 up, 1 right, 1 down, 1 right, 1 down, 1 left, 1 down, 2 right, 2 down, 2 left , 1 down, 3 right, 2 down, 2 left, 1 down, 3 right, 2 down, 2 left, 1 down, 3 right, 2 down, 2 left, 1 down, 3 right, 2 down, 6 left, 2 down, 1 left.
Why can't you be distracted? Because (and this is the main advantage of graphic dictation) the result is a funny picture: a flower, a house, a man. As soon as the baby sees a drawing in front of him that has appeared as if by magic, he immediately demands: more!
A variation of graphic dictation for the little ones - the “complete the picture” exercise. Offer your child the left half of a symmetrical pattern, for example, our “herringbone”, and offer to complete the right side. To do this, you don’t even need to know the numbers and distinguish between “right” and “left”.
For students junior classes the task can be dictated (if it is important to practice the perception of information by ear), or you can give written instructions, where the direction of the pencil movement will be indicated by arrows - also a very useful exercise.

Tulip
1 ←, 8, 1←, 1, 1←, 6, 1→, 2↓, 1→, 2, 1→, 2↓, 1→, 2, 1→, 6↓, 1←, 1↓, 1←, 2↓, 1→, 1, 1→, 1, 1→, 1↓, 1→, 1↓, 1→, 1↓, 1 ←, 1↓, 1 ←, 1↓, 1 ←, 1, 1 ←, 1, 1 ←, 5↓, 1←.
Of course, graphic dictation is useful not only for training attention. Fine motor skills also develop (than smoother line, the more beautiful the drawing will be), the baby gets acquainted with the concepts of “right”, “left”, “top”, “bottom”, and, of course, the skills of counting within ten are practiced. And it's all in shape exciting game- wonderful, isn't it?

Butterfly
4, 8, 2←, 6, 1→, 2, 6→, 1, 1←, 1,1←, 1,1←, 1, 3←, 2, 1←, 3, 1←, 4, 1→, 1↓, 4→, 1↓, 1→, 1↓, 1→, 1↓, 1→, 3, 1←, 2, 1→, 1, 1←, 1, 1←, 1, 1←, 1, 1←, 1→, 1↓, 1→, 1↓, 1→, 1↓, 1→, 1↓, 1→, 1, 1→, 1, 1→, 1, 1→, 1, 1→, 1←, 1↓, 1←, 1↓, 1←, 1↓, 1←, 1↓, 1→, 2↓, 1←, 3↓, 1→, 1, 1→, 1, 1→, 1, 4→, 1, 1→, 4↓, 1←, 3↓, 1←, 2↓, 3←, 1↓, 1←, 1↓, 1←, 1↓, 1←, 1↓, 1←, 1↓, 6→, 2↓, 1→, 6↓, 2←, 4↓, 1←, 3, 1←, 1, 1←, 1, 1←, 1, 1←, 4↓, 1←, 4, 1←, 1↓, 1←, 1↓, 1←, 1↓, 1←, 3↓, 1←.
When starting to dictate, do not forget to set the starting point - you can mark it on the sheet yourself. The resulting drawing can be used as a coloring book.
For graduates primary school The exercise can be complicated and diversified by giving out a sheet lined in the manner of a field for “ sea battle" In this case, the dictation will look like this: “A7-C12; B3-E2...” The drawing in this case can become infinitely more complex, consisting not only of vertical and horizontal, but also diagonal lines.
Don't be surprised, but graphic dictations popular among teenagers too. True, these are completely different dictations, using colored pencils and pens, but the result can be real paintings!


Finally, graphic drawing- this is a good meditative entertainment for adults, no worse than anti-stress coloring books, only much cheaper. You get funny pictures in the Minecraft style - maybe this is the hobby you'll like?
Prepared by Antonina Rybakova
Teach your child to navigate notebook sheet, while developing handwriting, accuracy and, most importantly, teaching him to write is very difficult. Repeated and lengthy writing leads to a reluctance to learn and robs the child of all the joy from learning. But in kindergarten, where the classes have a lot of time and there are no strict requirements for the child and no limits to academic performance, you can teach children not only to navigate the notebook sheet and not be afraid of the notebook, but also to hold a pencil and pen correctly, strengthen the small muscles of the hand and develop fine motor skills.
Graphic dictations conducted in an interesting, game form have the opportunity to contribute to the development of all of the above.
Fragment of a mathematics lesson in 3rd grade ( school VIII type):
Working with older children preschool age V preparatory group, I applied several techniques and forms of graphic dictations that I developed while still working at school and where they brought tangible results and significant support in the development of writing, counting, motor skills, etc. My goal was, first of all:
- development fine motor skills hands;
- development of the concepts “left / right”, “top / bottom”;
- strengthening numeracy skills;
- development of attention;
- development of imagination;
Along the way, we observed the position of the sun in the sky throughout the day, which means the children also:
- developed powers of observation;
- expanded knowledge about nature.
Stage 1. Preparatory work. Consolidation of left and right hand knowledge
We take a landscape sheet and fold it in half in height, bending the sheet from left to right (the next day - from right to left), aligning the edges. We bend the sheet folded in this way again, but from top to bottom (then from bottom to top). The result is a rectangle. Let's expand it. We have a sheet of 4 rectangles. Draw along the folds with a pencil. In the future, we will begin to use a ruler for this. We count the rectangles, paying attention to the fact that we have two rectangles on the right and left and two rectangles at the top and bottom.
Stage 2. Tasks
Draw a circle in the bottom right rectangle, a triangle in the bottom left, a square in the top right, and a triangle in the top left.
Stage 3. Observations of the sun
Where is the sun in the morning? Show. Name (bottom left rectangle). During the day? Show. Name (top left). After sleep? Show. Name (top right). Let's go for a walk. Show. Name (lower right).
Stage 4. Complicating tasks
Place a red dot in the middle of the lower left rectangle, and a blue dot in the upper right corner of the lower right rectangle. We carry out this work in stages: show the lower right rectangle with your finger, now find the upper right corner in it, put a dot there with a blue pencil.
Stage 5. Observations of the sun
Drawing the sun in different time days, looking out the window. The window is also divided into rectangles.
I note that this work was carried out by me for only 4 months almost every day, in different forms difficulties. But, nevertheless, 2 weeks after the first lesson we began doing work in checkered notebooks. By that time, the children already had the concept of a cage and were able to navigate a little on a piece of paper.
We draw the lines “by hand”, along notebook lines according to my samples. I drew samples for everyone. You can use entertaining game moments preparation: large colored cells, various figures that children traced with pencils of different colors, etc.
Before starting work with graphic dictation, draw a large visual sample on the board, put a large red dot in each notebook. Start working: 3 cells down, 3 cells to the right - this is an auditory sample, a landmark of the point from which we begin to “dance” and build a figure.
First graphic dictation.
The figure is a cage. I say place the tip of your pencil on the red dot. Without lifting the tip of the pencil from the sheet, draw a line to the right 2 cells. Without lifting your pencil, draw a line down 2 cells. Without lifting your pencil, draw a line to the left 2 cells. Without lifting your pencil, draw a line up 2 cells. Connected the lines. What did we get? Square. Well done.
Take a red pencil, trace the square along the lines you drew and color it in.

We performed simple figures every day until the children stopped being afraid of the sheet. I took the material to get started from the manual “Developing our hands - to learn and write and draw beautifully”, authors S.E. Gavrina, N.L. Kutyavina, I.G. Toporkova, S.V. Shcherbinina. (Yaroslavl, “Academy of Development”, “Academy and K”, 2000).

- Do not put a red dot to indicate the start of work.
- Perform not one, but 2-3 figures.
What was the result on the part of the children? The children began to confidently navigate the notebook sheet. They tried to strictly follow my instructions and listened to me carefully. They were very interested to know what would come out of the dictation, what shape it would be.
We have already marked the path of the sun as follows:

And they told it like this: In the morning the sun is in the lower corner of the lower left rectangle, then it rises to the upper right corner of the upper left rectangle. After lunch, the sun begins to sink down to the middle of the upper right rectangle. Before the evening walk, it goes down even further to the lower corner of the lower right rectangle.
The result of such work with a group of preschoolers was that almost all the graduating children were not afraid to do work in a notebook, they began to understand that in a notebook you need to work not in an arbitrary place on the sheet, they began to confidently hold a pencil and pen, did not confuse the right and left sides, and learned note the weather. Their attention also improved, their imagination began to develop, and they became interested in studying at school.
We are all artists at heart. And we all want to decorate our world. Therefore, drawings on the cells in a notebook can help us with this. With them you can easily perform complex and simple drawings. Understand how to draw a heart by cells, or food, flowers, a playful mother cat and her bully kitten. Would you like to be able to make portraits as well? For example, there are such drawings by cells, the photos of which also resemble images of people: a boy and a girl, all these different drawings easy to master.
To understand how to draw colored cells beautiful pictures, it is worth getting acquainted with the technique of applying a pattern by numbers. See what's there different schemes and they are all very easy, accessible even to beginners. They can be mastered quickly. After all, for each of us, in small parts, it will not be difficult to reproduce drawn animals, smiley faces and hearts.
And yet, what small and large, color and black and white drawings there are, made in such a way that they can be easily repeated; and what are the prospects for mastering this technique:
- What are the significant advantages of square drawings for beginners?
- Thematic pencil drawings in cells;
- The scope of application of such original drawings;
- What opportunities do they provide? beautiful drawings in small parts.
Simple drawings: here everyone can be an artist
Everyone can be an artist! This statement absolutely guarantees that all our guests, as soon as they learn how to learn to draw by cells and can download a couple of options on the website, will repeat and decorate everything beautifully. Whatever the purpose of our tips, for example, if they are pictures of squares for 12-year-old girls or drawings of delicious food, they can all be used to hone your artistic skills.We have not only samples of ready-made postcards, but also drawings by cells: diagrams. A hint like ready-made instructions will help you move clearly according to plan, and maybe even complete work of any complexity in your own, familiar, favorite manner. For example, make a drawing of ice cream by cells, or animals, the same cat, or entire compositional illustrations for a personal diary.
This opportunity is provided not only for long-time friends of our entertainment resource, but also new guests will also have a chance to learn this art, they have the opportunity to take a kind of master class, a lesson on depicting all kinds of pictures, for every taste and of varying complexity.


Pictures on various topics
The most attractive thing is that the site has illustrations that are interesting for both girls and boys. And there are neutral themes, for example, drawings on the squares of food, as well as illustrations on the squares of animals: pets or forest animals, there are also fairy-tale ones, such as a unicorn.Especially for all the kids who love cartoons about cute ponies and their friendship, we have prepared a surprise! We have pictures of pony cells. Bright, colorful, they are very attractive to children. That’s why we offer a diagram of how to draw a pony in cells. This and similar “instructions” are quite clear and easy even for a child. And most importantly, they are interesting for kids.


A separate category is drawings based on smiley face cells. They are always interesting and always relevant. They convey the mood and are easy to repeat. For adults and children, this topic is exactly what can bring joy from fruitful work.
It's amazing how often pictures like this help us out. Thanks to them, you can have a great time with your child, no matter how old he is, 5.7 or just a year old. We can use a notepad to jot down sketches during boring meetings or to keep ourselves occupied while on the go. And pictures in cells for a personal diary are generally an irreplaceable thing. Therefore, everywhere and on any occasion, download or draw cute illustrations yourself.
More complex drawings
We are ready to offer more serious and interesting options. It could be the sameGraphic dictations
(Drawing by cells)
Admission to school – important point in the life of a child and his parents. How better baby will be prepared for school psychologically, emotionally and intellectually, the more confident he will feel, the easier it will be for him adaptation period
Graphic dictations or drawing in boxes for preschoolers are a good way to help parents and teachers systematically prepare their child for school and prevent such typical learning difficulties as underdeveloped spelling vigilance, restlessness and absent-mindedness. Regular classes with these graphic dictations develop the child’s voluntary attention, spatial imagination, fine motor skills of the fingers, coordination of movements, and perseverance.
Drawing by cells is a very exciting and useful activity for children.
This is a playful way to develop a child’s spatial imagination, fine motor skills of the fingers, coordination of movements, and perseverance. Graphic dictations can be successfully used for children from 5 to 10 years old. By completing the tasks proposed below - graphic dictations, the child will broaden his horizons, increase lexicon , learn to navigate a notebook, get acquainted with different ways
images of objects.
How to work with these graphic dictations:
Each dictation contains tasks for children aged 5–7 years.
Graphic dictation can be performed in two versions: 1. The child is offered a sample geometric pattern
and ask him to repeat exactly the same drawing in a checkered notebook.
2. The adult dictates the sequence of actions indicating the number of cells and their directions (left, right, up, down), the child does the work by ear, and then compares his image of the ornament or figure with the example in the manual using the overlay method. Graphic dictations are supplemented with riddles, tongue twisters, tongue twisters and finger exercises. During the lesson, the child practices correct, clear and competent speech , develops fine motor skills of the hands, learns to highlight distinctive features
objects, replenishes your vocabulary.
The tasks are selected according to the principle “from simple to complex.” If you start studying these graphic dictations with your child, do the tasks with him in order: start with the very first simple dictations and gradually move on to more complex ones. For classes, you need a squared notebook, a simple pencil and an eraser so that the child can always correct the wrong line. For children 5–6 years old, it is better to use a notebook with a large square (0.8 mm) so as not to strain their eyesight. Starting from graphic dictation No. 40, all drawings are designed for ordinary school notebook
The following notations are used in the tasks: the number of cells being counted is indicated by a number, and the direction is indicated by an arrow. For example, the entry:
During classes, the child’s attitude is very important and friendly attitude adult. Remember that classes for a child are not an exam, but a game. Help your child, make sure he doesn’t make mistakes. The result of the work should always satisfy the child, so that he wants to draw in the cells again and again.
Your task is to help your child master the skills necessary for good study in a playful way. Therefore, never scold him. If something doesn’t work out for him, just explain how to do it correctly. Praise your baby more often, and never compare with anyone.
The duration of one lesson with graphic dictations should not exceed 10 - 15 minutes for children 5 years old, 15 - 20 minutes for children 5 - 6 years old and 20 - 25 minutes for children 6 - 7 years old. But if the child gets carried away, do not stop him and interrupt the lesson.
Pay attention to the child’s sitting position during the dictation and how he holds the pencil. Show your child how to hold a pencil between the phalanges of the index, thumb and middle fingers. If your child doesn't count well, help him count the cells in his notebook.
Before each lesson, be sure to talk with your child about what to eat. different directions and sides. Show him where is right, where is left, where is up, where is down. Pay attention to the baby that every person has a right and left-hand side. Explain that the hand with which he eats, draws and writes is right hand, and the other hand is the left. For left-handers, on the contrary, it is necessary to explain to left-handers that there are people for whom working hand- right, but there are people for whom the working hand is the left.
After this, you can open the notebook and teach your child to navigate on a piece of paper. Show your child where the left edge of the notebook is, where the right edge is, where the top is, where the bottom is. It can be explained that previously there were slanted desks at school, which is why the top edge of the notebook was called the top edge, and the bottom edge was called the bottom edge.
You yourself will also need a pencil and an eraser in order to mark the lines you read. Dictations can be quite lengthy, and to avoid getting confused, put dots with a pencil opposite the lines you are reading.
This will help you not to get confused. After the dictation, you can erase all the dots.
Each lesson includes graphic dictation, discussion of images, tongue twisters, tongue twisters, riddles and finger gymnastics. Each stage of the lesson carries a semantic load. Activities with your child can be arranged in different sequences. You can first do finger exercises, read tongue twisters and tongue twisters, and then do a graphic dictation.
On the contrary, you can do graphic dictation first, then tongue twisters and finger gymnastics. It is better to make riddles at the end of the lesson. When the child draws a picture, talk about the fact that there are objects and their images. Images can be different: photographs, drawings, schematic images. A graphic dictation is a schematic representation of an object. Talk about how each animal has its own distinctive characteristics. A schematic image shows the distinctive features by which we can recognize an animal or object. Ask your child what the distinctive features of the animal he or she has drawn are. For example, a hare has long ears and a small tail, an elephant has a long trunk, an ostrich Long neck
, small head and
long legs
, and so on.
Work with tongue twisters and tongue twisters in different ways:
1. Let the child pick up the ball and, rhythmically tossing and catching it with his hands, say a tongue twister or a tongue twister. You can throw and catch the ball for each word or syllable.
2. Let the child say a tongue twister (pure tongue twister) while throwing the ball from one hand to the other. 3. You can pronounce a tongue twister by clapping the rhythm with your palms.
4. Suggest saying the tongue twister 3 times in a row and not getting lost.
Finger gymnastics
Many tasks, such as graphic dictations for children 6-7 years old and preschoolers, develop spatial thinking and perception of the world around them, perseverance and attentiveness, and most importantly help prepare preschool children for writing and the basics of mathematics.

- this is very interesting tasks which the child must complete on squared paper under dictation. The graphic dictation technique itself is based on developing the child’s attention and fine motor skills. This is very useful to develop before baby will go to school, but it’s not scary if the child has already entered first or second grade, these tasks will be a useful addition to education.
- To complete the graphic dictation exercise, you need to prepare sample tasks, and give your child a piece of paper, a writing tool (pencil, pen, felt-tip pen), a small ruler and an eraser. It is easier for the youngest students to use a pencil; the fourth or fifth year of life is already suitable for this type of exercise.
- You can also make special sheets of paper for preschoolers, on which there will be large squares (not the standard ones of half a centimeter, but for example - 1 cm), they can be drawn in advance or printed. But children must complete the 1st grade graphic dictation on standard-checked notebooks.
You will have a drawing on your sheet, it could be different animals, a pattern or transport. The purpose of the exercise is for children to repeat the actions dictated by you, at the end of which the pattern should be identical to the sample.
Rules for drawing by cells

The tasks follow certain rules; this is not a math lesson, but it still teaches children the basics of counting and the concepts of direction in space. At the very beginning, you place a dot on the paper at the corner of the square (this will be the starting point), it should be in such a place that the child, repeating the pattern, can fit it on the piece of paper. Also, your child can set this point on his own, but you should tell him how much he should retreat from the top and side of the sheet.
Next, arrows will be drawn on your sheet, indicating the sides of the direction of space and numbers indicating how many cells need to be drawn to get the desired pattern. Example: horizontal arrows “5←” – five cells to the left, “1→” – one cell to the right.
Vertical arrows “3” – three cells up, “6↓” – six cells down. Diagonal arrows: “2↖” – two cells diagonally up to the left, “4↗” – four cells diagonally up to the right, “↘” – down to the right “↙” – down to the left.
Options for graphic dictations by cell

- Dictations can be simple or complex, it all depends on the level of development of your child. So, for example, dictation for preschoolers should be very easy, since kids are just learning to hold pencils in their hands and are just beginning to navigate space. But dictations on cells for children in grades 1–2 can be more complex and the pattern can be made in different colors.
- Exercises can be written in text ( short story) or simply have directional designations and numbers. Other dictation options may be intended different genders. So a graphic dictation for boys can consist of drawings that the boys liked, these could be: a robot, an airplane, animals (pelican, rhinoceros, dog, etc.). Whereas for girls the picture can be: a flower, a doll, a cat, etc.
Simple tasks

Simple exercises are considered easy to repeat and form. So, for example, you can teach the basics of geometry using pictures with squares, triangles, trapezoids, rhombuses, etc. To make it easier for your little one to complete the lesson, help and guide him while sitting next to him.
If the baby gets confused, then tell him that he drew in the wrong direction and be sure to praise him when correct action. IN simple lessons the lines must be directed strictly horizontally or vertically. You can draw a hint in the corner of the piece of paper, in the form of arrows and a number of names of directions.
Dog
To draw the “Dog” dictation, we retreat six cells to the left of the sheet and six from the top, put a dot, and start drawing from it:

2→, 1, 2→, 1, 1→, 5↓, 7→, 2, 1→, 3↓, 1←, 7↓, 2←, 1, 1→, 3, 6←, 4↓, 2←, 1, 1→, 3, 1←5, 3, ←2.
Color the dog in yellow, paint her eyes, you can paint the spots with a different color, for example, brown.
Robot
We retreat 6 cells from above and 7 to the left, draw from the point:

1→, 1, 3→, 1↓, 1→, 1↓, 1←, 1↓, 1←, 1↓, 3→, 1↓, 2←, 2↓, 1→, 2↓, 1→, 1↓, 3←, 2, 1←, 2↓, 3←, 1, 1→, 2, 1→, 2, 2←, 1, 3→, 1, 1←, 1, 1←, 1.
Paint it in any color.
Robot (graphic dictation by cells), draw a robot by cells
Car
To draw a car, move two squares to the left of the sheet and 9 from the top, put a dot, and start from there:

4→, 2, 8→, 2↓, 3→, 3↓, 2←, 1, 2←, 1↓, 6←, 1, 2←, 1↓, 3←, 3.
Offer to finish drawing the wheels and windows and doors of the car, and paint it in any color.
Difficult tasks
The difficult lesson is that the shape of the drawing is not simple, it is no longer just squares and triangles, but full-fledged graphic drawings with many bends. In addition to horizontal and vertical lines, you can add diagonals.
This complicates the process quite a lot, and should be done if the child loses interest and completes everything very quickly. You can also add different colors, i.e. one part of the drawing is drawn in one color (red), and for the second half the color changes (blue or green).
Donkey
In order to get a donkey you need to retreat 32 cells to the left and 2 from the top, put a dot and start:
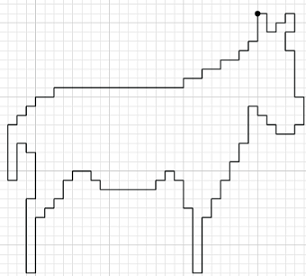
1→, 2↓, 1→, 1, 1→, 1, 1→, 2↓, 1←, 2↓, 1→, 5↓, 1→, 3↓, 1←, 1↓, 2←, 1, 1←, 1, 1←, 1, 1←, 4↓, 1←, 2↓, 1←, 2↓, 1←, 2↓, 1←, 2↓, 1←, 6↓, 1←, 7, 1←, 3, 1←, 1, 1←, 1↓, 1←, 1↓, 6←, 1, 1←, 1, 2←, 1↓, 1←, 2↓, 1←, 1↓, 1←, 1↓, 1←, 6↓, 1←, 8, 1→, 5, 1←, 1, 1←, 4↓, 1←6, 1→, 1, 1→, 1, 1→, 1, 2→, 1, 14→, 1, 2→, 1, 2→, 1, 2→, 1, 1→, 1, 1→, 3.
Color the donkey gray and add an eye.
Airplane
Try to draw an airplane with your baby, use a special “formula” for this.:

2→, 1↘, 5→, 3↖, 2→, 3↘, 4→, 1↘, 2←, 1, 1→, 2↘, 5←, 3↙, 2←, 3↗, 5←, 3↖, connect at the starting point. Color the airplane gray, blue or green, do not paint over the cockpit.
Kangaroo
So, the graphic dictation of a kangaroo needs to start by setting a point, retreating 2 on the left and 5 on top:

1, 2→, 1, 1→, 1, 1→, 1, 1→, 1, 1→, 1, 2→, 1, 1→, 4, 1→, 1↓, 1→, 1↓, 1 →, 1↓, 1←, 2↓, 2→, 2↓, 1←, 1, 1←, 1↓, 1←, 2↓, 2←, 1↓, 2→, 1↓, 4←, 1 , 1←, 1, 1←, 1↓, 1←, 1↓, 3←, connected to the beginning.
Color the kangaroo in Orange color, complete the eye.
Kangaroo (graphic dictation by cells), draw a kangaroo by cells
Giraffe
To draw a giraffe you need to start from the starting point:

1↗, 2→, 1, 1→, 10↓, 4→, set a point, from it 2↘, 1→, 1↓, 1←, 1, returned to the set point, from it 8↓, 1 to the left, 5 , reverse 5↓, 1←, 5, 3←, 5↓, 1←, 4, 1↙, 2↓, 1←, 2, 2↗, 1↖, 1, 1↗, 7, 1←, 1↖ and connect to the starting point.
You can draw spots on the giraffe and finish drawing the eye.
Fish
To draw a graphic dictation of a fish, we retreat six cells to the left of the sheet and seven from the top, put a dot, and start drawing from it:

1→, 1, 3→, 1, 2→, 1↓, 2→, 1↓, 1→, 1, 1→, 1, 1→, 1, 1→, 1, 2→, 3↓, 1←, 1↓, 1←, 2↓, 1→, 1↓, 1→, 3↓, 2←, 1, 1←, 1, 1←, 1, 1←, 1, 1←, 1↓, 2←, 1↓, 2←, 1, 3←, 1, 1←, 2.
Color the fish's fins blue, add an eye, and color the fish itself green or purple.
Fish (graphic dictation by cells), draw a fish by cells

