Star news


How to make a cone from a rectangular sheet. How to make a cone out of paper or cardboard - scan diagram
Print Thank you, great lesson +0
Cone is one of the simplest geometric shapes, which you can do yourself thanks to our step-by-step instructions with photographs. Moreover, its height and width can be controlled and you can create a figure that you like.

- Paper
- Stationery glue
- Scissors
- Ruler
- Pencil
Step-by-step photo lesson:
We select paper for the future cone. Can be used from plain white copier paper to designer cardboard. Each has its own advantages and disadvantages. For example, if you make a cone from plain white paper, the craft will be very fragile. This is its disadvantage, but its advantages include the availability of this material and its low cost. But designer cardboard has opposite meanings. Therefore, we will choose the middle, namely, colored half-cardboard. It holds its shape well, has many colors and is more static to the environment.
Then we draw a circle. Its diameter will determine the size of the finished cone.

Carefully begin cutting out a circle along the contour.

Then divide the circle into four equal parts.

Then we will determine what kind of cone should be made. If we take one part out of four, we get a small thin cone with a sharp tip. To create a cone with a wide base and short length, cut one half from the circle and glue a shape from the remaining three. But for our cone we will select an average diameter for the base, which will give a short length. To do this, cut out half of the circle. By the way, this way we get two cones at once!

We take the edges and glue them with office glue. If you don’t have glue on hand, you can do this quickly with a stapler, just making two presses.

In the end, after the figure has dried, we will get this paper cone with our own hands. Some people still prefer to make a base. So if you have the desire and free time, then why not do it?!

Video lesson
For holiday decor Small decorations in the form of Christmas trees made from scrap materials are perfect. The main advantage of such jewelry is its ease of manufacture. One such material is paper. Paper Christmas trees in the form of cones fit perfectly into the New Year's atmosphere, charging those around with joy and fun. They may have the same base - a cardboard or paper cone, but what freedom for imagination opens up when assembled! We will tell and show you how to make a cardboard cone for a Christmas tree out of cardboard in our article.
If you decide to add several of these crafts to your New Year's interior, then you will probably want to know how to make them yourself. The first thing you need to figure out is the basic question: how to make a cardboard cone for a cardboard Christmas tree?
Two ways to roll a cone
This method is familiar to many. A sheet of cardboard is rolled up like a paper bag, and the unnecessary corner is cut off with scissors. Then the cone is glued together, the lower edge is trimmed so that the figure stands straight, without falling over. The sequence of actions is shown in the figure.

The other option is a little more complicated. An even circle is drawn on a piece of paper using a compass or by eye. You can circle a round object, for example, the bottom of a plate. The circle is then divided into quarters. One of them is cut out, as shown in the diagram, after which a cone is rolled up from the remains and secured with glue.

If your cone is wider than needed, it's easy to fix. The sharper you want to make it, the more you need to remove from the circle. The minimum is one quarter, the maximum is three. You can cut off not a whole quarter, but one and a half, for example.
What to do if the cone does not want to stick together? Regular clothespins will help you here. Press them onto the places that need to be glued.
Bottom for cone
To make a bottom for a figure, place it on a piece of paper or cardboard and trace the edge with a pencil or pen. Draw another line next to it with an indentation of 1 cm to create a circle with a larger radius. Cut a circle along this line and make cuts along the edge so that they rest against the inner line of the circle. Bend the resulting teeth, apply glue to them, and then insert them inside the cone, gluing the bottom to it.
Now that you know how to make cardboard cones, you can start assembling the crafts themselves. A master class dedicated to making Christmas trees from cardboard and paper will help you with this.
Volumetric Christmas tree for the New Year
Let's get started step by step instructions from the base of the craft. Roll the green cardboard into a cone. It is advisable to use green so that the gaps between the parts that will be glued on top are not so noticeable. If you want to do big craft, take an A3 sheet, or glue two A4 sheets together.

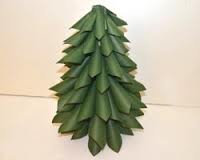
To give the workpiece a greater resemblance to evergreen tree, prepare more needle parts. They can be the most different forms and sizes - how exactly to make them is up to you. The choice of color is also yours, although green is traditionally chosen. If you make the needles white, as if covered with snow or frost, then it is better to make the base white.
Needles in the form of voluminous half-cones are beautiful and quite simple: fold a rectangular piece of cardboard or paper into a trapezoid and cut off its upper side. Fold the wide edge into a triangle and secure with staples or glue.
Sharp triangular needles can be replaced with circles glued to the base by the top edge. Use material different shades Green colour to create a more interesting look.

Glue the needle blanks to the base of the craft, starting from the bottom edge of the cone. For beauty, reduce the size of the needles every three rows. If at the very bottom there are parts measuring 6.5 cm, then 6 and 5 cm should be glued higher, respectively. Ready craft sprinkle glitter or chopped tinsel over dabs of clear glue.
Another option
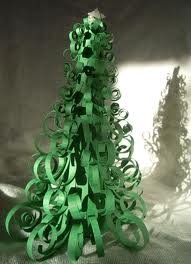
Prepare cardboard cone- basis for the next lesson step-by-step assembly. From colored paper, colored on both sides, cut not very long thin strips and wind each of them onto a pencil. This will make them wavy and curly. You can twist the strips with the blade of scissors, carefully moving it from one end of the strip to the other, while pulling out the part. Glue the twisted strips to the cone. It turns out to be a fluffy, airy Christmas tree.
Christmas tree cone made of paper droplets
Glue teardrop-shaped needles onto the pre-prepared cone-shaped frame. They are made like this: the ends of strips of paper of green or any other color are glued together to form a drop. The lower elements should be slightly larger than the upper ones, as shown in the photo.

Christmas tree in the shape of a cone made of paper strips
Horizontally glue wide strips of paper with cut fringes onto the cardboard base. The color of the paper, again, can be anything. Cut the strips into small needles, leaving a little space at the edge. When the glue has hardened, run scissors along the needles, bending them upward. A Christmas tree made from corrugated paper.
You will learn more about making cardboard cones from the videos below.
How to make a cone for homemade Christmas tree?
- Take a sheet of cardboard and roll it as shown in the picture.
- Draw a circle on the cardboard (you can use a compass, or you can circle any round object, for example, a plate). Cut it out. Now use a pencil to divide it into 4 equal parts and cut one of them (see picture below). Roll the remaining shape into a cone and glue the edges together.
A cone made of cardboard or paper can be rolled from any piece, rectangular sheet paper or round. If you twist it from a rectangle, then there will be an extra edge left and a second sheet of paper with a cut out diameter will help to cut it evenly. insert the edge of the cone into the cut out circle, circle and smooth edge ready, see diagram below. Or you can cut it out of a circle. If you make a cone from a whole circle, then the cone will turn out to be very wide; if you make it from half a circle, then it will be smaller. You can practice on a simple piece of paper from your notebook and see what size cone you get. And you can also cut out the tape with an allowance for gluing or glue the edges overlapping.
There is nothing difficult about making a cone with your own hands for the New Year tree.
You just need to first cut out a circle and then cut out a certain part in the circle as shown in the photo. Connect and glue the two parts and you get a cone as a base for a Christmas tree.
There are several ways to make a cone out of paper. You can make it more rounded, but low, as suggested in this video, then the Christmas tree will turn out to be low and plump.
Or you can take a larger sheet of cardboard and twist an elongated cone for a tall and slender forest beauty craft. You can wrap such a cone with tinsel, thread, felt, foil and other materials.
You can make such a Christmas tree by making a cone out of cardboard, and then decorate it with green corrugated paper or green petals. satin ribbon using the kanzashi technique. You can also watch these techniques in more detail in the video.
I suggest you make a cone for a homemade paper tray in the same way as shown here:
First, we cut out a part of such a shape as in the first picture, then we twist it and secure it with glue.
By the way, with the help of such a cone you can get something like this:
Most The best way- this is on a sheet of paper, you can use an ordinary plate to draw an even circle, which is then divided into four parts. We cut out the fourth part of such a circle, after which it will be very easy to roll it into a cone. Don't forget to secure it with glue.
The easiest way is to make a cone for a homemade Christmas tree from cardboard. Look at this version of a DIY Christmas tree. Quite original and simple:
Here's another original version:
And this is what the Christmas tree should look like in the end:
You can make a cone for your future Christmas tree in the same way as a regular cone for any other crafts. Here all you have to do is choose the size of your Christmas tree. The more paper you take, the larger the cone you will get.
A cone for basting is not easy to make, but very simple. On a sheet of Whatman paper or thick paper draw a circle of the desired diameter with a pencil. Then use scissors to cut and remove a segment approximately a quarter of a circle in size. Roll the main part into a cone and fasten it with a stapler or glue it together, trim the edges with scissors. The figure shows everything quite clearly.
Typically, a cone for any crafts is made of cardboard.
Here are two ways you can do it:
Then glue the edges together and trim off the excess cardboard at the bottom with scissors.
Such different Christmas trees
Beautiful handmade Christmas trees are perfect solution for decorating your home for the holiday, as well as for small gift For loved one. It's so important to share festive mood with other people. There are a lot of options for such Christmas trees. Children can make a Christmas tree from a cardboard cone. They will enjoy this activity and will help them realize their creative potential.


Adult craftswomen make magnificent crafts from various papers, decorative elements, threads, tinsel, sweets and even feathers.


Inspired? Now look carefully at the photos of all these beautiful crafts. What do they have in common? Of course, this is a cone-shaped base. Moreover, each Christmas tree has its own. If the Christmas tree is intended as a floor or table composition, then you don’t have to do the bottom. But there are also crafts in which the bottom of the cone must be closed. Read below to learn how to make cardboard cones for the base of these Christmas trees.
Cones without bottom
The best material for making the base for Christmas trees is cardboard.
Since decor sometimes weighs quite a lot, it is better not to use paper for the base. It is only suitable for making children's crafts or Christmas trees decorated with paper decor.
To make a conical base you will need:
- Cardboard;
- Scissors;
- Glue or tape;
- A compass or round object that can be traced along the contour (plate, bowl);
- Pencil;
- Ruler.
The thickness of the cardboard should be selected depending on the weight of the selected decor. If the decor is quite heavy and the cardboard is thin, the base may not be able to support it and the tree will turn out to be unstable and will fall on its side.
You can make a paper cone using several methods. To implement the first one, you need to fold the cardboard into a little bag, as in the figure:


Next, the excess cardboard from the bottom side is cut off with scissors. This must be done exactly as in the diagram, otherwise the product will collapse. Glue the side edge of the cone with tape or glue. This method is convenient because you can independently and without calculations adjust the height and width of the cone.
Making the bottom
Products such as topiaries or Christmas trees with legs, as well as Christmas trees using the sweet design technique, require conical bases with a closed bottom. Small master class will clearly show you how to make a paper cone with a bottom.
To complete the job, you will need the same set of tools as to create the cone itself.
Now let’s take a step-by-step look at making the bottom. Take the finished cone and measure the diameter of its base using a ruler.

As you know, if the diameter is divided in half, you get the radius. Make the necessary calculations and use a compass to draw a circle that matches the size of the base of your cone.

Do a fitting. The edges of the drawn circle and the edges of the cone must match in size.

To secure the bottom to the base of the cone, you need to add 1-2 cm. Draw a second circle and cut it out.

Cut the distance from the edge of the outer circle to the edge of the inner circle with scissors (step is 5 mm).

Lift up the cut edges.

Lubricate with glue and insert the bottom into the base of the cone.

The bottom for the cone is ready, you can start creating a unique decor for your Christmas tree.
Sheets of paper allow you to create a wide variety of objects. It can be complex crafts, like a high-quality notebook or a model of a ship, or maybe even very simple ones. For example, some people are interested in how to make a paper cone with their own hands. Such a simple figure can be used for various purposes, including to create a Christmas tree decoration.
First, you need to understand the basics of creating cones. Then, with the help of various additional elements, from them it will be possible to build original elements decor, even in the form of animal faces. The most common craft made from a paper cone is a small Christmas tree.
How to make a paper cone with your own hands?
The materials used are completely determined by why the cone is being made. The most simple options You don’t even need to glue it from a regular sheet of paper - just fasten it with some kind of clamp. If you have to build a beautiful Christmas tree toy or a decorative element, it is better to find a suitable one colored paper or cardboard.
To create an even cone you will need a round sheet. It can be done different ways, for example, cut it out from a regular A4 format, marking the required area with a compass. If you don’t have a compass at hand, you should use a pencil and string. The thread should be equal to the radius of the future circle. It is held with a finger in the center of the sheet in a taut state, and a circle is drawn with a pencil.
How to make a paper cone with your own hands:
- On the finished circle you need to draw two lines to make a cross dividing the sheet into four even parts.
- Then one of the quarters is cut off.
- All that remains is to fold the required form and secure it with glue or clothespins.

After this, the cone is ready, but, if desired, you can make a bottom for it. To do this, place the resulting figure on a sheet of paper. A circle is drawn around it, but before cutting it out, about another centimeter is added to the shape. From this distance you need to create teeth with which the bottom will be attached to the cone. They are coated with glue and attached.

When working with thin paper You can make a cone from a regular rectangular sheet. To do this, it is twisted, as shown in the photo below, and then the excess edge is cut off. Sometimes it can be used to create the base of a cone, or it may be enough to simply bend it inward.

Creating a Christmas tree
From a ready-made paper cone you can create an excellent Christmas decoration in the form of a Christmas tree. A wide variety of materials are used, but the overall manufacturing system remains common.
- Tape or cling film is glued to the paper cone.
- Thick woolen threads are attached on top of them, using PVA or other suitable glue.
- After they dry well, you need to remove the cone from them. The threads must retain its shape.
- All that remains is to add elements for decoration. It may be small knitted balls, glitter paper stars or any other materials you have on hand.

For creating Christmas tree You can use a completely different technique. Papier-mâché will come to the rescue, with which you can also make a paper cone. Of course, much more material and time will be required, but the finished structure will be durable and stately.
- For work you will need newspaper or magazine trimmings. Almost any paper will do. A base is also needed. You can take any plastic cone, for example, from children's toys. It will not be damaged during the manufacturing process.
- The selected base is coated with PVA and a layer of paper is placed on it. When it dries, you can apply the next one. In this way, the process continues until sufficient thickness is gained.
- Now you need to remove the base. Sometimes you have to cut the shape to do this.
- Then, instead of the base, you can mark a rod inside, which will act as a frame.
All that remains is to glue the cut halves back together, and you can start decorating the future Christmas tree. For example, you can actually paint it or wrap it with threads, as in the photo below. This scheme will allow you to create any variants of Christmas trees, depending on your desire and the existing base.

What else can you make from a paper cone?
A paper cone blank can be used to make packaging for a sweet gift. To do this, add pieces of double-sided tape to the edges, on the inside, or simply coat them with glue.

- Sheets of corrugated paper are then placed over these areas.

- To make it fit beautifully, you need to make small folds.
- After this, the workpiece with paper is glued into a cone.
- Sweets or other items are placed inside the craft, and the corrugated sheet is tied with a ribbon on top, forming a bag.
- You can add other decorative elements to the finished packaging.

The paper cone can be used for other crafts as well. For example, if you make it from thick cardboard, then, using fabric, you can create such animal toys or Christmas tree decorations.


Video instruction
One of the main attributes of such a holiday as New Year, is a Christmas tree. Traditionally, the Christmas tree is decorated with tinsel and toys, but you can also make an original one cardboard Christmas tree. Making such a tree is quite simple, the main thing is to correctly form the cardboard base in the form of a cone, besides, such a tree does not have to be a New Year's tree, it can fit into the interior of any room as a decorative element.
This article will provide instructions on how to make a cardboard cone for your Christmas tree. Will also be described various options decoration.


A selection of educational video lessons
How to make a cardboard cone for a Christmas tree: 1 way
One of the main advantages of Christmas trees with a cardboard base is that the technique for making them is very simple, but there are many options for decorating the cardboard base.
To make a cardboard cone with your own hands, you will need a sheet of cardboard, scissors and glue. There are two ways to form it.
The essence of the first option is that you need to roll a sheet of cardboard in the shape of a horn. Then trim off the excess edges that protrude from the wide part of the cone. Then the edges need to be glued, overlapping them on top of each other. Next, the bottom edge must be cut so that the cone stands stable.
How to make a cardboard cone for a Christmas tree: method 2
The second option assumes that you first need to draw on a sheet of cardboard smooth circle, then divide it into four parts. Next, one part needs to be cut out, and a cone should be formed from the remaining parts of the circle, securing the edges with glue. For balance, you should also cut off the bottom edge.
The stages of forming cardboard cones are shown in the photo.


Master classes on decoration
Below will be a master class that will describe how to decorate the base of a Christmas tree - a cone using paper needles. To work you will need sheets of colored paper in green or some other color, scissors and glue. The process will be described step by step.
First of all, on a sheet of colored paper you need to outline rectangles with different sides. In order to ready product looked beautiful, you should reduce the size of the needles every three rows, so the bottom rows of needles will be made of rectangles seven centimeters wide, the next three rows will be made of rectangles six and a half centimeters wide, then six centimeters, and the top row of needles should consist of rectangles wide five centimeters. From each cut rectangle you need to make a trapezoid, that is, cut off the top side. Then each trapezoid should be folded into a triangle shape and the lower wide edge should be fastened with a stapler, and the upper edge will be glued to the cone. Paper needles must be glued in rows.
Instead of voluminous needles, you can also glue circles of the same diameter, cut from sheets of colored paper, in rows.


There are other ways to decorate a Christmas tree with a cone-shaped base. Below we will describe step by step how to decorate a Christmas tree using stripes.
The first step is to make a cone. Then strips should be cut from sheets of colored paper; the length of the strips depends on the diameter and height of the cone. Then each strip needs to be wound onto a pencil so that they are twisted. Next, the prepared strips must be glued to the cone; it is desirable that the bottom rows consist of long stripes, and the upper rows are made of strips of shorter length. The drawing will illustrate ready-made option Christmas tree decorated in this way.
Another option is to decorate the Christmas tree with drop-shaped needles. The scheme is simple. To make such needles, you need to cut strips from a sheet of colored paper and glue the edges of each strip with glue. Then drops bigger size should be glued to the cone as bottom rows, and smaller drops should be glued to the top.
Paper cones can be used in a variety of home projects. Needed sharp nose For paper rocket or a snowman? Want to make a party hat? Paper cones have enormous potential in terms of appearance, besides, they are quite easy to make. With the finished cone in hand, you can go ahead and decorate it in all sorts of ways.
Steps
Making a cone from a paper circle
- An incorrect shape will greatly affect the result of your cone. Put extra effort into cutting out the circle into the correct shape.
- To achieve round shape, you can use a compass or circle a round object, such as a lid or a round container.
-
Draw a triangular wedge. Use a template to cut the circle on both sides to create a wedge. To draw your own wedge, make a mark in the center of the circle. To make a wedge, take a ruler and draw two straight lines from the center point. The closer these lines are, the smaller the wedge will be and the wider the bottom of your cone will be.
- Use a compass or protractor to determine the center of your circle if you are not sure where to place the dot. If you initially used a protractor to draw a circle, then in order to save yourself time, first mark the center, and only then proceed to draw a circle around it.
- You can also draw a triangular wedge using a ruler and pencil.
-
Cut a triangular wedge into the circle. To make a cone with a small bottom, cut a larger wedge. Use scissors or a pattern knife to cut the wedge as straight as possible. If you make a mistake, you will most likely have to start over.
Bring the cut sides of the circle together. Bring one slice of your circle together with another to create a cone. Hold the sides tightly and make sure that the bottom edge of both sides overlaps evenly. Your circle should now take the cone shape you want.
- Unfold the paper and try again if the sides don't line up correctly the first time.
- Don't make hard bends in the paper. The cone should be rounded.
-
Cover the inside of the cone with tape. Start by gluing the two cut sides of the paper together to form a cone. Then glue the inside of the cone, placing one side on top of the other and gluing them together. After this, the cone will be ready.
- One straight piece of tape will give your cone the most strength. If you try to secure the inside of the cone with a few pieces of tape, your cone will look sloppy. Use one hand to hold the cone together and apply the tape with the other.
Making a cone by folding paper
Cut out a large triangle. If you don't like the circle method, you can make a cone out of paper triangle. To roll it into a regular cone, one side of the triangle must be long, and the other two must be short and of the same length. The larger the triangle, the larger the cone. Try to keep your measurements and cuts as accurate as possible.
Fold the far corners of the paper toward the center. Take one of the far corners and fold it towards the center so that the edge of the paper is in the center of your triangle. With your other hand, fold the second corner and wrap it around the first. As a result, your triangle should take the shape of a cone.
Line up your cone. If you don't get the paper wrapped perfectly, then you will have to move it a little to align the cone. Pull the folded corners tighter if necessary. If you feel like you haven't turned the corners evenly, you might want to try again.
- If there is excess paper peeking out from the bottom of the cone, your original sheet was uneven. In this case, to continue working, cut off the excess with a modeling knife. If the base of your cone turns out to be smooth, it is unlikely that anyone will notice the mistakes that you made during the manufacturing process.
- The whole process doesn't take very long, so it's best to repeat it several times until you get the perfect cone.
-
Fold the free edges of the cone inward. Excess paper must be wrapped inside the cone. This will allow you to hide all the unevenness and allow the folds to retain their shape. If you folded the paper correctly, all that remains is to take care of the triangular tip, which needs to be folded inward.
- If for some reason you cannot roll it up due to a lack of paper, you can solve this problem by covering the base of the cone with tape, from the outside and inside.
- Try squeezing or releasing the cone slightly if you are having trouble finding the crease.
-
Cover the cone with tape. Although folding over the loose edges helps keep the cone shape, by taping the seam lines from the inside of the cone you will definitely maintain its integrity. Cut a strip of tape and apply it along the seam line. If you still doubt the strength of the cone, cut additional strips and glue them across the top and center of the seam. Once the tape is attached, your cone is ready to use.
- Loose edges can also be glued.
Creating a unique cone design
-
Choose suitable paper. You will be able to think ahead about what material to use if you have a clear idea of what you need the cone for. Some types of paper are better for some projects than others.
Make a paper circle. The height of your cone will depend on the radius of this circle. The larger the radius, the higher the cone will be. Print out the pattern and transfer the figure onto suitable paper. If you decide to draw a circle by hand, try to make it as round as possible.

