Star news


How to make a large flower from napkins. We make beautiful flowers from paper napkins with our own hands
Galina Vorotnikova
Master class on making flowers from napkins to decorate a room
1 step. For making flowers we will need red napkins, white, pink, yellow colors;
stapler or wire, or maybe thread.

Step 2 Take six napkins, unfold and fold exactly on top of each other

Step 3 These napkins needs to be folded like an accordion


Step 4 Find the middle and tighten it with something

Step 5 Use scissors to cut corners or round corners


Step 6 turned out to be such a bow. Now we raise each napkin to separately to the middle


Step 7 turned out so beautiful flower

Next we started experimenting a little. We also decided to make white and pink flowers- it turned out apple color. After all color Apple trees are a symbol of purity, freshness, spring, the beginning of a new life, which perfectly conveys the national joy of all generations in connection with the Great Victory Day.
Step 8 - take three white and three pink napkins, and do exactly the same as with the red ones.


And from the red ones napkins The result was wonderful carnations or poppies. I immediately remember the words of Yuri Antonov’s song
Poppies, poppies, red poppies,
Bitter memory of the Earth.
After all, red color reminds us of the blood shed during the war, of the feat of the dead and surviving soldiers. Red color - the color of the Soviet banner, color Victories of courage and bravery.


Congratulations, Dear colleagues Happy Great Holiday HAPPY VICTORY DAY!
Publications on the topic:
I made this presentation for a competition that took place in the House children's creativity in our city for my son. Maybe it will be useful to someone, c.
On the eve of the celebration of the International women's day I thought for a long time about what gift I could give to the children of my preparatory group.
New Year is considered one of the most favorite holidays for most people in this world. And Happy New Year greetings are the most popular.
I offer you a master class on making a gift for mom “Bouquet for Mom” from colored paper. A wonderful holiday is coming soon.
Dear colleagues, I recently offered a master class on making a costume for the Snow Maiden. But to complete the image of the Snow Maiden there was.
Dear colleagues, I would like to present to your attention a master class on making a Snow Maiden costume. There are a lot of beautiful New Year's ones in the stores.
Morning exercises in kindergarten It is carried out daily, it is very necessary and even important for awakening the body, for raising the mood and development.
In this master class we will learn how to make flowers from napkins with our own hands and assemble a charming bouquet from them. He can serve an original gift and a wonderful decoration for your interior. Moreover, such a product is easy to make, because you don’t need to run around the shops and look for some special means for its execution. Only available means are used or available materials, which can be purchased at your nearest supermarket.

Necessary materials:
- newspapers;
- the thinnest knitting needle you have, No. 1 or No. 2;
- PVA glue ;
- Moment glue, hot glue gun, any other;
- acrylic paint, or stain, dyes for painting tubes;
- acrylic varnish;
- napkins or toilet paper for pasting the base;
- napkins of different colors.
For a wicker pot we use newspaper tubes. If you want to weave a pot more natural effect, for example, imitation of a vine, then tubes twisted from office paper/draft paper will do. They are harder and less obedient, do not wrinkle or flatten. For this bouquet they were used as risers for relief.
We cut the newspaper into strips 4.5-5 cm wide, the length of a strip of newspaper.

If you twist only the top and bottom of the newspaper, the tubes will be white; they can be easily painted over with stain and color. But since acrylic paint will be used here, you can take tubes with letters. We place the knitting needle so that the angle between it and the newspaper is minimal.

Using your fingers, roll it into a tube. It's like we're spinning a thread. Apply PVA glue to the tip of the corner.

Let's wind up some extra tubes (a couple of newspapers) and start weaving. We start the bottom of the pot with eight tubes folded crosswise. We connect two tubes and bend them in half. We go around two riser tubes.

We begin to weave with a rope. We install the front working tube behind two risers, the rear tube in front of the risers. We braid 3 rows with two risers each, from the 4th row we braid one riser each. We weave until the bottom matches the size of the mold. A caviar jar was used here.

Then we tuck the working tubes into the already woven bottom and cut off the tails. Let's move on to the walls of the pot. To do this, we bend one riser behind the next, lifting it up.
We bend the last riser into the first. The result is curved risers wrapped in a spiral.

It will not be possible to straighten them out right away. They need to be aligned during the weaving process. They need to be replaced immediately with tubes twisted from office paper. We connect two newspaper tubes, go around the riser and begin to weave with the same rope. We place the front tube behind the riser, and the rear tube in front. We weave closely with the form.


The risers can also be hidden in weaving, but here a bend was made so that the shape fits well into the pot. The bending is the most basic. We tuck one riser behind the next, bending it into the inside of the pot.

We fill the last riser into the first. We coat the joints thoroughly with PVA glue and when dry, you can cut them off. Or you don’t have to cut it off, since the inside won’t be visible.

Now you need to paint the product. Because the selected colors for the product do not include white, it was decided to use white acrylic paint add a drop of yellow art acrylic paint.

We will paint the pot only on the outside, since the inside will not be visible. You need to paint 2-3 times so that all the newspaper spaces are covered.

Leave to dry for several hours. In the meantime, we will make the base for the flowers. Just crumple office drafts, newspaper or any other paper into a ball the right size. It is important to know that the ball should be slightly larger than the pot. Wrap it with threads and align it well. Now this ball needs to be covered with napkins, like papier-mâché. Green napkins are better for this. Even if there are gaps between the flowers, a green “lawn” will be visible.

Add a little PVA glue to the water, place a napkin on the ball and blot it with a brush. Leave to dry for several hours.
Let's start making flowers. Fold the napkin in half twice and secure it in the middle with a stapler. Let's cut it out round shape from cardboard. We cut a circle along it. Take the first top layer of the napkin and crumple it at the base. Then the next layers of napkins. For speed, you can crumple two layers. In order to cover the entire ball, 20 cm in diameter, with flowers, 48 pieces were needed.

When the pot and the base are dry, glue the base with “Moment”, glue gun or other glue. Let's wait for the glue to dry and start gluing the napkin flowers.

We start gluing flowers from the bottom, alternating colors. On the top of the head we glue the flowers more tightly.

We decorate the pot with a bow. To do this we take: satin ribbons 2.5 cm wide, 14 cm long and 1 cm long, 12 cm long, a ribbon 1 cm wide and long enough to encircle the pot, a ribbon 3 cm long, a needle and thread. We singe all the ends so that the ribbon does not unravel. Sew the bow: fold the ends of the ribbon in the middle, sew first one and immediately the second. Pull the thread so that the bow shrinks in the middle. We wrap it with the same thread. That is, they squeezed, reeled.

Glue the “belt” onto it gathered bow. The charming bouquet is ready. Such flowers will last a very long time and will always give you a good mood.
Did you like the master class? Save it for yourself:
 You can also make this elegant
using one of our master classes.
You can also make this elegant
using one of our master classes.
Fresh flowers are beautiful at any time of the year and always brighten up our lives. bright colors, bring sunny mood and positive emotions. But this does not give us a reason to treat artificial flowers skeptical. If living flowers are a wonderful creation of nature, which we never cease to admire, then non-living ones can turn out to be a real work of art in in capable hands masters and literally come to life. So, today we will create beauty and mood around us, namely, make amazing paper flowers with our own hands.
Let's start with something simpler. Let's try to create a bouquet of cute flowers from napkins.
We will need several colored napkins (according to the number of flowers), Moment glue (universal or superglue), scissors, and a stapler.
Take a napkin and fold it in half and then in half again.


We fasten the layers of the napkin in the center with a stapler.
Using scissors, cut the folded napkin in a circle.

Then, starting from the top layers, crumple the circles towards the center: the top ones are stronger, the bottom ones are weaker. Carefully straighten the desired petals to form a beautiful and neat flower.


If we are making a bouquet in a pot or vase, rather than flowers on legs, we need to prepare both the flowerpot and the base of the bouquet in advance.
The basis of the bouquet can be, for example, a large wad of paper, a ball or hemisphere of foam rubber, or you can make paper ball using papier-mâché technique. To do this, inflate the balloon to the size we need and spread it with cream or Vaseline. Take PVA glue, napkins or thick enough toilet paper. We coat the paper with glue and stick it in even layers onto the ball. When the "shell" balloon becomes sufficiently thick (about 4 mm), leave it to dry. After completely dry paper frame, the ball can be deflated or burst and removed from it.

Let's return to our bouquet. If the base is ready, we begin to glue our flowers to it. We plant them close enough to each other so that the bouquet is fluffy and the base is not visible.
We glue leaves from a green napkin between the flowers to enliven our bouquet. And if you want the bouquet to sparkle, you can decorate the flower petals with beads or transparent beads for a dewy effect.
Finally, bright bouquet ready!
We continue to use napkins. This time we're making shy carnations.
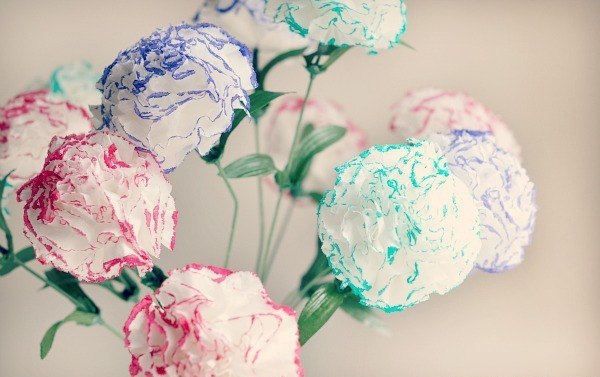
We take napkins of any color you like, you can even take white paper handkerchiefs. We will also need ordinary bobby pins, colored markers or felt-tip pens with a thick rod, and scissors.

If you have stems with leaves from artificial flowers, great, you can use them. If not, then prepare a wire, green duct tape(you can use it instead green napkin and Moment glue).

Let's start with the buds. Fold the napkin as shown in the photo, that is, like an accordion, and secure it in the center with a bobby pin.
Manually, without the help of scissors, tear off the ends of the napkin on both sides. Imagine how long the petals of your carnation will be, set this length to the right and left of the bobby pin, and tear off the rest.
Don’t worry about the evenness of the edges when torn off - the petals of the carnations are just uneven, with notches.
Now we saturate the edges of the napkin, that is, our future petals, with marker or felt-tip pen paint. Again, do not try to draw a line of this thickness, let it be careless. You can even slightly moisten the drawn edges of the napkin so that the paint drips. Then the carnations will look even more unusual.

Well, you can carefully remove the bobby pin, collect the napkin at the attachment point and begin to form a carnation flower.

We secure the base of the bud with adhesive tape and screw it to the stem if it is ready.


How to make a leg yourself. You can wrap the wire with green adhesive tape, periodically attaching pieces of colored paper or napkins to the stem. Or you can wrap the wire with a green napkin or thread: to do this, you first need to fasten the thread or napkin to the wire with glue at one end, and then coat the wire with glue during the wrapping process. And here, too, do not forget about the narrow leaves, like those of a carnation.
Well, the buds with multi-colored edges are already on the stems, it’s time to place the bouquet of carnations in a suitable vase.


From napkins we move on to colored double-sided paper or even cardboard (choose a density of 200-250 g/m2). Let's try to make a bouquet of tulips.
Some people like these spring flowers yellow color, someone in red, white or two-color... Choose your favorite color for the paper and let's get started.
In addition to paper or cardboard, we will need a patterned hole punch with a six-leaf or five-leaf flower (if you don’t have one, it’s okay, draw and cut out a flower template, and then a few more identical flowers based on it).
For the stems you need elastic green twine (you can also paint regular twine with watercolors), for embossing petals and leaves you will need a roll of wire and a non-writing rod from ballpoint pen(or stack), PVA glue or Moment-gel, scissors, napkins, container with water.

Sprinkle the cut flowers generously with water from a spray bottle (you can tint the water with watercolors so that there are streaks on the tulips) or simply lower the flowers into the water for a few minutes so that they get wet. After soaking, blot the flowers with a napkin to remove excess water.
Now let's do some embossing so that the petals of our tulips become more alive and look more like real ones.
It is better to do embossing on a silicone mat (you can replace it with a soft mouse pad). Place the flower on the mat and press down its petals with twisted wire.
Until the flower blanks are completely dry, we begin to form tulip buds. We pierce the core of the flower and thread a piece of twine with a pre-tied knot there to secure the bud. We fix the flower on the stem with glue.


Then we lubricate three petals with glue, as shown in the picture.

Place the petals together and roll them up at the same time. Then we coat the two remaining petals closer to the base and close the tulip bud, completing it.

It's time to tackle the leaves. Lightly moisten a tulip leaf cut from green paper or cardboard and remove excess moisture napkin. Carefully and slowly, so as not to tear or damage the surface, draw longitudinal lines on the sheet with a rod or stack, squeezing them out. Like embossing, this is best done on a mat.

Roll the leaves at the base and glue them to the stem of the tulip. And you're done!
A couple more of these tulips - and you will get a small bouquet, and if you wish, you can make a whole armful of several flowers and, putting them in a vase, arrange an extraordinary spring in the room.
Very delicate flowers are obtained from crepe paper. We can say that it is simply a godsend for making paper flowers, because their petals turn out thin, translucent and sometimes incredibly similar to the petals of real flowers.

So, to create poppies we need:
We cut out the petals of the future poppy from crepe paper in the shape of a drop (its base can be made even wider than in the photo). The petals do not have to be the same. Five petals are enough.

To make the core, we fasten 7-9 stamens together with adhesive tape (if you have ones like those in the photo, you can fold them in half).
We collect petals around the stamens. You can secure each one with a drop of Moment-gel glue so that they do not fall apart. At the same time, we give the petals a curved shape - crepe paper is easily deformed.

We insert our stem into the base of the bud if it is ready. If the wire is only “bare”, you need to first wrap it with adhesive green tape or cover it with green crepe paper.

We attach the stem with adhesive tape and at the same time decorate the base of the bud.
We straighten the petals and slightly stretch the paper so that the flower turns out to be the desired spherical shape. And our poppy is ready.

If desired, you can make petals on the stem, and also insert a lump of gray crepe paper into the core between the stamens, for greater resemblance to a real poppy.
These poppies are easy to make, so you can put together a bouquet pretty quickly.
Now let's try to make a flower of stunning realism. Peonies delight us for only a short time in the summer, so we have a great opportunity to collect a bouquet that will stand on the table all year round. And you won’t immediately guess that it is made from paper flowers with your own hands!

What you need to prepare:
- white or pale pink crepe paper;
- a microwave-safe cup;
- watercolor, water, spray or soft natural brush;
- stems from old artificial flowers, floral design green wire or any other (you already know how to make a stem);
- floral green ribbon (tape tape).
Cut out petals from crepe paper the desired shape, not necessarily the same.
Place the petal on an inverted cup and begin spraying it with tinted water from a spray bottle (or lightly apply watercolor water with a brush). Use different shades and colors to add realism.
When you have achieved the desired color, put the cup with the petal in the microwave for about 30 seconds. If the petal is not dry, leave it for a little longer. Remove the dried petal from the cup and prepare the next one.
This technology helps us achieve the desired shape of the petals and make them very naturalistic.

If you have an old stem as big as the base of a bud, great. We form the core as shown in the photo. If this is not available, use glue to attach a twisted ribbon with a cut edge made of crepe paper to the previously prepared stem.
 Then we begin to carefully glue the petals to the core, collecting the bud. We decorate the base of the bud with tape (or green crepe paper).
To complete the bouquet we make several peonies with different amounts petals and a couple of unblown buds.
All that remains is to choose the same delicate vase for this beautiful airy bouquet.
Let flowers created with love and inspiration always decorate your home. Happy creativity!
Typically, napkins are used to decorate a holiday table. But if you wish, you can make very original craft, which will decorate gift packaging for loved ones, diversify home interior or will decorate the same festive table, but in a slightly different capacity.
There are various crafts from napkins: flowers, little people, angels, animals, insects, birds, etc. Some are easy and quick to make, others require time and certain skills. We will tell you how to make flowers from the most ordinary napkins yourself with your own hands.
This bouquet will delight you for a long time, moreover, it does not require financial investments and long production times. You can make flowers for every taste from napkins.
Master class on creating flowers from napkins with your own hands
We'll tell you about the in a simple way making such cute crafts.
To work you will need a paper napkin, scissors, thread, glue and a tube for the stem if necessary.
First, carefully align the edges of the napkin. Fold the napkin in half. Then we make an accordion out of it: we bend the edge of the napkin by one centimeter, then we bend the next centimeter of the napkin in the other direction, we bend the next centimeter in the same direction, then the first and so on until we get the accordion effect.
We flatten the accordion, determine the middle of the napkin and tie it with thread.

For more interesting looking Round the edges of the napkin with scissors.
Now let's fluff the flower. If you have small children, then this moment will give them a lot of pleasure. They are delighted by the transformation of a piece of paper into a fluffy flower. If you just created a flower, then place it on a stem (a cocktail tube or skewer) and glue it. You can glue it to paper box to register gift wrapping for a gift.

You can also make a rose from napkins:


The rose always looks beautiful and is made quite quickly. To work, you need a simple single-layer napkin. Divide the napkin into four parts, which will be rose petals. So that the napkins do not lose their decent appearance during operation, they must be dense and of high quality.
Fold the other napkins diagonally. The edges of the resulting triangles should be bent.
After this, we place the core on the triangle and wrap it with the free ends of the triangle. At the same time, we give the flower the required shape. Fix the resulting figure with thread.
We work in the same way with the rest of the blanks. Using this technique, you can make roses of various sizes and textures.
For the stem, you can use a wire wrapped in a napkin. You need to glue the napkins together with paper glue.
This flower can be used both in a composition and separately.
Trying to make your own flower bouquet for a gift
Can produce more difficult option flowers from napkins. To ensure you do everything right, we offer step by step instructions on how to make a flower like this.

This flower can look great in a flower pot and as an accessory in your interior. Such a flower will be irreplaceable when decorating a banquet hall.
You will need: stapler, glue, napkins, bouquet base, scissors.
Draw a circle in the middle of the napkin and cut it out. Depending on the size of the base, flowers can be of different sizes. To give our bouquet a more interesting look, we outline the edges of the cut out circle with a red felt-tip pen.


Then cut out the circle.

We staple the circle in the middle.

We received a flower blank. Now let's start designing it.
From the middle, lift each layer of napkin as shown in the photo.

By lifting all the layers of the napkin, you will get a flower like this.

You need to make several of these flowers. To make enough for a bouquet, you will need 16 pieces.

Next we work with the base of the bouquet. This could be a simple foam ball. You can make the base yourself. To do this, make a ball out of newspapers, crumple them, tie it with threads, and the base is ready. You can also use a foam base. If you plan to hang your ball as an interior decoration, then you need to make a ribbon at the base in advance.


This is what we got.

If you place such a ball in flower pot, then it can become a full-fledged element of your interior.

If you were unable to glue the flowers close enough to each other, you can fill this space with napkins suitable color. For example, green ones that will look like leaves in your bouquet.

Don't miss the video we suggested, because... Only by seeing the process with your own eyes can you understand all the nuances of the work.
Video on the topic of the article
Nadezhda Sazonova
Master Class "These are magical napkins"designed for joint creativity adult and younger child preschool age. The master-the class will be of interest to parents, educators, teachers additional education, and just creative people.
Target: develop the ability to work with napkins very carefully and accurately, develop and improve hand motor skills, develop Creative skills children, imagination, help create a festive atmosphere.
Move work:
To work you will need the following materials:

1. Paper napkins 2 pcs. (2 colors)
2. Scissors
3. Stapler
4. Bamboo (or any other) wand
5. Green corrugated paper colors(strip 2 cm wide)
6. PVA glue
Progress:

We put one napkin to another, add both accordion napkins.

Place a staple in the middle of the accordion with a stapler.

We round the edges of the accordion on both sides.

We turn the accordion with the folds up and straighten it, we get a “butterfly”.

We begin to separate the layers one by one and collect them towards the center, lifting them from the edges.


If, at the stage of rounding the accordion, you tint the edges of the entire “pack” felt-tip pen, it will turn out like this petals:


stripe corrugated paper we wind it diagonally onto the stick, gluing it onto the stick at the very beginning and at the end.

We cut a strip of corrugated paper about 15 cm long at the edges at an angle and tie it with a knot in the middle of the stick, adding a drop of glue.

Using a drop of glue, attach the finished stem to the cap. flower.

Our wonderful napkin flower is ready.

Magical napkins helped us make a whole bouquet!
Publications on the topic:
On Christmas holiday, my children and I senior group made from openwork napkin Angel. The craft is simple and easy for children to complete.
DIY scrapbooking paper from a three-layer napkin. I would like to offer you a master class on how to make your own scrapbooking paper.
Master class "Angel". First junior group. Vladikavkaz. At Christmas you always want miracles. So I decided to make an angel and place her there.
To draw a sparrow from regular napkin we will need: 1. watercolor or White paper A4 format; 2. gouache; 3. wet wipes;
What is a master class? This is what a teacher can show to teachers and parents, that “zest” that can be presented creatively so that.

