Star news


Paths made from old things. Volumetric rug for the nursery
We crochet a rug from old things, knitted yarn, bags and much more.
How to create comfort in your home is probably the most popular topic among women of all ages! And no matter whether a young housewife or an experienced one, everyone wants to update and add a cozy zest to their home. Handicrafts are especially good at this, because you can create unique masterpieces with your own hands for very affordable money.
In this article we will tell (and hopefully inspire) how to knit a rug for the floor in the most various techniques. We hope that after reading this article, you will add at least one exclusive rug to your home!
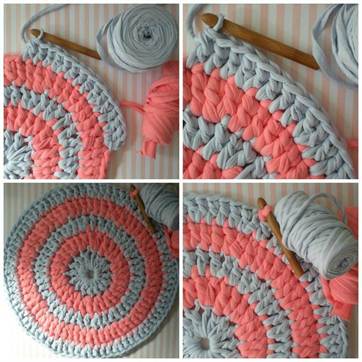
Round crocheted rug for the floor for beginners: diagram, description, master class, photo
There was a time when we actively threw away textile rugs even from dachas and summer houses bound by grannies from old yarn and scraps. But a few years ago, just such rugs became trendy, but with some modifications. So - we knit fashionable grandma's rugs.
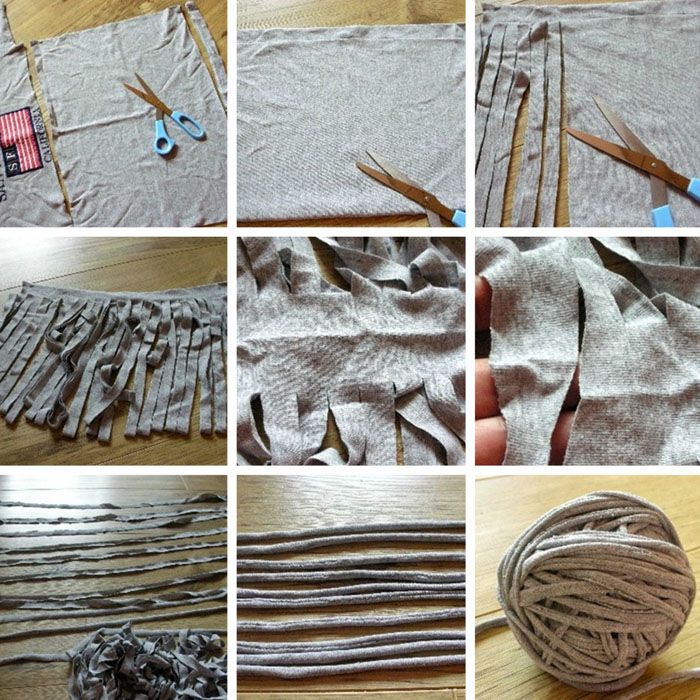
For knitting, we need bright knitted yarn of one or more colors. If it’s too expensive for your budget, you can make such yarn yourself from old knitted t-shirts. Details on how to do this in the video below.
Video: Yarn from a T-shirt. Knitted Improvisation
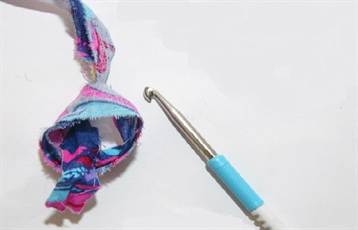
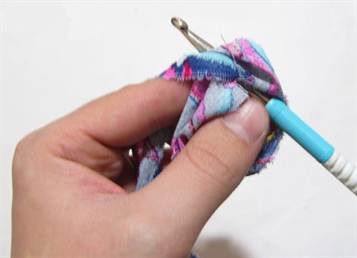
The yarn is ready, let's start knitting! We take the thickest hook that is in the house and start knitting. Remember, the ease of work and density of the mat depends on the size of the hook. We knit an air loop and carefully hem it with thread No. 40 to match the knitted yarn for convenience. And we start knitting:
Row 1: 2 chain stitches and 11 double crochets.
2nd row: 2 chain loops and 2 double crochets from each loop (according to the diagram).


3rd row: 2 double crochets and 2 double crochets from one loop (according to the diagram).


Row 4 and subsequent ones: according to the pattern, each time adding one double crochet in each section.


The last row knit to the end and tighten the last loop tightly. As at the beginning of knitting, we hem the edge with thread No. 40 for strength.


Please note that such a rug can be knitted in both plain and multi-colored threads. But it is important that the colors come in sections, and not ripple like our grandmothers. It is this trick that distinguishes fashion models from grandma's rugs.
Crocheted square rug for the floor from old tights: diagram with description and photo
For those who have already cut up all the T-shirts, but really want to create, don’t be discouraged and take out the tights! In this section we will teach you how to knit an interesting and very original rug from tights! So, we will need everything, we will notice everything! Unnecessary tights and granular filler of your choice, it can be holofiber, silicone, etc.


Cut the tights into different pieces from 10 to 20 cm, different colors tights will add texture to the rug. We sew each piece on one side, fill it and sew it tightly into a “pebble”. If the tights are thin, we wrap one stone in several layers of tights so that the filler is not visible. We sew the “pebbles” together and sew them to the base. Rug from " soft stones" ready!
Well, that's not the only way to turn the ordinary into the wonderful. We complement our master class with several inspiring videos.
Video: Rug FROM TIGHTS
Video: How to knit a rug from old tights?
Crocheted oval rug for the floor from old T-shirts: diagram with description and photo
And in this section we will tell you how to create a beautiful oval rug from old T-shirts or knitted yarn. We talked about exactly how to cut and fasten T-shirts in the first section and won’t dwell on that.
We dial from 6 or more air loops. Limitations - the size of the place where the rug will lie. The calculation is simple - the width of the desired product is divided in half and subtracted from the length of the product. Do not forget that when knitting the chain stretches by 30-40%.


After finishing knitting, you can sew/glue the rug to the base so that it is rigid and does not bunch up at the edges.
Crocheted rectangular rug for the floor from old jeans: diagram with description and photo
Another simple and original rug, now made from old jeans. We will need a large mesh from a hardware store and jeans cut into 5*15 cm pieces.


At each crossing of the mesh, use a hook to thread a piece denim and tie a knot so that the ends diverge into different sides. If desired, the ends can be slightly tousled, then the rug will look even more delicate. Just? Yes! Beautiful - of course! Perfect option for youth housing.
The same option looks great with knitted pieces.


Video: Rugs made from old things
For those who want to knit an openwork rug, you can take both a cord and knitting yarn. The essence of knitting will not change because of this, but the size and, naturally, thickness of the carpet directly depends on the thickness of the yarn. note that openwork rugs Unlike dense products, it cannot be glued to a dense lining.

Knitting is quite simple. One air loop is hemmed for strengthening and further according to the diagrams below.


Don’t forget to also thread and reinforce the last loop at the end.
Video: Knitting together an oval rug from the “Lacy” cord
Video: Crochet floor mat star made of knitted yarn
Crochet rug for the bathroom floor made from plastic bags
The bath mat looks like plastic bags very impressive. But its production will require a lot of effort and time. This is worth remembering before you start working.


Preparation: cut from garbage bags(or any other dense) strips of the same thickness (3 cm for those that are thinner and 1.5 cm for dense ones). We cut lengthwise and then tie it with neat sea knots.
Since the knitting technique from a row is easier to see once than to read a hundred times, we have included three step by step videos which you will probably quickly knit your first and perhaps not the last rug from the packages.
Video: Crochet rug from bags, part 1
Video: Crochet rug from bags, part 2
Video: Crochet rug from bags, part 3
Video: Making a mat from plastic bags
Crochet rug for the toilet floor
And these rugs can be knitted from a wide variety of materials, everything is limited only by your imagination! Below we present a pattern according to which we knit one motif, and then repeat the same six copies.


Now we need to connect the elements according to the following diagram, after which all that remains is to wash and starch the openwork rug.
Video: Crochet rug from sheets
Now it's time for the amazing rugs for the stools. To work, we will need all kinds of leftover yarn, or purchase a lot of multi-colored threads.


We knit 12 air loops and connect them into a single ring, after that we knit 5 air loops and knit the core - 24 columns with 5 crochets. The element is ready. Next, we knit exactly as much as required and use threads and a gypsy needle to sew the elements into a single rug.


Video: Crochet rug made from motifs with twisted columns (rug crochet)
Sometimes you need a simple, yet durable rug, most often for the veranda, hallway or dacha. In order for dust and fine dirt to pass through it well, and for minimal maintenance, a mat without a lining is required. Rope and thin thread great for this.


So, we take the rope, fold it as in the photo and stitch it with thread No. 40. And then we knit layer by layer in single crochet columns so that the cord is always inside. These can be both small and very impressive carpets.

If you want the carpet to be oval, then instead of a circle, tie a cord of the required length around the first row and then just like in a knitted rug, only with a cord inside.
Video: Rug knitted from cord
Video: Crochet rug made from twine
2 114 228
Making a rug from old things - Easy!
Do you think colorful, soft, original, practically free rugs are a myth? Look around! Do you have threads, cord, rope, unwanted knitwear or old T-shirts at home? Then let's make the house even more comfortable with our own hands, and at the same time protect our planet from excess garbage!
This article contains original ideas for needlewomen for home comfort. Do-it-yourself carpets will be the envy and admiration of your neighbors and friends.
Rectangular pompom rug

Would you like to have a soft rug at home where you can lie down in front of the TV or play with your child? Then look for leftover threads at home. If a housewife is fond of knitting, then usually there are always small skeins left that are a pity to throw away, and they are stored in some box for years.
In addition, you need to find scissors, cardboard and a mesh base (plastic can be purchased at hardware store). Now we’ll tell you how to create a shaggy bedside rug step by step at home.

The video shows the whole process in more detail:
HEALTHY! If suddenly you don’t find cardboard at home, then you can wind the yarn directly on four fingers of your hand (we don’t take thumb), and the central thread will be tied between the middle and ring fingers.
If you decide to decorate the rug with small pom-poms, then you will definitely find a table fork for winding the material. All four cloves are wrapped, and long thread tied between 2 and 3 cloves.
Oval carpet made from braids woven from T-shirts

A nice, homemade rug made from old things for feet in the bathroom or bedroom can be made from old T-shirts (it will also work old T-shirt). Cotton is environmentally friendly and soft material. Just three steps and the masterpiece is ready! You will need to select about 13 T-shirts. Choose plain or colored T-shirts - it depends on your taste and interior.
First step. Manufacturing of knitted threads
Making knitted stripes with illustrations and detailed description we posted it in the photo.Here's how to cut a T-shirt to make one whole strip:
Second step. Braiding
From the resulting balls, take three and begin to weave a braid. When the strip ends, weave in the next strip and so on until the fabric runs out. If the colors are different, then try to alternate them when weaving.When working, it is convenient to weave a braid, holding it between your knees, and to keep the braid tight and not unravel, use a clothespin when moving to the next piece of braiding.

As a result, you will end up with a long colorful braid. Fold the ends and sew with strong thread.

Third step. Machine stitching
Take a sewing machine and a knitting needle, put a zigzag stitch on it. Next, select the shape of the product: oval or rectangle (you will get a track).IN oval rug you need to decide on the length of the center; the longer the center, the longer the rug. The smaller it is, the wider the oval will be.
We take the end, measure the length, make the twist correctly - clockwise. Next we apply the second row of braids.

Start stitching where the first turn is.

We pass between two braids in a zigzag. We reach the beginning of the braid and carefully bend it under the next layer and make a turn again.


And so on in a circle (if oval shape) or along a snake (if rectangular shape) until the knitted braid ends.

HEALTHY! The product may slip, so you can sew or glue it to a non-slip backing for safety, which can be found at IKEA called STOPP FILT.
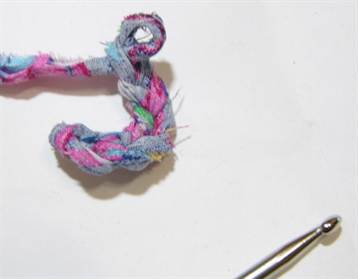
Round rug made of twine and waste fabric

Where can you use scraps of fabric? Do not throw it away under any circumstances, because if you have a lot of free time, using this method you can make a small cup holder or a large interesting carpet for the floor with your own hands.
For this work you will need a lot of unnecessary scraps of rags, twine (jute rope or twine), a hook, a needle and thread.
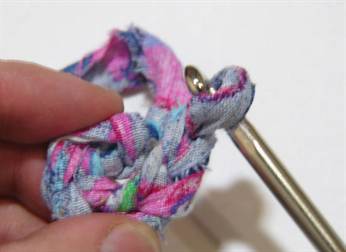
Step-by-step operating instructions: 
When the first skein of fabric ends, use a thread and needle to sew on the end from the next skein. Or we twist the end and beginning together, then you don’t have to use a needle.


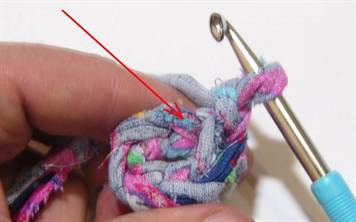
HEALTHY! It is better to make a rug on a flat surface. If you see that it begins to bend, then you can make two columns from one loop. In some places, you can remove fabric strips to level the product.
The craft will last a long time if used nylon tights , not fabric.
Instead of scraps of fabric, you can also use a clothesline instead of twine strong threads. As a result, the rug will be harder and more rigid. See the photo for more details:
Rope or jute rug

To create this masterpiece from scrap materials to decorate a room in a nautical or Scandinavian style, select the rope. You will also need sharp knife, silicone glue and thick fabric for the base. Making this craft yourself is quite simple, here is the description:

Everything ingenious - simple and fast!
The second option for handicraft made from these materials is a rectangular door mat for the hallway. Let us describe its creation step by step.
To make it, you will have to buy the cheapest rug in the store, or look around the house to see if there is an old one lying around in the pantry. The main thing is that it fits in size.

Rug made from shreds and clothesline
Sometimes thin scraps of needlework remain and housewives throw them away, believing that they are useless. But if you add a clothesline and a thread and a needle to them, you get a nice floor rug self made. What do I need to do:- Take a clothesline and a piece of fabric. We begin to wrap the rope tightly in a spiral.
- When the length of the wrapped rope is enough to form two rows, we roll the rope into a bagel and on one side (the wrong side) we begin to sew the rows of the rug together. One stitch in the first row, a second stitch in the second row and tighten them by pulling the thread.
- We make the next circle and stitch again. When one piece ends, we put the next one on top of the end of one piece and then wrap it around the rope. If the pieces do not hold well, you can grab them with a needle and thread.

This is how you can give thin scraps of unwanted rags a second life.
Rug made from old towels
Old terry towels in the household they are often used as rags, but needlewomen can also use them to create a chic carpet for the bathroom, without having to sew anything.
Follow these instructions for soft and fluffy results:
- Finding the terry towels you are going to get rid of.
- Cut them into strips approximately 2 cm thick and 12 cm long.
- We buy the desired size of plastic mesh at a hardware store.
- We tie the cut rags to the mesh, securing them with a double knot.
- When the cells are large, you can tie two strips to one partition.
- By alternating colors, you can get a pattern on the rug.
An original design version of a rug made from various materials
The advantage of the following product is that you can use any materials to make it: thread different colors, ropes, pompoms, braid, strips of old clothes(denim stripes look good), grass yarn, etc.Making the base:

ATTENTION! All warp threads must be on one (front) side of the cardboard, with reverse side There will only be loops between the cuts along the edges.
Weaving:
Waterproof polyethylene mat
A good country option for the street. Such crafts can be made from plastic bags accumulated at home. A real housewife always has a bag of bags at home. Products made from garbage bags are softer, especially since now you can find almost all colors in stores: purple, yellow, black, red, blue, green, etc. You can make rainbow versions or with a gradient. You open the door, and there is a rainbow at your feet.You can watch the manufacturing tutorial in the video:
Stages of work:
- Fold the bag four to six times so that you get a thin strip: the bottom of the strip is at the bottom, the handles of the bag are at the top. Cut off the bottom and handles, cut the remaining strip into pieces of 3-4 cm.
- We straighten the resulting pieces to form rings.
- We tie the rings together using a loop. Take two rings. We thread the first one inside the second ring, then straighten the ends of the first ring and pull one end into the other and get a loop, fix the loop on the second ring.
- We make a ball from the resulting several meters of tape of polyethylene rings and begin crocheting.
- To knit a circular product, start with a ring of 6 loops, then rows are knitted in single crochet columns, from each loop two columns are knitted in the next row (or at your discretion, the main thing is that the work does not bend).
We will send the material to you by e-mail
It’s no longer fashionable to go and buy something for your home: now they appreciate manual labor. For those who want to update the decor of the room and purchase a new rug, the editors of the site suggest not to spend money, but to make a rug with your own hands from old things.
Weaving can be done in several ways
What kind of rugs can be made, and, most importantly, from what? The main material that is easy and pleasant to work with is old T-shirts.

Craftsmen have gotten the hang of crocheting a rug from old T-shirts using a hula hoop as a base, using a base mesh.It's a small matter: collect more T-shirts in the desired color. This is not difficult to do, since there will always be a few things that are no longer worn. Or maybe your friends will have a warehouse of old T-shirts.
Is it possible to crochet a rug from old things, and how to do it?
On an autumn evening, you can spend a pleasant time doing a calming activity - knitting. And if you combine this process with making a rug for your favorite room, it becomes doubly pleasant and interesting.
What is useful for crocheting rugs from old things
Before we announce the list of items with which you can start knitting, let’s take care of the availability of yarn. Our yarn is not simple, but... t-shirt.

Preparing the yarn: ruthlessly cutting up old T-shirts.First, the seam is cut from the bottom, then a strip of about 2 cm is cut from side seam to the opposite, but not completely, and not reaching 3 cm to the edge. It is necessary to cut the entire fabric up to the armhole line.
| Illustration | Description of action |
|---|---|
 | T-shirts are cut into long ribbons about 5 cm wide. For convenience, it is better to wind the ribbons into balls. |
 | Having secured the three stripes in any way, they begin to weave a regular braid. As soon as the strip ends, a new one is either sewn on or tied on. You should get a very long braid. |
 | The round shape is made by simply twisting the braid around its center. Adjacent rows are sewn by hand or by machine. |
 | If desired, you can do oval shape, and select a zigzag stitch and knitting needle. |
Advice! At each turn, you should not pull the braid too tightly; it can cause curvature in the finished product.
Let's make a rug out of scraps with our own hands?
Let's remember how in childhood we loved to play with scraps, or just cut paper or fabric? You can plunge into childhood again, and even with benefit: you can make excellent things for the home from scraps. For example, it could be rugs made from scraps of old jeans, or a fluffy shaggy product that will decorate the floor and delight your feet.

What do you need for work?
The process will require a thick base (it is better to take burlap), a lot of scraps from old things, threads, a needle, fabric glue, and tape.
How to sew?
To sew a carpet from old things with your own hands, you first spend time cutting scraps of fabric, T-shirts, and knitted pants.

The first row of scraps is laid out on the canvas, placed parallel to the edge of the base. One edge of the row is secured with tape, and a regular seam is sewn in the center using a machine. The next row of scraps is laid out close to the first, in the same way securing the entire edge of the laid strips with tape and stitching in the middle using a typewriter.
Laying out each row, the previous ones are thrown aside.

The carpet gains individuality through the selection of colors, the length of the patches and the frequency of laying out the rows.
How to make a rug from old things on a mesh with your own hands
If you really want a beautiful fluffy rug, and sewing machine no, you can use either a construction mesh or a soft bath mat as a basis.

Making a do-it-yourself rug on a mesh from old things step by step
Armed with a net, a hook, scraps and scissors, they get to work. If there is an idea related to the pattern, then make notes on the grid with a marker of the desired color. In this case, they begin to tie the strips according to the color markings.

If you sew the patches on a machine, they will stretch out, and it will be more convenient to work with them removed.


The essence of the work is clear: the mesh is alternately filled with strips of fabric tied with front side.
Making your own rug from old belts: photos and diagrams
How to make a rug from belts with your own hands if you have plenty of them?


Making such a rug will take approximately 12 leather belts. Take genuine leather or leatherette - the owner's business. To work, you will need a leather puncher or an awl and twine.

Along the edges of the straps you need to make holes in increments of 2-3 cm and retreating about 0.5 cm from the edge. The belts are sewn together using twine in any order. Instead of rope, metal staples are sometimes used.
How to make a rug from wine corks
Almost everyone drinks wine, and corks, unlike bottles, are not thrown away, but put away for no apparent reason. To make it clear, we suggest making an excellent durable rug from your stock of corks.


Since bacteria cannot multiply on such material, this chic option for the bathroom. In addition, this is an additional massage for tired legs.
In order to make such a massage mat, you take 160-180 wine corks, glue, a base (you can take a ready-made rubber mat, thin plastic), a knife, coarse sandpaper, and a cutting board.
Corks are washed warm water, better with the addition of soap. If they have red wine stains, it's best to soak them in water and bleach for a few hours.Clean corks are cut exactly in the middle into two parts using a knife and a board. Sandpaper is needed to straighten the cuts.
Advice! It is better to cut the cork in a vertical position.

Over time, any person accumulates a huge number of things, for example, curtains, bedspreads, tablecloths, items of clothing that will no longer be used anywhere, but it is still a shame to throw them away. If you didn’t throw out all this trash, then you acted very wisely and far-sightedly, because old items of clothing can be woven into wonderful rugs, ideal for hallways, bathrooms and even living rooms. It is enough to have at least a little ability to use a crochet hook and knitting needles, as well as to have developed fantasy and imagination.
Making yarn - how to cut old things
When making your own rugs, you will need various pieces of old clothing. In the best possible way jerseys are suitable because the fabric is different necessary level softness and pliability. It is very easy to work with; knitting does not cause any difficulties. Try to select multi-colored items so that the finished rug turns out bright, colorful and rich.
First, we’ll tell you how to properly prepare yarn from old things:
- Find unwanted tank tops, sweaters or t-shirts from natural materials, iron them out;
- Use scissors to carefully cut off all finishing seams;
- We cut the fabric into strips up to 3 cm wide from one seam to another, without allowing the seams to intersect. The stripes must be straight, otherwise the rug will not be so beautiful;
- The strips must be cut right up to the neck;
- The last step is to create one long ribbon from strips of fabric. The T-shirt should be placed on your hand and cut diagonally in those places that remained uncut after previous manipulations. The result should be a long narrow ribbon, which we will later use to create rugs.
The process of creating yarn is relatively simple, although there are a few things to consider. For example, the density of the fabric affects the thickness of the stripes. So, the thicker the knitwear, the narrower the strips need to be cut. If clothes with sleeves were used for yarn, then you should not throw them in the trash, because we will also need them. By cutting small pieces of fabric in a spiral pattern, we obtain strips of reasonable length, which can then be sewn or knitted together.
The end result should be a lot of stripes and ribbons made from old items. They need to be wound into balls and sorted by color to make it easier to find the fabric when knitting the desired shade. If you want a fun and bright rug, then you need to prepare as many colored balls as possible.
Knitted rugs - how to make them bring comfort and warmth to your home
The fastest and easiest option is to create a knitted home rug. Even a beginner in knitting can cope with this task. For these purposes, we will need pre-prepared glomeruli from various materials, as well as a hook with a thickness of 7 or higher. First of all, you need to decide where exactly the resulting rug will be located in the apartment. Depending on this, you can choose its size, color, shape and other parameters that are important to you.

Weaving rugs does not provide for any clear patterns. For the most part, everything here is done on an intuitive level. For example, to create rectangular or square shape You will need to cast on a certain number of chain stitches across the width and knit one row after another.
It should be noted that in in this case The double crochet method will not work; everything is done single crochet. Otherwise achieve desired result will not work.
Rugs round shape knit a little differently. To begin, create a ring from small quantity air loops, after which knitting continues in a spiral. Naturally, you should not forget to add new loops from time to time. Not having enough air loops can result in creating a domed rug when we want a regular flat rug.
American knitted carpet - the spirit of American country in the interior of your apartment
If you are a fan of American culture of the 60s of the last century, then next way knitting is perfect for you. Americans are distinguished by their well-developed fantasy and imagination, they came up with own way recycling unnecessary and used knitwear. To work, we will naturally need all the same balls of fabric, but we will use the thickest crochet hook. We knit a chain of air loops - the chain should be quite long and voluminous, appearance even resemble a thick braid. Place the finished chain on the floor, twisting it into a tight spiral. Be sure to secure the ends with pins, otherwise the braid will come undone.

The larger the carpet required, the longer the tape should be. Laying it down this way long braid on the floor, we just have to tie it so that it does not fall apart in the future. It’s easier to do this with a regular sewing machine, but not every device can handle material of such thickness, because there are many layers of fabric. The only way out is to knit all the layers of the newly made rug by hand.
The result of these manipulations will be a beautiful American-style rug. In stores, you will need to pay a decent amount of money for such a creation, whereas you could do everything yourself. The only difficulty when knitting American rugs is the duration of the process itself. So, depending on the size of the braid and the shape of the future rug, it may take several weeks to complete all the work. However, you shouldn’t worry about this, because the result will please you for a very long time.
How to make a shaggy rug - secrets of craftsmanship
Fans of fluffy or so-called “shaggy” rugs will be happy to know that you can even make such a product at home. Moreover, it is much easier to make compared to an American rug. To create a fluffy carpet, T-shirts and tank tops should be cut into short lengths. thin tapes. As a basis, we choose a regular mesh, which you need to go to the store to purchase. In the sewing department you can choose the optimal mesh for you. By the way, ready-made kits are also sold there, including a grid, specially prepared strips, as well as instructions. It is enough to follow the attached algorithm to make a beautiful carpet yourself, ideal for any room.

If you don’t have instructions at hand, you can use the following tips:
- 1. Ribbons should be cut up to 10 cm long and up to 1.5 cm wide. Moreover, all strips should be the same length;
- 2. Woven carpets made on a mesh basis can include various designs and patterns, for which regular markers are suitable. We lay a cloth or any other material under the stack so as not to stain the surface, and apply a design to it.
- 3. After this, all that remains is to knit the rug with prepared ribbons of the appropriate colors in order to repeat the pattern as accurately as possible. Naturally, not everyone can do this, because you need to have certain talents not only in knitting, but also in drawing;
- 4. The knitting technology itself is simple process– crochet the strips through the mesh and secure them in the corresponding cells.
As already noted, knitting such a rug is very fast. In one day you can independently make a product of any level of complexity, depending on your own skills and craftsmanship.
Advice from experienced craftsmen - how to simplify your life
Despite its apparent simplicity, knitting rugs is quite difficult, especially if you have virtually no experience. However, if you listen to the advice and recommendations of craftsmen, you can somewhat simplify the whole process:
- The strips must be prepared in advance, and not left for later. Otherwise, when knitting, you will be distracted by other things, which will prevent you from focusing directly on the main task;
- It is recommended that each specific product be made from one type of fabric. Of course, no one forbids experimenting, but the result will not always meet your expectations;
- The yarn should be washed before knitting, otherwise the rug will lose its shape after the first wash.
- The material should be selected of such quality that it will not fade, so that the finished rug retains its multi-color and brightness.
These simple tips will allow you to succeed in any event. Be sure to follow the above recommendations so that a rug made from old things will delight you with its original appearance for a long time.
Many housewives love to decorate their home various products. Made with your own hands, they create an atmosphere of warmth, coziness and comfort. winter evenings. A good option diversify the interior of the apartment, introduce elements of antiquity into it - make a crocheted rug, which is easy to make from old things. Please note that the execution scheme is very simple and accessible.
You will need to prepare source materials. Go through old things. T-shirts, dresses, tights, skirts and others made from knitted and synthetic materials. Cut them into strips in a spiral and wind them into balls.
The width of the strips depends on the density of the material. The thinner it is, the wider the cut strips.
Prepare a hook size 8.5-10. It will be great if the balls turn out to be multi-colored.
We crochet a rug from old things with a pattern
The basic rule is to adhere to the principle of circular knitting.
Dial 3 v. etc., connect them into a ring. Knit the first row 6 single crochets. In each subsequent row, 6 columns must be added evenly. IN finished form the product will be smooth, without bulges or distortions. Knit the rug until required sizes.
For a better understanding of the knitting pattern:

To get a more impressive rug with a convex relief, follow the steps according to the diagram. Just knit the stitches by picking up back wall loops

Making a pentagonal rug according to the diagram
When knitting such a rug, it is better to use soft knitted items. You need to start by knitting a circle of 5 loops. In the 1st row – 3 chain stitches, 2 double crochets in the first loop bottom row, 2nd century p., *3 double crochets, 2 in. p.* Perform the pattern between the stars 5 times. In the 2nd row - the same as in the first row. But after 3 double crochets, knit 1 chain stitch and then follow the pattern below.

Knitting the rug in the round is done to the required size. Each corner of the star is knitted separately.
How to make knitting threads from unnecessary things
In order to succeed long stripes, cut the T-shirt from bottom to top in a spiral. Immediately wrap it in a ball so that the “threads” do not get tangled.
The short strips are easy to connect. Step back 1.5 centimeters from the edge and cut each strip.

Align the two strips so that their slots line up.

The other end top strip pass from below through the aligned slots and pull out. As a result, you will get a knot.

In this way, you can fasten all the strips when knitting the product.
Master class on a rug in the form of a corridor path
After watching a knitting master class original rug, you can make a beautiful carpet from old things, which is convenient and practical for the corridor.
Cut old T-shirts, T-shirts, and skirts into strips. Roll them into balls. It is better if they are of different colors.
Make a chain of air loops equal to the width of the future rug. Next, knit with single crochet stitches


When one ball ends, connect another. Sew the ends together with thread.

The track is knitted in a rectangular shape, so the fabric will need to be turned over when knitting.

If there are not enough threads, cut more strips of the required width.

The result of creativity will be beautiful path for a balcony, cottage or corridor.

Options for correct use of weaving
Prepare a frame according to the size of the future carpet product, fill the nails on two opposite sides. Set the distance to 2.5-3 centimeters from each other.
The following DIY instructions will help you learn how to weave a rug, including from old things.
Pull the strips of material taut. It is advisable to take it in colorless shades. This will be the basis.

Pull the working strips first above the thread, then under it.

At the end of the row, pull the strip under the warp thread and work in the opposite direction.

When weaving a rug, sometimes move the finished rows towards the starting row. At the end of the work, hide all the knots on wrong side. Now ready product can be removed from the frame.
Trying to work with knots
The basis is cut strips from old T-shirts approximately 12-15 centimeters long. You will need quite a lot of strips. Now they need to be rinsed washing machine. The result is twisted strips from which the rug is made.
Place the carpet mesh on the table and place a strip of material underneath. Using a thick hook, pull out both ends of the strip and tie them tightly with a knot pull to one side. Now tie the next strip. It is advisable to start from the center of the grid, gradually moving in a circle to its edges.

Knotted rugs can be made different forms and color shades.
Round rug made from unnecessary things
To better understand how to knit a rug, study the following instructions on creating products from old things.
Pre-cut unnecessary knitted items into strips 3 centimeters wide.
To make the rug smooth and beautiful, try to make the strips the same width.
Use different colors of material.

Make a loop and insert your hook into it.
Knit several loops to create a small braid.

The loops are connected in a circle.

Knit a chain stitch.

Thread the hook into the loop of the circle, pick up the thread and pull it through the two loops.

Knit a rug like this the right size. Make a fringe along the contour of the finished rug.

Tip: while the knitted circle is small, make air loops before each loop.
A simple lesson for beginners