Star news


Simple DIY backpacks made from fabric patterns. How to sew a leather backpack or bag with your own hands - description and patterns
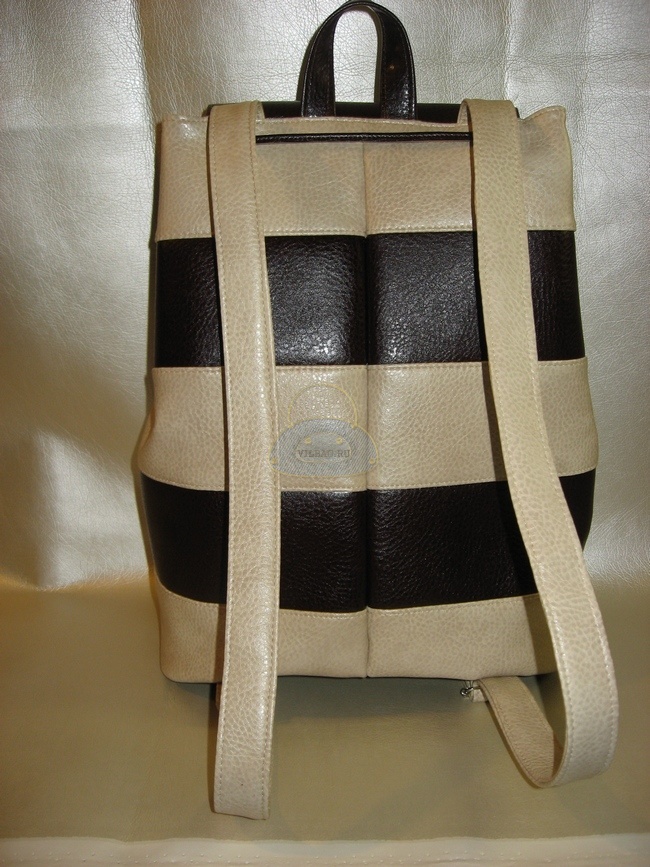
I’m posting for you the story of a striped backpack and telling you how to sew a backpack with your own hands from contrasting colors artificial leather. In my opinion, its effectiveness lies precisely in the contrast, the width of the stripes and, accordingly, the final height of the backpack.
As a prototype for this backpack, the client suggested a photo of a backpack from genuine leather. I often ask for photos to roughly understand what the client wants to get as a result. This helps to avoid mutual disappointment and makes it possible, during the discussion, to adjust the image of the future backpack or bag.
How to sew a backpack with your own hands, pattern and cut
The height of the backpack is 35 cm, and since 5 stripes were planned, each was 8 cm high (7+1 for allowances).
In my video, there is more detailed instructions according to the sizes and in the same place, below, in the article, you can get a pattern for the valve and the figured bottom of the backpack.
The perimeter of my figured bottom (its shape is visible in one of the photos below) is 82 cm + 1 cm for the allowance and as a result we get the width of each strip 83 cm.
I already have the pattern for the valve and bottom ready-made template there is (you can take it). I make the belt loops and handles of the backpack at least 70 cm long and 12-20 cm short. The width is at your discretion, depending on how you sew them, butting the edges or folding the seam allowance inside. I have 8 cm, I folded the allowance.
Inside: a 32 cm high lining and a 4 cm high leatherette strip. I always try to decorate the top of the lining with the same material as the outer part of the bag or backpack. Firstly, it’s beautiful, secondly, the lining is not visible, and thirdly, it’s practical in terms of installing eyelets.
As you can see in the photo below, an appliqué of a Parisian tower was planned on the valve, simple and unpretentious, but nevertheless the client liked the idea.
The sizes and number of pockets can also be very different, based on your wishes, and most importantly, your needs!
In my version, I needed a zippered pocket on the outside, under the flap, and a couple inside, open.
Also, for volume and additional shape, I added isolen (a backing for the laminate). I like this seal because it is lightweight and easy to sew. I cut out the valve and bottom parts from it.
Also, I needed a small handle to carry the backpack in my hands. I planned to insert a cord there to round the shape. The length of the part is approximately 20 cm, but it can be shorter or longer. I have seen such loops and very long ones (I don’t really like this option, I always remember how boys were grabbed by them at school). And instead of a cord, I made a strip of dark leatherette 4-5 mm wide finished form.
And finally, metal fittings were added. 2 pieces of half rings, 2 pieces of length adjuster and a button for the valve.

You ask how to sew a backpack with your own hands? It's simple!
First I make blanks from individual parts. I sew the belt loops, handles and immediately thread the fittings (so that they don’t get lost in the process of rearranging the parts, otherwise I might inadvertently sweep the part under the machine)

I sew the belt loops to the bottom in accordance with the markings. I also attach a seal around the perimeter, along the edge with a large stitch.


I place the top part of the button on the bottom part of the valve. We sew the applique onto the top part and assemble a sandwich from the valves and seal. I turn it inside out and lay it out finishing stitch along the top.

In the middle of the second strip I marked the size of the pocket opening I needed and made a frame for the zipper. I decided to do this on a separate, not yet sewn strip, it seemed more convenient.

The next step was to sew all the strips together, alternating the color.

And I stitched along the top of each edge, with a wide, decorative seam.
I love this stage. Sewing a backpack with your own hands is actually not difficult, but the fun begins when you assemble all the parts into something big and already significant. When something concrete and beautiful is created before your eyes and with your own hands. The stitching gives me a feeling of completion and quality.


I made a blank for a small handle - loops and a cord from leatherette to match the backpack. But in the process, she changed her mind and sewed an ordinary loop. But I managed to take a photo, so I’m showing it to you.


We assemble the lining. Sew on the patch pockets and top strip- border made of leatherette. I ran a securing stitch over the border.


We collect the outer part of the backpack into a bag and sew all the details to it: belt loops, handles, and a flap on top of them.
We insert the bottom with loops, focusing on the markings.


We connect the lining of the backpack using the same principle. We insert the bag into the bag and sew along the top edge.
Turn it inside out through the hole left in the subframe. Also, after I tuck the lining inside, I add a finishing stitch along the top edge of the backpack.


I mark the points for punching holes for the eyelets. I make holes and install accessories: eyelets and bottom part valve buttons.

Sew up the hole in the lining. Insert our cord and you're done!
It turns out that sewing a backpack with your own hands is not at all difficult. What do you think?


P.S. Did you like the backpack? Write your opinion below, I will be very glad!
The modern market offers fishermen and hunters huge selection various ammunition. It won’t be difficult to purchase what you need. All the more surprising for some may be the information on how to sew a backpack with your own hands, which is posted in large numbers on the Internet.
Indeed, the times of total shortages have sunk into oblivion, and consumers now seem to have no urgent need for handicrafts. But this is only at first glance. Upon closer examination, it may turn out that sewing a backpack for fishing with your own hands means purchasing equipment that fully meets the needs of a particular fisherman. Moreover, such an ideal accessory will cost him much less than the same, but ready-made one. In today's conditions this is very relevant. The money saved can be spent on purchasing other devices necessary for fishing. You will find out which ones exactly by visiting this page: http://www.ohotniki.ru/equipment/backpacs/. Go to the specified address and you will receive information about what is especially necessary when fishing.
We will now move on to something else - searching for an answer to the question posed in the title of this article.
What do we need?
First of all, you should be concerned about purchasing fabric. For sewing tourist backpack Not every one will do. Avizent and Kondura have proven themselves best in this sense.
One caveat - the avisent is produced on the basis of natural fabrics and nylon. The first one doesn't suit us. Only nylon fabric can and should be used for sewing a backpack. The advantage of this material is its lightness (unlike the previously used tarpaulin, which weighed quite a lot when dry, but once it got wet, the burden became unbearable), it is not afraid of wind and is quite resistant to moisture. Certainly, heavy rain The advising will not withstand it, but a light one will do just fine.
If moisture-resistant characteristics are decisive for you in a backpack, we recommend using a condura with water-repellent impregnation and polyurethane coating. Such nylon fabric is not very cheap, but its price is more than justified. Did you know that Kondura was originally intended for the army? Agree, this fact shows a lot. The advantages of kondura include its high resistance to abrasion - backpacks based on it will last quite a long time.
Little advice. If you are not confident in your seamstress skills, you should not immediately start working with expensive material. Try sewing a pattern using old things: jeans, raincoats, etc.
In addition to the main fabric, we will also need additional fabric. This is bologna or parachute silk.
In addition, also purchase a travel foam mat (isolon).
How much fabric do you need?
To sew a backpack of the main fabric (avizent or kondura) you need at least 3 sq.m. It all depends on the pattern you choose (more on that below).
Bologna or parachute silk requires three times less - 1 sq.m.
Isolona needs 1 sq.m. The thickness of this material is also important, which should not be less than 1 cm.
Accessories
In addition to materials, you need to purchase a large number of various accessories.
First of all, the slings are wide and narrow. The first we need 2 meters with a width of 45 mm, the second - 7 m with a width of 25 mm.
In addition, at sewing supply stores, purchase snap buckles (2 pieces) and tightening buckles (14 pieces).
Twenty-centimeter zippers should be purchased in quantities equal to the number of pockets. You also need 1 zipper 30 cm long.
In order for the backpack to keep its shape, you need to sew a frame into it. Its base is usually an aluminum tube. Length – 70 cm, diameter 4 mm. We will need 2 of these metal “sticks”. Don't forget also about the rope (diameter 3 mm, length 1.30 m).
The last thing you should purchase is centimeter tape (length - 2m) for finishing the seams.
Pattern
On the Internet you can find a huge number of the most different patterns, and not all of them are simple and understandable. But for a beginning seamstress, complex designs may not be suitable. Therefore, today we will describe one of the simplest and most accessible...
So, first we cut the body of the backpack. It has a trapezoidal shape with dimensions 75x80x75x85 cm. Please note 75 cm is the height here, and 80 and 85 are two lengths. Dimensions do not include seam allowances. They are usually 1-2 cm. Immediately on this piece with chalk dotted line mark the places where the pockets will be sewn. This backpack can fit up to 3 pieces. But you can have one - it all depends on your needs.
In any case, there should be one pocket. Its dimensions are 25x25 cm (excluding seam allowances). If you want to have more than one pocket, the other two measure 25x15 cm. Immediately sew zippers into them.
Now let's cut out the back of the backpack. This is a long rectangle with a height of 75 cm and a width of 30 cm. Separately, you can cut out a bottom measuring 36 by 33 cm. But it is better to cut it out together with the back - then you will be able to reduce the number of seams. Immediately make tunnels for the tubes. To do this, two slings 2.5-4 cm wide are sewn to the back from top to bottom. They are not sewn tightly - so that the tubes can then be inserted. The lines should end just above the beginning of the bottom. Sew tightening buckles on top in the corners, two more should be sewn on the sides of the back at an equal distance from each other approximately in the center. Also find a place for a handle and make it from a narrow sling. It is recommended to place the handle not at the top of the backrest, but slightly lower - at a distance of approximately 2.5 cm from the top edge.
Now let's start cutting out the straps. This is where we need a thick and thin nylon and a travel mat. We cut the straps from all three parts same shape(this is supposed to be a layer cake). Two pieces each. Length of straps 65 cm. Width – 3 cm.
How this is done: parts made of thin and thick nylon are sewn together, but not stitched along the bottom. Then they are turned inside out, an isolon part is inserted inside the resulting pocket, and now everything can be stitched up. In the same way, we make a belt 75 cm long and 20 cm high. It is reinforced at the top with a wide strap. 2 slings, 40 cm long and 2.5 cm wide, are also attached to the edge. Tightening buckles are attached to the top where they connect to the backpack.
What were the slings needed for?
They are necessary to strengthen the straps. Take a narrow sling (25 mm) and stitch it to the straps in several places (across). At the same time, a tightening buckle should be strengthened at the point where it ends. Important nuance– the slings are sewn to the side of the strap that is made of dense nylon.
We sew the shoulder straps to the back - over the handle. The specific distance is calculated depending on your height. For a person up to 180 cm, the distance from the bottom edge of the backpack to the beginning of the straps is 50 cm. For taller subjects - 55 cm. If your height is less than 170 cm, the straps are sewn lower - at a distance of 45 cm from the bottom edge of the backpack.
To prevent your backpack from rubbing your back, make a special “pad”. To do this, we will need the same travel mat and soft nylon to protect it. Cut out two identical parts from them in the form hourglass. At the narrowest point, the distance should be 15 cm. The width at the top is 20 cm, at the bottom 25. The height is 50 cm. Moreover, the height is 20 cm to the point of narrowing and 30 for everything else. Now we sew these parts together and sew them onto the back over the straps. But there is a trick here. At the bottom of our watch we leave a gap for the belt. The gap is precisely the same 20 cm that remain to the point of narrowing.
Today, the most popular among the many accessories is the backpack bag. An indispensable thing not only in the city, but also for various trips. Buying a backpack bag is not a problem, but for those who love needlework, it is much more interesting and enjoyable to sew it with your own hands, especially since the choice of materials always remains with the needlewoman. Therefore, a hand-sewn accessory has an individual design without losing its functionality.


How to make a women's transforming backpack with your own hands?
To make such a transformer you need to prepare:
- fleece;
- a piece of neoprene measuring 55 cm x 140 cm;
- a piece of leather;
- a piece of matting 160 cm wide and 45 cm long;
- zipper 35 cm long;
- three buckles:
- as well as threads, pins, scissors, a ruler and two ready-made pens with carabiners 85 cm long.
We draw a pattern of three parts. Two rectangles measuring 33x23 cm and 43x13 cm, a circle with a diameter of 28 cm.
The dimensions of all parts include seam allowances.


Next steps:
- We cut out one round piece from neoprene, matting and adhesive and glue them together using an iron, placing a circle of adhesive fabric between neoprene and matting. We do the same with pieces measuring 43x13, cut from leather, neoprene and glue. In a rectangular glued piece, we make a side seam and attach a circle to it, 1 cm away from the edge.
- From neoprene and matting we cut out two pieces of 33x23 cm, which we sew together along the long side. We attach a zipper to the resulting two parts, without bending the sections to which we glue, and then sew two strips of leather measuring 2x44 cm.
- Now let's grind side seams this blank and attach two buckles to different ends lightning. To attach the buckles to the bag, we cut two parts from leather. Each part consists of two rectangles measuring 6x45 cm, connected by a 2x2 cm jumper. We insert buckles into them and fix them with glue and an iron, and then sew them along the side seams.
- For the third buckle, you need to cut a belt loop measuring 2.5x5 cm from leather and sew it to a blank made of glued parts (the bottom of the bag). Now we connect the bottom and top of the accessory by stitching with wrong side, joining the bottom side seam with the top seam. The bag is ready.
We sew for a child
For your baby, you can design and sew a beautiful backpack that transforms into a bag with the help of a handle.
We will need:
- two types of fabric: plain and with ornaments;
- harsh material and padding polyester for compaction;
- cord to match the color of the plain fabric and four zippers.
The accessories required for manufacturing consist of a magnetic clasp, three buckles, two half rings, two carabiners and one fixing element for the cord. The tools we use are thread, scissors and a sewing machine.
Uncover
- We cut out seven rectangular blanks from fabric with an ornament. Two pieces for the back pocket 25x25 cm, for the front pocket 16x25 cm, for the side walls 15x32 cm and one blank 8x130 cm for the fabric shoulder strap.
- From plain fabric we cut out one blank for the back and front walls of the backpack, 25x32 cm. We duplicate parts for two types of belt loops measuring 8x15 cm and 8x10 cm, as well as for a backpack belt 8x80 cm.
- We will sew the upper part of the backpack from two pieces of 25x25 cm, from which we cut off the corners of 7 cm on each side.
- For the bottom of the bag, draw an oval 28 cm wide and 16 cm high.
Sewing steps
- For sealing the lid, bottom, two walls, loops and backpack straps we cut out one piece at a time from the rough stuff. Additionally, we seal the bottom and back wall with padding polyester. We quilt the three blanks for the bottom together and set them aside.
- We sew zippers on one side to the pocket blanks. We sew pockets to the front and back walls of the backpack, with front side. Carefully align the pocket and pin it to the wall. We put a braid on the upper half of the zipper and attach it to the main workpiece. The result was two blanks with pockets.
- We sew the side sealed parts to the back wall and overlay the sections. For belt loop blanks, we turn the sections inward, fold them in half and stitch along them. We insert frames into the finished loops and sew them to the back wall.
- Now we prepare the backpack straps. To do this, we fold the sections from the long sides inward, then fold them in half and iron both parts. We insert a zipper between them and stitch.
- We sew a workpiece consisting of a back wall and two side walls with a front wall and a bottom. We turn it inside out and attach to it a strip of 8x80 cm, intended for the lace with pre-folded edges, and departing from the top edge about 5 cm.
- We sew together the parts of the backpack lid, iron it, insert the upper half of the fastener, decorate it, and then sew it to the main piece along with the backpack straps. We attach belt loops with inserted half rings on the sides.
- We insert the second half of the fastener into the front wall. Now we sew the lining, adding a pocket with a zipper. Finished lining We place it inside the backpack, bending the top edge by 2 cm, and backing about 5 mm from the edge we sew it. Then we retreat another 5 mm and make a line along the strip for the lace.
- We insert the cord with a pin inside the product, and we drag the ends through the fixing device, tying the ends with a knot.
- Now we sew the shoulder strap. We bend the sections inward, fold them in half, iron them and stitch along the front side.
- At the ends we install a buckle for adjusting the length and a carabiner.
The bag is ready.
Beach model with mat
For a trip to the beach, you can sew a comfortable and functional backpack with a rug in the shape of a bear.

To make this interesting and funny beach accessory you will need:
- Two terry towels sizes 70x140 and 50x90.
- Waterproof fabric 100x150.
- Pieces of fabric of various sizes for pockets, paws and head. For the top pocket and lining side of the ears - 50x100 cm, lining fabric for the paws - 50x50 cm and for the bottom pocket - 50x90 cm.
- You also need a backpack tape - 270 cm, a zipper - 50 cm, a semi-automatic fastener for the tape - 4 pcs, Velcro - 50 cm.
- In addition, you will need thread, scissors, pins and a fabric marker.

Sewing
- We cut out the muzzle from a 47x37 cm cut. We draw on paper and then cut out the eyes, nose, ears. Apply the resulting details to the fabric, trace and cut out. We attach the resulting blanks to the head using a curly seam.
- Then we cut out two pieces from lining fabric and one of identical size from moisture-resistant fabric. We sew the parts of the ears with the lining fabric and set them aside.
- We pin the belt tape on the parts. We sew pockets and a belt loop with a half ring into one of the lining blanks. We attach the zipper between the lining parts and the front parts. For convenience, we sew the pieces grosgrain ribbon. We sew the lining blanks around the perimeter, folding them right sides together. We sew the ears to the muzzle.


- Preparing the parts for the paws. To do this, we cut out four parts for each paw: two for the lining, one main one from terry cloth and one from moisture-proof fabric.
- We sew the main terry and one lining, folding them right sides together. Then we fold the sewn parts right sides up and make another line. We place the second lining blank front side up, and on it a sewn blank with the terry side up, stepping back from the edge 2-3 cm, and a blank made of fabric that does not allow moisture to pass through, face down. We fasten all the details with pins and draw oval shape for the paw from the bottom edge. We cut and sew along the perimeter, do not touch the top cut and turn it inside out. The result was a paw with a pocket. We do the same with the remaining three paws.


Handmade leather - how to sew a backpack with your own hands
Choosing a backpack is always not an easy task. It is important to take into account a lot of points - fit, stress on the spine during exercise, design, presence of pockets, adjustability and comfort of straps, etc. I've owned many backpacks and none of them met ALL my needs.
As a result, I came to the idea that I should sew it myself and, in addition, I paint on the skin with acrylic, which means I can paint it. I have been looking for a normal description and pattern for a long time - I present the search results to you in the form of a selection of material on how to sew a leather backpack with your own hands.

Description of work
Let's start with a general guide to making leather bags and backpacks for the novice craftsman. Mark on fabric approximate form bags. By the way, the cut for sewing can be taken from an old leather jacket, For example.
Then place the prepared pieces of leather on it, after lubricating the fabric with a thin layer of glue. Apply the pieces so that each next covers the previous one by 5 mm. This will give you a surface slightly larger than the bag.

Sew the pieces using a regular seam or a zigzag stitch. Cut out the exact shape of the bag using the pattern and glue the lining with rubber cement. Connect the sides with a seam from the inside, and if the fabric is thick, from the outside using an edging. For edging a strip will do made of leatherette, regular braid or thick film fabric.
The bag can be closed with a zipper, button or Velcro. A long strap, like short handles, can be made from an old belt, attached to the top of the bag or sewn into the side seams.
In this way you can make a cosmetic bag, a casual or theatrical handbag, a fashionable stylish backpack, a sports bucket bag that is in no way inferior to branded products. Appliques, embroidery, decorative buttons, fringe, braid, etc.
How to sew a leather backpack

The first diagram shows a pattern for a large backpack with dimensions. The diagram below shows a smaller backpack.


Main details
1 and 1, a. The main part of the backpack is 1 child. with fold
2 and 2, a. Pocket flap - 2 parts.
3 and 3, e. Pocket -1 child.
4 and 4, a. Backpack valve - 2 children. with a fold.
Additional leather details:
The strip for edging the backpack flap is 60 (50) cm long and 1.5 cm wide, cut without allowances;
The strip for edging the pocket flap is 40 (30) cm long and 1.5 cm wide, cut without allowances;
2 belt loops 8 cm long and 6 cm wide, finished 3 cm (6 cm long and 4 cm wide, finished 2 cm);
2 patches 12 cm long and 6 cm wide, 3 cm in finished form (10 cm long and 4 cm wide, 2 cm in finished form);
2 belt loops for half rings, 10 cm long and 8 cm wide, 4 cm in finished form (7 cm long and 6 cm wide, 3 cm in finished form).
Another description with a pattern

In conclusion, I offer a clipping from a magazine with a description and patterns women's backpack made of leather from Anna Samoilenko from the city of Mogilev. Everything is described in great detail.
Men's leather shoulder bag - commander's belt

How many things does a little fashionista need! And everything, absolutely everything, is extremely necessary. Well, how, for example, can you do without a doll comb and a mirror? And what about the pebble that was found on the road yesterday? Well, don't carry it in your pocket!
And here, mom will come to the rescue. She knows that everything can fit into a comfortable backpack.
Store shelves are filled with a huge number of all kinds of children's backpacks and handbags. Large, small, in the form of toys, books, you name it, in general, there is plenty to choose from. Or you can take a different route. backpack for your baby. You don’t need any special professional knowledge, and the pleasant emotions from sewing will last for a long time. By the way, you can involve the child himself in this process.
DIY children's backpack: step by step with patterns
In order to sew children's backpack with your own hands, you need:
- thick fabric nice colors,
- padding polyester or needle-punched fabric,
- zipper,
- bright fabric for making flowers.
How to sew a children's backpack:
We cut out the details. The size and shape depend entirely on your desire. These are the parts of the front and back of the backpack.
 2.Straps.
  3. Side parts and bottom.
 4. Cut out the lining details.
  5. Let's start stitching. To do this, on each part on the front side, it is necessary to draw lines along which we will stitch.
 6.Then we place the part on the padding polyester, secure it with pins and stitch along the lines on a sewing machine.


 7. Putting the parts of the backpack together. We sew the bottom.
 8.We process the straps. Fold each piece lengthwise, pin, stitch and turn inside out.
  9. It is necessary to sew facings to the zipper. The width of the facing when unfolded is 4 cm. It should be placed on the zipper with a fold inward and the stitching should be 2 mm thick. from the edge.
 10. Sew on the side parts.
 11. We sew in and sew in the fastener as shown in the photo. Please note that between back wall backpack and a handle is inserted with the zipper facing.
  12.In the position we need, we fix the straps with pins and grind them.
 13.We will assemble the lining in the same sequence.
  14.Sew the lining to the base of the backpack as shown in the photo.
  15.When turned inside out, the backpack should look like this.
 16. Let's start making flowers with which we will decorate our backpack. To do this, we cut out petals from bright fabric, grind them, turn them inside out and fill them with padding polyester.
  17. Collect the petals into a flower. Sew a button covered with fabric into the middle.
  18. Decorate the backpack with flowers.

