Star news


Reproduction of materials is permitted only with the written permission of the editor! Free master classes on creating modular origami balls, step-by-step photos and descriptions.
In order to do flower ball origami, we need:
Paper (plain or colored), cut into squares. I use 7cm note blocks. You can take larger paper or smaller size. From squares with a side of 7 cm, a ball with a diameter of approximately 13 cm is obtained;
PVA glue;
Paper clips;
Ribbon. You can use cord, chain, etc.;
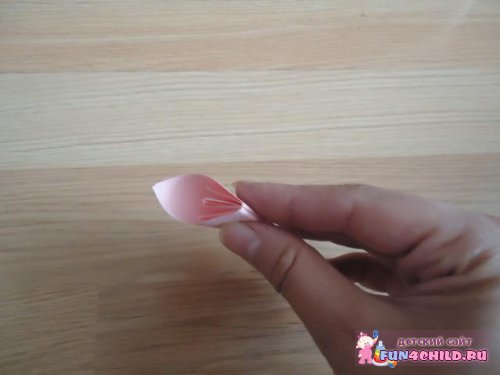
2. Fold the flower petals. To do this, take a square and fold it diagonally. It turns out to be a triangle.

3. We bend both corners to the top of our triangle so that we get a regular rhombus.

4. Now turn the corners out one by one.

5. Bend the protruding parts (ears) towards you.

6. Fold our corners inward along the fold line.

7. Apply glue to the halves of the corners and glue them together. Jam. When the glue dries. The result is one petal.
8. One flower needs five of these petals.

9. Glue all five petals together to create a flower.

10. For kusudama we need to make 12 flowers. They can be the same color, they can be multi-colored, as you like. As you can see, mine are colored.

11. When all the flowers are ready, we begin to assemble the ball. First, we collect two halves of 6 colors each. We fix the contact points with paper clips.

12. Then we connect the two halves of the ball with paper clips. This is roughly what should happen. Until we have fixed everything with glue, the flowers can be swapped.

13. When the composition is ready, glue the places where the petals touch each other with glue. Let the glue dry. It turns out to be such a ball of flowers.

14. We thread a lace, fly or chain through the hole between the flowers. We fix the ball with a bead or tie a ribbon on a bow, you can attach decorations. Here, as they say, a flight of fancy! Kusudama is ready!
You can make completely different balls from paper and for different purposes: for decoration on New Year or another holiday, in order to play and leave (an inflatable ball is ideal here) to give your friends and loved ones such a wonderful magic ball, and just for fun, to further improve your origami technique. You will learn how to make different balls out of paper from this article and various videos.
1. How to make a New Year's ball out of paper
— colored paper(to create balls, you can use other paper, including corrugated paper);
- ruler;
- scissors;
- a stationery stapler (although you can do without it);
- glue stick or double-sided thin tape.
As already mentioned, you can use any paper to create the ball, as long as it is not very thick. You can take colored paper that has one color - due to the fact that such paper has one side colored and the other white, you get a wonderful effect. One of the most economical options- this is colored paper from notes (which we used as an example), since a whole pack of this paper is enough to decorate not only the Christmas tree, but the whole house with balls.
To do New Year's ball you need to take 12 pieces of paper (3 different colors– for each color 4 leaves) and put them in one pile. Can be used different quantities pieces of paper, both more and less - the splendor of the ball depends on this quantity.
Then you need to take any item that has round shape(we used a glass) and trace it along the contour, drawing a circle on the top sheet.
Take the entire stack of paper and scissors, carefully cut out circles from the paper (you don’t have to cut the entire stack at once, especially if it is too thick, but divide it into smaller stacks to make cutting convenient and possible).
We fasten our circles strictly along the fold line with a stapler (if there is none, then they can simply be sewn, that is, fastened with threads).
We draw an additional template on a sheet of A4 paper, which will be needed in order to glue the circles in the right place. We apply markings, dividing the semicircle into approximately three equal parts, mark 1/3 at the bottom and top, as shown in the image, and draw straight lines, aligning the ruler with the marked points and the center of the circle.
Next, we apply the ruler, aligning it with the line until the glue is applied to only the required area, and apply the glue with an adhesive pencil to the upper sector, which is limited by the ruler. (Glue can be applied pointwise in the place where the arrow shows 1/3 or glued with a small piece of double-sided tape).
We turn the page of our round book over, gluing it, move the ruler to the lower sector and repeat the procedure again.
So, gluing the sheets alternately, first from the top, then from the bottom, we are gradually approaching the moment when only two parts remain to be brought together, unfolding our “book” into a beautiful festive ball of paper. Before the last step, when you unfold the craft into a ball, we advise you to glue it inside the ball beautiful thread, on which our decoration will later be hung on a Christmas tree or other things.
That's how easy it is to make a New Year's ball out of paper.
2. How to make a magic origami ball
This ball, when folded neatly and correctly, bends beautifully on both sides.
This ball resembles a little kusudami, but unlike it, it is created from one sheet of paper. To assemble such a model will require a lot of patience, since you will need to create a large number of neat folds (several hundred). But the result is worth it, since you will create interesting toy, which will appeal to everyone without exception, both children and adults.
In order to make a magic ball you need to use a long sheet of paper (15cm -30cm), on which you will have to bend many small squares. Watch the video instructions carefully so you don't miss it. important points. As a result, you should get great craft which can be used as a gift.
3. How to make an inflatable paper ball
Children love to blow up balloons, as well as kick, throw and puncture them. For them, you can create an inflatable paper ball with your own hands.
Watch the video on how to create such a ball, which you can then inflate. This ball can also turn into a kind of paper bomb if you fill it not with air, but with water - you can throw such a ball.
4. How to make 3D paper ball
To make a 3D ball you will have to print the picture below on thick paper. Or print it on a regular one, and then transfer it to thick paper– but just don’t use cardboard. You can take velvet paper, paper for pastels - it all depends on what you have at home or on your desire (after all, any paper can be purchased at the store). This will look good both in white and in color.
Two templates - one for big ball, and the other for the little one. It's easier to train on a larger one. If you decide to start the training with a large ball, then print the drawing 2 times - so that you get 12 parts. Click on the picture and save the template.
Is it possible to make a real one out of a square sheet of paper? volumetric ball?! In this lesson we will make sure that this is possible using the origami technique and just one sheet of 15 x 15 cm black. As a result, with the help of various folds, folds, “pockets” and others small parts, as well as origami tricks, we get a three-dimensional figure, which has a name - a fusen ball. The material used is colored thin paper. You can take any color you like.
Necessary materials:
- sheet 15 x 15 cm.

Stages of making an origami ball:
- Fold a square sheet of paper diagonally. To do this, the top of each of the upper parts must be bent down to opposite corners.

- Now bend the top of the sheet in half downwards.

- Using your fingers, bend the sides towards the middle to form a double triangle.


- We bend the lower corners of the top layer of the triangle upward towards the central corner.

- We turn the workpiece over and do the same on this side.

- Now you need to bend the side corners to the central vertical fold line.

- We will do the same on the other side by turning the workpiece over.

- Bend the bottom corners in half upwards.

- Now we take the right corner and hide it in the resulting “pocket”. Let's do the same with the left corner. We turn over and hide the lower corners in the pockets, which should first be bent in half.

- We bend each side. At the bottom you can see a small hole through which our fusen ball should be inflated.


- So the treasured real ball is ready using the origami technique, which is created from “pockets”, folds and folds on a simple square sheet. This fusen ball can be used for games if you urgently need a ball.


Today we will learn how to make an origami ball out of paper with our own hands. Despite the apparent complexity, even a beginner can create such a craft, and available scheme And step-by-step instruction with a photo they will tell you how to do it correctly.
Tools and materials Time: 1 hour Difficulty: 4/10
- scrapbooking paper with a beautiful pattern;
- scissors;
- pencil and ruler.
– most interesting japanese art, which allows you to create a wide variety of simple module elements volumetric figures and decorations, like this origami ball. Making crafts using this technique - great way Give your brain a rest and get rid of unnecessary thoughts in your head.

This volumetric ball is made using the technique modular origami. In fact, it is a polyhedron of 12 identical pentagonal spheres - a dodecahedron. Such original ball Perfect for decorating a living room or children's room, it can also be hung in a doorway or on a window.

Step-by-step instructions with photos
So, let's get to work. To make the origami ball neat, first prepare workplace, carefully wiping it from dust and moisture.
Step 1: Cut the Paper
To build this model you will need 30 identical pieces of paper. Each piece should have dimensions in a 3:4 ratio (for example, 3 cm x 4 cm, 6 cm x 8 cm, etc.)
To do this volumetric origami a ball made of paper, we used colorful scrap paper in light green tones, plain and with a geometric pattern.
Step 2: fold the module
- Fold the paper into three sections in a Z shape. You now have a strip of paper in a 1:4 ratio.
- Fold the bottom right corner upward towards the opposite side.
- Next, fold the top left corner down towards the opposite side.
- Now take a ruler. Use it to make a diagonal fold from the top left corner to the bottom right corner. Using the same ruler, iron the folds thoroughly.
One of the modules is ready. Using the same technique, make 30 of these parts.

Step 3: Assemble the ball
Take two modules. Fold one piece with the folded corner into the inner flap of the other piece.

Take another module. Place the folded corner of the third module into the inner flap of the second module. After this, place the nearest corner of the first module into the inner pocket of the third module.

We used three different patterns for each of the corners, but you can assemble this ball any way you want! When you insert the last 30th piece, you will get a dodecahedron shaped ball.


