Star news


How to make large pompoms from crepe paper. Making a pompom from corrugated paper with your own hands
In contact with
Classmates
It is difficult to imagine any holiday, be it a wedding, birthday or christening, without beautiful dishes, extraordinary accessories and ceremonial decoration.
The room where the holiday takes place is usually decorated balloons, flower garlands, ribbons and weightless paper pompoms. And if you think that in order to decorate your home, you will have to order decorations from the store, then you are mistaken. In fact, making paper pompoms with your own hands is incredibly easy. It's so easy that you can produce paper pompoms at assembly line speed.
Pompom paper
It is worth paying attention to the choice of paper for the future pompom. There is no need to use regular office paper, as it is quite difficult to “fluff” it, and the pompom can come out a little heavy. Also, do not use crepe paper for these purposes. It stretches and during operation the ball may accidentally turn into an oval or even into an incomprehensible figure. The perfect pompom can only be made from paper. This light paper, airy and fits perfectly where you point it.

Pompom size and density
Everything is simple here. How larger size sheet of paper, the larger the pompom will be. From a sheet measuring 50*50 cm, a pompom with a diameter of about 40 cm is obtained. The density of the pompom will depend on the number of sheets folded. How more paper, the fluffier the pompom will be.
Pompom holder
You can fasten paper using a wide variety of materials. This could be a stapler, chenille, a piece of wire, a thick thread, or a plastic clamp (tie).
How to make a paper pompom
To do this, take at least ten sheets of paper and fold the entire stack like an accordion.


Try to work carefully so as not to damage or crush the thinnest layers. Having turned the paper into an accordion, lightly press down all the folds and secure in the center using any of the fastening options described above.

Do not tighten the resulting fan so as not to accidentally tear it. Tie near the fastener thin thread if you plan to hang the pompom later. Use scissors to round the edges.

Now separate the top layer from both sides of the fastener and lift the paper vertically upward.

Continue to lift towards the center layer by layer, straightening the paper slightly.


After fluffing about half of the pompom, turn it down and continue fluffing the other half.

After this, all you have to do is spread the petals evenly and hang the pompom from the ceiling. Using small paper and lifting all layers of paper to one side, you can make a one-sided pompom and use it as decoration when wrapping a holiday gift box.

Step-by-step guide: we show how to make a pompom from corrugated paper with your own hands
We only took crepe paper because it was easier to find. The pompom turned out beautiful, rustling and strong. However, pom-poms made from silk and crepe paper are lighter and more airy. Maximalists and perfectionists will have to look for gentle varieties.
Preparation
To create a fluffy and beautiful pompom from paper we need:
- corrugated, crepe or silk paper
- scissors
- thread, ribbon or lace
The maximum diameter of your pom pom is limited by the width of the paper. However, if you decide to make a huge paper ball, the full width of a roll of corrugated paper, be prepared for the fact that it will take almost 2 rolls to make one pompom!
Making one pompom takes from 10 to 20 minutes. To decorate a room, 2-3 may be enough big balls. But a large hall requires a large investment of time.
So let's get started.
6 simple steps and you will make a paper pompom with your own hands.
Step 1
Cut 8 identical square sheets from the selected paper. Once again: the side of the square will determine the diameter of the future pompom! And put them in a stack. 
No, we did not take measurements using a ruler. Corrugated paper is too unruly for this. A square “by eye” is our method.
Step 2
With a confident hand, we take the entire stack and begin to fold them like an accordion in increments of 1.5-3 cm. If the pompom is large, then the increment can be increased to 5-8 cm. The principle of the accordion is super simple: one fold on one side, the second on the other etc. to end. This is what the accordion drawing looks like if you straighten the paper: 
Step 3
The result was a narrow accordion-stack strip, the width of the selected step. We determine the middle and carefully pull it with thread without damaging the integrity of the paper. 
Step 4
Use scissors to carefully round or, conversely, sharpen the ends of the resulting strip. We rounded: 
Step 5
We straighten the halves into different sides and begin to fluff our butterfly. 
Paper pompoms are a wonderful decoration for any occasion. Playing with color, you can make such pompoms on New Year, Christmas, Easter, Halloween, birthday or wedding! And making them is very simple and relatively quick. For pompoms, crepe or corrugated paper is usually used, as well as paper. The last option is more airy, with light transparency and grace. But it is also more expensive. The choice is yours. Let's watch a master class on how to make paper pompoms with your own hands.
To make paper pompoms you will need:
crepe paper (at the rate of 1 sheet of 50x200 cm format per 1 pompom);
thin wire (for beading - quite suitable);
hanging tape;
a simple pencil;
two small office clips.

DIY paper pompoms: job description
You can make one-color or two- or multi-color pom-poms. For colorful options, simply lay out several different sheets of paper to form one pompom.
So our sheet crepe paper rolled up. We measure the middle of the roll and, without unfolding, cut it in half.


Now you need to unroll the first roll and fold it in half and in half again, i.e. to make four layers of paper. We cut the edges to make 4 separate sheets - their size will be 25x50 cm. When I made a pompom out of paper for the first time, I made a mistake: I folded the sheet into 6 parts, and each rectangle for forming a pompom turned out to be 25x33 cm. Experience suggested that the rectangle should be much longer. Option 25x50 or at least 25x40cm is ideal.


We cut the second roll in the same way - we will get a stack of 8 sheets.
Cut a small piece of wire - no more than 25 cm.

We fasten the sheets with clamps.

We decorate both edges of the rectangle along its long parts - cut out petals, sharp or rounded.

We fold our rectangles like an accordion (remove the clamps ahead of time).

On the finished accordion, measure the middle with a ruler and put a mark - for example, with a simple pencil.

At this mark, we wrap the accordion tightly with wire and tie it in a knot.

We wrap a ribbon on top, on which the finished pom-pom will be suspended. Why is one tape not enough, and it is necessary to first fasten it with wire? If you tie it with a ribbon, there is a high chance that the finished pompom will fall apart. But we cannot allow this!

This is the blank we have for a paper pom pom. If you need to make pom-poms at home and then take them to the celebration site, where you will have a little time, you can limit yourself to preliminary creation of blanks, and you will straighten them on site. How to straighten a pompom correctly?
Begin. For the accordion, detach the top layer on both sides of the ribbon tie and lift them up, as shown in the photo below.


We do the same with the rest of the leaves - until about the middle of the stack.

Carefully turn it over, without pressing our flower onto the table. We do the same manipulations - we lift the leaves up.

When all the leaves are straightened, it will look something like this.

Not very neat. This is easy to fix.
You need to take a paper pompom by the ribbon as close to the center as possible and shake it well, you can help it a little with your hands the required form- spherical. Now that’s great.

You can hang pom-poms made by yourself from corrugated or crepe paper where the most interesting things will happen. And beautiful. Happy creativity!


Eva Cascio specifically for the site
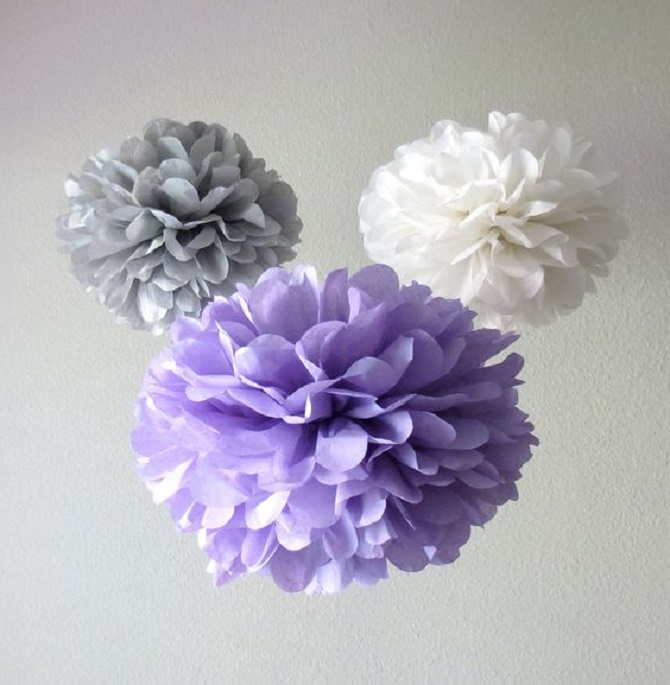
Surely you paid attention to huge balls, suspended from the ceiling in celebration halls. Lush, delicate, airy, almost weightless, colorful and monochrome, bright and pastel colors... They really attract the eye! It seems as if to create this work paper art requires unique design talent. It turns out that this is not entirely true. It is quite possible to make paper pompoms with your own hands.
What are pompoms for?
- First of all, pom poms are wonderful budget option decoration of a wedding (bride's room, restaurant hall) and in general any celebration where a large area is involved. You can, of course, use fresh flowers for decoration, but just imagine how many plants will have to be destroyed for this purpose. Pom-poms will look no less luxurious, stylish and modern.
- It is worth mentioning separately. In fact, pom-poms will make any table bright and festive! Napkins and napkins are decorated with decorative balls, as well as cute, toy-like pancakes, which with pompoms are simply a sight to behold.
- Pompoms are often used as hanging decorations. Intricate balls hanging at different heights create a feeling of celebration, transform the space and accentuate a certain color in the interior. They are used to decorate homes, cottages and offices. None theme party can't do without pom-poms. And if you use these stylish accessories for a photo shoot, you can be sure that the photos will turn out beautiful, bright and memorable!
At the beginning of the article, we already mentioned that this magnificent decor can be made independently, without resorting to the expensive services of specialists. But how to do that? How much time and nerves will this take? creative process? So, we present to your attention a DIY paper pompom master class.
Pompom chrysanthemum
These pom-poms look like spectacularly disheveled balls. Despite the rather simple technique of execution, they look extremely cute and cute! 
Required
- scissors;
- cigarette paper;
- wire.
 Three sheets of paper need to be placed one on top of the other. Fold them as for a fan, then secure with wire and trim the edges in the shape of a triangle.
Carefully separate each sheet and straighten it first on one side, then on the other. Gradually you will get a shaggy ball.
 If you can't find tissue paper, use any other thin paper. By the way, with careful handling, you can even make a pom-pom from newspaper: you will get a spectacular stylized accessory.
Pompom carnation
This type of pom-pom turns out to be very fluffy and looks so elegant! 
Required
- cigarette paper;
- wire;
- scissors;
- hot glue;
- ribbon;
- foam ball.


Pompom rose
The technique of execution is similar to a pom-pom carnation. Only the shapes of the buds will differ. 
In a festive interior, these decorations look bright, extraordinary and even fabulous, creating a solemn, unique atmosphere, emphasizing the color and style of the room. The undeniable advantage of this type of jewelry is that it is easy and relatively quick to make, requires a minimum of money and effort from its creator, comes in different types, shapes and sizes and can be made from any paper - even from ordinary napkins. At the same time, a room decorated with garlands, hearts and pom-pom balls will always look elegant and original.
Pompoms can not only be hung in the form of bright garland balls, they can also be successfully used to make panels for photo shoots, zone space, make numbers, flowers and other crafts and compositions, and in this article we will look in detail at how to make different types pom-poms for your holiday decor.
The main thing in the article
DIY paper pompoms: step-by-step guide with photos
Traditionally, to make a pompom with your own hands, you need a minimum set of tools:
The technology for making pompoms is almost always identical.

Do-it-yourself corrugated paper pompoms: master class with photos
 Pom-poms made from corrugated paper look especially elegant, because the paper itself has a crinkled texture. That's why decorative balls it makes them seem even more fluffy and voluminous.
To make pompoms, it is better to choose medium-density corrugation, since too thin one can break through during the manufacturing process, and too thick one will look rough and it will be difficult to crease it when forming a pompom from it.
The process for making a pompom remains the same as in the previous paragraph.

DIY napkin pompoms
Even napkins are suitable for making pom-poms; moreover, from this material, available for every type, decorative balls are obtained the most delicate and airy. Now you can buy napkins of any color, density and texture. Making pom-poms from napkins is the easiest and fastest way, because this is already a ready-made material, where you don’t need to measure or cut anything - the napkins already have standard size And square shape. The scheme for making pompoms from napkins is simple: 
- Take 10 napkins and stack them one on top of the other.
- We fold it into an accordion, trying to keep the folds the same width.
- We find the middle of the accordion and tie it with colorless fishing line or thread to match the napkins.
- Use scissors to round the edges. If you see that the edges are not rounded enough, trim them further, straightening the fan out a little.
- Carefully straighten each napkin on both sides of our accordion. The result is a fluffy and delicate pompom.
You can make your pom-poms from napkins even more elegant if you take material of two or more colors, alternating multi-colored napkins with each other, or you can do as in the photo below, making a beautiful pom-pom flower out of them.

DIY crepe paper pompoms
Do-it-yourself pom-poms: video master class
Silence paper - smooth, delicate, rustling in a festive way is ideal for making pom-poms, which turn out to be the most elegant, fluffy and durable. In addition, this paper is usually already on sale in sheets, for example, 25x35 cm and is excellent for making large pompoms.
DIY small pompoms
There is not always a need to make voluminous pom poms for decorating the room. There are times when you need to make small pompoms, for example, to cover a number with them, make a bouquet, a garland, some kind of craft from them, attach them to a suit, and for other purposes.
The volume of the pom pom will depend on the size of paper you use.
To get a small pompom with a diameter of 7-8 cm, take 4 ordinary napkins (standard size 23x23 cm), fold two of them and place them on top of each other.
- Fold the napkins like an accordion, moving along the length of the material to create as many folds as possible.
- Secure with thread in the middle and round the edges with scissors.
- Spread the petals towards the center, and miniature fluffy pompom ready.

How to make large pompoms with your own hands?
Best for making large pompoms thin will do corrugated paper or quiet paper. To make a giant pompom, stock up big amount paper - for such a product you will need a whole package of tissue or crepe paper, the total length of the roll is 10 m. The standard width of such rolls is 42-45 cm.

Do-it-yourself pom-poms from bags
Pompons today are used in many areas of life - they not only decorate halls and make all kinds of crafts from them, they are also actively used in dancing, gymnastics and other leisure activities. Children often return home from school with the task of making pom-poms from bags; most often they are used for cheerleading, a sport that combines dancing, gymnastics, acrobatics and show elements.
Many girls join so-called “support groups” primarily in order to put on bright clothes and dance with lush pom-poms in their hands. Cheerleading pompoms are most often made from bags, and we will teach you how to make them quickly and beautifully.
How to make pompoms for cheerleading with your own hands?
 To make 2 bright, fluffy pompoms for cheerleading, prepare:
- 2 packs of plastic bags - 2 will be enough different colors, although one is possible;
- Scissors;
- Scotch;
- Wooden or plastic stick.
- Fold the bags one on one, cut off the sharp corners and cut the joints.
- Fold the bags in half, defining the middle.
- Make cuts on both sides without cutting to the fold line. Try to make the strips the same width. If your task is to do lush pompom, measure out the strips narrower.
- Fold the stack of bags in half, twist and tape them around the stick to create a handle for the pom pom. Ready!
Pompoms made from garbage bags, especially since the size of the material makes it possible to make them more voluminous.
How to make the fluffiest paper pompom with your own hands?
To make a mega fluffy and voluminous paper pompom, you need to take as much paper as possible and divide it into equal parts - squares or rectangles - at least 20 sheets.

The only thing you may have difficulty with is rounding the edges of the pompom; scissors are unlikely to cope with such thick layers of paper at once. Therefore, make a stencil according to the size and thickness of your fan, for example, from cardboard, and round the edges of the pompom not all at once, but in parts, using the stencil.
What can you make from paper pompoms with your own hands?
Pom-poms are good and beautiful as DIY decoration interior, and “as part” of other decorations and crafts. Create with pompoms original products using our tips and master classes.
DIY pompom flowers: master class with photos
Flowers from paper pom poms can be done different ways. The pompoms themselves already look like blooming lush flowers, but you can further enhance this effect.
- Take napkins of three colors - 2 pieces of each color.
- Fold in half, and then one on top, you get a rectangle.
- Make an accordion along the long side of the rectangle.
- Mark the middle and wrap it tightly with fishing line.
- The edges can be rounded with scissors, or the petals can be made triangular.
- Gently straighten the flower petals on one side and the other, bringing them to the center, while Bottom part the pompom will also “go” into the upper “inflorescence” and you will get not a round pompom, but a lush flower.
 Here's another easy way to quickly make paper carnations and even a bouquet of pompoms.
 But using this simple technology for making pompom flowers, you can create poppies that are simply indistinguishable from real ones.

Decorating the hall with paper pompoms


DIY photo zone made from paper pompoms
Multi-colored pompoms - simple, original and very effective solution for decorating a photo zone. Taking a photo against the backdrop of a stand decorated with pom-poms in the holiday style will also come in handy at wedding celebration, and at an incendiary youth party, and at a cheerful children's party.


DIY number made from pompoms
Nowadays it is very important to congratulate children on their birthday by decorating their holiday volumetric figure from pompoms. Such products look very bright and elegant, lifting the spirits of the birthday boy and all the children at the holiday. It will be especially touching if parents themselves make such a lush, multi-colored number, and we will tell you how to do it simply and easily.

DIY pompom heart
Such an exhibition looks very touching and romantic, and photographs taken against the backdrop of such a photo zone look especially bright and original. Please your loved one with such a surprise, for example, on, or on, but in the meantime, be inspired by our photo ideas.


DIY paper pompom balls
Pom-pom balls made using the honeycomb technique look very beautiful and unusual. For such a product, you need to stock up on quite a lot of paper and devote at least 30 minutes of your time until you get the hang of it, but the result will be worth it.
 You will need:
- paper in silence;
- glue (preferably NOT hot);
- scissors;
- cardboard (or thick sheet);
- Double-sided tape;
- rope;
- 2 multi-colored pencils.
DIY pompom garland
And of course, pom-poms are just begging to be made into a garland - New Year's, or for any other holiday. This is done very easily, because pom-poms, thanks to their fluffiness, are quite simply attached to a thread or fishing line using any glue. And see for yourself how elegant, festive and harmonious it looks.


 An alternative to garlands made from classic pom-poms is a composition made from bright and playful pom-pom-tassels, on the production of which you will spend a minimum of cost, time and effort.


Crafts from paper pompoms: ideas with photos
Ordinary paper pom-poms can decorate your home in a completely unique and original way, and not only during the holiday. From pompoms you can make absolutely incredible things - original interior items. And children's crafts made from pompoms are an affordable and simple option for your child to bring to kindergarten not just an “on-duty” souvenir, but an unusual handicraft, especially since even a kindergarten-age child can make a simple pom-pom. Get ideas from the photos below.


