Star News


Plasticine figurines are complex. Original and beautiful do-it-yourself plasticine crafts: interesting ideas and recommendations
A properly organized workplace plays a key role, opens the door to the world of creativity for the child and helps to learn accuracy. It is important to carry out all activities in the presence of children. Let, for example, prepare a table for work by covering it with a newspaper with their own hands. In general, it is necessary that the kids are actively involved in the process.
To get started you will need:
- Plasticine. It is better to use several types. At modeling lessons, you need a special soft clay, which is suitable for very young children, and ordinary. And what pleasure will the child get from getting to know and playing with material that does not sink in water;
- Modeling board. On the desktop, you can also spread a newspaper or an unnecessary oilcloth tablecloth;
- Plastic knife for smooth cutting of plasticine;
- Details for specific crafts. For example, cones, colored cardboard, nutshells, etc.
After carrying out all the preparatory work, you can safely proceed to the creative process.
Examples of plasticine crafts for the little ones
The most important principle of conducting modeling lessons is to follow from very simple crafts to more complex ones and must necessarily take place in the form of a game. The first plasticine works made by the hands of children are designed to teach them how to handle the material itself, to learn its properties.
Whose trace?
Required: a piece of soft plasticine, cardboard and any items whose traces we will determine. You can buy special molds, or you can use any household item (pencil, comb, etc.).
With your fingers, you need to smear plasticine on the cardboard and leave traces of various objects there in any form, or in the form of some kind of drawing. You can start with small hands of children.
Rainbow
Required: plasticine of different colors and white cardboard.
We roll out sausages, which we then connect with each other and lay them out in the shape of a rainbow.
We draw with plasticine
Necessary: plasticine of different colors and a drawing of any simple figure (square, circle, house) or a blank sheet of paper.
We sculpt small balls, roll out sausages, and then fill the drawings with blanks. Children, in this way, can make many variations of the same pattern, filling it with only balls, or only with sausages. You can also combine.
Vegetables and fruits
Required: plasticine of different colors.
With our own hands we sculpt all vegetables and fruits familiar to children. With such crafts, you can play cook or feed your favorite toy.
Ideas for plasticine masterpieces for older children
The lessons of introducing the child to the modeling material are behind. Now he can make elementary crafts with his own hands and come up with new games with them.
It's time to move on to complex work and create interesting figures.
We sculpt figurines of our favorite heroes. With them, children's games will be more interesting, because the characters are made by hand. We use plasticine mass of different colors.
We blind Mushroom detectives. You will need plasticine of brown, orange, white and green colors, as well as toothpicks.
For the manufacture of our character, we need a light green color. It will be right if the child creates it with his own hands, pinching off a little from the orange, green and white pieces.
We blind the torso-head and paws from green plasticine. We make a hat from a light brown piece in the form of a round cake. We connect the parts together. Since the head of our animal is large and heavy, we strengthen its figure with a toothpick. We sculpt eyes - small white balls with blue pupils. You can add an orange mouth with a thin sausage and a black nose. We attach it to the face and our animal is ready.

Craft "Visiting a fairy tale"
In such work, children create a composition for further play. Fragments from favorite fairy tales. You can also come up with your own fairy tale and your own hero.
Blind Kolobok. We will need green, brown, orange and white plasticine, a piece of cardboard on which the composition will be attached. Children can cope with such work without the help of adults.
First you need to make weed by smearing green plasticine on cardboard with your hands. Then mold a path from brown plasticine. All children will make a gingerbread man with their own hands, because sculpting it is very simple. We put it in our composition.
We finish the lesson of such modeling by telling a fairy tale, or by watching this cartoon.
Examples of plasticine crafts using natural materials
Hedgehog on a quiet hunt
Required: a cone, 3 black beads, brown and white plasticine.
From brown plasticine we sculpt a muzzle and legs of a hedgehog, as well as a hat for a mushroom. And in order to make his leg we use white color. The finishing touch is the eyes and beaded hedgehog nose.
snow woman
Required: half a walnut shell, a thin birch twig, white, black, orange or red plasticine.
By analogy with a real snowman, we sculpt three balls of different sizes, as well as two very small ones (future hands). We add up all the details and get a figure, in whose hands we give a twig from a birch, and on top we put on a hat from a shell.
We make eyes, buttons and a mouth with black plasticine and attach it to our woman, with whom then a snowball fight will come in handy.
gifts of nature
Necessary: plasticine, acorns, chestnut, dried rowan leaves, maple seeds "spouts" and so on.
The craft begins with modeling a dish or basket figurine from plasticine. It will be easy for a child to make such figures with his own hands. There we place all your gifts of nature.
For creative work of children from plasticine, rice, pasta, beans, empty jars of baby puree and much more are suitable. This list is endless. As well as a list of games that you can come up with using these crafts.
Fascinating modeling lessons cheer up children and help them develop properly. It is very good to conduct them accompanied by children's songs or audio fairy tales. Modeling is a vivid example of how fine motor skills of hands and mental abilities develop in the form of a game in a child. A touching panel made by the hands of a child is the most valuable gift. Successful pictures can be put in a prominent place, stimulating children's desire to pick up plasticine again and create.


Modeling classes improve fine motor skills of the hands, which has a good effect on the development of the child. From plasticine, you can sculpt various animal figures, flowers, and even food for dolls. As a rule, modeling does not bring labor to children, and it is not necessary to force them to do this business. The main thing is to show the baby how to handle this material correctly.
Modeling with plasticine: cartoon models for children
Smeshariki from plasticine


You will need:
- Soft multi-colored plasticine;
- Plastic knife for modeling;
- Board or oilcloth for modeling.
Instruction:
- Savunya. Take purple plasticine and roll it into a ball the size of a chicken egg. From plasticine of the same color, make 2 small triangles - these will be the ears. Roll up the base for the white eyes.
- Attach the ears and base eyes to the round body. Cover the eye from above with a small visor that will serve for centuries. Sculpt the beak from orange or red plasticine, the pupils from black.
- From purple plasticine, blind the legs and wings. With the help of a knife, decorate the wings of Sovunya. Attach the limbs to the body in place. Attach the pupils of white plasticine to the eyes - this way the look will look more alive. The owl can be decorated with a cap and a scarf molded from the same material.
- Barash. Its manufacturing technology is almost exactly the same as that of Savunya. Make a ball out of blue plasticine. Make eyes out of plasticine. Roll up a few small balls from blue plasticine - it will imitate Barash's wool. Make ears, horns and hooves. The mouth can be made of red plasticine, rolled up a thin strip or painted with gouache.
- Exactly the same technologies can be used to mold other characters from Smeshariki: Nyusha, Losyash, Krosh, Kar-Karych, Kopatych, Bin, Hedgehog.
Plasticine turtle


Prepare orange, yellow, lilac, green, blue, black and white plasticine. From lilac, blind the turtle's head in the form of a cone-shaped ball, as well as the tail and paws. Roll up a ball from yellow plasticine, cut it in half. Concave 1 part of the ball a little.
Make eyes from white plasticine, pupils from black, and eyelids from blue. Have your child roll six balls each of orange (larger) and green (smaller). Trust him to crush the resulting balls with your fingers - this will turn out the spots for the shell. Now, stick green circles on the orange circles. Attach the resulting spots to the turtle's shell.
Wrap each white eye in a blue strip of plasticine, and attach a black pupil to the center. Make the turtle's mouth with red plasticine or cut it out with a knife. Attach the head, neck and legs to the shell. Turtle is ready!
How to make flowers from plasticine?


Plasticine rose
The 1st of the most beautiful flowers is undoubtedly a rose, so it is better to start mastering the technique of sculpting flowers from it. To create it, you will need red, green and yellow plasticine, as well as a few toothpicks.
From red plasticine, roll 15 balls of different sizes. Squeeze each with your fingers a little, giving it the shape of a petal. Fold the resulting petal, forming a bud. Attach the petals tightly in the middle, but along the edges they should move away from the bud.
Cover the toothpicks with green plasticine and stick them into the finished base. Attach rosebuds to the other end of the toothpick. Roll up leaves from green plasticine, make veins with a knife and attach to the stem. If desired, you can blind thin spikes.
Chamomile from plasticine
It is very easy to make a camomile from plasticine. Roll the ball out of the yellow material, then flatten it and poke a few holes with a toothpick. Pinch off 7 pieces from white plasticine, roll them into sausages, flatten and sharpen at one end. Attach the chamomile petals to the yellow center.
Roll up sausages from green plasticine, flatten them. Using a stack or toothpick, draw the veins. Make the stem from green plasticine, attach a chamomile bud and leaves to it.
Food for plasticine dolls: modeling features

Many girls want their dolls to have their own food. In order not to spend money on buying it in the store, it is better to start modeling this very food together with your child. This is both informative and interesting.
Try making a few packs of juice. To do this, knead the plasticine in your hands and form small rectangles. The edges of the rectangles can be slightly rounded. Attach a thin sausage made of bright plasticine to the juice box - this will be a tube. On the pack itself, you can write juice in a stack and draw some kind of fruit.
So that the dolls can eat something sweet, you can make cakes, cookies and cakes. Cookies are easy to make. It is enough to mold rectangles, circles, squares and ovals from plasticine. You can decorate the goodies as you wish: you can attach brown balls to the cookies, make cream from white plasticine to cakes, and decorate cakes with plasticine pieces of fruit.
To make a loaf or bread, take beige, yellow and brown plasticine. Roll a long oval out of yellow and beige, and make several notches on top with a sharp object. Rye bread will turn out from brown plasticine, it is enough to mold a rectangular bar and also make a few notches.
Scrambled eggs for dolls can be made using white and yellow plasticine: flatten a white plasticine ball, and attach a smaller yellow ball to the center. For scrambled eggs, you can make strips of ham from red material.
Flowers are an integral part of any holiday for mothers and grandmothers. How about making bright plasticine flower arrangements as gifts? Or maybe it will be a hot plasticine island with luxurious palm trees and green cacti? I will be happy to help you bring your most daring ideas to life.
To make flower arrangements you will need:
- plasticine,
- stack,
- plastic work surface.
We make flowers from plasticine
Who would not want to have a tiny plasticine miracle at home, for example... a graceful flower that would effectively harmonize with the shade of the wallpaper, or follow the contours of the carving on the furniture? Everyone can make an original decoration for a room. And plasticine flowers will certainly come in handy when preparing a do-it-yourself product for a school or kindergarten.
Charming roses
The queen of the kingdom of flowers - an elegant rose - can be molded in two ways: from flagella and droplets, as well as from plasticine balls. Let's consider both.
Method 1
From plasticine of your favorite color, make a drop and a flagellum.

Give the flagellum a flat shape, as it should, knead it with your hands, and stick it around a plasticine drop.


Make another flagellum and, flattening it, stick around the middle of the flower. The more flagella you make, the more magnificent the flower will be.

Congratulations! Rose is ready.

Method 2
Download small plasticine balls of approximately the same size.

Give the balls the shape of cakes and lay out in one row, as shown in the photo.

Roll flattened balls into a pretty rose.

This is what beauty should turn out in you:

Plasticine dandelion
A bright yellow dandelion is a ray of sunshine in your palm. Let's make a plasticine dandelion and invite spring to visit.
Make a long plasticine sausage.

Flatten and trim with a stack, trimming the bumps. Use scissors to make a fringe for the future flower.

Roll the flattened and fringed flagellum into a fluffy dandelion.

Hooray! A tiny plasticine sun is ready!

Flowering glade from plasticine
How about to make a rose, chamomile, chrysanthemum and calla plasticine and make an original picture for mom? If you like the idea, follow me!
From the opened plasticine balls, make rose.

The middle will consist of orange-colored stamens. Lightly press them against the flower to make them stick better. Rose is ready.

Let's move on to production chamomile.
Download sausage from white or yellow plasticine. Divide it into equal pieces and make balls out of them. Flatten each ball on one side and pinch the thin edge with your fingers. Like this:

Lay the petals in the shape of a flower on the surface of the future picture (for example, on the lid of a plastic tray), press the wide edges of the petals to the plastic. From orange plasticine, make a round center and use a toothpick to make stamens. Chamomile is ready.

We make chrysanthemums.
From plasticine of your favorite color, make three balls, different in size. Flatten them and make cuts with a stack.
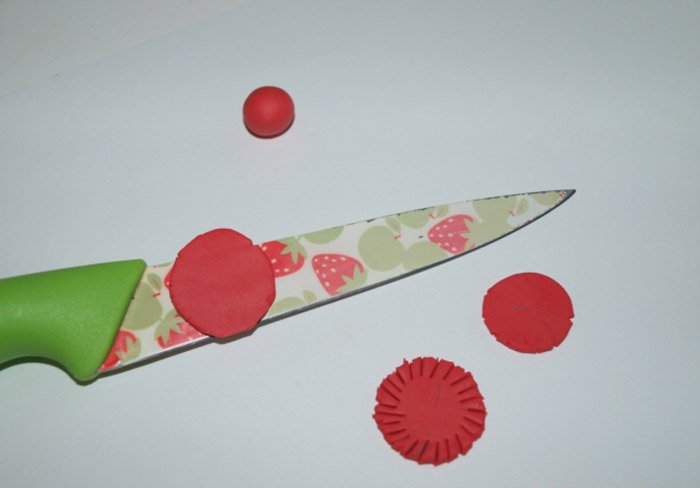
Put the layers of chrysanthemum into each other, slightly pressing the middle of the flower. Spread the petals with a knife or a stack, bending some of them up. Inside the “mound” of yellow plasticine balls-stamens, press lightly.

And now let's do callu from plasticine.
Flatten a white or purple plasticine ball into a thick cake. With a stack, cut off a little plasticine from two edges, making one side of the pancake narrowed.
The small yellow flagellum will be the stamen, while the long and massive green flagellum will be the stem.

Wrap the calla petal around the stem and stamen. From the wide side press to the surface of the picture.

Decorate flowers with leaves, make stems. From thin flagella, roll rolls, add herbs from plasticine.
Congratulations, a flowering clay meadow is ready!

And if you prefer video instructions, watch online how to make a flower from plasticine.
How to mold a cactus from plasticine
Handsome plasticine cactus is a stylish decoration for any desktop. Do you want to have a prickly plasticine miracle at home? There are many options for decorating cacti. Choose yours!
Plasticine and corrugated paper cactus
This cactus is made by trimming. Simply connect three plasticine blanks together and use a trimming stick to attach colorful pieces of corrugated paper.

Incredibly beautiful work!
Cactus from plasticine and vermicelli
To make this cactus, in addition to plasticine, you will need sparkles and vermicelli.
Add the glitter to the green plasticine and knead it well to distribute the glitter evenly. From two massive flattened balls of different sizes, mold a cactus pot.
Download three balls from green plasticine and flatten them, giving them the shape characteristic of a cactus. Connect together, attaching in turn to the plasticine pot. Make spines from vermicelli, or tiny needles from plasticine.

Complementing the composition, mold a snake from plasticine. How do you like this "Texas Ranger"?)

Beautiful plasticine cacti
A cactus looks cool, the needles of which are made by pulling plasticine with the sharp end of a pen, or with an ordinary stick.

And if a green handsome man also decorates with a flower, he will become a small find for all connoisseurs of beauty. See what different shapes your plasticine cactus can have and get ideas for creativity!

And finally (how did you guess?) video master class on modeling a cactus from plasticine.
How to mold a palm tree from plasticine
It is very easy to make a luxurious plasticine palm tree. Shall we try?
Download a lot of brown plasticine balls for the barrel.

Make palm branches.

Using toothpicks, connect all the details of the palm tree and place it on a sand island.

Plasticine palm is ready!

How to make a palm tree out of plasticine quickly and easily, a funny cartoon will tell. Happy viewing!
Creative modeling lessons are useful for a child, they develop fine motor skills, thinking, imagination and speech. What can be molded from plasticine at home with children of different ages, how to do it in an interesting and correct way, read the article.
Preparing for modeling from plasticine
Working with a child in a good mood is an important rule for a successful result. Modeling lessons should not be a burden. If the craft is not over yet, but the child is tired, it is better to postpone everything until the next time.
For modeling you will need the following materials:
- multi-colored plasticine;
- plastic board;
- a set of plastic tools;
- boxes for storing finished products;
- wet wipes for hands.
Which plasticine is better to choose depends on the age of the child. For modeling with very young children, it is better to use salt dough.
For preschoolers, Luch plasticine, a classic of 18 colors, is suitable. It is a little hard, but when warm in the hands, it is good to sculpt from it. Products do not spread, retain their shape for a long time.
Interesting ideas for activities with a child 1-3 years old
You can start modeling with a child of one year. Plasticine dough, soft in structure and comfortable for children's fingers, is sold in the store, but you can also make it yourself. When working with paper, ordinary soft plasticine is used, since it adheres better to the surface of the sheet, unlike dough.

You can start your acquaintance with the plasticine test with prints. They take objects of various shapes (keys, emblems, badges, etc.), and press them into the surface of the plasticine cake. When the object is removed, an interesting imprint remains. Special kits with molds for modeling are sold in stores.
How to work with plasticine:
- prints;
- kneading;
- pressure;
- indentation;
- pinching;
- smearing on the sheet;
- stick sticks;
- rolling lumps;
- flattening;
- rolling sausages.
Each reception with the baby needs to be beaten. For example, roll out a plasticine sausage, cut it into pieces and mold pies for dolls. Invite toys to visit for a puppet birthday, drink tea with pies.
What can be molded from plasticine with children 3-7 years old
For children of younger preschool age, wax clay "Gamma" is convenient in modeling. If a child sculpts for the first time, he is introduced to the material so that he masters the basic techniques of working with such material.

Three-year-old children learn to sculpt plasticine figures of various shapes:
- Column or cylinder. To make it, a piece of plasticine is rolled out in the form of a sausage between the palms.
- Ringlet. To make a ring, the column is folded into a ring.
- Ball. To make a ball, roll a piece of plasticine between the palms in a circular motion.
- Disk. Having pressed the ball to the table, they give it the shape of a disk.
The initial stage of mastering modeling takes several months.
After that, you can do various simple plasticine crafts with children:
- fungus;
- airplane;
- doll Tumbler;
- hare;
- pyramid.
We offer a step-by-step description of sculpting a funny multi-colored caterpillar:
- To work, you need plasticine of eight different colors, two pieces of white and black.
- Roll up 9 multi-colored balls of the same diameter, the size of a cherry. Two of them will be the same color.
- On a pink ball, a mouth is made using a stack. Two eyes are attached - cakes of white plasticine with black dots in the middle.
- At the top of the head, two coiled antennae are made of black plasticine.
- The balls are fastened together in a row, it turns out a multi-colored caterpillar with a smiling pink head.
- A small plasticine cone of any color is attached to the tail, corresponding in size to the base balls.
- Bend the caterpillar as if it were crawling.
More complex crafts for children 8-10 years old
With children of primary school age, beautiful flowers, animals, cartoon characters are made from plasticine.

Steps for making a plasticine rose:
- To work, you need red and green plasticine.
- 8 balls are rolled from red. Six of them are about 2 cm in diameter and two are 1 cm in diameter. These will be rose petals.
- Flat disks are made from balls, kneading them with your fingers.
- Collect a flower. Small petals are placed in the center of the bud, large ones at the edges.
- A long sausage-stalk and two ball-leaves are rolled up from green plasticine.
- They give the leaves an oblong shape, apply a stack of veins and teeth along the edge.
- Lay the rose on a cardboard sheet, stick the stem and leaves to the flower.
Almost like a living plasticine turtle turns out.
Stages of its manufacture:
- To work, you need brown, yellow and green plasticine. For the eyes, two small pieces of white and black.
- A cylinder is rolled from green plasticine. Divide it into 3 equal parts.
- From one part they mold a short "snake" with a large head. This will be the head of the turtle and its tail, which peeks out from under the shell.
- Stick "already" eyes from two white discs of plasticine with black dots in the middle. Make a smiling mouth with a stack.
- Two other pieces of a green cylinder are rolled into two long sausages with a diameter of about 0.5 cm, 8 cm long. These are the paws of a turtle.
- Fasten long cylinders crosswise, in the middle they place a “snake”.
- A cake made of yellow plasticine is attached from below - this is the lower part of the shell.
- The paws are slightly bent down so that the turtle does not lie, but stands.
- A ball is rolled from brown plasticine, an oval hemisphere is made, and placed on top of a turtle in the form of a shell.
- They draw a pattern on the shell with a stack (a pentagon with rays going down), make 3 claws on each paw.
Cartoon characters often become the favorite toys of the child.
We sculpt a Hedgehog from Smeshariki from plasticine:
- To work, you need pink and purple plasticine, small pieces of white, black and red.
- A ball is rolled from pink plasticine. Make two indentations on it with a round stick for the eyes.
- 2 white discs are placed in the recesses - large hedgehog eyes.
- A thin thread is made from purple plasticine - a border around the eyes.
- Pupils are placed in the center of the white disks - small peas of black plasticine.
- A small ball is rolled out of pink plasticine, fastened under the eyes, in the place where the nose will be. They stick, level, make an elongated muzzle.
- On the muzzle, a mouth is cut out with a stack, a thin strip of red is inserted into it.
- A small purple ball is attached to the nose.
- Hedgehog needles are made in the form of triangular pyramids. To do this, roll up 12 balls of purple plasticine, make triangular pyramids out of them with your fingers.
- The needles are attached to the back of the hedgehog, which is located almost immediately behind its large eyes. In the first row - 3 needles of the pyramid, in the second - 4, then again 3 and 2.
- A sausage is rolled from pink plasticine, divided into 4 identical parts - these will be the hedgehog's paws.
- Make 4 cylinders with rounded edges. The paws are fastened, and slightly bent so that the hedgehog can be planted on the ass.
- From pink plasticine, small rounded ears are made above the eyes.
- Notches are applied with a stack, drawing folds in the ears and fingers on the paws.
Drawing with plasticine from template pictures
For this unusual drawing, wax plasticine, Luch, or any other soft plasticine, is suitable.

You will also need:
- plastic knife (stack) to make small parts;
- plain or coated cardboard;
- oilcloth or plastic board under a sheet of cardboard, so as not to smear the table;
- a glass of water to wet your hands;
- hand wipes.
Before starting work, the desired drawing is applied to the cardboard with a simple pencil.
Pieces of plasticine are torn off, rolled between the fingers into small balls, and applied to paper, gently smearing the desired color within the outline of the drawing. It is convenient to distribute plasticine on paper with the middle or index finger of the right hand.
Using a stack, plasticine is leveled on the surface of the sheet where a large layer has turned out. With the same tool, everything unnecessary is removed from the sheet, different colors are mixed, strokes are applied to the drawing. In the hands of a skilled craftsman, the picture is bright, voluminous and expressive.
Rules for storing plasticine crafts

For storage of plasticine crafts, a hotel shelf is assigned in a sideboard or bookcase. To prevent dust from sticking, beautiful toys are varnished.
Figures intended for the game, it is better not to cover anything. They are conveniently stored in transparent plastic containers with a lid.
Plasticine melts from heating, so crafts should be kept away from radiators and direct sunlight. They can also be stored in cardboard biscuit boxes.
If a child is sculpting every day, and soon there will be nowhere to put his products, it is better to take a photo with commemorative signatures. Of the plasticine toys, only the most beautiful or made for some occasion are left.
Related videos
In kindergarten, teachers often conduct classes in modeling various crafts from plasticine. These lessons not only form fine motor skills, they also develop abstract, logical thinking in kids. In addition, children are interested in the process, which has a beneficial effect on their behavior and concentration.
The main thing in the article
How to choose material for children's modeling?
In our market there is a large selection of different materials for sculpting. Bright colors of plasticine will delight kids with their variety. However, before deciding on a particular product, parents should consider the following:
- Material toxicity. Crumbs up to two years old should not take plasticine from a Chinese or domestic manufacturer, which contains harmful dyes, raw materials obtained as a result of oil distillation. The composition is usually written on the back of the box. Pay attention to the plasticine of foreign companies. It is much more expensive, but natural ingredients are used to create it.
- Material color. Too bright, unnatural colors of the product may be an indicator of low-quality plasticine. More precisely, the manufacturer uses harmful chemical dyes for its manufacture.
- Aroma of plasticine. Pungent odors indicate the use of toxic components in the manufacture of modeling material. The best option when choosing plasticine is a product without any aromas and fragrances.
- material consistency. If the raw material for modeling has a too hard consistency, then a small child will not be able to soften it. You should choose soft plasticine. These products are produced by well-known foreign companies: Herlitz, Jovi, Koh-i-Nor etc.
Do not purchase modeling products in spontaneous markets. It is better to buy plasticine in supermarkets, hypermarkets, large, specialized children's stores, where there is a quality certificate for products.
Tools for children's plasticine crafts
You can’t do without auxiliary tools when creating different types of crafts. Therefore, choosing plasticine is only half the battle. You will also need:
- A board for rolling out figures.
- Stacks - as an auxiliary tool.
- Rolling pin - to roll out the plasticine cake.
- Wet wipes. With them, the child's hands will remain clean.

Plasticine crafts for the little ones
Babies 2-3 years old are not yet able to sculpt figures from plasticine with a large number of small components. Therefore, they need a little help and set tasks easier. Then the modeling process will turn into a pleasant, useful activity. Next, see different modeling ideas for young craftsmen.
like this giraffe made from 10 parts. Perhaps the child will not have such even components, but nothing, over time, the crafts will get better and better.
 multicolored sports cars with plastic wheels a child of 2.5-3 years old can do it. This activity will bring him pleasure.
![]() For children who already know how to roll round, long strips of plasticine, it will not be difficult to make crafts - snail with a house(shell). Ears, eyes, nose you can blind yourself if the baby does not roll up such small details on his own.
For children who already know how to roll round, long strips of plasticine, it will not be difficult to make crafts - snail with a house(shell). Ears, eyes, nose you can blind yourself if the baby does not roll up such small details on his own.
 Roll from yellow plasticine bagels just don't let your child taste them.
 The composition must be made of several parts. Sculpt the lower part on thick cardboard so that it retains its shape. Then put a mushroom on a white leg on this basis.

The abilities of children are individual, each kid has his own talents. The task of parents is to develop them. Also, moms and dads should teach the crumbs what they themselves can do.
In particular, by the age of three, your child, with your help, will already be able to:
- divide plasticine into parts,
- make balls,
- crush them
- make stripes,
- twist them into a spiral,
- collect details in one composition.
Crafts from plasticine for kindergarten
Already in the younger group, teachers with kids conduct needlework lessons. They give simple tasks to children. In the older group, children are already developing skills, and they create not only voluminous crafts, but also whole pictures from plasticine.


Working with plasticine, educators teach children to order. After creating crafts, the child must wash his hands. It is not allowed to taste the modeling material. Roll parts for crafts should only be on the board (not on the table). Plasticine must be handled carefully, namely: do not throw it at other children, on the floor, store the material only in a box, make sure that its pieces do not fall on things.
Plasticine crafts for children - fruits
Crafts in the form of fruits and vegetables from plasticine come out very beautiful. It is not difficult to sculpt them, some of them consist of only two parts (pear, apple, cherry). See below for examples of such products.


Crafts from plasticine animals with execution schemes
To mold animals, you will need tools, plasticine of various colors. Here is such a fun bunny you will make in less than an hour. See detailed instructions in the pictures below.
 Good Burenka is done in ten stages. To prevent body parts from falling apart, they are connected with toothpicks.
 for crafts "giraffe" you need to take plasticine:
- yellow,
- black,
- white,
- Brown color.
Sculpting order:
- From yellow plasticine, make a torso, tail, legs, ears.
- From black - hooves.
- From brown - spots on the body of the animal.
- Use white plasticine for the eyes.
 Next, see the detailed scheme for making a small tiger cub from orange plasticine.

How to make a horse, cat, dog, lion and pony: diagrams
for modeling horses immediately prepare material, tools:
- plasticine of different colors;
- cardboard for the stand;
- paper, felt-tip pens for making eyes;
- stacks, plank.
Progress:
- Start with the mane and tail. To create them, roll out thin strips of different colors.
- Then make four legs from white plasticine.
- Roll out the details on the board: torso, neck, head, ears.
- Prepare the stand - stick green plasticine on the cardboard.
- Assemble the horse with toothpicks.
- Glue your eyes.
 Next, see what parts it consists of cat
. Step by step, make them and connect them together.
Next, see what parts it consists of cat
. Step by step, make them and connect them together.
 The image below shows in great detail how to do puppy
. Follow the step-by-step scheme, and you will get a beautiful dog.
The image below shows in great detail how to do puppy
. Follow the step-by-step scheme, and you will get a beautiful dog.
 Even with a 3-year-old baby, you can make a funny lion cub
if you look closely at the pictures below.
Even with a 3-year-old baby, you can make a funny lion cub
if you look closely at the pictures below.
 It shows the main components pony
. You just need to divide the pink, black, blue plasticine into parts, mold these details, and at the end connect them.
It shows the main components pony
. You just need to divide the pink, black, blue plasticine into parts, mold these details, and at the end connect them.
 But the process is not over yet. Do not forget to glue the mane and tail to the pony.

DIY plasticine crafts for March 8 mom
Every child is always anxiously preparing for the holidays. By March 8, kids make gifts to their beloved mothers. This is where educators and teachers help. Handmade flowers will delight any mother, especially since they are made by the hands of their beloved child.


DIY plasticine crafts for February 23 dad
It's nice to receive a gift for dads by February 23 from a child, especially if the baby tried and gives it from the heart.


DIY plasticine paintings
Crafts from plasticine on a solid basis are different - voluminous (applications) and those that are created by the technique of embossed modeling. The softened material is applied to the base with a stack or fingers. For young children, of course, it is better to use simpler drawings. And older children can already create whole masterpieces from plasticine.


Modeling from plasticine: step-by-step diagrams of original crafts
owlet from plasticine.
 Ginger tiger cub from plasticine - a visual photo master class.
 Step-by-step diagram - how to do it Hedgehog-Smesharika from plasticine.
 Plasticine Barash.

Salt dough modeling as an alternative to working with plasticine
Testoplasty is suitable for all ages. Moreover, any mom can prepare material for modeling.
Recipe:
- In a dry container, add 200 g of flour, 200 g of medium-sized salt, mix thoroughly.
- Pour 125 ml of vegetable oil and a little water into the same bowl, add gouache or food coloring for color.
- From the finished dough you can sculpt crafts.
- Leave the crafts to dry in a warm place for several days or in an oven with a temperature of no more than 60 ° C (for 5-6 hours).

Plasticine craft photo ideas


Do not leave the child unattended when he is doing crafts. Take it easy if the baby does not succeed. Tell me how to sculpt, or help him make a difficult part of the product. Then the modeling process will cause only good impressions in the crumbs.

