Star news


Crafts from origami modules. Kusudam - crafts made from paper modules
If you are seriously thinking about learning a new type of creativity, then be sure to try your hand at modular origami. We learned to make figures from paper at a very young age, but at that time few people knew that you could create beautiful figures from modules: for beginners, this type of art, which came from the East, may seem difficult. Therefore, do not rush in any way, because this is an art that requires calm and attentive work with your hands. Just look at what masterpieces you can create using this technique:

If from one glance at volumetric figures made using technology modular assembly If you have a lot of questions in your head about how to repeat such a masterpiece, then be patient and have some paper. Any animals, flowers, fruits and much more can be created by your hands only from paper modules.
Modular assembly lessons
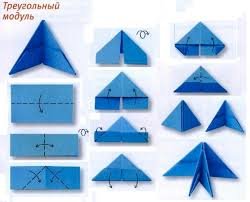
How to fold a module for this technique is clearly seen in this diagram:
For example, using detailed video master class, you can fold a very cute penguin:

But this is not the only master class. Origami crafts made from modules, the diagrams of which are very clear, will be your first step into the world of three-dimensional figures. To make the work clearer, it will be useful for beginners to watch a video with detailed comments on each step of the work.
Crafts from origami modules: Swan
The first creation will be little swan from modules. Therefore, stock up on paper and get to work, following my instructions.
Materials:
- 69 white modules;
- 1 black module.
Progress:
We begin to assemble the figure from the body of the swan. The first row will consist of 12 modules connected to each other in a circle. The connection of the modules is clearly shown in the diagram:

In the second and third rows we will also have 12 modules.

We turn our workpiece over and start making the tail and wings from the 4th row. For the tail, we fix 2 modules in an arbitrary place.

In the 5th row we complete the tail with 1 module, the short side of the element should be outward.

Now, symmetrically from the tail to the left and right, we begin the formation of the wings.
For the wing, we return to the 4th row again and attach 4 modules to the left of the tail.

To narrow the wing, you need to reduce the number of modules in each subsequent row. Those. in the 5th row - 3 modules on top of the previous 4 elements, in the 6th - 2 elements, in the 7th - 1 element. In the 8th row we again fasten 1 module. The right wing must be done according to the same pattern.


We smoothly moved on to the final stage of creating a small swan. Now we just have to make the neck, and we again move on to the 4th row. We fix 2 elements on the remaining free modules.

In the 5th row we add another module, to which we need to add 5 white elements nested inside each other.


For the beak, add 1 black module at the end of the neck. Thanks to the design of the neck, its bend can be changed at will
This is the swan we got:

Now you can try to create more complex crafts, a triangular origami module is easy to make, and the figures made from these modules are truly breathtaking and amazing in their beauty. The MK below will convince you of this.

This paper folding technique is very easy to learn. The main thing is to get good at making triangle basics, and then any figure is within your grasp.
Flowers from modules
For example, flowers from origami modules will be an excellent way to create summer mood during cold winter evenings.

By the way, creating such a flower is not at all difficult. For this we need 55 yellow and red modules.

The first row consists of 5 yellow modules (to fix it, it is best to lubricate the internal pockets of the modules with transparent glue).

We begin the formation of petals. To do this, insert the yellow corners of the first row into the pockets of the red modules. Add 8 modules:

We close the petal with the ninth connecting corner:

We repeat this operation for 4 more petals:

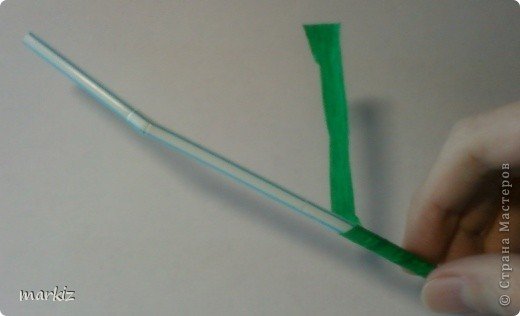
So that our flower can be placed in a vase, using cocktail straw and strips of paper to make a stem:
And glue it to the base of the flower:


Most importantly, remember to remain patient and concentrate on your work. Creating large volumetric figures from modules is not an easy task. But the result will meet all your expectations, inspiring you to new achievements.
In the meantime, while you are practicing forming modules for origami, I will prepare another MK that will reveal modular origami from a new side for you.
Crafts from origami modules on video
Making an Easter egg:
Another egg for Easter:
Father Frost:
White dove:
During production modular origami: "Rainbow Swan" you can experiment with various types paper. Suitable paper is for origami, office, coated paper. Triangular modules of the following colors will be useful for work: 136 pink, 90 orange, 60 yellow, 39 blue, 78 green, 19 purple, 36 blue, 1 red. The size of the pieces of paper for the modules is approximately 4x6 cm.
To make a swan, there is no need to prepare everything at once triangular modules, and make modules during the assembly process. If you wish, you can change the color of the swan you are making.

1. Take 3 modules Pink colour and arrange them as shown in the picture.
2. Insert the corners of two modules into the pockets of the third module.
3. Take 2 more pink modules and attach them in the same way to the first group.

4. Connecting modules according to this principle, make a ring of two rows: internal and external. Each row consists of 30 modules. Connect the modules in series, holding the resulting chain with your hands. With the last module, close the ends of the chain into a ring.
5. Take 30 orange modules and complete the third row. Please note that the corners of two different modules are inserted into the pockets of each module.
6. Complete the fourth and fifth rows in the same way, consisting of 30 orange modules each.
7. Now, holding the edges of the workpiece with your fingers, perform a movement as if you want to turn the ring inside out. You should get the shape shown in the photo (top and bottom views).
8. Complete the sixth row of 30 yellow modules. Now you need to put the modules on from above. Check that the modules are positioned in the same way as in the previous rows.
9. From the seventh row, start making wings. Select one pair of corners from two adjacent modules. This will be the attachment point for the neck. To the left and to the right of this pair, make a row of 12 yellow modules.
That is, the seventh row consists of 24 modules and has two spaces.
10 . Continue making wings, reducing each next row by two modules: in the eighth row - 22 green modules (twice 11), in the ninth - 20 green modules, in the tenth - 18 green modules. In this case, the gap intended for the neck should expand.
11. Make the next rows from blue modules; in the eleventh row - 16, in the twelfth - 14 modules.

13. Now take the purple ones: for the sixteenth row - 6 modules, for the seventeenth - 4, for the eighteenth - 2. The wings are ready. Shape them so that they are convex at the bottom and slightly curved at the top.
14. Make a ponytail consisting of three green and two blue rows. In the same way, reduce the number of modules by one in each row. The tail will require 12 green and 3 blue modules.
15. To make the neck, the modules need to be connected in a different way. Take the red module and insert
in two of its pockets there are two corners of a purple module. If you do not want the swan's beak to be forked, it is better to glue the corners of the red module in advance.
16. In the same way, connect 6 more purple modules in series. Try to immediately give your neck the desired shape.
18. Strengthen the neck at two corners between the wings. If desired, add details - eyes, bow.
19. Make a stand in the form of two rings. One ring has 36 and the other has 40 pink modules. Connect the modules in the same way as when making the neck. You can glue the rings together and glue the swan to the resulting stand

Modular origami: "Firebird", like modular swans, take pride of place in modular origami. These crafts always make an amazing impression. They are often made as gifts. Many varieties and options for making tails have been invented. Choose interesting ones color combinations, add additional details (beads, sequins, bows), and your birds will not leave anyone indifferent.
1. The body of the firebird is performed similarly to the body of a swan. At the base there are rows of 20 modules. Make three rows of light green modules. Close the chain into a ring and do not forget to turn the workpiece inside out.
2. In the fourth row, alternate light green modules with green ones. The fifth row is made entirely of green modules.
3. In the sixth row, leave 6 corners free for attaching the tail. Next, lay out from left to right: 3 green, 1 pink, 4 green, 1 pink, 4 green, 1 pink, 3 green modules.
4. Complete the wings, cutting each next row by 1 module. On each wing, lay out a pattern in the form of a pink diamond with an orange center (seventh row - 2 green, 2 pink, 2 green modules, etc.).
5. Create a neck between the wings. On the neck, place the same pattern as on the wings. Seventh row - 1 green, 2 pink, 1 green module. Eighth - 1 pink, 1 orange, 1 pink. Ninth - 1 green (on the corners of the last and penultimate rows), 2 pink, 1 green. Tenth - 1 green, 1 pink, 1 green.
7. Fourteenth row - 1 green, 1 orange, 1 green module. Fifteenth - 2 green.
8. In rows sixteen to twenty-two, green modules are used, inserted with the short sides outward (ksn). In the sixteenth - 3, in the seventeenth - 2, in the eighteenth - 1, in the nineteenth - 2, in the twentieth - 1, in the twenty-second - 2, in the twenty-second - 1.

10 . All that remains is to complete the tail of the firebird. Take 3 modules (2 green, 1 pink) and attach 4 more modules (2 green, 2 pink) to them, as shown in the photo. You will get the first two rows of the tail.
11. In the third row, lay out 5 modules: 1 green, 1 pink, 1 yellow, 1 pink, 1 green. In the fourth - 2 green, 2 pink, 2 green. In the fifth - 3 green, 1 pink, 3 green.
12. The sixth row consists of 10 green modules. To do it, put one module on the 4 middle corners.
13. In the seventh row, secure 11 green modules. Insert two additional modules into the pockets of the first row to attach the tail to the body.
14. Turn the workpiece over and secure 12 light green modules in the eighth row. In the ninth row, alternate: 1 light green, 1 light green (ksn), 13 modules in total.
15. Place a pen on each module (ksn). The pen is done like this: first row - 1 yellow module; second - 2 yellow; third - 1 yellow, 1 pink, 1 yellow; fourth - 1 yellow (put on the pink module); fifth - 2 green (put on 4 internal corners); sixth - 1 green (put on two inner corners).

16. Between the feathers, make columns of 4 light green modules: 1 module, 1 module (ksn), 1 module, 1 module (ksn). Extreme columns put on three corners.

17. Place a feather of the second row on each column (7 feathers in total). The feather is made like this: first row - 1 green module; second - 2 green; third - 1 yellow; fourth - 2 yellow; fifth - 1 yellow (put on the yellow and green corners), 1 orange, 1 yellow (put on the yellow and green corners); sixth - 2 yellow; seventh - 1 yellow.

18 . You can leave the tail with two rows of feathers, or you can make a third row. To do this you will need 6 more feathers. For each feather, make a column of 8 light green modules, placing the modules alternately with the long and short sides first. Place a feather on the column: first row - 1 yellow module; second - 2 yellow; third - 1 yellow; fourth - 2 yellow; fifth - 1 green; sixth - 1 orange; seventh - 2 yellow; eighth - 1 yellow. Secure the posts with feathers on the pairs of corners between the feathers of the second row.
19. Secure the tail to the body by wearing pockets bottom row tail to the corners of the back of the body. The whole figure should stick well without glue.
MINI_SWAN

Having mastered the execution technologyclassic swan model, you can try to make different variations of it. One of them is the mini swan model.
During productionmini swan2 colors of modules are used - pink and white. Triangular modules made from pieces of paper measuring 3x5 cm. Rows of 28 modules are laid at the base.
1. Start doing the craft in the same way asrainbow swan. The first two rows consist of 28 white modules each. Attach the pink modules of the third row immediately after you have fastened several modules of the first and second rows.
2. Alternate colors in all subsequent rows: a row of white modules, a row of pink ones. Complete 6 rows without forgetting to turn the craft inside out.
3. Now select the location of the swan's breast. Extend the corner for the breast on the five modules of the top row. To do this, put 4, 3, 2 and 1 modules on them in sequence. Make the same ponytail on the opposite side.
4. Make wings between the breast and tail. Place the modules row by row. In each next row there should be
be one module less than the previous one. You will only have eight rows. Fold the wings inward.
5. Make a neck out of 20 modules, alternating colors. Finally, make the beak. Please note that when assembling the neck, the right angle of the module must be at the bottom.
6. Fasten the swan's neck and glue on the eyes.
What is modular origami. Modular origami. Where to begin?
Modular origami is a type of origami. Modular origami is assembled from identical parts (modules), which are folded according to a certain rule. The parts are not glued together, but are inserted into one another.
By practicing origami with children, you get unique opportunity develop children's attention, memory, perseverance, spatial thinking, and fine motor skills.
So, in order to fold beautiful origami figures, for example, like those in our photo, you need to learn how to fold modules.

Module assembly diagram.
1. Fold the sheet in half.
2. Mark the fold line (bend and straighten)
3. Fold the corners to the center

4. See fig.
5. Turn over to the other side
6. Bend the loose ends up

7. See fig.
8. Turn over to the other side
9. Fold the corners down

10. Turn over to the other side
11. Fold the edges, straightening the corners
12. Fold the edges up, tucking the corners down

13. Fold the workpiece in half
14. Module ready

For one craft you need enough a large number of modules.

Once you learn how to fold them, you can move on to finding assembly diagrams beautiful crafts using modular origami technique.
How the modules are attached to each other
Method 1. Modules on long sides

Method 2. Modules on short sides

Method 3. Two modules on the long sides, one on the short side.

Which method of assembling modules should be used will be indicated on the diagram you choose for assembly.
We suggest you collect from Snake modules- symbol of 2013.
On New Year you can decorate your home New Year's origami snowflakes .

Flower lovers can try making a lotus flower. Watch the master class.

Excellent Easter souvenir and this chicken will decorate your interior. For a description of making chicken from modules, see.
Origami - good way keep yourself and your children busy free time. Surely you and your child will enjoy both the process and the result.
What is origami and what is needed for it
Origami is Japanese technology folding paper, resulting in various shapes, most often flat. Modular origami is a complicated, advanced version of the classic one, when a full-fledged one is created from paper blanks. volumetric composition. Crafts made from modules are used as interior decoration.
Classic origami involves using strictly one sheet of paper, without glue or scissors. Moreover, the paper must be special - it is called “kami”; ordinary office paper is not suitable for serious crafts. Origami paper should not be too thick or, conversely, too thin. Manufacturers of specialized paper took care of this, so the sheets hold their shape quite well, the folds remain in original form and they are easy to work with. Crafts made from modules also involve the use of such sheets. Interestingly, in Japan itself they use paper made from rice, bamboo or wheat, which is common for the Japanese.
Who can do modular origami?
Crafts from modules, or modular origami, as this technique is also called, is great way spend time usefully and get moral and aesthetic pleasure. Origami with children is also an opportunity to have fun together. For children this is development fine motor skills hands, imagination and the opportunity to feel like a real artist, sculptor.

Crafts from modules will be possible for children from the age of three, and perhaps even earlier if the child has enough developed attention and perseverance. But not only children will enjoy this activity, because this is an entire art that can require a lot of time and effort. The creation of some crafts can take several days, or even weeks, depending on the complexity and size of the future figure.
Why crafts made from paper modules keep their shape and don’t fall apart

As already mentioned, glue is not used to create origami. But why don’t the crafts fall apart, but gather into shapes and remain that way? Everything is much simpler than it might immediately seem; one of the laws of physics applies here, namely the force of friction. Thanks to this, the workpieces hold each other tightly.
Some crafts from modules for beginners may not be easy to complete. Exist complex figures, which even require mathematical calculations. Therefore, it is better for beginners to turn to master classes and try to create products in someone else’s likeness. And only when all the basic folds have been mastered can you begin to create more complex crafts from modules. It will also be useful for beginners to learn how to read the basic signs in origami. They will definitely come in handy in the future.
Crafts from modules. Creation schemes. Where can you learn technology?
In origami courses you can find many talented people who are happy to share their skills and ideas. They also provide diagrams, photos and videos from which you can learn the art of origami. In big cities you can find courses where children and their parents can be taught how to create some crafts from modules, the diagrams of which will certainly be provided. Some courses and seminars can teach you how to mathematically calculate what size and shape the blanks should be in order to make your own unique complex figure.

DIY triangular module
The most common and simple to make, but at the same time very beautiful are crafts made from triangular modules.

Boxes, vases, garlands, toys - all this can be made from paper triangles. But of course, these are not ordinary triangles, and they still need work to create. In such a matter, the main thing is to be patient, because, as a rule, a lot of such preparations are required.
The size of the rectangles does not matter, the main thing is that the aspect ratio is 1:1.5. Lay the paper down and fold it in half, connecting opposite sides of the larger sides. Then bend it in half, connecting the smaller sides, and then straighten it. This is necessary in order to mark the middle of the workpiece. Fold the corners towards the middle. Turn the part over. Fold the edges of the rectangles to the triangle you created earlier. Fold everything into a single triangle. This module has two pockets for connections with other modules.
Modular crafts for beginners

The easiest way for beginning origami masters is to create a small toy Christmas tree. You will need:
- a stick on which you will string the modules;
- origami paper;
- stand.
The first tier in the first row of the tree consists of eight triangular modules closed into a ring. The second row is also made of eight blanks. In the second tier, use ten modules in the first, second and third rows, and five in the fourth (attach the triangles one at a time). The third tier, from the first to the fourth rows - 12 modules, in the fifth - six. The fourth tier, from the first to the third row - 14 modules each, in the fourth - seven. On the fifth tier, make four rows of 16 blanks, and in the next two - half as many.
All that remains is to put all the tiers on a stick and attach it to the stand. Finished Christmas tree can be decorated with rhinestones, New Year's rain, self-adhesive paper.
Majority modular figures begin to create from below. Therefore, it is necessary to learn how to make a basic ring from blanks. It will be used as in simple figures for beginners, as well as complex, more advanced models for true origami lovers.
How to make a paper swan
To create it you will need 459 triangular blanks. You need to collect the triangles into a ring. Attach two more into one module, one in each pocket. Then make another such blank of three triangles and attach it to the first one.

Continue this way until the ring closes; this should take thirty modules in total.
In the next row, the modules are attached in a checkerboard pattern to the previous row. In total, it is necessary to make five such rings, each of which should take thirty modules. The resulting ring now needs to be turned inside out. The shape of this figure should resemble the Roman Colosseum or bowl.
Continue attaching the modules in a staggered pattern. In the seventh row, attach twenty-four blanks. From 24 triangles, make a swan neck by connecting triangles in a row. Now make the wings. Attach the modules in a mirror manner, reducing their number in each row by one.
Came out wonderful craft from modules. The swan will fit perfectly into any interior, and can also be given as a gift. Friends and family will definitely appreciate it.
How to make a vase using origami technique
Start assembling the modules into a ring, as in working on the swan. From the first to the third row, 28 blanks are used. In the third row, start adding triangles. Every three blanks, add another one, in total there should be 35 modules in the row. Simply assemble the fourth and fifth rows into rings without any additions. In the seventh row, increase the number of modules by seven. Collect rings until the twentieth row. Then, until the thirtieth, reduce the number of modules. In the 21st - 28, in the 22nd - 25, in the 23rd - 22. Then decrease one module at a time. Finally, you can lubricate finished vase with PVA glue so that it does not fall apart.

You can put paper flowers in the finished vase, which can be made using the modular origami technique. Make a ring from triangular modules. In the second row, attach more blanks, but of a different color. The result is a simple, but very beautiful chrysanthemum. All that remains is to glue the stem to the flower. It can also be made from triangles or simply rolled into a thin roll of paper and glued to a chrysanthemum bud.
If you like to tinker and create new things, then you will definitely like crafts from modules. Vase, swan, Christmas tree decoration, a flower, an animal figurine - all this can be done using sheets of paper and your imagination.
So, let's begin:
Let me remind you that modules can be placed on the long side and on the short side.
Let's consider the option when all modules are on the short side.
We insert the corners of one module into the pockets of another module. Continuing to connect the modules in this way, we get a strip.

This is the most convenient way to store modules. They are easy to count if you collect 20 or 25 modules. And they take up little space.
Now consider the option when one module is on the short side, and the next module is on the long side. We connect the modules again by inserting the corners of one module into the pockets of the other module. If we alternate modules in this way, we get a completely different strip.

You see how, by changing the position of the module, you can get different figures. After the lesson you can dream up.
Now let's see what can be made from these simple strips.


Now let's look at ways to connect modules, which are the basis for many crafts.
Let's consider option 1.
Let's assemble two rows of 10 modules each. We will place the modules equally on the short side.
Let's place two modules next to each other (these will be the modules of the first row). We insert the adjacent corners of the modules into the pockets of the third module (this will be the module of the second row).


We add modules to the first row and also connect them with the adjacent corners of the previous modules, inserting the corners into the pockets of the modules of the second row.


When there are 10 modules in the first row, connect the corners of the last and first module. We will get a circle consisting of two rows. There are 10 modules in each row. All modules face us with their long sides.


Turn the circle over. You see the difference - now the modules are looking at us with their short sides.
Turn the circle over again and add a third row. Connect adjacent corners of the second row modules by inserting them into the pockets of the third row modules.


I recommend assembling three rows at once, then the circle will be stronger and the modules will not fall apart.
Let's consider option 2.
In the first row we place the modules on the long side. In the second row - on the short one. We collect 2 rows of 10 modules and close them in a circle. It turns out like this asterisk. The first row is practically invisible.


Such circles are the beginning of many crafts.
If you do not close the collected rows into a circle, you will get a flat figure.
The photo on the left shows a flat figure. There are 10 modules in the first row. The second row has 9 modules. In the third row there are again 10 modules, etc.
To get a flat figure, you need to learn how to shape the edges of the product
Pay attention to the outer modules in the third row. They are put with one pocket on the corner of the outer module of the first row, and with the other pocket on the corner of the outer module of the second row. We also repeat in all odd rows. Thus it turns out smooth edge(see photo on the right).


Now let's look at increasing the number of modules in a row of a flat figure on both sides. This can be done in two ways. We will put the outer modules on the left side with an internal pocket (which looks inside the product) on one extreme corner, and with right side– an external pocket on one extreme corner.
On the left photo there is 1 module in the first row, 2 modules in the second row.
In the right photo there are already 3 modules in the third row.


We continue to increase the number of modules. This results in an isosceles triangle.

The sides of the triangle have different appearances. In the photo on the left left-hand side. The photo on the right is the right one.


If you make a smooth edge on one side and increase the number of modules on the other, you will get a triangle like this.

This way you can make flat shapes of different configurations. For example, the wings of a butterfly.

Let's consider adding modules in a circle.
1 way.
We assemble 3 rows of 10 modules (we place the modules on the short side) and close them in a circle.
Now we simply insert the modules between the modules of the third row (do not put them on the corners). The third row already has 20 modules. The added modules in the photo are green.
And we make the 4th row, putting the modules on with one pocket on the corner of the green module, and with the other pocket on the corner of the orange one. Row 4 also has 20 modules. We have doubled the number of modules.


Method 2.
In the 4th row we put all the modules in one pocket on one corner. So that there are empty pockets between the modules. And we again double the number of modules.


In the fifth row we put on the modules as usual, connecting the corners of adjacent modules. This photo shows that we have 10 modules in 3 orange rows, and 20 modules in 2 green rows.

Let's repeat adding modules. In the 6th row we put yellow modules on one corner each.
In the next 7th row we put it on 2 corners as usual. We already have 40 modules in the yellow rows.


Reducing modules.
To reduce the number of modules, in the next 8th row the modules must be put on 3 corners of the 7th row at once. Moreover, this must be done evenly in a circle. In our case, we put 2 modules on 3 corners each. We leave 2 corners free between them in the 7th row.


We add yellow modules in the 8th row, putting them on the free corners of the 7th row in the usual way.
In this photo you can see that all the green modules are put on 3 corners each. And yellow ones - for 2 corners each. As a result, the number of modules decreased by 10 and we were left with 30 modules.

By adding and subtracting the number of modules, you can give the product different shapes.
This is what we got great lesson... But now we can move on to master classes.

