Star news


Paper fox. Folding an origami fox according to diagrams
Origami fox for children in three versions from simple to complex. Step-by-step instructions with visual photos.
Materials:
- Double-sided and single-sided colored paper (origami paper);
- Glue, markers, paper eyes, adhesive moving eyes to choose from.
Origami fox: 3 ways for children
The first method is very easy, the other two are more complicated, but similar in some details. Pay attention to the very first photo, which shows not only the work itself, but also the dimensions. This can be important, since when using paper of the same size, the resulting chanterelles vary in size. It all depends on the technique and the number of folds: the more actions, the smaller the character.
Origami fox for little ones

Let's start with the easiest method that even kids can handle. The fox consists of two parts (head and body), glued into one whole, but folding them is extremely simple.
To work, you will need two pieces of square paper of the same size.

Making a fox head
Place a paper square in front of you.

Fold it in half, connecting opposite corners. Press the fold carefully. You can do this using a ruler.

Lift the right and left corners of the triangle upward, adjusting their height as you go. You need to try to make sure that the tips are at the same level, because these are fox ears. A narrow straight corner should form at the bottom.

Turn the paper over to the other side and glue or draw eyes and a nose. The origami fox head is ready.

Folding the fox's body
Place a second square piece of paper in front of you.
As in the previous case, fold it in half to form a triangle. For convenience, in the photo the triangle is positioned so that folding from right to left is visible. That is, the fold is on the right.

Fold the bottom of the triangle back. Do this so that part of the paper protrudes on the left, and there is a tail at the back. The origami fox body is ready.

Glue the head to the body, and you will get this cute and cunning paper fox using the origami technique.
Origami fox for children – method 2

Another simple way to fold this animal, popular in children's creativity. This time the fox consists of one paper square.
As you can see, the fox’s face and neck are lighter, so it is recommended to use single-sided colored paper or special paper for origami. On one side it is yellow, and on the other it is white.
Place the paper in front of you, color facing up.

Fold it from right to left, side to side. The white color will come out on top.

Draw a line mentally from the upper left corner of the rectangle to the lower right, and then fold the side up so that its fold runs from corner to corner along the imaginary line.

Fold the paper on the other side in the same way.

For convenience and a better understanding of the process, align the part as shown in the photo. That is, position the bottom horizontally.
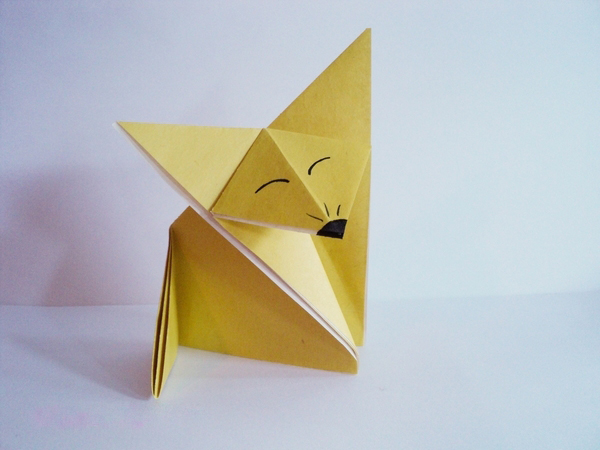
Fold the top part with the white area towards you.


Align the corners and press. The origami fox is almost ready, all that remains is to draw its eyes and nose.
Origami foxes: 3rd method of greater complexity

Even though this option is more difficult than the previous two, it is actually quite easy as well. Perhaps not for toddlers, but older preschool and primary school age children can get the job done.
Place square-shaped double-sided paper in front of you.

Connect the first pair of opposite corners to form a triangle.

Then connect the second pair to make intersecting lines across the area of the square.

Fold the triangle by connecting the corners from left to right.

Connect the bottom corner to the right.

Then point to the right and upper corner, smooth out the folds.

Bend the top corner back and connect it to the bottom. You will get a triangle. Be careful, in this step the part is essentially folded in half, only you need to make the fold not towards yourself, but away from you, that is, backwards.

On the right side, lift the corners up. For convenience, align the left straight side of the part horizontally, since this will be the lower part of the fox.

Now open the right corner that appears and simply lower it down, forming a small square or a fox’s face.

Bend the tip on the left, turning it into a tail; if desired, the legs can be expanded a little. Draw the eyes, nose and the cunning origami fox is ready.
These are the three ways you can fold an origami paper fox. Choose the option you like or is within your child’s strengths.
We continue with beautiful crafts made from plain paper. Today I will teach you how to make a paper fox with your own hands. Compared to, or, this is a very easy craft. Professionals do it in 5 minutes, beginners in 15-20 minutes. When you have made a paper fox, you can paint it or leave this task to your children. This paper fox will decorate your origami corner and add to your collection. As usual, we need a sheet of paper and that's it.
The last steps in manufacturing are the main ones, so be careful, the main thing is to bend the paper in the right direction. Step-by-step photo instructions, as always, for all people, are attached.
Necessarily! Watch the edges of the folding of the paper and which side to lay it on, this is where you should not make a mistake.
Take a sheet of plain, white paper.

We bend the corner like this, only evenly.

We need a paper square, so we tear off the excess part or you can take scissors and cut it off.

We got two parts, the one that is rectangular can be thrown away, we take a square.

From the square we make a simple rectangle, simply bend it, corner to corner.

Once again bend the rectangle into a rectangle. But only to mark the middle (height) of the rectangle.

We turned it back and now bend each side towards the middle. Left.

And then we bend the right one.

This is what we get, we continue to make a paper fox further.

We bend the left corner to the right corner, the fold goes to the back of the specimen above in the photo. To get exactly such a rib.

We place the workpiece on its side like this.

We immediately make a tail for the fox.

Now we bend the right side as shown in the photo.

Unfold it a little and this will give you the front part of the fox made of paper.

We begin to bend the middle part as shown in the photo.


This is the white fox we got. As I said, the craft is very easy.

I hope everything works out for you the very first time and there are no difficulties!
Print Thanks, great lesson +2
Foxes are very cunning and dexterous red creatures. However, there are also nice and kind ones. To do this, you need to make it out of paper using the origami technique. When making such a cute and kind fox, you don’t need glue. All you need is dexterous fingers and attentiveness.
Required materials:
- Two yellow or orange squares 10 x 10 cm
- Black marker or felt-tip pen.
Step-by-step photo lesson:
Making the fox's head. To do this you need one square. Let's put it with one of the corners up.

Bend in half.


Let's expand. The result is a fold line in the middle.

We turn the right corner of the triangle up a little diagonally.

Repeat the previous step with the left corner.

We turn the workpiece over for future crafts.

Let's make the body of our cute little fox. To do this, we will prepare another square, which should have the same color and size as the first one.

Bend the square.

We turn the lower part up a little and diagonally.

Turn it over.

We combine the torso and head together.

Using a black marker, we will now draw in the small features of the fox’s face. On the sharp corner we will draw a nose, but a little higher we will place two bold dots that will indicate the cunning eyes of the fox. You can also draw the outline of the ears with a black marker and outline the craft.

Our colored paper fox using origami technique is ready! With such a craft, you can safely look for colored cardboard and create a picture that will become a gift for a friend or just a beautiful decoration in the room.

Video lesson
All children dream of magic, let's help them plunge into a fairy tale.
Interesting crafts for children it is possible make from paper, today I will show you how Yulia Tomilova makes a cute paper fox.
For work we will need:
1. Cardboard (Julia used old folders from binders.)
2. Colored paper (single-sided and double-sided.)
3. Rubber glue and PVA.
4. Compasses, scissors, ruler, paints and brushes.
The fox consists of four parts - a body, a head, and two legs. We make a pattern on cardboard and cut it out. We cut out the fasteners in the form of a zigzag, and you also make the size yourself, thereby adjusting the volume of the part.

Glue the body, head and legs together. We should have four cones.

We glue the bottom to the head and paint all the details with orange paint or paste it with colored paper. We make an apron from colored paper and glue it onto the body. We glue all the parts with rubber glue; it does not deform the cardboard.

We make a hole in the head where the edges were connected and attach it to the body with glue.
Now let's start making the fur. We cut the paper into strips of 1.5-2.5 cm and cut it in the form of grass, as shown in the figure.
Now we run scissors along the fibers so that they bend. We glue the structure from bottom to top. We do not glue the grass on the apron; we tear off the strip near it.

We don’t cover the muzzle with wool, we make ears.

If you want, you can cut off a piece of the muzzle and make a mouth.

Now we can do our fox's hair. Glue the curls to the back of the head in pieces, also make bangs and a large blue bow. We paint the eyes, make the nose out of foam rubber and paint it black. We make the tail and the fox is ready.


This is how the fox turned out.


Hemp pattern: transfer it to cardboard, cut it out, glue it, glue the bottom and paint it.
From papier mache We make a bun, dry it, paint it and put it on a stump. 
We decorate our clearing and we're done.

Don't forget to leave a comment on this article.
Copyright © Attention!. Copying text and photographs can only be used with permission from the site administration and by indicating an active link to the site. 2019 All rights reserved.
Isn't it time for us to add new inhabitants to the paper zoo? Today the collection of animal figurines will be replenished with an origami fox. We will tell you about 3 types of folding of the cunning forest beauty, the more interesting it will be to collect a whole fox family, where each toy will be unique. Take an orange, preferably double-sided, colored sheet and a black marker to draw a sly face for the fox. You won't need more. Now look carefully at how to make a paper fox in no time.
Paper fox: option 1 - a simple toy
Even kids can do the first paper fox. The following schemes will be more complicated, the more interesting it will be to tinker with them. We will need a square piece of paper of a suitable color. You can make it from white office paper and then color your animal or entrust this activity to the children. Next, fold the paper in stages:

- Fold the square of the sheet along the diagonals, then fold it in half along one of the bends into an isosceles triangle;
- Bend the sharp corners of the resulting triangle to an obtuse angle. See fig. 1, step-by-step instructions in pictures will not allow you to make mistakes;
- Now fold the workpiece in half away from you. Having grabbed all 3 “walking” corners, bend them towards you, focusing on the vertical axis of the roll;
- Then lay out the folded corners - the outer ones will become ears, unfold the double central corner (from the inside) and press it, forming a fox's face out of paper;
- Bend a tail made of colored paper inward, due to which the fox will gain stability. The origami fox is ready, all that remains is to draw its eyes and nose.
This is what you should get:
Paper fox: option 2 - Japanese fox
Do you want to know how to make an origami fox using classic Japanese technique? Everything is incredibly simple: by analogy with the first simple version of the toy. Here you will also need a square of paper. Scheme 2 is similar to the first instructions in steps 1-2, then this origami fox folds a little differently. Proceed step by step, first repeat steps 1 and 2 (the previous simple fox craft made from a square), and then:

- Bend not the “walking” corners towards you, but a strip of the plane on this side (as shown in Fig. 2). This way you will set the supporting “legs” of the cunning animal;
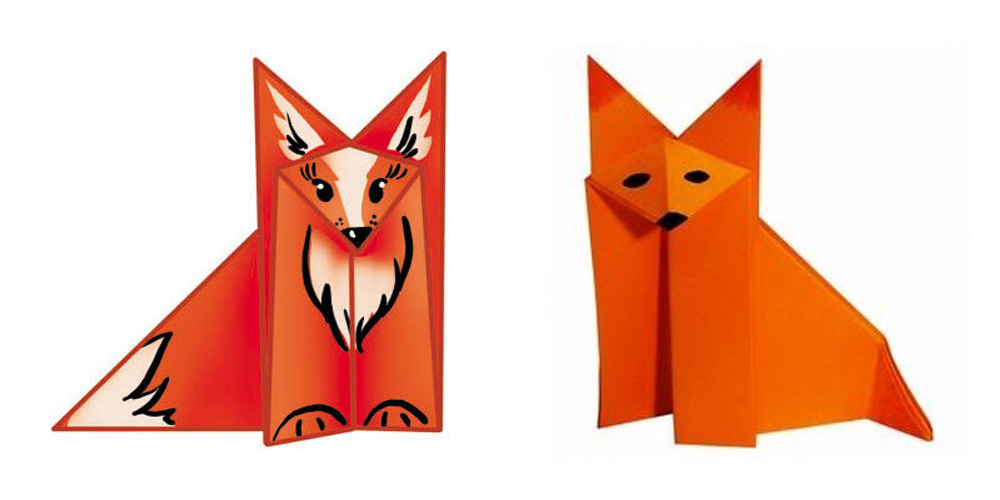
- Next, unfold the fox’s muzzle from the middle corner, straighten the ears and bend the tail part arbitrarily so that the origami fox stands confidently, paint the paper fox.
We've done it again! Hooray!
Paper fox: option 3 - a voluminous complex toy
Are you ready to learn how to make a paper fox with your own hands so that the animal looks as much like a real animal as possible? Then let's start analyzing the 3rd (most complex) scheme. She shows us how to make an origami fox with detailed anatomical detailing of the body parts. The scheme is not easy, but you can be proud of yourself if you manage to master the intricate folding technique. So:

- Fold the sheet of paper from a horizontal orientation so that its side edges meet in the center, then the origami paper blank needs to be sharpened both at the bottom and at the top. To do this, bend all 4 corners of the package inward, then unfold them (you need outlines of the edges);
- Open the lower corner “pockets” from the inside (both) and press along the plane. But the upper corners should not be opened, but folded inward (both). Did you manage? Let's make a paper toy for children next;
- We bend the upper corners (future ears) towards ourselves, focusing on the palpable groove. The ears need to be folded towards themselves again, reducing the resulting regular triangle. The ears overlap one after another (see Fig. 3);
- Bend the corners of the bottom edge sticking up downwards, fold the package in half (marking the central axis) and return it to its previous position. Fold the structure along the axis into a step (accordion), as shown in Fig. 3. The lower part now slightly overlaps the upper. Bend the corners of the steps towards you;
- He turns the package face down and bends the head of the future fox towards himself - the upper corner of the workpiece. Next, make folds that separate the front paws from the hind paws towards you (see Fig. 3 carefully);
- Acting strictly according to the scheme, systematically form the details - paws, voluminous muzzle, tail. At first, the origami fox will seem angular, but then it will take on spectacular final shapes. You can watch the video if the diagram is difficult to understand.
A voluminous chanterelle is not made from cardboard - it is difficult to maintain the shape of the workpiece. If you have mastered how to make a fox according to scheme 3, you can easily make origami animal figures of any complexity out of paper. For example, you are quite capable or amazing, which jumps or opens its mouth.
Don’t understand how to make an origami fox, but still want to make a toy for your baby out of colored paper? Use a ready-made template (Fig. 4). Here you don’t have to worry about how to make a chanterelle. It's simple: print out the finished drawing, cut out the parts along the contour and assemble a funny little fox with glue. It couldn't be simpler.