Star news


Volumetric decoupage painting for beginners. Volumetric decoupage - features of creation for beginners and basic design options (95 photos)
Decoupage is the process of decorating objects with various images made mainly from paper napkins. Decoupage first appeared in China in the 12th century. Back then, the Chinese decorated windows and household items with brightly colored paper cutouts. It received its name in the 18th century in France, decouper - to cut. Even before our era, the peoples of Eastern Siberia decorated tombs with felt. But only in the 21st century decoupage gained popularity in Russia, called the napkin technique. Decoupage can be direct or reverse, three-dimensional, with black and white graphics. To perform the decoupage technique, you will need the following items: the object to be decorated, three-layer paper napkins, small nail scissors, PVA glue, brushes for glue and varnish, and the varnish itself for coating.
Let's try to figure out how to make volumetric decoupage using the example of a wall clock for the kitchen. To decorate the watch we will not need special materials for decoupage; we will try to do without them.
Master class: volumetric decoupage for beginners
This is the kind of watch we will try to recreate today.

Take any old wall clock with a diameter of 27 cm.
First, let's disassemble the watch for spare parts.

And stick a napkin on the dial part - the base.
Select the area that we want to highlight and make voluminous.
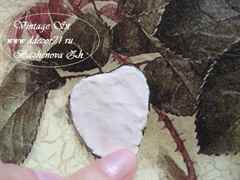
Apply PVA glue to this part of the picture on a napkin - the base and apply modeling paste on top, not reaching the edge of the leaf.

Cut out the selected part of the picture from the second napkin, apply PVA glue to it and glue it onto the paste. If there is a lot of paste and the edge of the leaf turns out to be rough, then you can remove the excess with a regular toothpick and wipe around it with a cotton pad soaked in water. As you can see, there is excess paste in the image, which we will later remove using the method described above.

We continue to design the leaves, apply modeling paste without touching the edge, and glue the double leaf on top.

Do not let the paste harden and shape the leaves.

For a more realistic shape, you can add relief to the leaves either at the stage of gluing the second part, or at the stage of applying paste to the base. It is better, of course, to do this when applying modeling paste in order to avoid damaging the surface of the napkin.

Coat the top of the leaf with PVA glue.

Clean the edges of the leaf, carefully removing excess paste with a cotton pad.
These areas of the image turned out to be voluminous.
There are moments when the paper may tear and the white paste will become visible. In this case, you can use acrylic paints, carefully covering the area of the gap. Using the same acrylic paints we apply shadows under the buds; you can emphasize some details, such as the bee, or paint the hands of the clock mechanism, making them a little darker. This is the kind of watch we got.

I hope that the technique of volumetric decoupage is presented step by step in an accessible and understandable language. To fully study the decoupage technique, consider another master class.
Volumetric decoupage for beginners for the New Year

Let's try to decorate a bottle of champagne or wine for the New Year's table. To do this, we will need to prepare the bottle itself, a primer, a three-layer paper napkin with a certain pattern, PVA glue and acrylic varnish.

We take a bottle of champagne, thoroughly clean it of all stickers and dry it, apply the first layer of primer, let it dry, apply the second layer.

We take a napkin and tear off its bottom layer, apply it to the bottle, apply a small amount of glue to the middle part of the napkin and smooth it from the middle to the edges.

After the napkin dries, turn to the other side of the bottle. In the same way, glue the napkin to the back side and use acrylic paints to highlight the contours of the image.

We paint the empty areas of the bottle with a piece of sponge, wait until the paint is completely dry, and cover it with varnish.
Here, in fact, our New Year’s bottle, made using the decoupage technique, is ready.
Master Class. Panel using volumetric decoupage technique “Plate with vegetables”
Maria Tarasova, 11 years old, 3rd grade student, Boarding School No. 5, Kursk.
Supervisor: Muravyova Olga Evgenievna, teacher, OKOU “Boarding School No. 5”, Kursk.
The master class is intended for teachers, parents, and school-age children.
Purpose: The plate is an excellent gift for family and friends; it can be used to decorate the interior of a room or exhibit children's creativity.
Target: introduce the technique of volumetric decoupage, with the basic techniques of working in this technique.
Tasks:
teach the “volumetric decoupage” technique;
develop the child’s imaginative thinking and imagination, his cognitive activity;
cultivate artistic and aesthetic taste and accuracy;
improve fine motor skills of hands and tactile perception.
Materials: disposable plate, kitchen-themed napkins, cotton wool, salofan bag, threads, spices, dried peppers, rose hips, various decorative elements, PVA glue, acrylic varnish, scissors.

Description of the Master class:
Such a Pano will have two meanings: as a decoration and as a talisman.
Here comes decoupage on a plate and the creation of three-dimensional elements: garlic, dried peppers, rose hips and other decorative elements.
We need a background, we are making decoupage of a disposable plate.
To do this, you need to degrease the plate.
We cut the napkin to the size of our bottom.
Separate the 2 bottom layers of a three-layer napkin.
We combine water and PVA glue (proportions 1:1).

Glue the napkin from the center to the edges. Cover the entire bottom of the plate with a napkin.
We glued it, expelled all the air from under the napkin so that it fit tightly to the plate.
Be very careful - the napkin is thin and breaks easily! Let it dry well.
Making garlic. For this we need cotton wool, a salofan bag and threads.
The threads should be white, strong and not very thick.
We cut the bag into pieces, approximately 15 by 15 cm, always in one layer.

Now we form a ball out of cotton wool.

We take the threads and make several turns at the base.

Try to draw our thread exactly in the middle and fasten a couple of turns at the base.

Next, we divide our halves into halves, then quarters, which we divide into six more slices.


We stretch the threads so that it presses the cotton wool with the bag and divide our garlic into eight parts.
This is how garlic turns out.


In nature, garlic cloves are not all the same, so it’s okay if ours looks similar to natural ones. We cut off everything that is unnecessary. Adjust with your hands and shape the garlic.
We make roots. Take any spices or ground coffee.
Apply PVA glue with a brush thickly to the center of the garlic and dip it in spices, removing the excess.
Let it dry.


When our decoupage on plates has dried, we need to apply 2-3 layers of varnish or PVA glue and secure our base. Only after this we glue the garlic.
For volume, use super glue to glue dried peppers and rose hips to the plate.

You can fantasize and add your own elements.

Without special expenses, you can decorate your kitchen and create bright, harmonious compositions.

Pano "Vegetable plate"

Pano “Coffee plate”.
Now I have this pano in my kitchen and it smells wonderful.
The wonderful aroma of coffee beans creates a wonderful mood.
Many needlewomen study the art of decoupage with great interest. It appeared in the 17th century and remains popular to this day. Over time, many types have emerged. One of the popular varieties is volumetric decoupage.
This is not just a paper cutting technique, but a real creation of a 3-D masterpiece from scrap materials. Despite the complexity of the name, every beginning needlewoman can master it. Photos of volumetric decoupage can be viewed on the Internet.
Creation Basics
The technique of creating volumetric decoupage is quite simple if you follow certain rules. The idea is to glue the details of the design layer by layer onto the base.
Upon completion of the work, the entire composition is coated with water-based varnish or even glaze, adding even more volume and shine.
Preparing for work
By following the instructions for creating volumetric decoupage, you will be able to create original decorative items.
First, you need to think about the composition of the finished work with the elements to which you will add volume.
But, you need to take into account that it is very difficult to give volume to small details, for example, tree bark or human hair. Prepare tools and materials. Cut out the pictures, giving them volume.
Selection of tools
The main tools that are used to make a 3-D composition:
- different types of paper;
- glue;
- water-based varnish or glaze;
- scissors with curved ends;
- tweezers;
- sharp knife;
- mat for cutting parts;
- paints and brushes.
Thick paper is used in this work. The thin paper material will tear in the process. Paper that is too thick will be difficult to glue.
It is advisable not to use silicone glue in your work; it contains acetic acid. When applied to paper parts, it seeps into the deep layers of the paper.
In this type of art, it is good to use water-based acrylic varnish. It will give the composition a complete look. This varnish dries within 6-12 hours.
To create three-dimensional parts, a special clay-based paste is often used, which, when dried, becomes similar to white ceramics.
Creating a volumetric decoupage plate
How to make volumetric decoupage with your own hands so that the end result is beautiful and high-quality work? To begin with, you can easily decorate the plate.
- Thoroughly degrease the transparent glass plate. To do this, wash it well with dishwashing detergent and wipe dry. Then wipe with alcohol and dry.
- We cut out the selected design from the paper and glue it to the back of the plate, facing the glass.
- When the paper dries, turn the plate over and paint over the visible pattern with white acrylic paint. This way we will add brightness to the composition.
- Now you can decorate the plate with a colored border. First, degrease its edges by wiping with alcohol. Then we start painting with acrylic paint.
- Place the plate on the rice paper, trace its edges, and cut it out. Then we glue this element to the back of the decorated item.
- After waiting for the glue to dry completely, paint it with acrylic paint of a pre-selected color.
- Then you can paint the back surface of the plate with a smaller pattern, after waiting for the background to dry completely.
Master class on volumetric decoupage is ready!
Creating a 3-D composition with a craquelure effect
3-D compositions using eggshells look very original. Following the step-by-step instructions for beginners, this work technique will be within the power of every needlewoman.
Stages of decorating a glass vase with a mosaic effect.

- Degrease the vase by washing it with dishwashing detergent. Wipe dry.
- Then paint the entire surface with white acrylic paint in two or three layers.
- We apply putty.
- Then we cover a small surface of the vase with decoupage glue or PVA. Using tweezers or a wooden manicure stick, glue pieces of eggshell, after washing and drying it well.
- Apply a layer of glue to the entire glued surface of the vase. Let it dry well.
- Cut out the selected designs from decoupage napkins.
- Then paint the vase with acrylic paint of the color you like.
- Glue the drawings to the surface. After the glue has dried, you can paint them with acrylic paint to add additional volume.
- Apply two layers of decoupage varnish to the entire surface of the vase.
You can decorate old furniture, boxes, and bottles with voluminous decoupage. Even a beginner can master this decoration!
Photo of volumetric decoupage


This year my summer was marked by decoupage. Apart from a few jewelry trinkets I made casually to decorate my summer wardrobe, most of my creative achievements this summer were decoupage work.
There are so many decoupage products that it’s time to open your own handmade gift shop.
I think it would be logical to end the summer season with some decoupage work. Moreover, I have long promised to show
To decorate using the 3D decoupage technique, I again chose a jar, but this time not a glass one, but a cardboard coffee tube.
Tools and materials for volumetric decoupage:
- a pair of identical decorative napkins with large, clear-cut motifs;
- acrylic paints;
- foam sponge;
- fine-grained sandpaper;
- decoupage glue;
- glossy acrylic varnish;
- brushes;
- scissors;
- self-hardening mass for modeling;
- modeling tools (modeling stack or toothpick);
- plastic board for modeling;
- penknife or disposable scalpel;
- thick white paper or thin cardboard;
- a simple pencil or pen.
The preparatory stage of work is well known even to beginning decoupage artists, so I will not show it in detail.
Briefly about the preliminary preparation of jars for volumetric decoupage:
- Prime the can with several layers of white acrylic paint using a foam sponge.
- After complete drying, I sand the surface of the can with fine-grained sandpaper.
- I paste on the motifs I tore out of the decorative napkin with my fingers using decoupage glue.
- I paint the white areas of the jar's surface that are not filled with decoupage motifs with acrylic paint to match the background of the decorative napkin. I apply the paint with a small piece of foam rubber.
- I cover the jar with a layer of glossy acrylic varnish.
As a result, I get a jar decorated with bright summer motifs:

How can you make pasted pictures come to life and become three-dimensional? But I’ll tell you about this now.
Volumetric 3D decoupage using light modeling mass
In my work, I do not use any special means or compositions for volumetric decoupage, such as volumetric varnishes, glue or structural pastes and gels to create a three-dimensional effect. I make voluminous decorative elements from lightweight self-hardening air-hardening modeling compound “DARWI” Light:
The “DARWI” Light” modeling compound is extremely simple and easy to use, and the finished volumetric decoupage elements are light, almost weightless, and firmly adhere to the surface of the product. In addition, unlike Keraplast, which I usually use in the paper art technique, “DARWI” Light” is much more plastic and practically does not crumble during sculpting. Although you also need to get used to working with this wonderful material at first.
So, without pretending to be innovative in this area, I will simply show how I personally do volumetric decoupage.
In my case, it’s not at all difficult to decide which elements of the picture should become voluminous: of course, these will be large, bright poppy flowers.
1. Using nail scissors, I carefully cut out a flower from a decorative napkin along the contour. As you understand, it is necessary to cut out elements of the same shape and size as those that were already glued at the preparatory stage of work.
In principle, there is no particular difference which of the layers of the napkin you outline, so to transfer the outline of the flower onto the paper, you can also use the silhouette from the non-colored layers of the napkin.
3. Now you need to slightly reduce the flower template. To do this, I draw a new contour inside the first one, moving 2.5-3 mm from the edge.
And then I cut out the resulting flower template.
4. I place a small piece of DARWI Light mass on a modeling board and use my fingers to form it into a flat part 2-2.5 mm thick, corresponding to the size of the paper template.
Manufacturers of modeling mass recommend doing the work with wet hands, however, in my opinion, when making small flat parts there is no particular need for this. Here you will have to be guided by your own feelings; if necessary, you can moisturize your hands.
5. To make the surface of the future element smooth, I very carefully remove it from the modeling board and turn it over to the reverse side.
6. Now you need to cut out the flower from the modeling mass using a paper template. I apply the template to the rolled out mass. Note! The template should be placed face up so as not to mistakenly receive a volumetric element in a mirror image.
Using a small knife with a short blade, I cut off the excess modeling material along the contour of the paper template.

7. Lightly flatten the edges of the resulting flower detail with my fingers.
8. Immediately coat the modeling mass piece with decoupage glue.
9. I glue the prepared napkin motif.
10. I let the glue dry just enough so that the glued napkin does not stick to my hands, and I begin to form bulges on the surface of the part.
In my case, this is not at all difficult: I simply add volume to each individual petal with my fingers.
11. I coat the place where the volumetric element is attached to the surface of the can with varnish.
12. Having aligned the contours of the decoupage motif on the surface of the jar and the three-dimensional flower from the modeling mass, I carefully glue the latter, lightly pressing it with my fingers along the edges.

13. Until the modeling mass has completely hardened (and according to the instructions, this takes about 12 hours), you can adjust the relief of the volumetric decoupage part with a toothpick,
brush handle
or with your hands.
The main thing is not to overdo it, so as not to damage the glued napkin.
14. Upon completion of the formation of the volumetric element, I cover it with a layer of acrylic varnish.
It’s even easier to add volume to small elements. Here I even do without decoupage glue.
15. Using the modeling mixture, I form a part that is slightly smaller in size compared to the size of the decoupage motif on the surface of the jar.
16. I coat the gluing area with acrylic varnish.
17. I glue the modeling mass piece directly to the surface of the jar so that the contours of the napkin motif protrude 1 mm beyond the boundaries of the modeling mass.
18. Using scissors, I cut out a motif from a decorative napkin that is identical to the motif on the surface of the jar, layer it and glue the top layer of paint to the surface of the modeling compound piece with acrylic varnish.
19. I add relief with a toothpick
and coat it with acrylic varnish.
20. After all the volumetric elements of the decoupage have taken their places on the surface of the jar, I leave the work to dry for 12 hours. And then I cover the jar with four layers of glossy acrylic varnish with intermediate drying for 3-4 hours.
After the modeling mixture has completely hardened, the parts with volumetric decoupage become as dense and hard to the touch as the entire surface of the can.
And the bank itself takes on a completely new face and new life.
As you can see, making volumetric 3D decoupage with your own hands is not at all difficult. In the finished product, the three-dimensional elements look very impressive. In addition, this decorative technique can be successfully used to disguise raised inscriptions and logos on the surface of cans and bottles as an alternative to eggshell decoupage.
And now a small bonus for those who read and watched this long post to the end. I suggest you listen to the unusually beautiful and touching song of the Znamenins “Trio Marenich” (Ukrainian: Trio Marenich) called “Poppies of Chervoni”. And don’t let it bother you that the song will be performed in Ukrainian: real art exists beyond borders, language barriers and time. “Know that the flower of the soul never flies around” - this is sung in the song:
Master new facets of the art of decoupage with HobbyMama!

