Star News


Volumetric autumn application with patterns. Bright and colorful applications on the theme of autumn


Collecting beautiful leaves on a fine autumn day is an exciting experience. And when you return home, you want to somehow preserve this splendor or use it to create something beautiful - the material just begs for it! The most interesting thing is to make various compositions and applications from colorful autumn leaves. This kind of creativity develops the fantasy and imagination of the baby. In it, images can be created from ready-made forms, just overlaying them on top of each other, and not cut out of paper. And the color palette of falling leaves will outdo any largest set of colored paper!
YOU WILL NEED:
colorful autumn leaves
Multi-colored cardboard or velvet paper
PVA glue (you can use starch glue or rubber glue)
Brush
Scissors
Tweezers
Oilcloth
DRYING AUTUMN LEAVES
Applications can be made from both freshly picked leaves and dried ones. If you want to preserve the leaves, two drying methods can be recommended.
The first, well-known, method is to insert leaves between the pages of an old unnecessary book. It is better to lay each leaf on both sides with a paper napkin.
The second way is express drying of the leaves with an iron. Just remember that the leaves are not sterile, so it’s best to iron them on a surface that you don’t mind throwing away later, for example, on large sheets of paper. On top of the sheet before ironing, you also need to put a sheet of newsprint or a paper napkin.

AUTUMN LEAVES APPLICATION TECHNIQUE
Before starting work, cover the table with oilcloth so as not to stain it with glue. Prepare the base - a sheet of cardboard, collected leaves, scissors, glue, tweezers.
First you need to come up with a future picture. Then arrange it on a separate sheet. And only then start gluing the individual parts-leaves to the base. Glue is best applied in drops around the edges. If you apply glue to the entire surface of the sheet, then when the application dries, it will warp.
The finished picture should be put under pressure for one or two days.
Don't forget to frame it!
4.
TYPES OF APPLICATIONS
Overlay application. Try to get started by coming up with pictures that don't require any details to be cut out of the leaves, but are created by overlaying the leaves. You can come up with a lot of such pictures: butterflies, mushrooms, chickens and other birds ... The missing elements can be added with a felt-tip pen or made from other natural materials.
Having mastered simple pictures, children can begin to come up with multi-tiered images. In this technique, the leaves are glued on top of each other in layers. The application will turn out bright and cheerful if the leaves differ in color.
5.
6.
Silhouette application.
In this type of applique, the extra parts of the leaf are cut off to get exactly what the little artist intended.
7.
8.
9.
10.
11.
12.
Modular application (mosaic).
Using this technique, a picture is created by sticking a lot of identical or similar in shape and size leaves (or, for example, maple seeds). So you can make the scales of a fish, the tail of a cockerel or a firebird.
13.
symmetrical application.
It is used to create separate images or entire paintings that have a symmetrical structure, as well as to obtain two completely identical images (for example, reflection in water). To do this, you need to select similar leaves to get an image with its “reflection” or symmetrical in itself (“Butterfly”, “Dragonfly”, “Landscape with a lake”, “Boat on the river”).
14.
15.
Tape applique- a kind of symmetrical application.
Its difference is that it allows you to get not one or two, but many identical images - ornaments. It turns out whole "round dances" of trees, flowers, mushrooms, butterflies, etc.
In conclusion - a small selection of pictures collected from different parts of the Internet - to awaken the first associations for you and your baby. One has only to show the child how it is done, and his imagination will allow him to create more and more pictures from this amazingly beautiful natural material - autumn leaves!
16.
17.
18.
19.
20.
21.
22.
23.
24.
25.
26.
27.
28.
29.
30.
31.
32.
33.
34.
35.
36.
37.

Source: http://allforchildren.ru/article/autumn01.php

These samples of work are taken from
1.
2.
3.
4.
5.
6.
7.
8.
9.
10.
11.
12.
13.
14.
15.
16.
17.
18.
19.
20.
21.
22.
23.
24.
25.
26.
27.
28.
Every season, children notice changes in nature, weather and climate. In summer, they feel that the air temperature rises, people sunbathe while lying on the beach; they associate spring with delicate flowers and a women's holiday; winter - with a game of snowballs and snowman modeling. And golden autumn - with the beginning of the school year, colorful leaves, umbrellas, rain and clouds. Autumn is a wonderful time of the year when handicrafts can be found on the street.
Many teachers suggest that children collect especially beautiful leaves to get a herbarium. Dried leaves can be used to create interesting applications. For them, you can also take the bark of trees and twigs, in general, any materials that can be picked up from the ground in the fall. You can also give the children colored paper and felt-tip pens to create colorful drawings. You can work in a team, or you can work alone.
What materials will be required to create an original autumn application?
Using different materials, children can create beautiful autumn applications, which can be used to make an exhibition on one of the walls of a kindergarten or at home. The creation of crafts and applique creates the atmosphere of the season that is approaching or has already arrived in the best possible way.
How to inspire children to create a beautiful autumn appliqué
So that the child really wants to create something interesting with his own hands, need to prepare it. Before handing the materials and explaining to the child what he will do today, you should tell some fairy tale about autumn, show pictures, describe the weather and talk with the baby about this time of year. Let the children answer for themselves what autumn they associate with, what games they play, what they think about when they hear the phrase “autumn time”.
You can arrange themed hours in kindergarten dedicated to the time of the year. Children can ask different questions, arrange contests and quizzes. One of the competitions that sets in a positive mood and makes the child want to create is berry picking relay.
You can take plastic berries, you can lightly inflate balloons, or you can make them from pompoms. The group needs to be divided into two parts, name each of the teams, put the children in a column and place a large basket in front of them (2 meters will be enough). On a signal, the first child from the column should run to the scattered berries, take one and throw it into the basket from a distance, for example, 50 cm. Educators themselves can set the rules of the game, complicate or facilitate it.
Gallery: autumn applications (25 photos)


How to make a children's application on the theme "Autumn"
You can invite the children to assemble the herbarium in advance and bring colored paper, scissors and glue. Each child is encouraged to take the following materials:

Children of the older group place a sheet of paper in front of them and begin to create a beautiful application. For this you need:
- Draw a picture on the theme "Autumn". Children can use all their imagination. It can be a forest keeper, an autumn landscape or a hedgehog with mushrooms on its back.
- Color the drawing with colored pencils, felt-tip pens or paints.
- Now the fun begins: the child is invited to decorate the application with leaf confetti, sparkles and any decor elements. If this is, for example, an autumn girl, then you can make a wreath for her from dry leaves. Decor is limited only by the imagination of the child.
How to make an application "Hedgehog" with your own hands
This work is quite common in kindergarten, especially in the younger group. It does not require much time and effort, the main part of the work is prepared by the teacher, and the most interesting part is done by the child.
For the application you will need:
- hedgehog drawing template on A4 sheet (according to the number of children);
- colored paper;
- scissors;
- glue stick.
After the hedgehog drawing template is ready, you can start distributing drawings to children and decorating the application:

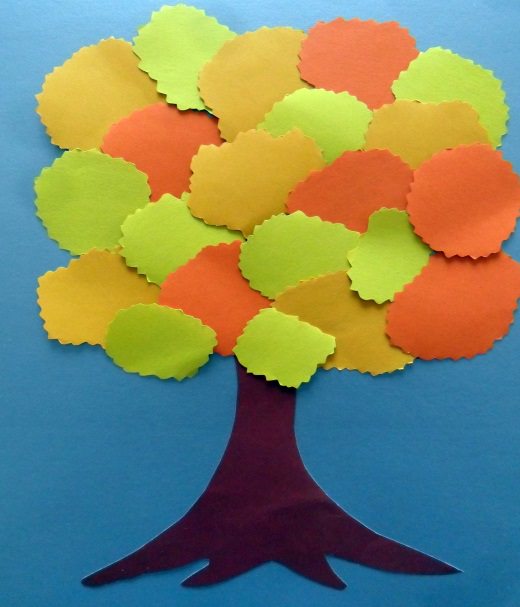
How to make an application "Autumn tree" with your own hands
This application looks original and beautiful. For it, a non-standard material is used - a sponge. For such a drawing you will need:
- sponges of different colors: yellow, green, orange;
- scissors;
- black marker;
- a sheet of white cardboard;
- PVA glue.
You need to start by placing a sheet of white cardboard in a vertical position in front of you. Next, the child needs:
- With a black felt-tip pen, draw a silhouette of a tree - a trunk and branches. It can be oak, aspen, birch, in general, any tree that the baby likes.
- Cut out “leaves” from sponges of different colors. In shape, they can resemble triangles or rhombuses.
- Glue the sponge pieces with PVA glue to the branches of the painted tree.
Application "Fish" from dry leaves and colored paper
Autumn crafts can be done not only on an autumn theme. Children can make original works, and none of them will be similar to the other. The craft is suitable for children of the middle and older groups. . To make fish, kids need the following materials:
- a sheet of A4 paper;
- simple pencil;
- colored pencils or markers;
- herbarium;
- PVA glue.
To make this beautiful craft, you need to follow the instructions:

Collective application "Autumn tree"
This craft is suitable for the younger group of kindergarten. For her you will need:
- a sheet of A1 paper;
- brown paper;
- glue stick;
- simple pencil;
- scissors;
- paints.
The work template is prepared by the educator . To work you need:
- Glue several sheets of brown paper together with a glue stick.
- Sketch the silhouette of a tree - a trunk and branches with a simple pencil. Cut out the silhouette and glue it onto a large white sheet.
- Now children can continue to work on their own. They need to dip their fingertips in gouache - red, yellow, green and orange. The main fun of this craft begins - children need to leave fingerprints all over the picture.
Teamwork brings a huge amount of positive emotions, so creating applications from colored paper on the theme "Autumn" is real fun and joy for children and adults.
Autumn time inspired not only poets and artists. This time of the year has always been fertile ground for the development of a child's sense of beauty. Application on the theme of autumn is a clear confirmation of this. Kindergartens and schools have always used this theme in their work. The child is happy to make something beautiful with his own hands. This allows him to feel more mature, meaningful and listen to the praise of his parents. Applications of this kind are a competent pedagogical step to educate a child in a sense of the beauty of the surrounding world. And it is impossible to refuse such methods.
Autumn time inspired not only poets and artists
Application on the theme "Golden Autumn" in the preparatory group: a master class for the joy of children
The main task of educators in kindergartens has always been the same - to keep the child busy so that he does not sit idle. There is no need to waste time. If it can be spent on the education of the baby. Let the child make their own application on the theme of golden autumn. Outside the window - the most beautiful landscapes, which are a natural visual aid for any kind of crafts.
What will be required for the children of the preparatory group to complete the plan:
- colored cardboard;
- colored paper;
- scissors;
- glue.
The first step is to prepare the base. After that, tree trunks (trees) and leaves are cut out. After all the planned blanks are made, the process of gluing them onto the base begins.
- Tree trunks are first glued to a sheet of cardboard. What kind of trees it will be better to come up with in advance.
- Then comes the turn of the leaves. They need to be glued so that the crowns of the trees are saturated, thick and large. In the preparatory group, you can cut, for example, maple, oak and birch leaves.
- Glue should not be applied to the entire surface of the cut blank. It is enough to smear only the edges. This is done so that the glued parts do not deform after they dry.
- On one canvas of cardboard, you should not make more than two trees: it will be difficult for the child, he will simply get confused in this forest of blanks. One or two is enough.
Tell the children what can be improved, how to make it more beautiful: they are waiting for the advice of their elders, although they may not ask for them.

Dancing leaves: application on an autumn theme (video)
Gallery: application on the theme "Autumn" (25 photos)

Application on the theme "Autumn" in the younger group: to teach the child the beautiful
The simplest, but very interesting option for children of the younger group will be an application from real autumn foliage. On a walk, invite your child to keep the autumn beauty as a keepsake. Let him collect different leaves. Help him select good, dry, not torn leaves. Try to collect foliage from different trees with the children.
Required materials to continue work:
- glue, brush;
- paper that will be the background - the basis for the leaves;
- you can come up with some small decorative elements.
From the total mass of the collected autumn "gold" it is necessary to select the most beautiful, those that did not have time to rot. Arrange them in one row and dry quite a bit. It is not necessary to dry the leaves strongly - they will break when you start gluing them. Then you need to select the required number of sheets of colored background paper.
Apply glue to each leaf with a brush and glue the foliage to the paper. It is better to do it randomly, without observing any symmetry - this way the application on the theme of autumn gold will be more natural. It is necessary to try so that on a sheet of paper there are leaves of not one type of tree, but different ones. After the sheet is filled, you need to put it, for example, closer to the battery so that the glue dries quickly.
Alternatively, on a piece of paper that serves as a background for a future application, you need to draw a tree - just a bare trunk. And already glue the collected leaves on it. Such a combined application will look even more interesting than from single leaves.


Application on the theme "Trees" for children of the preparatory group: instructions and useful tips
It is quite possible for children of the preparatory group to make an application on the theme “Trees” not only from paper, but also from plasticine. But first things first.
First, let's see how to make an application from colored paper:
- To do this, take a piece of brown paper. If it is not monophonic, but with small third-party inclusions, it's okay. A tree is drawn on the selected sheet. You can use ready-made templates, if available. But still, if a child draws a tree on his own, it is much more useful.
- Next, the drawn tree should be carefully cut with scissors.
- The approximate height of the tree will be 20 cm from an A4 sheet. Then we prepare the blank of leaves: you need to cut squares of different colors about 3 cm x 3 cm. After the leaves, a blank for grass is made - a green rectangle 2 cm x 28 cm. The squares must be folded with an accordion, starting from the corner. Fold the grass harvesting also with an accordion, but in width.
- When the blanks for the tree itself are ready, you need to make a small mound on which the tree grows. To do this, fold the green rectangle 9cm x 4cm in half. Cut along the curve with scissors. Expand - you get the correct semicircle. Now you need to complete the formation of foliage. The accordion, which turned out from the colored squares, bent in half and glued in the middle. Glue the cut mound into the center of the bottom edge of the blue cardboard sheet. In the center of the mound, step back from the bottom of the cardboard sheet 1.5 cm. Glue the wood blank. Stretch the accordion of grass along the entire length of the bottom edge of the cardboard. The grass should cover the "roots" of the tree.
- Now the formation of the crown of the tree begins. It is necessary to glue the leaves, trying so that the colors do not go in a row. More leaves - more magnificent crown. You can stick a couple of leaves that are not attached to anything, creating the effect of leaves plucked by the wind and floating in the air. It remains to make the sky. The sky itself, in fact, already exists - the cardboard is blue, there is no need to highlight the sky on it. But the clouds will need to be done. For this, blue paper is taken. You can cut out the clouds, you can just tear the paper into small pieces. It remains only to glue them to the top of the cardboard without any order.
The tree against the background of the autumn sky is ready, mind you, without any effort. But, if you want to complicate the drawing, it all depends on who makes the application. There would be a desire. The figures below show several options that are also made quite simply.


Ideas for autumn applications for kids: turn on the imagination
The smaller the child, the more demanding he is. With the youngest part of humanity it is always more difficult than with the rest. Here, fantasy and all sorts of little tricks come to the aid of parents. For example, you can make a fun autumn application in just a few minutes. In this case, the child will laugh with joy.
A simple option, easier than which is already difficult to find. Take just one yellow leaf from those that were blown onto the balcony by the wind (or take yellow paper for application in extreme cases).
The leaflet should look like the one in the picture:

Flip it wide side down. Glue a sheet of cardboard. Draw legs and handles to it, one of which will contain an umbrella. Glue a couple of more buttons on the leaf itself. And on them - a couple of smaller diameters. Draw raindrops and a smile on the resulting sly face. All. Cheerful yellow autumn man - the leaf is ready.
It took 15 minutes. The child laughs with happiness. Parents breathe a sigh of relief.


Beautiful leaf crafts (video)
Of course, there are a great many ideas on the theme “Golden Autumn”. And everyone sees autumn, trees and everything else differently. Here were given the simplest techniques and applications. If fantasy treacherously does not want to help, you can purchase books on this subject. A lot of interesting literature on this kind of topics has now appeared in stores. Read and create something special with your child so that he is proud of his joint project with his parents.
Helpful Hints
In autumn, nature gives us many different materials to work with.
First of all, it is, of course, multi-colored leaves.
From a huge selection of leaves of different shapes, sizes and shades, you can make beautiful applications.
It is not necessary to make complex applications to make them beautiful - just turn on your imagination and learn a few simple secrets.
On our website you will also find:
Here are just a few of the beautiful autumn applications that are very easy to make:
Application on an autumn theme: leaves in a frame
This project is incredibly easy to do. By inserting a leaf into a glazed frame, you decorate the interior (albeit briefly) with autumn colors.

Children's, autumn application: leaves - mosaic
In this craft, you can show all the colors of autumn in one leaf. It not only looks very beautiful, but it is also very easy to do - collect the leaves, color them and fold them in a certain sequence to form a kind of mosaic picture.

Leaf Applique: Hanging Leaves

You will need:
Gold paint (spray)
white marker
twig
adhesive tape

1. Gather up some dead leaves that haven't curled up yet and place them under a thick book.
2. Take the gold paint and gently apply it to the tips of the leaves. Let the paint dry.

3. Use a white marker to write something beautiful on the leaves.
4. Tie several threads of different lengths to a small branch.
5. Cut two identical pieces from the tape, fold each in half. To make loops, attach them with a pin or nail to a wall or board (if in a kindergarten or school) at a distance of about the length of a branch.
6. Hang the branch on the loops, and glue the leaves to the threads.
DIY applications: chandelier
Such a simple hanging structure can be made from colorful leaves and decorate any interior with it.

How to make an applique: a wreath of leaves
Leaves can be combined into one whole design so that you get a beautiful wreath. You can use ordinary leaves, or you can use those that are used for the above mosaic, i.e. put under the press and painted.

Crafts, applications: autumn vase
Making this decoration for your home is very simple - collect a few branches with leaves that have not yet fallen and put them in a vase of water. You can also find dry branches and use transparent tape or a bright string to attach fallen leaves to them.

Application on the theme "Autumn": name cards from leaves
You can make such cards to indicate to each guest his place at the table or to write some wish for the holiday and attach it to a gift.

You will need:
Leaves with tails (peeled, dry, even)
Gold paint (spray or gouache)
Rope
colored paper
Scissors
Hole puncher

1. Once you have collected the leaves, wash them, dry them, and place them under a press (a thick book, for example) to level them.
2. After that, apply spray paint to the leaves - you just need to do this carefully in the open air, with a mask and preferably with special glasses, because. the contents of the can are poisonous. You can color them with gouache.
3. Cut out labels from colored cardboard on which you can write the name of the guest or a wish with a pen or marker (if you decide to give someone a gift).

4. Using thread, attach the labels to the painted leaves.


Application (master class): autumn lanterns

You will need:
Autumn leaves
jar
Glue for decoupage (mod podge)
Glue brush

1. Collect the leaves, straighten them under the press and dry.


2. Apply decoupage glue to the surface of the jar.

3. Glue a layer of leaves to the jar and apply another layer of glue on top.


4. Leave the blank to dry overnight.
* If some leaves don't stay on the jar completely, use rubber bands (money rubber bands) to hold them.
Autumn is a great time for needlework. Parents can collect natural materials together with their children, so that later they can easily make an application in a kindergarten or school. Autumn leaves, when properly harvested, are very convenient to work with. From them you can create simple and complex compositions that will turn into plots from your favorite fairy tales. In this article, you will learn how to make appliqués with autumn leaves.
Applications from autumn leaves for children in kindergarten


Materials for a simple application:
- colorful leaves;
- thick A4 sheet or cardboard;
- brushes;
- sample picture.
When walking with your child, collect leaves of different colors and shapes, as well as other natural materials. Everything that you find, carefully clean from dust, dirt and seeds, and then dry it. If you want to make a simple application, then you will need even and dry leaves. To do this, put them under the press or in a book. You can use the prepared material after a couple of days. After that, cut out suitable parts and lay them out according to the template on a piece of paper or cardboard.

Now you can glue the parts one by one. First make the background and glue the bottom layers, then proceed to decorate the appliqué. For example, if you want to make a bird, then first of all glue the leaves for the body and head, and on top you can already glue the wings and tail. Seeds of different colors will help diversify the application. If the finished picture is missing eyes or a nose, finish those parts with a marker.
Animals from autumn leaves
It is not necessary to repeat the image from some picture. Together with your child, you can come up with some kind of plot and create an original application. You can play associations by laying out the leaves on the table and collecting some animals or autumn landscapes from them.

You can make applications of a variety of animals, while they will look beautiful in some kind of plot, for example, birds sitting on branches or hedgehogs in the autumn forest. It is not necessary to completely make a plot application only from leaves, you can finish the picture with felt-tip pens. Also use colored paper and cardboard, then your applications will be fun and original.
Beautiful applications from autumn leaves
In order for the application of autumn leaves to turn out beautiful and original, you will have to prepare leaves not only of different sizes, but also of various shapes. In this case, it is best to use wet leaves, not dry ones, as they will be more convenient to work with. In order for the leaves to be even, they still have to be put under the press for at least one day.

After that, come up with a picture that you will fill in. It can be an abstraction or a real picture. To make the applique look original, you can cut the edges of the paper with curly scissors. The craft will look like a real picture if you make a frame out of cardboard or paper. Now stick the leaves and wait for the painting to dry completely. Application of autumn leaves is ready.

Now you yourself have seen how beautiful and original can be autumn leaf appliqués made . Use our ideas for leisure activities for the whole family.

