Star News


Do-it-yourself Christmas paper crafts. Christmas decorations: do-it-yourself snowflakes, Christmas balls, garlands, wreaths
Time inexorably runs forward and now white flies are flying outside the window, slowly sinking to the ground and covering everything around with a snow-white fluffy veil. However, despite the cold, the soul is warm and joyful. And all because suddenly appeared snowflakes herald the onset of the New Year. The most important holiday of the year is already very close, which means it's time to think about New Year's decor, gifts and, of course, crafts.
The days are getting shorter and the evenings are getting colder and longer. What to do with yourself, and even more so with your little fidgets, when it is already too dark for outdoor winter fun? Well, crafts, of course. New Year's crafts can be made from the most unexpected materials: cocktail tubes and much more. But there are also more traditional materials, such as paper. In this article, we have collected for you more than 60 step-by-step master classes for making paper crafts for the New Year. If you still think that only applications can be made from paper, then drop everything and carefully look at our article! Well, for those who are looking for something unusual and know what miracles can be created from ordinary paper, we can only advise you to immediately begin the process of creating New Year's paper crafts according to our schemes and templates.
One of the simplest New Year's paper crafts can rightly be considered a garland. We all remember well from our childhood how they decorated the Christmas tree with such paper garlands not only at home, but at school or kindergarten. A paper garland is made very simply: colored paper is cut into strips of the same width, the first strip is glued into a ring, and each subsequent one is threaded into the previous ring and also glued. This paper craft is perfect for 4-5 year olds.
If the task of entertaining children is not worth it, but you need to decorate the house, then here's another version of a paper garland for your note. It is made even easier than the previous one, but you will need a sewing machine. So, to create such a New Year's paper craft, you will need: a lot of circles of different diameters (the number depends on the size of the garland), a sewing machine. Sew circles through the center on a typewriter and hang a garland. From any gust of air, such a garland will “come to life”.

So, if you decide that the issue with garlands is closed and there is nothing else to think of here, we hasten to upset you - this is only the very tip of the iceberg. Simple paper garlands are an activity for beginners. Professionals prefer more complex tasks, such as voluminous paper crafts. Below is a master class on making a volumetric garland in the form of light bulbs.

By the way, you can decorate an ordinary LED garland with paper lanterns. This New Year's paper craft looks very cool, especially if you decorate the wall with this garland.

Interested in a garland? Then see more ideas:
Since we are talking about the decor of the apartment, it would be strange not to mention Christmas wreaths, or as they are also called New Year's wreaths. Everyone can make such a paper craft, in addition, a New Year's paper wreath is a reusable decoration that will not deteriorate and will not lose its appearance over time.

A very cool paper craft for the New Year is a wreath of roses. You will have to work hard to create such a craft, so if you decide to make yourself such a paper wreath on the door - stock up on patience and mood!

If you're planning a New Year's themed party, say Cuban or Hawaiian style, then you'll definitely need some kind of decoration to set the atmosphere. Here is such a simple, but very original wreath made of paper will come in handy!

Surely your child at school or in the garden was asked to make a Christmas wreath with their parents. Allegedly for a competition, but the main task of this task is to get parents to spend time with their children. But maybe you should not wait for a task from school, but spend time with your child yourself. In addition, with such a New Year's craft, you can decorate the house in a very original way, and most importantly, get a lot of positive emotions!

Need a Christmas wreath? See more ideas:
So, we continue to decorate the apartment. There is a garland, there is a wreath. Something is missing? Oh, of course, Christmas trees! If you prefer to put a big forest beauty on New Year's holidays, it doesn't matter. By the way, read on. Small paper Christmas trees make a great addition to the decor, and they can also be used as small souvenirs for guests!
# 10 New Year's paper crafts with our own hands: we make a Christmas tree toy "Herringbone"
A Christmas tree made of paper does not have to be on the table or somewhere in the house. You can make a craft out of paper, which you can then hang on the Christmas tree itself, and if there is no Christmas tree, then you can simply hang such voluminous paper Christmas trees around the house. The scheme for making a Christmas tree is quite simple, but if you don’t quite understand what the essence is, or you just don’t have time to figure it out, then you can download a ready-made template.

A very cute Christmas tree can be made from corrugated paper. This paper craft looks very realistic, but it is done quickly and easily.

If you are still interested in a paper Christmas tree, but you want to make something unusual, then use this master class.

The tree does not have to be on the floor, it can also be hung from the ceiling. An excellent Christmas garland will turn out from plain paper.

How to distinguish the New Year's table from the usual festive one? Everything is correct! According to thematic elements of decor. And how to make a suitable New Year's dessert, see.


Do you want more workshops on making paper Christmas trees? See:
#17 Christmas paper crafts: making a movable card with wishes
From paper, you can make not only flat or voluminous crafts, but also movable ones. With our ready-made scheme, you can make a postcard with an encrypted congratulation or message. Such an unusual gift will please not only children, but also adults! You can download the finished scheme below.


In winter, wild flowers are not to be found, even in flower shops. But there is nothing to worry about, flowers can be made from paper with your own hands. And our step-by-step master class will help you with this.

A wide variety of flowers can be made from paper, the whole secret is cutting out the ends.


If you want to make a big Christmas star for decorating a wall from paper tubes, then this master class is especially for you!

A very themed New Year craft made of crimped paper. Such a paper cone looks very natural and is quite difficult to distinguish, especially if it is used as a decoration. With our master class, you can easily cope with such paper crafts.

There is another technique for creating paper cones with your own hands. This method is more labor intensive and will take you more time. In addition, to create such a New Year's craft, you will need: paper, a foam blank, a lot of safety pins, a ribbon and beads for decoration. However, if you have the time and desire, then pay special attention to this scheme for making a cone, especially if you want to impress.

From paper, you can make very special crafts using the Japanese origami technique. Our step-by-step master class will help you create a New Year's paper ball that can be used to decorate both a room and a Christmas tree.

A step-by-step diagram for creating an origami star with your own hands. You can decorate the top of the Christmas tree with such a star, you can simply create a festive atmosphere in the house, or you can combine it into one big garland.

You can make the base yourself, as in the first picture. Or you can download the finished pentagon blank and, depending on the size of the pentagon, the size of the finished star will change.


At your service is a step-by-step scheme for making a three-dimensional paper snowflake. Follow the instructions and you will definitely get such a miracle.

# 34 We decorate the apartment with cones: do-it-yourself Christmas paper crafts
In continuation of New Year's paper crafts, I would like to offer you another scheme for making paper cones. In addition to paper circles, you will need an oval or round blank, glue and fir branches for decoration.

Another great option for decorating an apartment with your own hands is a large voluminous snowflake on the wall. A snowflake can be not one, but a whole ensemble. In addition, on such a New Year's background, you will get great photos!

New Year's gift must be in a beautiful package. In my opinion, the gift itself is not so much important as the intrigue around it. After all, it is this intrigue that will remain in the memory, this is a pleasant expectation and unfolding the paper. Use our scheme for making paper flowers with your own hands and decorate gifts for dear and close people.

It is customary to decorate a Christmas tree with toys, but these toys do not have to be purchased. Even better if they are made by hand. And what could be easier than making a Christmas tree toy out of paper. Use our step-by-step instructions and make your own paper Christmas ball.

Very simple, but incredibly cute voluminous lanterns can be made from ordinary colored paper. Even children can handle this craft, so feel free to get to work if you have little helpers. Well, if not, then you can do it yourself!

You can make completely unexpected crafts out of paper, including gift boxes. And not just boxes, but in the form of delicious sweets. For such a gift box you will need: cardboard cylinder, colored paper, glue, scissors, satin ribbon.

In continuation of the question of gift wrapping, we want to offer you another budget, but very charming option. You can make such a gift elf with your own hands using our master class.

Here is another version of the original packaging of a New Year's gift with your own hands.

Need more gift wrapping ideas? See:


Want more Christmas ball ideas? See:


#55 A simple paper snowflake pattern: decorating a room for a party

#56 Do-it-yourself voluminous paper crafts: making a snowflake. Scheme


#58 Christmas paper crafts: decorate the house with diamond crystals
Download ready-made schemes and make your own paper diamond crystals.

#59 New Year craft paper ball "Mistletoe" do it yourself
Here you can make such a mistletoe paper ball with your own hands, using ready-made cutting templates. Stock up on patience and New Year's mood!

You can decorate a house not only with standard snowflakes or stars. You can make such a wonderful vase out of paper. Download the finished scheme and assemble the vase following the instructions in the master class.

A wide variety of decorative elements can be made from plain paper, just download the finished scheme, print it, cut it out and glue it. A wonderful Christmas paper craft is ready!

#64 Christmas patterns for cutting: a great photo shoot for the new year
Note! The templates are very large and of good quality, so the download may take some time.

Simple Christmas decorations can be made from paper. In our master class, an example with a ball is given, but it can be other shapes: hearts, stars, Christmas trees and much more. You can download ready-made templates below.

You can make a simple and original Chinese lantern with your own hands using our ready-made scheme.

An excellent decoration for the new year will be a composite paper star. You can download a ready-made template for gluing below.

In our time, you will not surprise anyone with ordinary paper cutters. Volumetric crafts cause much more delight. In this master class, a scheme for creating a simple volumetric star is described step by step. You can download a ready-made template with a large, medium and small star from the link below.

It is quite difficult to imagine a New Year's decor without all sorts of variations on the theme of stars. In this master class, you will learn how to make a volumetric double-sided star out of paper with your own hands. You can download the finished scheme below.

#70 Christmas paper masks
Carnival masks must be included in the list of New Year's paper crafts. Well, what New Year's party can do without masks? That's right, none! In fact, there are a lot of options for making paper masks, and if you turn on your imagination, you can make many wonderful crafts!

More ideas:
Help us become better: if you notice an error, highlight the fragment and click Ctrl+Enter.
Helpful Hints
To decorate your home, office or another room, it is not necessary to purchase a lot of decorations.
Try to usesome helpful tipshow to make certain decorations and you will have an unforgettable holiday.
It will be much more pleasant to use your imagination and help friends/children/relatives to create beautiful decorations for any interior.
On our website you will also find:
- DIY New Year's gifts
- How to make a Christmas tree with your own hands
- DIY New Year's cards
- DIY Christmas decoration
- DIY Christmas compositions
decorations for the new year,handmadeIt's not that hard to make, you just need a few materials and some imagination.
Christmas decorations for the house. Felt ornament.

You will need:
Felt (preferably 3mm thick)
Ruler
Stationery knife
Scissors
simple pencil
Glue, needle and thread or stapler
1. From a piece of felt, cut a square with scissors, measuring 15x15 cm.

2. With a simple pencil, mark several lines parallel to the sides of the square, leaving about 2 cm between them - you should get 3 parallel lines. Also draw a diagonal dividing the square into 2 equal parts.

3. Place the square in front of you so that the diagonal line runs vertically. Using a ruler and a clerical knife, make cuts on the left and right along the marked parallel lines, not reaching the diagonal (central) line by about 6-7 mm.
* Take your time so as not to spoil the felt.

4. Start folding the ends of the formed squares in opposite directions, securing them with glue, a needle and thread or a stapler (see picture).

4.1 Fold the shortest ends first and fasten them.
4.2 Turn the figure over and secure the middle ends.

4.3 Turn the shape over again (backward) and bend and secure the large ends.

5. Once you have the shape shown in the image, cut off a piece of thread and thread it through the shape. You can add felt balls or small pom poms if you like.

* You can make several of these shapes and thread a thread through them to make a long Christmas decoration that can be hung in any room.
* Try experimenting with different sizes of squares, as well as different numbers of cuts.
Christmas tree decoration. Balls of wire and beads.

You will need:
small inflatable balls
flower wire
beads
Wire cutters (for wire)
1. Inflate a small balloon, leaving a small tail.
2. Put some beads on the wire.
3. Start wrapping the beaded wire around the balloon, adjusting the beads as needed to make sure they lie flat and look nice. Passing through the tail of the ball, twist the wire and continue on.

* Do not wrap the balloon too tightly so that it does not burst.
4. When wrapped around the ball, do not immediately cut the wire, leave the tail from 80 to 100 cm without beads and start wrapping again to secure the structure.

5. At the end, you need to make a hook out of the wire (see picture).

6. Now you can burst the balloon and pull it out.
The decoration is ready and you can hang it on the Christmas tree or anywhere in the room.


Christmas tree decorations. Button garland.


In this example, I used pale colored buttons, but you can choose bright colors to make the garland look prettier wherever you hang it.
You can use old unwanted buttons or buy buttons in the size, color and shape you need from the store.
You will need:
Buttons
Thread or braid
Everything is pretty simple. Take a look at the pictures - you need to thread the thread through the holes in each button.


You can add a few other details if you like: pompoms, paper flowers and/or snowflakes, etc.
* For this craft, you will need a lot of buttons (about a hundred or more, depending on the length of the desired garland).
* Feel free to involve children in the work, they will love making this simple but original decoration.


Christmas paper decorations. Chain garland.

You can make a similar New Year's garland with your children and decorate your home or office with it. It looks not only beautiful, but also very fashionable.
You will need:
Golden scrap paper, size 30x30 cm (enough for a garland about 1 meter long)
Light green acrylic paint
Small container for paint
paint brush
Pencil or pen
Ruler
Masking tape (width 2.5-3 cm)
Stationery knife
Glue gun or PVA glue and glue stick
1. Fully cover the non-gold part of the scrap paper with light green acrylic paint.
2. At opposite ends of the paper, make marks of 2.5-3 cm. Using a ruler and pencil, draw parallel lines connecting the marks.
3. Prepare a clerical knife, make cuts, but do not cut off the strips completely - leave enough space so that you can easily tear off later.


4. Turn the sheet over and bend the cuts a little to make them more visible.
5. Glue masking tape to the shiny side of the paper. The pieces of tape should be placed directly over the cuts (see picture).


6. Paint the part of the paper not covered with tape with light green paint and leave to dry.
7. Remove the tape carefully.
8. Gently tear off the paper where you left some space (see point 3). Start making chain links. First, make one ring by connecting the ends of one strip, and then thread the strips through the finished ring and glue the ends.

You should have a nice chain.
How to make Christmas decorations. Snowflake garland.

You will need:
A4 paper
Snowflake pattern template
Pencil
Scissors or utility knife
Glue stick
Twine (thick thread)
Buttons, optional.
1. First you need to fold the paper in a certain way. Here are photo and video instructions on how to do it:
2. Pay attention to the snowflake drawing template, do the same on the piece of paper you folded.

3. Cut out the template with scissors or a utility knife.

4. Unfold the paper. You should end up with a pattern like this:

5. Connect the ends: 1+5, 2+6, 3+7, 4+8.
6. Now you can start stringing blanks on a thread, and attach buttons to the ends of the garland so that the paper patterns do not fall.
DIY Christmas decorations photo. A garland of stars.

You will need:
Paper (plain or color, heavy or printable)
Shaped hole punch (in this case, the hole punch makes the shape of a star)
* Instead of a hole punch, you can use a star template, a pencil and scissors.
* It is not necessary to make asterisks. You can choose any shape you like.


Christmas decoration toys. Pigeons on a tree.


You will need:
White felt
Pencil or pen
pins
pearl beads
Glue (PVA, moment, glue gun)
Silver tulle
White decorative (or real) feathers
silver thread
1. First you need to draw a template for a dove on paper. With the help of Yandex or Google, you can find a simple picture and draw it. Or you can use your imagination.
It is worth noting that the dove has 3 parts - the body, wings and the lower part.


2. Cut out the dove template you have drawn and lay it on the felt, pinning it in place. You need to make two halves of the body, two wings and one bottom. You also need two tulle wings.


3. After you have prepared all the details, start sewing the two halves of the dove's body. Fill the torso with cotton wool or leftover felt.
4. Add wings. Place tulle on top of the felt, if desired. Sew the wings to the body.
5. For the eyes, use pearl beads by gluing them.
6. Prepare a decorative feather and cut a piece of the length you need from it. Insert the feather into the dove. You can fix the pen with glue.


Helpful Hints
To decorate a Christmas tree or a house, it is not necessary to buy a lot of toys and decorations.
If you have colored paper, cardboard, glue, and a few extra simple supplies, you can create a ton of Christmas crafts.
Here are just a small part of paper crafts for the new year:
On our website you will also find:
What can be made of paper for the New Year: tube decoration

You will need:
2 sheets of cardstock in different colors or 2 sheets of scrapbooking paper
Scissors
PVA glue
Ring with chain attachment (optional)
1. From one sheet of cardboard, cut out 14 squares with a side of about 2.5 cm.
2. From the second sheet of cardboard, cut out 14 squares with a side of about 3 cm.

3. Start folding the opposite ends of the squares as shown in the image - one end on top of the other. In the place where the ends overlap each other, add a little glue.


4. From any sheet of cardboard, cut a circle with a diameter of 5 cm. Mark its center.

5. Apply glue to the circle and start gluing the prepared tubes - first large tubes, and then small ones - they are glued on top of the large tubes.

* Try to glue the tube evenly to the tube.
* You may not need all the prepared tubes for crafting - this is normal.


* Glue a few rhinestones to the craft as additional decorations (this is not necessary).
6. Add a ribbon - it can be glued or threaded into a ring attached to the decoration.
DIY paper cones

You will need:
Colored paper or cardboard
Ruler and pencil
Scissors
PVA glue or pins
Styrofoam ball
* If you did not find a foam ball, then it can be replaced with a crumpled sheet of paper in the form of a ball, wrapped with a thread that secures the shape.
1. Cut 2.5 cm thick strips of paper or cardboard.

2. Cut each strip across into small pieces 2.5 cm wide - you will get several squares.
3. Fold each square as shown in the image - make an arrow by bending the opposite ends.

4. Prepare the ball and start gluing (or pinning) paper blanks to it as shown in the image. Do everything in layers - first the bottom row, then move up, creating new rows.

5. Glue a ribbon to the top of the head so that the tree can be hung on the tree, and you can also add some artificial leaves as a decoration.
New Year paper crafts in quilling style

You will need:
Pages from old magazines or newspapers
PVA glue
Baking tins (optional)
Thread or braid and bead.
1. Cut out strips 4-5 cm wide from paper.
2. Fold each strip in half lengthwise. Unfold the strip and bend again, but this time each side to the center, and then the entire strip in half again (see image).
2. Prepare the glue and start twisting the strips into circles, adding a little glue so that they do not come apart.


3. Take another paper strip and bend it as in step 2. Prepare a baking dish (in this example, it is in the shape of a star) and put a paper strip into it, carefully laying it out inside the mold.
4. Now start laying out the twisted paper circles inside the molds. Apply glue to them so that all the circles are connected to each other and to the strip inside the mold.


4. When the glue dries, remove the blank from the mold. You can add more glue to make the workpiece even stronger.
5. Pass the thread or braid through the craft and add a bead for beauty. Tie a knot.
* For such crafts, you can use different molds, a heart, for example.
Wall decoration made of colored paper for the New Year

You will need:
10 paper plates
20 sheets of green paper
stapler
Double sided tape
Scissors
Cardboard decorations (can be cut from old postcards or drawn and cut)
White braid (optional).

1. Cut out large squares from green paper - one square from one sheet. The square should fit inside the paper plate. If necessary, reduce its size.
2. Fold each paper square like an accordion, and then in half.
3. Fasten the ends of the accordion folded in half to get a semicircle.
4. Repeat steps 1-3 with other paper.
5. Connect the two semicircles together with double-sided tape or a stapler to form a circle.
6. Using double-sided tape, attach the circle to the middle of the paper plate. Glue double-sided tape or apply glue to the back of the plate so that you can stick it to a wall or other surface (you can stick it to plywood, a wooden tablet, cardboard and then put it on a shelf or hang it on the wall).
7. Make 10 similar blanks.
8. Start making Christmas tree decorations. Cut out paper Christmas decorations and glue them together to form a circle. After making several circles (3-4 pieces), they can be glued to the plates, like Christmas decorations.
* You can add a white braid to the top of the Christmas tree, on which the Christmas tree supposedly hangs on the wall.
Christmas decorations made of paper: 3D paper droplet

INwe will need:
colored paper
Pencil
Scissors
1. Draw a large droplet on cardboard and cut it out.
2. Use the drop template to create a few more - place a cardboard drop on paper, trace and cut out.

3. Put a few drops into one stack, fold the stack in half and cut out a circle in the middle (see image).
4. Start gluing the sides of each drop to end up with one voluminous drop. In this example, it took 16 drops to make one voluminous, but more can be done.
* You can add thread or ribbon to hang the decoration on the Christmas tree.

Christmas paper toys: cone balls

You will need:
Paper (can be old magazines)
Scissors
Thread and needle
Double sided tape or glue.
1. Cut paper circles of the same diameter (choose any size)
2. Make a cut along the radius in each circle.

3. Make two cones from each circle - twist the paper from one and the other end (from the notch) to the middle, and fix the workpiece with glue or tape (see image).
4. Also make two cones from each of the remaining circles.

5. Prepare a thread with a needle and thread them through each blank so that in the end a ball is obtained from 10 blanks. Tie a knot.

6. Add string or ribbon to hang the toy on the Christmas tree.

How to make Christmas lanterns out of paper

You will need:
Stationery knife
Pencil and ruler
Thick colored or decorative paper
Needle and thread

1. Prepare a sheet of paper, fold it in half and cut it into two rectangles.
2. Lay one rectangle on a flat surface that can be cut. Using a clerical knife, make several transverse cuts from one end of the paper to the other - the distance between the cuts is the same, and they should lag about 1.5-2 cm from the edges.


* You may need to first mark where the cuts will be. Use a pencil and ruler.
3. Roll the paper into a tube as shown in the image. Secure the ends with tape.
4. Take a needle and thread and start threading them alternately over and under the strips that formed after the cuts.
5. When you have wrapped the entire workpiece with thread, tighten it and tie a knot.

Simple Christmas paper crafts and decorations are great because you can make them with your kids. Agree, very often we forget to devote time to our relatives in the pre-holiday commotion and constant household chores.
And then the holiday is approaching, so it's time to get together and start creating paper decorations: these are Christmas tree decorations made of paper, and lanterns, and paper garlands.
DIY paper Christmas tree
Small Christmas tree, example one
A decoration for a real Christmas tree in the form of a voluminous hanging Christmas tree can be made from ordinary cardboard.
To create we need:
- multi-colored cardboard;
- glue;
- awl;
- threads;
- scissors.
We draw the most primitive children's Christmas tree with splayed branches, the main thing is to observe symmetry, cut it out, then circle the exact same Christmas tree on another sheet of cardboard and get the second blank. We bend the workpiece along vertical symmetry and glue it together. You can decorate our paper toy with rhinestones. Then we pierce a hole in the upper part with an awl and thread it. The decoration is ready.
A cardboard craft that you can either put on your desktop or hang on a Christmas tree.
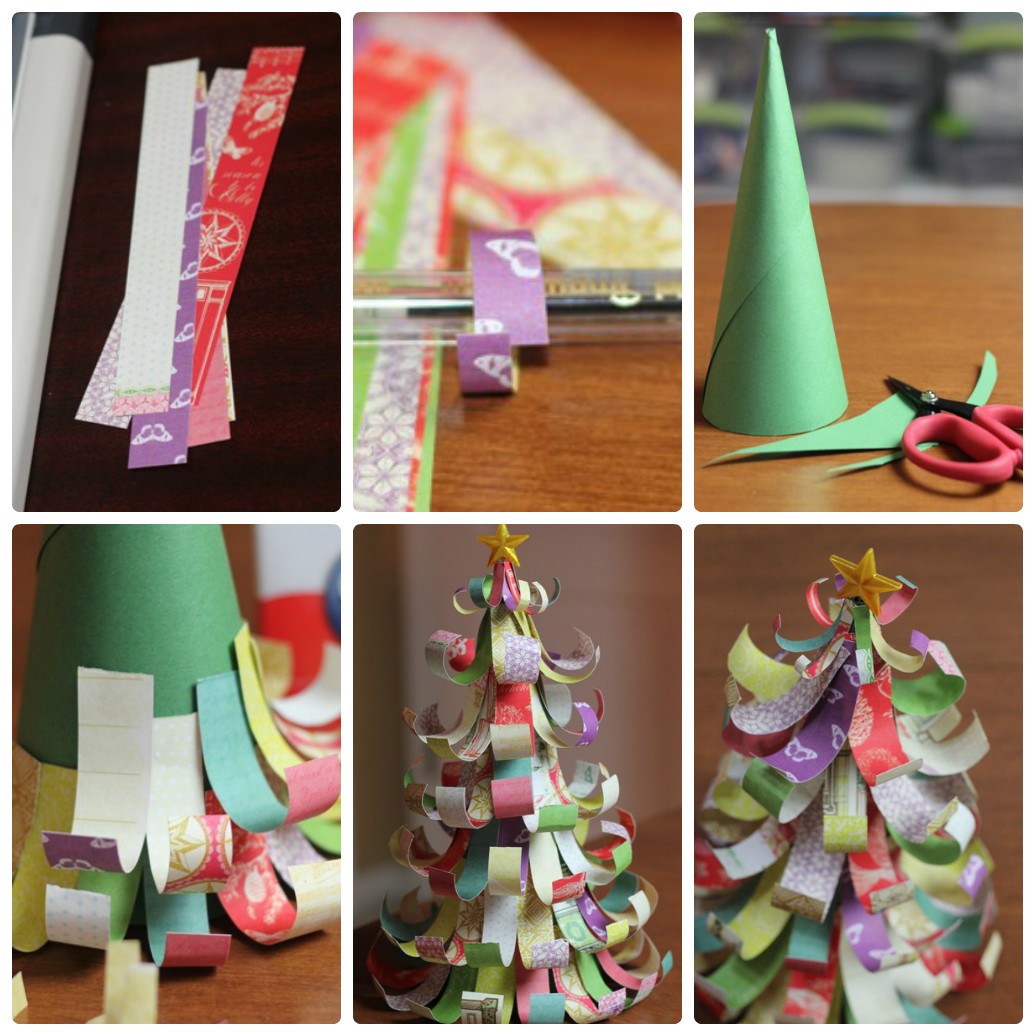
Another Christmas tree, option number 2
Another example of paper crafts. At the heart of such a Christmas tree - cardboard cone. To create we need:
- multi-colored paper;
- glue;
- scotch;
- scissors.
Production order:
- We cut out a large number of strips of the same length and width from colored paper. We glue each strip with glue so that it looks like a loop, then we glue all the loops on adhesive tape.
- On a cardboard cone we put layers of adhesive tape, to which our strips are glued.
This is the tree we got:
 A bright Christmas tree can brighten up any room.
 Christmas tree from a magazine
Unusual but very easy origami. In every house there is sure to be an unnecessary magazine - here you can make an original Christmas tree out of it.
In the magazine, we bend each page like this: the upper right corner towards us at forty-five degrees, then we bend the sheet diagonally in half.

The bottom corner has gone beyond the boundaries of the magazine, we tuck it up.

We fold all the pages like this.

Here is such an original craft turned out. As you can see, nothing complicated, but a lot of fun because you were able to make it with your own hands.
Christmas paper lanterns
We made a Christmas tree, now the next step is do-it-yourself paper lanterns. Consider a few simple options for how to make paper lanterns with your own hands.
Striped lantern
To create such a flashlight, you need to cut strips of colored paper of the same width and length: the longer the strip, the larger the flashlight will be. The average length of the strip will be 15 cm.
 Your kid will love to create unusual crafts with you.
 We fold the strips and pierce holes at both ends. We fix the end of the lace on one side and fasten it so that the lace does not pop out. Then we thread the lace into another hole and pull it. The strips will bend in a semicircle.
We straighten the flashlight so that the strips form the shape of a ball. The flashlight is ready.
Chinese lantern
How to make a Chinese paper lantern with your own hands? To create such a craft you will need:
- scissors;
- strips of colored paper (18 pieces);
- glue;
- two paper circles with a diameter of 4 cm;
- needle with thread.
Fold the strips in half. With the help of a needle, we first string a circle onto a thread, then one side of the strips, then the second and last circle. It will look like a spiral.
 DIY Chinese lantern, photo
 We tighten the thread so that the strips form a ball, and straighten. Top and bottom can be decorated with beads. Glue the loop. Our Chinese paper lantern is ready, it can be hung on a fluffy beauty - a Christmas tree.
sky lattern
How to make a sky lantern out of paper with your own hands? To create crafts, you need to take a sheet of colored paper measuring 24x60cm. We bend the sheet in half, then fold it with an accordion.
We unfold the sheet and make triangular creases along the central fold on all the folds of our triangular accordion.
 Sky lanterns can be made colorful
 We make the same creases along the lower and upper edges of the sheet. Glue into a cylinder. Sew a loop on top.
Advice. Such a flashlight can be glued from any paper, but preferably bright and saturated colors. Abstract drawings or oriental motifs will look very good. You can pre-paint the paper to your taste before creating such a craft.
paper garland
How to make a paper garland with your own hands? We propose to fulfill paper ball decoration.
 Photo of a paper garland of homemade colorful balls
 To make such a garland, we need stripes of the same length and width. In order to make it more convenient to fasten them with adhesive tape, we make the upper and lower parts pointed. For one ball you will need 4 strips, preferably if they are of different colors.
 We braid the strips into a pigtail until they form into a ball.
 We take two strips, glue them with tape and start weave a pigtail. As you weave, the pigtail will twist and turn into a ball. When the ball is ready, you will need to hide the free ends between weaving. It's worth doing this until the ball is completely formed.
For creating long garland you will need to twist a lot of balls.
Then we string each ball on a colored thread. A garland of paper balls is ready: you can decorate both the Christmas tree and the room with it.
Volumetric paper toy for the Christmas tree
Our next craft is. What should be done?
 It looks like a finished voluminous asterisk made of paper
Christmas ball is ready!
New Year's angel from napkins

Such an angel can decorate a table, a Christmas tree or make a gift for relatives. To create you will need: scissors, glue, thread and ordinary table napkins.

Angel is ready!
Christmas snowflake
Let's make beautiful paper snowflakes for the new year. How to cut a beautiful voluminous snowflake? A paper snowflake can be cut according to a pattern or made using the quilling technique. The instructions for making paper snowflakes are simple: prepare paper blanks and make a finished snowflake out of them. Glue the pieces together.
 This paper snowflake is made in the origami technique.
 To create such delicate and airy crafts, you only need office paper. Twisted in a special way, they look like real snowflakes. First we will prepare the strips of paper. To create a curl, a strip of paper must be tightly twisted on a skewer. After you have wound it, we correct the curl of the paper and remove the “washer”.
Read how to decorate a house for the New Year 2019 with your own hands - all the secrets of the festive decoration of rooms, walls, doors and windows, decor tips.
Snowflake blanks
We need to come up with a pattern for our snowflake. The number of rows can be from one to four. The main thing is that the patterns allow all the details to be glued together.

First row- on the sides we glue six "drops";
Second row- six "arrows";
Third row- six "squares";
And here is a sample of a snowflake:

You can dream up and make a variety of applications on glass or thread a shiny thread into a snowflake and hang it on a Christmas tree.
As you can see, you can make a great variety of Christmas paper decorations with your own hands. We have shown you only a small part of what can be made from paper. These Christmas crafts, paper decorations, toys and origami snowflakes will perfectly emphasize the festive New Year decoration of both the Christmas tree and the interior.
How are you planning to decorate your house for Christmas? What decorations will you hang on the tree?
If you want to make this process creative and unusual, we suggest making paper decorations!
It's simple and very original!
1. Graceful ballerinas with napkin tutu skirts

2. Funny snowmen from circles

3. Cute angels made of paper and beads

4. Very simple Santa Clauses and Christmas trees made from paper cones. They can be used for the advent calendar.

5. Original Christmas balls from paper circles

6. Angels from music books

7. Fancy fluffy herringbone, can be as traditional green,
and different shades of green or multi-colored.

8. And you can decorate the same Christmas tree with buttons or sequins!

9. A Christmas tree from a magazine will be the most unusual decoration of the holiday!

10. Paper boxes for small surprises. Kids love to look for such gifts on the Christmas tree!

11. Another unusual Christmas tree - from squares cut out of newspapers.

12. Volumetric paper stars for the Christmas tree

13. Very simple Christmas decorations in the same style: different colors and complemented with beads.

14. Christmas tree toy - paper cone

15. Beautiful paper stars with a stylish ornament and a pocket for a small gift

16. Angels from disposable paper plates

17. Graceful paper snowflakes


