Star News


Models of geometric shapes from paper sweep. Paper Origami for Beginners
Creating crafts with your own hands is interesting not only for children, but also for adults. However, for adults, a sufficient number of models have been invented, which differ in the complexity of implementation and the time spent on their creation. Recently, adults and children have become interested in creating complex geometric shapes. This type of figure includes the icosahedron, which is a regular polygon and is one of the Platonic solids - regular polyhedra. This figure has 20 triangular faces (equilateral triangles), 30 edges and 12 vertices, which are the junction of 5 edges. It is quite difficult to assemble a regular paper icosahedron, but it is interesting. If you are passionate about origami, then making a paper icosahedron with your own hands will not be difficult for you. Make it from colored, corrugated paper, foil, wrapping paper for flowers. Using a variety of materials, you can give even greater beauty and showiness to your icosahedron. It all depends only on the imagination of its creator and the available material on the table.
 |
 |
 |
 |
 |
 |
We offer you several options for developing the icosahedron, which can be printed, transferred to thick paper and cardboard, bent along the lines and glued.
How to make an icosahedron out of paper: diagram
In order to assemble an icosahedron from a sheet of paper or cardboard, you must first prepare the following materials:
- layout of the icosahedron;
- PVA glue;
- scissors;
- ruler.


During the creation of the icosahedron, it is important to pay special attention to the process of folding all the details: in order to evenly bend the paper, you can use a regular ruler.
It is noteworthy that the icosahedron can also be found in everyday life. For example, a soccer ball is made in the form of a truncated icosahedron (a polyhedron consisting of 12 pentagons and 20 regular hexagons). This is especially evident if you color the resulting icosahedron in black and white, like the ball itself.
You can make such a soccer ball yourself by printing a preliminary scan of a truncated icosahedron in 2 copies:

Creating an icosahedron with your own hands is an interesting process that requires thoughtfulness, patience and a lot of paper. However, the result obtained in the end will please the eye for a long time. The icosahedron can be given to a child to play if he has already reached the age of three. Playing with such a complex geometric figure, he will develop not only figurative thinking, spatial skills, but also get acquainted with the world of geometry. If an adult decides to create an icosahedron on his own, then such a creative process for constructing an icosahedron will allow you to pass the time, as well as show off your ability to create complex shapes to your loved ones.

Everyone should learn how to make geometric paper shapes! After all, you never know what knowledge you may need in life. Recently, the origami technique is gaining wide popularity among children and adults. But before you make a variety of crafts (animals, birds, plants, small houses), you need to start with simple geometric shapes. Such products are suitable for schoolchildren for a good visual representation of different figures.
Making a Cube
So, for today's master class, we need paper, diagrams, glue, scissors, rulers and a little patience.


The cube is the simplest origami shape, a simple polyhedron in which each face is a square. The scheme for creating a sweep can be printed on a printer, or you can draw it yourself. To do this, select the dimensions of the faces. The width of a sheet of paper should be at least 3 sides of one square, and the length should not exceed 5 sides. Draw four squares in the length of the sheet, which will become the sides of the cube. Draw strictly on one line, close. Draw one square above and below one square. Draw strips for gluing, thanks to which the faces will be connected to each other. Our cube is almost ready!

Then spread a thin layer of glue evenly over the joints. Glue these surfaces and secure for a while with a paper clip. The glue will set in about 30-40 minutes. Thus, glue all the edges.
Craft more difficult

The cone is a little more complicated. First, draw a circle with a compass. Cut a sector (part of a circle bounded by an arc of a circle and two radii) from this circle. The sharpness of the end of the cone depends on the cut out part of the large sector.
Glue the side surface of the cone. Next, measure the diameter of the base of the cone. Use a compass to draw a circle on a piece of paper. Then draw triangles for gluing the base from the side surface. Cut out. Then glue the base to the side surface. The craft is ready!

Complex box

A parallelepiped is a complex polyhedron figure that has 6 faces and each of them is a parallelogram.
To make a parallelepiped using the origami technique, you need to draw a base - a parallelogram of any size. On each side, draw the sides - also parallelograms. Next, from any of the sides, draw the second base. Add places for gluing. A parallelepiped can be rectangular if all sides have right angles. Then cut out the scan and glue. Ready!

origami pyramid

It's time to make a paper pyramid. This is a polyhedron, the base of which is a polygon, and the other faces are triangles with a common vertex.
First you need to choose the size of the pyramid and the number of faces. Next, draw a polyhedron - it will be the base. Looking at the number of faces, it can also be a triangle, square, pentagon.
From one of the sides of our polyhedron, draw a triangle, which will be the side. Then draw another triangle so that one of its sides is common with the first triangle. Draw as many of them as there are sides in the pyramid. Next, draw the strips for gluing in the required places. Cut and glue the shape. The pyramid is ready!

paper cylinder

A cylinder is a geometric figure bounded by a cylindrical surface and two parallel planes that intersect it.
Draw a rectangle on paper where the width is the height of the cylinder and the length is the diameter. Geometry lovers know that the ratio of the length of a rectangle to its diameter is determined by the formula: L=nD, where L is the length of the rectangle and D is the diameter of the cylinder. Using this calculation, find out the length of the rectangle that we will draw on paper. Draw small triangles for gluing parts.
Then draw two circles on paper, with a diameter like a cylinder. This will be the top and bottom base of the cylinder. Next, cut out all the details. Glue the side surface of the cylinder from the rectangle. Allow the parts to dry and glue the bottom base to it. Wait until it dries again and glue the top base. Ready!
Nowadays, probably, everything is already made of paper. The huge demand for this product is due to its wide popularity and extensive scope. Today we will talk about do-it-yourself volumetric paper figures. For some people, this hobby develops into profitable profession, because one can only say about their exhibits that this is a real work of art.
In the modular origami technique, three-dimensional paper figures are assembled from a large number of identical parts (modules). Each module is folded according to the rules of classic origami from one sheet of paper, and then the modules are connected by nesting them into each other. At the same time, the friction force does not allow the structure to disintegrate. In the modular origami technique, boxes, flat and voluminous stars, spherical objects are often made, which in Russia received the inaccurate name kusudama, since initially kusudama involved stitching modules into a ball.
Wet origami - closer to reality
There is another type of popular origami - this is wet folding. To give smooth lines, the paper is slightly moistened with a sponge or spray gun. Most often used to create animal figurines. Wet paper is more pliable and holds its shape better after drying. The peculiarity is that by wetting the structure again, you can give it a different shape without tearing the paper.
Kirigami - volumes from the plane
In the kirigami technique, you can use scissors and glue. Crafts using the kirigami technique are somewhat reminiscent of children's panorama books. Also, this technique is often compared to ‘pop-up’ postcards. Unlike traditional pop-up cards, these paper models are usually cut and folded from a single sheet of paper. Most often, they develop three-dimensional reproductions of architecture, geometric patterns and various everyday objects, etc.
Kusudama - rounded shapes
Kusudama technique has the same principle as modular origami. The main difference is that the figures have a spherical shape, and the parts for connection can not only be nested one into the other, but also glued or sewn.
Cubecraft - a square bun with many faces
This is a modern technique for making paper crafts. In this technique, all the figures are folded according to the same pattern. The point is that you can make figurines of various famous characters from movies, comics, cartoons, as well as real personalities: politicians, musicians, actors, etc. Such figurines are put on the table as a reminder or just to please the eye.
Papier-mâché - remembering childhood
The name of the papier-mâché technique is translated from French as “chewed paper”. But you will be surprised when you learn that China is the birthplace of this technique. The technique consists in multi-layer gluing pieces of paper soaked in a paste. Then the paper figures are primed and painted. You can make anything from papier-mâché (vases, toys, mugs), but most often they make masks.
Decoupage - decorate old things
Decoupage in translation means "cutting". Most often, the decoupage technique is used for old furniture - some dragons or birds, plants or animals are cut out. It gives a new shine to old things. It is also used in the creation of exclusive interior items, in the design of clothes and the manufacture of fashion accessories.
Facing - quilling in a new way
Using the facing technique, it turns out to make beautiful postcards or even paintings. Quilling uses long strips that are wound around a thin stick. Small squares are also cut here. Then, a stick is applied to the center of the square, and this square is wound on it. The resulting part is glued to the base. It turns out sometimes unusual and very voluminous.
Paper art - metal imitation
This technique was invented in 2006 and basically contains an imitation of metal and wood from paper napkins. The technique imitates wood carving or metal chasing. Coloring and patination gives natural textures. Strips of napkins soaked in water are twisted into threads, then a pattern is laid out of them and fixed with glue. After drying, it remains only to paint and give naturalness.
Iris folding - "rainbow folding"
To make a craft using this technique, you need to cut several strips of paper of different colors and lay them in a spiral or in another fancy way. It all looks like a multifaceted figure. The imposition of translucent papers on top of each other gives interesting effects when decorating.
Pergamano - painstaking work
Patterns and decorations in this technique are made on parchment paper using perforation and embossing. Most often, the parchment technique is used in the manufacture of postcards and invitations.
Katagami - need a sharp knife
Some more Japanese paper art. Katagami is the art of cutting whole pictures out of rice paper using a special sharp knife and stencil or along a drawn line. Most often used for paintings.
A collage is an image made up of various pieces of paper (wallpaper, newspapers, magazines, photographs, etc.) that differ in color and texture. Previously, they cut out pictures from magazines, newspapers, books and decorated things with them (remember your grandmother's suitcase or dressing table). Now this ancient technique has again become fashionable and is widely used in various countries when decorating handbags, hats, trays, Christmas tree decorations, sundials, caskets, dishes, packages, etc.
Paper modeling - paper turns into ...
Of particular interest deserves paper modeling. You can create almost any volumetric paper shape with your own hands. Starting from military equipment, architectural monuments and ending with various types of animals, both known to everyone and fictional. Of course, ideally, you need to be able to do everything (drawings, details, etc.) with your own hands, but for starters, you can use the Internet. Through the search, you can find a lot of drawings and layouts that can be printed on a printer, cut and glued. There are even special sites that store paper models: airplanes, cars, movie and cartoon characters.

All of these paper craft techniques have their own nuances, advantages and disadvantages. But most importantly, when choosing what kind of paper art to do, I advise you to be guided solely by your own heart. In order to make a bewitching figurine, you must truly love this business.
This is painstaking work that requires care and patience, and only with a strong desire can everything be done as it should. The admiring glances of friends and praise addressed to you can become a reward for you.
paper products They look very nice if everything is evenly cut and assembled. The main thing is that no special skills are required to create such figures. Enough attentively connect everything. With a little practice, you will get everything much faster and smoother.
An example of how unusual paper shapes can be can be seen in the video below. I advise everyone to see it, because it is really unusual and a masterpiece.
Large selection of sweeps of simple geometric shapes.
Children's first exposure to paper modeling always starts with simple geometric shapes such as the cube and pyramid. Not many succeed in gluing a cube the first time, sometimes it takes several days to make a truly even and flawless cube. More complex cylinder and cone shapes require several times more effort than a simple cube. If you don’t know how to carefully glue geometric shapes, then it’s too early for you to take on complex models. Take care of yourself and teach your children to crate these “elements” of modeling from ready-made scans.
To begin with, I, of course, suggest learning how to glue an ordinary cube. Reamers are made for two cubes, large and small. A more complex figure is a small cube because it is more difficult to glue it than a large one.

So, let's begin! Download the development of all the figures on five sheets and print on thick paper. Before you print and glue geometric shapes, be sure to read the article on how to choose paper and how to cut, bend and glue paper in general.
For better printing, I advise you to use the AutoCAD program, and I give you a sweep for this program, and also read how to print from AutoCAD. Cut out the development of the cubes from the first sheet, along the fold lines, be sure to draw a compass needle under the iron ruler so that the paper folds well. Now you can start gluing the cubes.

To save paper and for every firefighter, I made several scans of a small cube, you never know if you want to glue more than one cube or something will not work the first time. Another simple figure is a pyramid, you will find its sweeps on the second sheet. Similar pyramids cost the ancient Egyptians, though not made of paper and not so small :)

And this is also a pyramid, only unlike the previous one, it has not four, but three sides.

Development of a trihedral pyramid on the first sheet for printing.

And another funny pyramid of five faces, its development on the 4th sheet in the form of an asterisk in two copies.


A more complex figure is the pentahedron, although the pentahedron is more difficult to draw than to glue.

Reamers of the pentahedron on the second sheet.

So we got to the complex figures. Now you have to tighten up, gluing such figures is not easy! To begin with, a regular cylinder, its development on the second sheet.

And this is a more complex figure compared to a cylinder, because at its base is not a circle, but an oval.

The development of this figure is on the second sheet, two spare parts were made for the oval base.

To accurately assemble the cylinder, its parts must be glued end-to-end. On the one hand, the bottom can be glued without problems, just put a pre-glued tube on the table, put a circle on the bottom and fill it with glue from the inside. Make sure that the diameter of the pipe and the round bottom fit snugly together, without gaps, otherwise the glue will leak and everything will stick to the table. The second circle will be more difficult to glue, so glue auxiliary rectangles inside at a paper thickness distance from the edge of the pipe. These rectangles will not let the base fall inward, now you can glue the circle on top without any problems.

A cylinder with an oval base can be glued in the same way as a regular cylinder, but it has a lower height, so it’s easier to insert a paper accordion inside, and put the second base on top and glue it along the edge.

Now a very complex figure - a cone. Its details are on the third sheet, a spare circle for the bottom on the 4th sheet. The whole difficulty of gluing the cone is in its sharp top, and then it will be very difficult to glue the bottom.

A complex and at the same time simple figure is a ball. The ball consists of 12 pentahedrons, the development of the ball is on the 4th sheet. First, the two halves of the ball are glued, and then both are glued together.

A rather interesting figure is a rhombus, its details are on the third sheet.

And now two very similar, but completely different figures, their difference is only in the base.

When you glue these two figures, you will not immediately understand what it is at all, they turned out to be some kind of completely unreceptive.

Another interesting figurine is the torus, only we have it very simplified, its details are on the 5th sheet.

And finally, the last figure from equilateral triangles, I don’t even know what to call it, but the figure looks like a star. Development of this figure on the fifth sheet.

That's all for today! I wish you success in this difficult work!
Have you noticed how interested children are from a young age paper figures? Maybe this is the natural desire of all of us to see the whole world in a combination of simple geometric shapes. And the more interesting it is to see circles, ovals, squares or triangles in every object that surrounds us. Yes, and a child can get acquainted with three-dimensional figures long before the school geometry course in a fun, playful way.
Paper geometric shapes
In every book on early development, along with colors, letters and numbers, the first step is to study the basic geometric shapes. After all, this is how the baby learns to understand what the form of things is, what it is and how it can be characterized. In a playful way, with the help of educational videos, poems, examples from surrounding things, the child learns to distinguish between a square and a triangle, a circle and a rhombus. Having studied the pictures in the book, the child can remember the names of the figures, but the next task is to consolidate this information in a playful way. Here we will come to the rescue paper geometric shapes.
We will collect from various figures. She will demonstrate to the child in the best possible way that any drawing can turn out if you arrange simple geometric shapes familiar to him in the correct sequence. Here is an application with the image of a clown. For her, you will need to pre-cut the main shapes from colored paper. These will be multi-colored circles, an oval, a triangle, a star, semicircles. You can stick them on double-sided tape if the base is cardboard with a smooth surface. Or you can use a glue stick, very easy to work with.

Another simple example of geometric appliqué is landscape. It can depict a square house with a triangular roof, trees with a round and triangular (Christmas tree) crown, a round sun. Having completed these on their own, the child will be able to better understand how to draw the same landscape with a pencil, that for the house you need to draw a square with a triangle on top, and also provide the dwelling with a square window and a rectangular door.
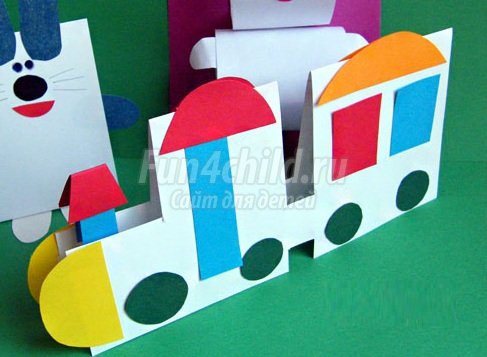
You can make a kind of symbiosis between and geometric appliqué by making such a smart train. Cut out the workpiece from a sheet of paper of a standard size, having previously bent the sheet in half. Next, invite the child to stick geometric shapes made of colored paper in their proper places: the yellow semicircle will become the nose of the train, small circles will be wheels, and blue rectangles will be windows in which you can even draw traveling passengers.
Volumetric paper figures
Don't be afraid to introduce your child to volumetric paper figures it will be early, and he may not understand something. On the contrary, it is a bit like magic that parents can do with their own hands, when a three-dimensional toy suddenly appears from a flat sheet of paper. These can become a teaching subject, and, for example, a part of any design.
Explain to the child that each flat figure has a relative, a three-dimensional figure, which may be called differently, but necessarily contains the outlines of a flat geometric figure. The easiest way is probably to start with a cube, because it is a classic toy. At first, you can simply draw the child's attention to the fact that each face of the cube has a square shape, after which you can begin to get acquainted with the layout drawing.
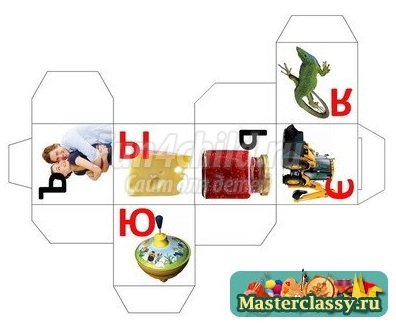
This word is complicated, however, the child will be able to understand how the cube is assembled in the end, to see that four squares are shown on flat paper, exactly as much as is needed for the finished cube. Over time, already studying at school, it will be easier for him to calculate square figures on checkered paper, because he will receive this knowledge at a young age. To begin with, you can draw the layout exactly on notebook sheets in a box, then moving on to a denser material. You can also buy ready-made layouts for almost all geometric shapes in the store, for example, cubes with ready-made letters and patterns on each of the surfaces.
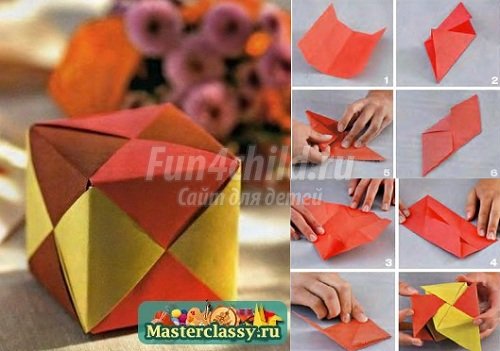
You can fold such a two-color paper cube with your child if you are fond of paper crafts such as origami. Fold a square sheet of paper in half, and then in half again to make four parts. Then, following the instructions, fold the edges of the figure so that you end up with a blank with two full surfaces and two sharp corners. All you have to do is make a second blank and combine it with the first, placing sharp corners in paper pockets.
How to make paper shapes
Naturally, we will not stop only at the cube, because there are still so many interesting crafts ahead. Let's find out how to make paper shapes other form.

Each such figure has its own name and it will be easier to remember it if you pick up any associations with this subject from the child. Now, for the cube, you don’t need to invent anything anymore, the kid already knows the name for his favorite children’s toy so well. Of course, you can not mention the parallelepiped yet (especially for "advanced" children), but it's easy to think of what you can associate a cylinder or a pyramid with.

If you decide to make a cylinder with a child, then ask him what object it resembles. Maybe it's a glass, or maybe a drainpipe. Tell us about the funny top hats that wizards or magicians wear in the circus. You can try to make such a hat together. To do this, you will need to take whatman paper, and the denser it is, the stronger your cylinder will be in the end. On this sheet we draw a long rectangle, the width of which will be equal to the future height of your cylinder. We retreat from the smaller edge of the rectangle a few centimeters and draw a circle that will touch the rectangle at its upper point. Cut out this shape carefully so as not to cut off the circle from the rectangle. Now, we begin to wrap the rectangle into a tube, and the circle covers this tube like a lid. With the help of adhesive tape we fix the circle and the edge of the rectangle. Now we cut out another circle, but of a larger diameter, cut a hole inside it, glue this circle to the cylinder. It remains to glue our craft with colored paper and decorate with appliqué.

It is in our generation that a cone can be associated with a bag for seeds, and for our children we need to look for other associations. On the basis of the cone, Christmas trees are made for New Year's topiaries, and you can also make funny figures, for example,. To do this, you need to draw a circle on a piece of thick paper using a compass and visually divide it into three parts. On one third in the upper corner in the center, we draw the face of the future snowman, eyes, nose and mouth. Cut out this third of the circle. We smear one of the edges with glue with a narrow strip, bend the cone and glue the two edges. From colorful wrapping paper we twist a small cylinder (now we already know how to do this) and fix it on top of the cone. We twist the bundles from black corrugated paper, rolling the paper between the palms. We glue mittens made of colored paper to these bundles, cut out and glue a scarf from the same paper. We consolidate the ability to twist the cone by making it from a piece of orange paper - this will be a carrot nose, without which any self-respecting snowman can not do.
Make a geometric shape out of paper
Offer to practice again make paper shapes, this time a pyramid. It can also be created using origami patterns, but we can also go another, simpler way, fastening the finished figure with glue.

The layout for the pyramid is a four-pointed star. Since it will not be easy to draw it correctly on ordinary white paper, you can draw figures on checkered paper, and then transfer to the sheet as from a template. So, in the center of the sheet we draw a square. From each of its sides we draw an isosceles triangle, providing one of its sides with an additional small strip for gluing. We cut out the finished star from paper and apply it to a sheet of thick and colored paper (you can also use thin cardboard). We bend all the lines between the square and the triangles well, smear the strips for gluing with glue and bring all the faces of the pyramid to one point. It's time to play, after all. On the layout planes we draw images of animals and after gluing we get new pyramid toys: a fish, a cat, a dog, a bird. In addition to the patterns on the pyramids themselves, you can add additional elements to the paper figures.
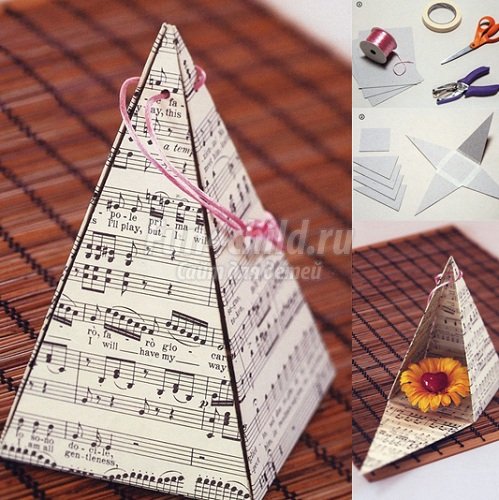
Pyramids can also make great homemade gift wrapping. The more beautiful the initial material - cardboard, the more beautiful the packaging will be in the end. You can use cardboard from boxes with a beautiful pattern for this purpose. You can see how to make a fastening on a pyramid with a rope in the presented photo. On all planes we make small holes according to the size of the fastening cord. We stretch it through all the holes, like a lace, we tie the ends into a bow. In order to get the contents of such a package, it will be enough just to untie the ends of the lace and pull it out of one hole.
Volumetric geometric shapes
Volumetric geometric shapes can be quite complex. After you master the basics, you can move on to them.

For example, try to make an icosahedron - a polyhedron with twenty faces, each of which is a triangle with the same sides. For such geometric figures from paper diagrams require special care, because even a small error in the parallelism of the lines will make the finished figure a curve. You can also fold half of the icosahedron, also making an original gift box out of it.

It will not be difficult to make an unusual three-dimensional figure - a torus, if you use a special scheme for assembly in your work, which you can download on the network. It is a set of ovals of different sizes, on which you need to make a lot of cuts. Ovals are cut out of thick paper, then begin to connect with each other using a system of notches. As a result, you should get a voluminous donut, whose geometric name is torus.
After such fun activities, no geometry will become too difficult for your child in the future schooling process.
Key news tags:
Other news

