Star news


Box with lid, unwrapped. DIY cardboard gift box: simple diagrams
Preparations for the second issue of the “DIY Gift Wrapping” series - the “Romantic Collection” educational set – are in full swing. 35 models of charming boxes for every taste with ready-to-print layouts and step-by-step assembly diagrams - in the coming days, friends, you will be able to add them to your packaging collections. I look at them myself and am touched))) So, I couldn’t resist, I wanted to show you a couple of boxes right now.
And, of course, I will reveal all the cards on how to make such DIY gift boxes. And they are made VERY simply.
Before we begin, download the scans:
How to open a pdf file? Instructions.
For making boxes you will need:
- stationery knife and ruler,
- scissors (you can even do without them),
- creasing tool (for example, knitting needle, compass, awl, etc.),
- hole puncher,
- ribbons, braid or decorative cord.
No double-sided tape or glue needed.
So, let's print and cut out the scan. Let's be the first to assemble a box in bright sunny colors (I didn't come up with names for the boxes, I'll leave that to your imagination :))
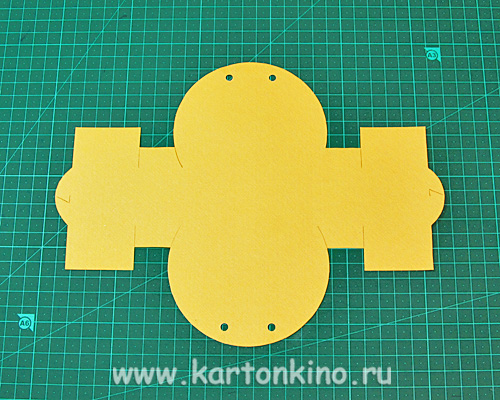
I “colored” this box (like the second one) in a graphics editor (I used the background from the free “Cheerful” scrap set from Fanta Ymoments - Scraps and more), and printed it on regular Whatman paper.
The holes can be punched with an ordinary stationery hole punch, a paper punch or a grommet installer - whoever has what.

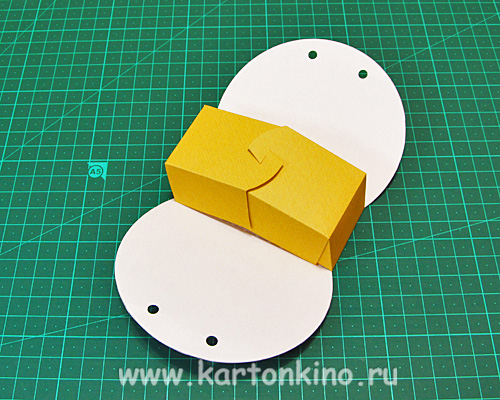
Now let's fold the halves of the inner box, connecting them using a “latch”.
And finally, we will thread the ribbon through the holes and tie a beautiful bow.

The second box is no less easy to assemble:

After punching and bending, we will thread the ribbon into the holes, as shown in the photo:

Carefully tighten the ribbon and tie a bow.

Just 10-15 minutes - and 2 wonderful gift boxes are ready!


In the very near future I will present you the entire collection of boxes from the second issue of the series “DIY gift wrapping”. This time the set, in addition to a set of high-quality scans (in PDF and PSD formats), includes 3 master classes on decorating boxes using different techniques: artistic cutting, scrapbooking and quilling - from Olga Kachurovskaya, Evgenia Yarovaya and Ekaterina Shkodovskaya.
Privacy Policy
By subscribing to the newsletter, you will be able to receive other free materials for paper crafts, as well as information about new products, discounts and promotions in the KARTONKINO Store (you can unsubscribe from the newsletter at any time).
— there is a lot of interesting things ahead!
See you again at KARTONKINO!
Today I am sharing with you my development of a reamer for a box with high sides. This development is unusual in that it saves paper and also allows you to place it on a smaller paper format, which is important when assembling boxes with high sides.
Of course, we are talking only about such boxes and only in the case of a double side (hard). For other types of boxes or lids, it will be more effective to use standard reamers.
It all started with the fact that I needed such boxes for the “Mom’s Treasures” project, and the standard scan did not fit into A3 paper precisely because of the double high sides.

The development was born thanks to several mistakes, and now, based on another mistake, I will show you how to make such boxes.
There are two mistakes in the photo - a box with the wrong lid and a lid that I mistakenly assembled to be the same size as the box, which is why it simply didn’t fit =)
I will now make a box for this lid.

Get ready, now there will be some numbers, geometry and spatial white shapes. But I tried to give you as many explanations and photos of the process as possible, so it should be clear.
So, first decide on the required box sizes. It’s better to write them down and sketch them, even schematically and clumsily, like me =) My box height is 5 cm, width and length are 6 and 9, respectively.
Now you need to draw a scan, so as not to get confused, it looks like the picture on the right.
The shaded rectangle is the future bottom of the box and has the dimensions length/width.
IMPORTANT: the location of the bottom must be exactly as in the figure: the horizontal dimension “a” (length) is greater than the vertical dimension “b” (width). If they are the same size, it doesn't matter.
The difference between this scan and the standard one is that in a regular scan one would have to add one more strip to the left and right, equal to the height of the box. But sometimes these same two “extra” heights simply do not fit on a sheet of paper.
Now about the sizes. We measure up and down from the rectangle-bottom twice along the height of the box, with the outer rows being 1-1.5 mm smaller so that the folds do not overlap the bottom.
To the left and right we measure the size “c”, equal to the larger of the width and height. In my case, the height is less than the width, so I measured a size equal to the width of box "b". In any case, it should be a larger size.

After measurements, cut out the resulting rectangle and crease along the lines. You can use special tools for creasing, you can use a knitting needle or a non-writing pen, whatever is more convenient for you.

Here is another photo, the position is similar to the picture.

Now again a little geometry :)
The picture on the left demonstrates what I indicated above: the extreme top and bottom lines should be slightly less than the height, literally 1-1.5 mm. In my case it is 4.9 cm.
When the rectangle is ready, you need to make several cuts in the places that are shown in the picture on the right with a green marker, and then bend along all the lines to make gluing easier later.

This is what should happen as a result

A little more geometry :)
Now you need to decide what is superfluous on the scan. It all depends on which size (width or height) you have. Since my width was larger, I use the diagram on the right: I cut off what is highlighted in green. Oblique cuts are needed in order not to interfere with the bends of the valves, make the bevel small, about 2 mm, and you also need to take into account that these parts will be inside, so the maximum height should be 1-1.5 mm less than the height.
If you have a larger size - height, then the oblique cuts are purely symbolic (1-2 mm), but the upper flaps will need to be cut to fit the width (smaller size).
Everything probably sounds incomprehensible, so the pictures should be much more informative.

This is how it worked out for me. as you can see, there are only two rectangles of waste. Unlike the standard scheme, where at least 4 are cut off, and sometimes more.

Now all that remains is the simplest physically and the most complex theoretically (it’s difficult to explain in pictures what to glue where).
So, let's start with the top valve. We simply glue it and bend it (indicated as 1).
Then we will deal with the left internal valve, why it is indicated by different numbers, but in one block - I will explain later.

This is what the reamer should look like when gluing the top flap.

Now let's move on to the left inner valve.
Apply glue to the part where my finger is pointing.

And we glue it in this way, assembling one of the sides

This is what happens

We lay the layout downwards with the place that is glued together and iron it well so that the surfaces are held together.
I have such a pen, it has a smooth tail, but at the same time slightly pointed

I use it to press down all the corners that my finger cannot access, as well as the entire gluing area. Since I work with a glue stick, the gluing happens quickly, and the paper (in my case, whatman paper for drawing) does not warp.

Now let's move on to the second part of the internal valve. We coat it with glue

And glue it to the bottom side. The result is a figure like this. Similarly, we iron the gluing area well so that everything holds tightly.
And now let's deal with the right side. We work with it in the same way, first we glue the part that the finger points to

And glue the side panel to it

And then... and here is the reason why in Figure 11 I painted the inner valve with one figure, although it indicates two stages. We are left with one flap at the end, which is very difficult to push inside, especially if the paper is thick, and it’s difficult to get around with glue without also getting everything around dirty.
That is why I smear the entire painted valve at once, and quickly glue it one by one to the two sides. Since it is solid, it is easier to smear it with glue entirely. By placing it inside right away, nothing gets dirty and it’s more convenient to align the corners.
Based on the type of assembly, cardboard boxes are divided into 2 main classes:
Fully assembled cardboard boxes(the unfolding of the entire package represents a single whole)

Typical examples of this type of packaging are:
- packaging for various electronic devices,
- cameras,
- spare parts for cars.
Cardboard box type<крышка-дно> (packaging unfolding consists of 2 parts: lid unfolding, bottom unfolding).
An example of this type of box is:
- chocolate box,
- cake box.
By design, cardboard packaging is also divided into 2 main classes:
1 - self-assembled cardboard boxes(assembly without glue)


Most often, the assembly of boxes of this type and the packaging of goods in them is done manually.
2 - glued cardboard boxes(with 1,2,3 or more gluing points). The assembly of this type of boxes and the packaging of goods in them can be carried out manually and on special conveyors.

Glued cardboard boxes can be flat-folded (packaging of this type is delivered flat)
The most typical examples of such packaging
- packaging for medicines,
- tea cardboard packaging,
- pizza.
Rigid glued: boxes of this type after gluing have a three-dimensional appearance; most often gluing of such boxes is done either on special machines or manually.

A rigid glued box, for example, is packaging for washing powder.
The packaging may have several locks:

Necessary information to calculate the cost of packaging
1. Purpose of packaging;
2. Packing size (mm);
3. Development of the package (disassembled perimeter size) mm;
4. Number of gluing points; in the case of single-point gluing, the length of the side gluing (mm);
5. Circulation (copies);
6. Brand of cardboard indicating density or thickness;
7. Colorful printing (CMYK, Panton, silver, gold);
8. Varnishing - selective or continuous. Type of varnish - offset, UV varnish;
9. Indicate availability<Заказчика>:
9.1. Packaging (design) or layout file;
9.2. Box or layout design file;
9.3. A set of photographic films with a die-cut layout;
9.4. Stamping form (stamp).
On the eve of the New Year holidays, store windows are full of gift boxes, decorative bags, and wrapping paper for every taste. Smiling sellers helpfully offer to provide wrapping services for New Year's gifts. And all this seems great, because you must admit, it’s much nicer to receive a New Year’s trinket in a beautiful package. But on the other hand, the whole meaning of the gift is lost, the very gift that should be intended specifically for you.
The recipient of the gift will be doubly pleased if, in addition to choosing the gift, you spend a little more time on wrapping it. In this article we will teach you how to make gift boxes from paper or cardboard with your own hands. This is not at all difficult to do, because all the crafts presented with us are accompanied by ready-made diagrams, templates and step-by-step master classes. All you have to do is choose the appropriate box option, print out the diagram and glue the paper box together according to the instructions. By the way, some of the boxes we present are made using the origami technique, which means that you don’t even need glue!
So, before we get started, let's check if everything is ready. To make a paper gift box with your own hands, you will need: beautiful wrapping paper (you can get by with plain white paper and then decorate it), scissors, pencil, ruler, glue or double-sided tape, and a stationery knife. Everything is? Well then, let's create!
#1 Box “Herringbone”
A great way to pack a small trinket for friends or family is this New Year's themed box. By the way, it’s very easy to do. You'll need green paper and hole punchers (although you can do without). Well, any rhinestones, beads, sequins are suitable for decoration, in general, to your taste!
#2 Gift box “Mint Candy”
And here is another original version of a gift box, which you can very easily make with your own hands, especially with our step-by-step master class. You will need red construction paper (for the box itself), as well as white paper for decoration. You can make the upper part of the box with applique or simply color the white sheet with pencils or felt-tip pens. By the way, there doesn’t have to be a lollipop on top. You can get creative with a New Year's theme and decorate the box on top, for example, with a snowflake, a Christmas ball or red angry M&M's.

#3 Box with lid (diagram)
Well, if you don’t have the time or desire to tinker with the box for a long time, you can use a simple ready-made template. You need to download it, print it, cut it and glue it. Voila, the box is ready! Please note that we have prepared 2 diagrams for you: square (size 5x5) and rectangular (size 7x6x4).

#4 Cup with a gift
But here is a gift packaging option for those who want to surprise with originality - a gift box-cup. It's quite simple to do, but looks impressive! To create, you will need thick paper, scissors and glue. And of course our step-by-step instructions!
#5 New Year's box “Cake”
If the New Year's party is planned in a large company, for example with a large family, it makes sense to pack gifts for everyone in one large multi-pack box. The cake packaging box consists of 8-10 pieces, each of which is a separate paper gift box.

#6 Gift box with lid for muffins and other small items
During the New Year holidays, edible gifts are quite common: various sweets and baked goods. An original gift will be a muffin prepared with your own hands in a designer gift box.

#7 New Year's box “Diamond”
You can pack a New Year's gift in a diamond-shaped gift box. With our scheme, making such intricate packaging will not be difficult. All you have to do is print out the box template, cut it out and glue it according to the instructions. It's simple!

#8 New Year's packaging "Santa"
A very cute New Year's package will be made from a regular paper bag, decorated with a paper Santa. Download the Santa pattern, cut it out and glue it onto the bag. DIY Christmas packaging is ready!

#9 Boxes “Harry Potter”
Fans of stories about Harry Potter will be indescribably delighted when they receive a piece of their favorite hero as a gift. By the way, such a box with magic sweet beans can be a wonderful addition to a set of books about the adventures of a young wizard.

#10 Box “Gingerbread House”
The symbol of the Christmas and New Year holidays, well known to everyone from Hollywood films, is the gingerbread man. You can make a paper box in the shape of a gingerbread man's house. By the way, putting the gingerbread men themselves in such a house will be very symbolic, but if you also make them with your own hands, there is no price for such a gift at all! The “Gingerbread House” box is made according to a special pattern, which you can download below. Also below is a master class on making a box with your own hands.
New Year's time is coming - a time of miracles, when everyone can feel like a little helper...
#11 Box “Heart of four parts”
A cute package consisting of four boxes can be made using our pattern. Giving your loved one not one, but four New Year's gifts at once is a true manifestation of love. You can download the diagram with four boxes and the base for them below.

#12 Box made using origami technique
To make such a gift box you will not need a diagram or template. To make a paper box with a lid, you only need a sheet of paper. The main condition is that the sheet must be square. Strictly follow the instructions of the master class and in 10 minutes you will have the cutest origami gift box made by yourself.

#13 And another option for an origami box
This box is very similar in appearance to the previous one, but the manufacturing method is slightly different. To make this box you will need scissors, but you don’t need a diagram: just a square sheet of paper. Follow the instructions of the master class and you will succeed!

#14 Box using origami technique “Volume Triangle”
If you want to get confused and ready-made templates are not for you, then be sure to pay attention to this complex and very impressive gift box. You will need paper and patience. Well, then follow the instructions and everything will work out!
If you like to make gift boxes without templates, glue and scissors, but only with the help of the correct folds of paper, then you will appreciate this box.
#16 Closing box using origami technique
Well, another version of the box using the origami technique. It's quite easy to do, especially if you follow the instructions. By the way, the steps of making the box are described below in the photo instructions.
#17 Box “Cupcake”
An original gift packaging for a New Year's gift will be a box in the shape of a cupcake. It looks very impressive, but it will take a little work to create. In general, there is nothing complicated in creating this box; you just need patience and imagination! See the step-by-step master class below.

#18 And another "Cupcake"
And here is another variation on the theme of a gift box in the form of a cupcake. The manufacturing scheme is very similar to the previous one, but you might like it!
#19 Gift box for cookies
A ready-made diagram for making a cardboard box with your own hands. All you need is to use our ready-made diagram, which you need to print, cut out of cardboard, and then glue it together in accordance with the master class.

#20 Chinese style gift box
You can put anything you want in this handmade box. And most importantly, it is done quickly and simply. You can download the box diagram from the link below.
Download the diagram

#21 Gift box in the shape of a cup

Truly original packaged gifts are valued much more than gifts in a regular gift bag. Pay special attention to this charming paper box, which you can make with your own hands using our pattern.
How to make a cup

How to make a lid

#22 Box “New Year's Sweater”
This beautiful gift box can be made with your own hands. To do this you will need a diagram, which you can download on our website, scissors, glue and a little patience.

#23 Box with bow closure
Quite simple to make, but very original gift box. You will need a square sheet of wrapping paper, glue and instructions from the master class. 15 minutes - and your gift box is ready!

It’s very easy to make a cardboard box for a New Year’s gift, but for this you will need not only cardboard, but also scissors (a stationery knife) and glue or double-sided tape (for secure fixation). Below is a step-by-step manufacturing master class, following which you can quickly and easily make a cardboard box with your own hands.

If you want to give a delicious gift in the form of cupcakes or muffins, then a paper egg tray would be the ideal packaging for such a gift. Cut the required number of compartments, decorate the top of the box with decorative elements, tie with a ribbon and Voila! The gift is ready!

You may be interested in:
#26 Original box “Milk package”
Another incredibly cool New Year's box that will amaze anyone. You can pack a simple trinket in such an unusual box. It’s quite simple to make it if you use a ready-made diagram, which you can download on our website.

#27 Box with lid
Using our simple pattern, you can easily make a gift box with a paper lid with your own hands in just a few minutes. You can put anything in such a box as a gift: from a cute trinket to handmade sweets. You can download the box diagram below.
#28 Packaging box with flower clasp
A simple design for a cute packaging box with a flower clasp. Fast, beautiful, original. Please your loved ones with a handmade gift. You can download the finished diagram from the link below.

#29 Gift box “Petals”
You can make a wonderful box for a New Year's gift with a petal-shaped lid with your own hands. In fact, making such a charm not only won’t take much time, but will also delight you with its cutest quality.
#30 Gift box for New Year's cupcake
You can make a very cute cardboard box with your own hands. It will turn out no worse than store bought. You can make a special bottom for the cake in the box. By placing your little delicious gift in a special stand, you don’t have to worry that all the cream will remain on the box. To make such a cardboard box with your own hands, you need to print the template and follow the instructions of the master class.

#31 Gift box for children “Ice cream”
A New Year's gift should be packed not just well, but with taste. In the “Ice Cream” gift box, your gift will be appreciated! With our scheme, making a delicious box will only bring pleasure!

#32 Packaging box “Candy”
Another option for “delicious” packaging would be a candy-shaped box. To create a New Year's atmosphere, the packaging can be slightly enlivened by adding eyes and a mouth. Download the diagram, print it and glue the box in the right places.

#33 Gift box “Cheerful Bunny”
You always want to give a special gift to your dear and close people. And it’s best when this gift is not only special, but also in special packaging that emphasizes the significance of a particular person. Making such a paper box with your own hands is not difficult if you download the diagram from the link below.
Download the diagram

#35 Box “Funny Frog”
Another very cheerful and positive box for New Year's gifts is “Cheerful Frog”. It’s done quickly and gives a lot of emotions! Download the diagram and please your loved ones with a merry New Year's box.

#36 Box with a face
You can also pack a gift in an original way in a box made of plain white paper, adding some details on it in the form of eyes and a mouth, thus bringing the gift to life. With our ready-made diagram, making such a box is not at all difficult. Just download the diagram, print and glue.

#37 Gift box “Birdhouse”
Let's start with perhaps the most unusual paper gift box. Making such a birdhouse is quite simple when you have a ready-made diagram. The diagram needs to be printed, transferred to suitable paper, cut out and glued in certain places. Complex and intricate at first glance, DIY boxes will be ready in 10-15 minutes. 
#38 Box “Apple”
A gift in a paper box in the shape of an apple will be original. With such a box, choosing a gift is quite easy - gelatin worms will come in handy. Making such a box with your own hands with the appropriate diagram is very simple; the manufacturing process will take no more than 10 minutes!

#39 Box “Christmas wreath”
There is no limit to your originality, we just give you direction, and then you create on your own. You can come up with a lot of boxes for the New Year theme, for example, in the form of a Christmas wreath. Very symbolic!
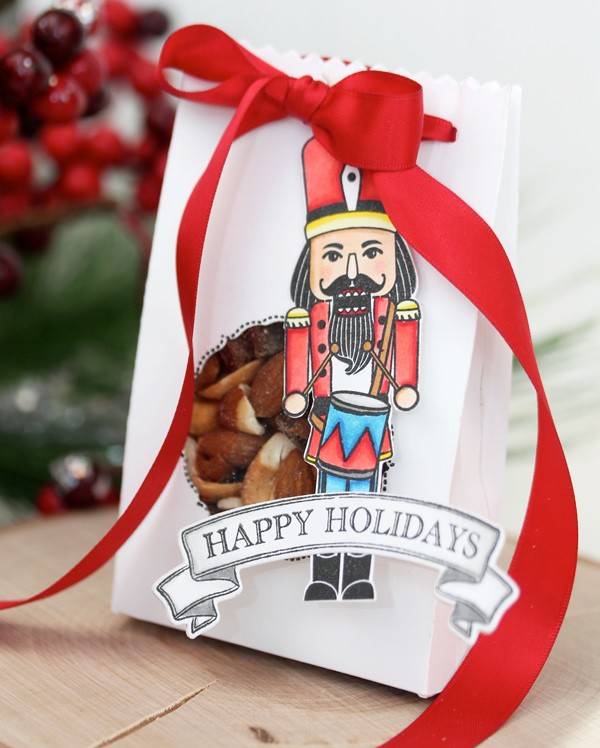
Well, what would a real New Year be without the Nutcracker and music from the famous ballet by P.I. Tchaikovsky? A great gift would be a bag of nuts with a nutcracker tag attached. You can draw the fairytale hero yourself, but if you have no inclination to draw, you can find an image of the Nutcracker on the Internet and print it, then cut it out and attach it to the bag.
It's 2012 outside the window. New Year's holidays behind. But doesn't the symbol of 2011 look like the Easter bunny?
New Years is soon! And if you need to give a lot of gifts c, this article will be interesting to you.
because it contains the most diverse New Year's boxes))
You can put any little thing in these (like candy or cookies) to make a nice warm gift!
It seems like a little effort, but the gift is handmade and pleasant.
Find out what else you can put in a small box at the end of the article.
Let's see!
By the way. We recently printed several boxes here and I’ll tell you, a gift in a box looks much more interesting than one packed in paper.
Maybe just because it’s unusual))
Since 2011 is considered the year of the rabbit, let's start with rabbits!

Source ,
download printable box template
and here is another rabbit - a funny gift box with long ears:

Source ideem, download outline vector template
(to download, check the box next to "I have read and accepted" Ideam's Terms of use.")

Photos, templates can be downloaded in vector and jpeg
but here is a more complicated box:

Photo by ustamp4fun, download template


Photo donteatthepaste, download outline template or
* * *
and this is actually not quite a box...
But if you wish, you can use it exactly like this:
All! While the hares and rabbits are over, let's go through the rest of the characters))
Gift box "Snowman"!

Photo by dianaevans, download template
another one:
Christmas tree box:

Photo rubberstamping, download template
and now a small selection of pyramidal boxes.
Such boxes look very advantageous and can also serve as Christmas tree decorations:

Photo accucut, you can download the template

Photo by polkadotprintsstudio, you can download the template


Photo mariestamps, you can download the template, watch the lesson

Photo rubberstamping, you can download the template
And in the year of the rabbit it’s good to give gifts in carrot boxes))
What's the main thing in the new year? So that there are enough carrots! And carrots are something different for everyone:
luck, happy occasions, romantic encounters, money or something else))
and here is another package, which (as Nastya suggested in the comment) is well suited for carrots
And finally, the funniest thing, otherwise we are all about rabbits and Christmas trees...
What do you think of the idea of giving a gift in a hat box?
Or number all the gifts, put leaves with numbers in a hat and invite guests to pull them out))
Or arrange a New Year's fortune telling, as described at the beginning of this article))
or make a hat and get gifts from it for everyone...
In general, what an idea! Rich!

The source was given in a jar, you can also give it in a box,
having previously poured it all into a transparent bag
and as always ( if you like surprises) photo of any large gift (along with instructions on where to look for it)
can be rolled up and hidden among candies small box!
Enjoy your gift-giving and have a good New Year's mood!

