Star news


 My life and soul in Latin")


Braiding from bottom to top with a bow. Bun hairstyle and its variations
Good afternoon, dear girls!
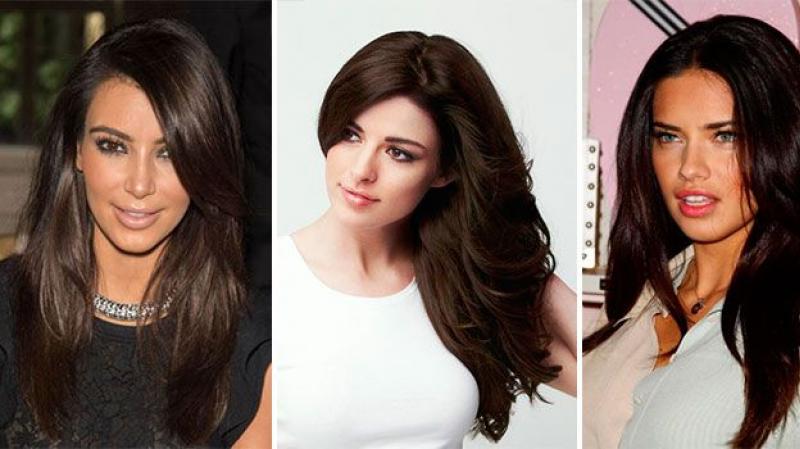
I love braids. Look at the photographs
I personally have a few types of hairstyles - loose straight/curly hair, loose hair with swept-back and combed bangs, a bun, a high ponytail, a side braid.
The ponytail and bun often give me headaches
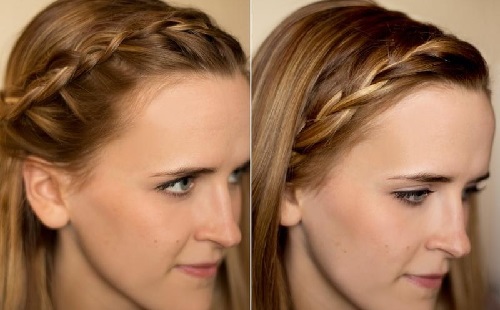
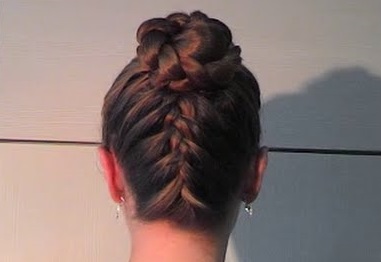
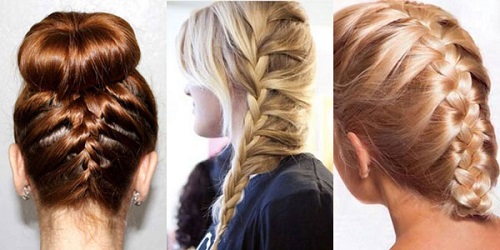
But still, I love braids... and on a hot day a simple bun gets terribly boring. Yesterday in the news on social media. online I saw a photo I liked under some snotty quote - the back of a girl’s head with a braid from the bottom up. First I started experimenting and fantasizing on myself, and only then I thought to google it and found this hairstyle. It’s called a “French braid from the bottom up”, it can be simple (like mine) and inverted, have different versions of the “top”... let’s see what I got. Please do not judge strictly, this is the first attempt (albeit on the third try) of such a braid
So let's get started.
This is what we have this morning. Curly disheveled hair
Of course, it would be easier with straight hair, but right now I wanted to repeat it, and on the 3rd day after washing my curls are not so pronounced: 
Comb your hair, tilt your head forward and comb your hair in that direction. We separate the strand at the base of the neck, divide it into three parts and begin to weave a regular French braid towards the crown. It’s easy in principle, but difficult on yourself - your arms and neck get tired, you can’t see anything and your hair gets tangled. I'll definitely try it on one of my friends, it should turn out prettier. This is what it looks like, trying to take a photo with my free hand from the “lean forward” pose
:

Then you can continue to weave a simple braid from the remaining hair and collect it into a bun. Or you can tie a ponytail: 
I would now make a bow out of straight hair. And from your wavy ones - a bun, dividing the tail into 2 strands and twisting them around the elastic band in opposite directions. Then I secured the pucho
The braid is the simplest and most common type of hairstyle. Thanks to the various types and methods of weaving, braids are extremely popular. Neatly braided hair is a convenient hairstyle in everyday life, relevant in an office environment and beautiful at a celebration.
To make your hair manageable and easy to braid and style, you can use various products in the form of foam, gel, or secure uneven strands with hairpins. You also need a good comb.
Weaving a regular braid
The most common and familiar from childhood was an ordinary braid, braided from three strands of hair. Having divided the hair into three parts and observing the sequence, we intertwine the hair with each other.
First, we intertwine the third part with the first and second strands, then the first with the second and third, and the second strand with the third and first. It is important to ensure that the strands are pulled tightly and the hair does not come out. Having finished this hairstyle, you can use a regular elastic band, a beautiful hairpin or weave a ribbon.


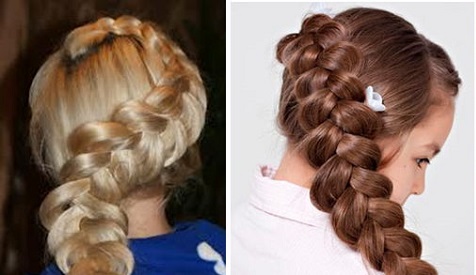
Braiding two braids
On thick, heavy hair, two braids will look great and original.

The photo shows a hairstyle with two braids.
For this hairstyle, the hair must be divided into two equal parts. Now each of them needs to be braided in the usual way, but it is important to make sure that the braiding of both braids starts from the same level.
Braiding a spikelet
Braiding a “spikelet” braid will be a little more difficult than a regular one, but the braiding technique is very similar, so you can do it. You should start braiding the same way as with a regular braid, only you need to take not all the hair, but only the top part and divide it into three equal strands. It is important to evenly distribute the strands so that the braid ends up looking even. We begin to weave the strands like a regular braid and slowly weave in new small strands of hair from the remaining hair on the side. In this way, continue to weave strands into the main braid until the hairline on your head ends.


Loose hair can be pulled up or braided into a regular braid.
If the “spikelet” is not voluminous enough, you can fluff it slightly with a comb. The “spikelet” will last a very long time in excellent condition if it is braided as tightly as possible.
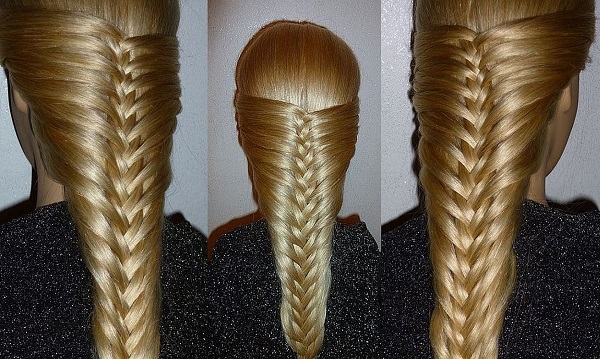
Fishtail braiding
We comb the hair back and divide it into two equal parts. We take each of the strands in our hands. Using the index finger of your left hand, select a thin strand of hair from the side (about 2.5 cm) and move it to the right side, securing it with your right hand. Then, with the index finger of your right hand, separate the same strand on the right and move it to the left, securing it with your left hand.


We repeat these steps until we reach the end. We tie the end of the braid with an elastic band or decorate it with a hairpin.
French braiding
Comb your hair and separate part of the hair from the top from the parietal area. Divide the strand into three equal strands and begin to weave, first placing the left one on the center one, then the right one on the center one. Then place the left strand over the center one and add the left strand to it. Now place the right strand over the center one and add a strand of hair to it on the right.


The photo shows a French braid from the side.
In this way, alternately add strands to the weave on the right and left. Tighten the loose ponytail with an elastic band or braid it into a regular braid. Once you start braiding a French braid, you can easily experiment. This French braid pattern, also suitable for two braids, a side French braid and a side braid.
This hairstyle is very convenient for everyday life; once you learn how to braid a “French” braid, it will become your favorite.


French braiding from bottom to top
Weaving this braid must begin from the back of the head, moving towards the crown. Use the weaving pattern of a regular French braid. You can complete your hairstyle by tying the ends into a bun or ponytail.


Inverted French Braid
Comb your hair. Take a section of hair and divide it into three equal parts. Place under the central strand, first the right and then the left strand. Place the right section under the center section adding a section of hair on the right. Now place the left one under the center one, adding part of the hair on the left to it.


The loose ponytail can be styled into a simple braid or ponytail. By stretching the braid a little, you can make it more voluminous.
Braiding Waterfall
Comb your hair in a side parting and begin to weave a regular French braid horizontally from the forehead towards the temples. Then we place the top strand on the middle one, separate a small strand from the top from the free ones and place it on the middle one, while releasing the lower part. Near the thrown bottom strand of loose hair, separate a small strand and place it on the middle one. We repeat this each time adding a braid of loose hair to the top strand, place it on the middle one and release the bottom strand, replacing it with a new one.


Braiding 4 and 5 strand braids
Braiding such a braid requires special skill and skill. To begin, you need to comb your hair back and divide it into five equal strands. Cross the right strand with the strand closest to it.
We cross the most central strand with the strand that was on the right. Then we cross the central one with the one to the left of it (not the outermost one). Now cross the leftmost one with the adjacent strand on the right. When braiding, try not to pull the braid too tight. Now braid the second row following this pattern. Such actions must be performed until the braid is woven.


Swiss braiding
The “Swiss” braid is woven in the same way as our regular three-strand braid, but each strand must be twisted with a strand. This hairstyle looks quite unusual and elegant, so it will be a godsend for both work and leisure.


Braiding tourniquet
First you need to collect your hair in a ponytail, then divide it into two equal parts. Then twist the right strand of hair towards the right, about 3-4 turns, and hold it tightly with your hand. Do the same with the left strand.
Now you need to carefully cross both strands, making sure that they do not unwind. As usual, secure the ends with a tight elastic band.


According to the pattern of twisting one braid, you can braid two. To do this, comb your hair in a middle parting, following the pattern, twist one part of the hair, then the other. Loose hair can be twisted together, braided, or left loose.


Braiding "Wreath"
Take a small section of hair from your temple and divide it into two equal parts. Then wrap the bottom part around the top and connect the strands into one. Now take a small strand from the loose hair below and wrap it around the top double strand. Next, continue to weave in this manner, adding strands of loose hair from below, wrapping around the top strand and joining them together. Secure the end of your hair with an elastic band and carefully hide it under the resulting wreath.

Braiding "Crown"

Weaving "Linno Russo" with ribbon
At the top of the head, separate a small strand of hair and put a ribbon on top of it and cross it. Next, select the strand below the previous one (Fig. 3), divide it into two parts and wrap each with the ends of the tape, so that the strands are at the bottom of the hair, and the tape is on top. Next, we again add strands of loose hair, separating them with a horizontal parting. We fix the resulting braid by tying a ribbon; you can also give the braid additional volume by slightly stretching the strands.


Knot braid
A knotted braid is very easy to make and will look elegant and neat. Separate the top part of the hair and divide it into two parts. Tie these parts together from right to left or vice versa (Fig. 1) like a regular knot. Next, add strands to the remaining free edges of the hair and tie the knot again, do this until all the hair is woven. The end of the braid can be secured with an elastic band and wrapped to the bottom.


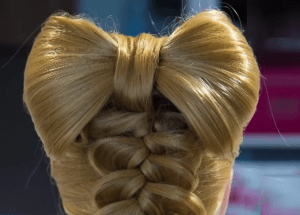
Weaving a braid "Bow"
This braiding is more of a decoration for an already woven braid; it is quite simple to do. First you need to braid the braid, leaving a thin strand of hair parallel to it, it is from this that you will later form bows. After the braid is braided, we separate a small strand from the loose hair left for the bow and spray it liberally with hairspray, then bend it in half to form an ear. Using a hairpin, carefully thread the eyelet under the braid, holding it with your hand.


Braiding a braid “Snake”
Separate the top strand of hair from the side and divide it into three equal parts. Start braiding a regular French braid, adding strands only from the top. When braiding, you should lead the braid along an inclined line, bring the braiding to the temple and make a turn of the braid, we braid the braid further by adding a strand as before on top, ignoring the bottom. If you have long hair, you can make turns along the entire length, depending on your desire. When braiding the lowest braid, the hair is picked up both from below and from above. The ends of the hair can be braided or left free.

Braiding "Basket"
At the crown of your head, select an area of hair and gather it into a high ponytail. From the head we begin to weave a regular French braid, each time adding strands of free hair on the right, and from the tail on the left, you need to take them of such thickness that they are enough for the entire braiding. Thus we weave in a circle. Having reached the place where weaving begins, we begin to weave a regular braid. We fix the end with an elastic band and hide it under the base of the tail; for greater fixation of the hairstyle, you can also secure it with bobby pins.


Snail braiding
Separate a small strand from the middle of the head and divide it into three equal ones. Then we begin to weave a regular French braid but with one grab on the right. At the beginning, it is important to take small strands so that there is enough hair for subsequent circles. Next, we braid the braid over the entire head, moving in a circle. We carefully fix the tip of the hair and disguise it under a hairpin.

Braiding "Flower"
To create a flower from hair, you need to braid a regular braid, but you need to braid it not up, but down (inverted braid), you need to braid it without tightening it too much.


Braided hairstyle "Butterfly"


Braids always remain in trend. Braiding looks beautiful on hair of any length. There are many variations of this hairstyle. The French braid has been at the peak of popularity for a long time.
Today we will talk about a type of reverse braiding - an inverted braid. It is slightly different from the classic one, but looks very impressive. The main thing is to follow the step-by-step instructions and carefully study the photo.

Classics of the genre
In Rus', a long braid has long been considered a symbol of femininity. Many rituals were associated with it. These days, such rituals are no longer practiced, but braids are still in fashion. Previously, there weren’t many varieties, but now you won’t surprise anyone with a simple scythe.

Weaving an inverted braid seems difficult at first, but with a little practice you will understand the technique. Then such a hairstyle will become a matter of minutes for you. You will need:
- massage hairstyle;
- spray bottle with water;
- rubber;
- hairspray.
Step-by-step weaving pattern

Technique:
- Comb your hair well. Separate a small section of hair above your forehead. You can experiment with thickness, this will significantly change the appearance of the braid.
- Divide the separated strand into three equal parts. Lightly spray the hair with water from a spray bottle, this makes it easier to separate one strand from another.
- We place the left strand under the middle one, the right one on top of the middle one, then the left one on top of the right one.
- After each cross, pull the strands very tightly, they will look neat, and the hairstyle will last longer.
- We free our left hand from the hair and hold everything in our right. Place your palm down and turn the two outer strands up. So the left strand turns out to be the middle one.
- We dive under the outermost strand on the left side, take a little from the head of hair and place it on the middle one. Take a strand approximately the same size as the main one.
- With your left hand, fix the base of the braid, release the two outer strands and turn it upside down. Again, place the outermost strand on the right side on the middle one with a small curl from the main hair.
- Using the same principle, braid the remaining hair.
- You can make a voluminous braid by securing the end of the curved braid with bobby pins at the very bottom. This hairstyle is decorated with shiny pins or barrettes.
- After finishing braiding, spray your hair with hairspray.
With the help of a French braid you can create a lot of beautiful hairstyles for every day and for any occasion.
Reverse braid on bangs

If you want to leave your curls loose, but also want a braid element, then you can only braid your bangs. To do this you will need to do the following:
- Comb your hair. Separate your bangs or a small section of hair from your forehead.
- Start weaving according to the pattern above, from one ear to the other.
- Secure the end under the hair with bobby pins so that it is not visible.
- Twist the rest of the hair a little and sprinkle with hairspray. You will get an original, simple hairstyle for every day.
Hairstyle with a bun

An excellent hairstyle for every day: start weaving an unusual French braid from the back of your head, finish at the top of your head, and gather the strands there into a messy bun. It is recommended to backcomb the curls a little in front to create volume.
Decorate this hairstyle with a bow or a bright elastic band. At the end of the braiding, secure the styled hair with hairspray. Buy medium hold hairspray, then your hair will always have a natural look.
original flower


Many have seen such weaving at brides' weddings. And we didn’t even realize that you could create a miracle of hairdressing with your own hands.

Step by step:
- Separate your hair with a side parting.
- From the side that is larger, separate the strand and start weaving an unusual French braid.
- In an inside-out braid, place the side strands from below.
- Continue weaving, do not forget to pick up strands from each side.
- The braid is braided from the parting to the side. You can stretch the braid a little along the way, so it will become more voluminous.
- When you have reached the other end, make a smooth turn back. Then finish weaving.
- Secure the finished braid with an elastic band, wrap it in the shape of a flower, and secure with bobby pins.
- Place a shiny hairpin or hairpin in the center of our flower.
- Don't forget about hairspray, thanks to it, your masterpiece will last a long time and will delight everyone around you.
Five strand braiding option


The styling looks impressive at any event:
- Comb your curls and divide them into five parts. The strand should not be parted in the middle.
- Gather each strand into a ponytail.
- Braid each section into a topsy-turvy French braid. Start braiding not from the bangs, but closer to the crown.
- Secure each braid with a small elastic band, after stretching the strands.
- Wrap all the ends of the braids into a ring, secure them at the very end of the back of the head, and cover them with braids on top.
- Decorate your hair with a bow and sprinkle with glitter hairspray.
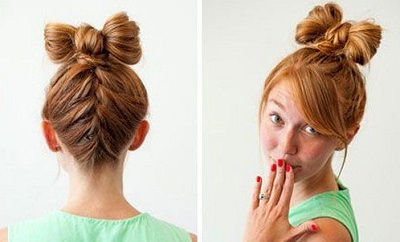
Malvinka made of hair with a bow

Making a hairstyle is a little more difficult than a regular little one, but read the instructions, look at the photo and you will understand that everything is not so difficult.
Weaving technique:
- Comb your hair back, separate the top part, and tie a ponytail. Wrap it with a small amount of hair and secure it with a bobby pin.
- Move the ponytail forward and secure it with a special clip.
- Using the remaining hair, begin to create an inverted French braid.
- As you weave, pull out individual strands, so the design will become more openwork.
- Complete the braid and secure with a small elastic band or a beautiful bow.
- Divide the remaining strand in front into a couple of parts.
- We comb each part, then smooth it.
- We wrap the strand in a loop, form part of our bow, secure it at the base with an invisible one, but do not hide it.
- We do the same actions with the second strand.
- There should be two small ends at the bottom of the bow, connect them together and cover the center. We secure it with invisible ones.
- Straighten the bow, smooth out any stray hairs or style with gel/wax.
- This design is secured with varnish.
Everyone will be delighted with such a bow with a braid. You will certainly become the most beautiful lady at the holiday, all the men will not be able to distract their eyes.


An inverted braid is an alternative to a regular braid. It can be woven on its side or as a headband. To begin with, just master the technique, then it will be easy for you to cope with any complex hairstyle.
Based on French weaving, you can create many unusual styles. It looks interesting if you start weaving not from the top of the head, but from the back of the head. The main thing is to find a little time, then a flight of fancy will do its job.
How to weave a French braid: video
Video tutorial on how to weave a reverse French braid:
What is good about the braids that every girl and girl are used to? They look neat, neat, comfortable to wear, and if desired, you can even create evening and formal hairstyles based on them. A great variety of braids and braids have been invented. And among all this diversity, the spikelet braid deserves special attention. It looks interesting and is not only suitable for every day, but also becomes a noticeable and eye-catching accent to an evening look. What is noteworthy is that a spikelet braid can be achieved on curls of almost any length. The only exception is .

Before going through step-by-step instructions on how to weave a spikelet, let's look at the general principles that will allow you to create a neat hairstyle and add some zest to it.
Before braiding the spikelet, comb your hair well. It will be ideal if you leave your curls slightly damp at first. This will allow the strands to fit better and look neater in the finished hairstyle. To ensure that the spikelet is perfectly even, comb each individual strand when weaving.
If, on the contrary, you would like to create a casual look in which your braided hair would look even a little disheveled, separate large strands and braid them loosely.
By choosing voluminous, large strands, you will get a thick braid. If the strands are thin, the spikelet will be graceful.
If you end up with flyaways during the braiding process, straighten your hair using a fine-toothed comb or comb.
Use while creating a spikelet. This will avoid unevenness and the same “roosters”. If you don't want to resort to hairsprays and mousses, simply moisturize your curls with a spray bottle of water.
When creating an even spikelet, divide the hair into strands so that the latter are strictly the same thickness. This way, when braiding, you can avoid the fact that the braid “leads” to the side.
Don't forget about accessories. Ribbons, hairpins, and elastic bands will allow you to create an interesting hairstyle even from a classic spikelet.
A spikelet braid looks interesting on highlighted and colored hair. The play of highlights and shades is what will add zest to your hairstyle.
In rainy or windy weather, a spikelet will help you out. This hairstyle will not fall apart and will look neat. For a trip to the beach or an overnight trip into nature, the spikelet is also a good option. Hair won't bother you.
You may not be able to braid a spikelet the first time. Don't despair and practice creating such braids. Ask a friend or sister to model for you and learn how to braid a spikelet on her hair, and then switch to your own, and you will succeed.

We braid a classic spikelet
This algorithm is the basis. When you learn how to make this basic version of a spikelet, other possibilities for creating based on it will open up for you. And they are numerous, and many of them are truly amazing.
Step by step the spikelet is woven like this:
Separate three strands at the top of your head. First, intertwine them as you would a regular braid, that is, place the right strand over the middle one, and then place the left strand over the middle one.
Fix the resulting base of the future spikelet with the fingers of your left hand. There should be strands of hair running between your fingers.
On the right side of your spikelet, take a strand of loose hair. It should be the same thickness as those used at the base. Place this side strand over the right strand of the base of the spikelet. Place it, together with the superimposed strands, on the middle strand of the base, and move the middle strand to the right.
We transfer the resulting strands from the left hand to the right. In the same way, they need to be separated from each other with your fingers.
Now on the left side you need to repeat the actions done earlier on the right. On the left, we separate a strand of loose hair and place it on the left strand of the base. After this, we put the left one on the middle one, and move the middle one to the left.
Continue to weave loose strands into the spikelet in the same way. So get to the nape line. Below, you can wear a regular braid or choose a fishtail.
As you can see, the instructions are simple, and the photographs will help you do everything correctly.
How to weave a spikelet on its side
This weaving option differs from the classic one. This spikelet will allow you to create an interesting romantic image. Choose this hairstyle if you plan to wear, say, a light dress on a date. Your image will be soft and airy.
Step-by-step instructions for weaving a spikelet on its side are as follows:
Comb your hair up away from your face.
Now, on one side (you can choose the right or left for this, it all depends on which is more convenient and familiar to you), separate a strand of hair and divide it into three even strands.
Start creating a classic braid. Weave two or three links.
Now start weaving strands from the side into the spikelet. They should be the same in thickness as the base strands. If you are braiding from the left, start adding loose hair from the left side, if you are braiding from the right, then from the right.
Repeat this action on the other side.
Now go again to the other side and so, alternating strands, weave them into the spikelet. Pull them tighter to keep your hairstyle looking neat.
When you reach the nape line, continue with the classic braid. Then secure its tip with an elastic band or tape. 
This hairstyle is suitable not only for older girls, it also looks good on little fashionistas. For a school or kindergarten, this is an excellent option, because hair will not interfere with learning or playing.
Half braid
This is unusual and very. It is suitable for work or university, and a romantic dress will organically complement and help create a memorable image.
The weaving technique is as follows:
Comb your hair from your forehead up.
On the left, separate a strand of small thickness and divide it into three equal strands.
Weave two links of a classic braid for the base.
Then start weaving the loose hair on the left into the spikelet. Do not touch the hair on the right side and leave it as it is.
When the braid reaches the base of the back of your head, secure it with a thin elastic band.
Repeat the same on the right.
Now connect both spikelets and secure with pins. Hide your loose hair underneath at the back of your head and fix your hairstyle with hairspray. 
Spikelet "bottom-up"
This is what will attract the attention of others to your person. It is convenient to make such a spikelet on yourself, without resorting to outside help. But at the same time, the movements must be brought to automaticity.
The weaving algorithm is as follows:
Tilt your head down and comb your hair.
Now spray your curls with water from a spray bottle. They will not be frizzy, and it will be easier to separate even strands to the touch.
At the hairline, separate a medium-thick strand and divide it into three more.
Now start creating the spikelet. Weave strands of loose hair into it, gradually increasing their thickness.
When you reach the top of your head, secure the ponytail at the base. Use an elastic band.
Now you can create some kind of babette or get creative and come up with your own version of how to secure your hair. 
It may seem that this hairstyle is difficult to achieve, but in reality it is not. The algorithm for weaving is as follows:
Comb your hair and part it in the middle.
Now, on the right side of the edge, separate a thin strand of hair. On the left, immediately separate another strand, but twice as thick as the previous one. Divide it into two more strands. All three need to be sprayed with hairspray.
Intertwine the strands once together, creating the base as for a classic braid.
Then alternately start adding strands to the spikelet from the right and left. Do not pull the curls tightly; the hairstyle should look loose and slightly careless.
Next, you have two braiding options: either continue to weave the loose strands into the spikelet in the same way until the very end, or bring it to the base of the back of the head, and then connect all the strands into a classic braid.
Whichever option you choose, the result will be surprising.
19 April 2014, 16:41
French braids from the bottom up with a bun are suitable for all representatives of the fair sex, regardless of face type and age. The great advantage of the French braid is the fact that it goes harmoniously with any color and style of clothing, adding charm, youth and its inherent freshness.
The fair sex has a huge selection of French weaves, each of which differs in appearance and complexity. Some people want to wear a cute French braid, while others prefer a reverse French braid.
And the only thing you need to do a French braid is a sufficient length of hair. You also have the opportunity to use natural or artificial strands.
The uniqueness of the French braid lies in the fact that despite its apparent complexity, creating a hairstyle is very simple and can even be done by hand. To create a French braid, you do not need to use expensive cosmetics or any special devices.

To create a French braid, you only need hairpins, elastic bands, a fine-tipped comb and a little patience.
How to french braid from bottom to top
The main feature of the French braid is its unusual weaving - even from the name it becomes clear that the hairstyle starts from the bottom, from the neck. It flows smoothly towards the crown of the hair, ending in a cute bun.

And as a result of fairly simple manipulations, we get an exquisite, very elegant hairstyle, because women’s curls, combed up and revealing the outline of a “swan” neck and the alluring, graceful curves of a spectacular hairstyle, will add tenderness, sex appeal and a touch of coquetry to any woman.
- - Tilt your head forward; Using a natural bristle brush, comb your hair thoroughly. Moisturize your curls with a styling spray, then separate a section of hair from the forehead area.
- — In the area of the back of the head, at the border of the growth line, we divide the hair into 3 narrow parts, then we begin to weave a braid - smoothly capturing more and more voluminous strands, in the direction from bottom to top. From the upper border of your ear, gradually grab uniform triangular strands.
- — We beautifully collect the curls in a braid braided from the bottom up.
- - When you reach the border of the back of the head, finish the braid.
- — Keeping your head straight, pull the braid up, then, forming a neat bun, wrap it.
- - Using an elastic band, secure the resulting bun and wrap the remaining tip of the braid around it. Secure the bun with hairpins.
- - Lay the rest of your hair in a wave on your forehead, then twist it around the bun. Secure it with bobby pins.
Video instructions for weaving a French braid
If you are going to go to a formal meeting, then it is better to braid several openwork spikelets, rather than one braid. You can also decorate your hair with strings of beads, pearls, shining rhinestones or fresh flowers.
//site/wp-content/uploads/2016/10/chitat-dalshe-7-150x150.png
French braids from the bottom up with a bun are suitable for all representatives of the fair sex, regardless of face type and age. The great advantage of the French braid is the fact that it goes harmoniously with any color and style of clothing, adding charm, youth and its inherent freshness. The fair sex has a huge selection of French weaves, each of which is different […]