Star news


Crochet a baseball cap. How to crochet a cap


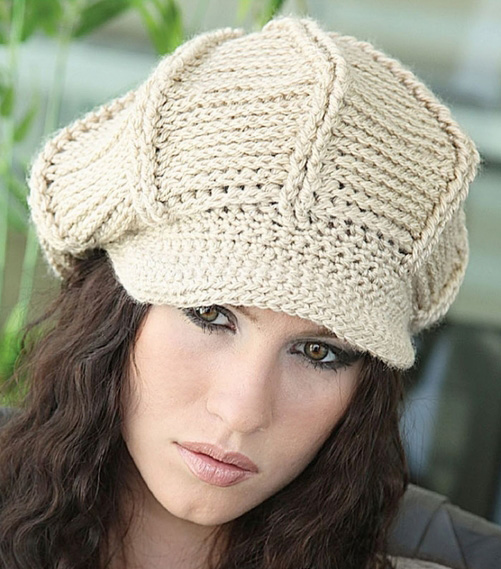
In the first cap, the size was not important to me, because I knitted it for sale, and it turned out to be 50-52 cm in size. I used Successful threads for the sides in crochet 2 and white Begonia in crochet 2.5
Today I will knit a sweet head for my daughter, size 48 cm. The threads I have are Successful from Pekhorka, orange and white, hook 1.5
Scheme of side fragments for girls

at the request of those interested, I am adding a side panel diagram for boys taken from the Internet

The layout of the central part can be whatever you like, for example:


So we start knitting from the side fragments. I am knitting for a girl, 1.5 crochet hook, successful yarn. In the diagram we see the section of the flower pattern that I cut off, because we will only knit half of it, in turning rows. In the first cap I knitted everything according to the pattern, I got 10 petals like this

So we knit two parts according to the pattern in white, we get 2 flower centers, like this

# In the 6th loop from the hook we knit 1 dc, 3 ch, 1 dc, 3 ch, 1 dc, 3 ch, 1 dc, 5 sc, with a connecting post we attach it to the base in the 3rd loop, like this

repeat 3 times, 1 dc, 5 ch. We attach to the first loop of the white fragment.
We turn the knitting and tie the petal RLS around the perimeter THIS IS NOT IN THE PATTERN!!!, returning to the place where the next petal will begin.
We attach to the next loop of the base with a connecting post, move the connecting post to the next loop and again cast on 23 VP for the next petal. #
We repeat all steps from # to #
Here's my start


For those whose fragments are larger than 17 cm and are knitted on a child’s head, try knitting according to this pattern

Accordingly, for 6 petals we dial 7 DCs and knit a semicircle, further according to the description
In general, as it turned out, it doesn’t matter how many petals you get (some don’t get 9). The main thing is that they form an even semicircle on a flat surface.
So, I knitted the sides and the center strip. When you have knitted the strip, be sure to tie it with a sc, the part will look neater and it will be more convenient to connect it to the sides.


We knit the rest according to the pattern. To make the visor stronger, we knit it in two threads very tightly, using the same crochet hook as the main fabric of the central part. If you find the visor not strong enough, you can add double monofilament to the knitting. Or knit two identical parts into one thread, trace them on paper and cut out such a part from a plastic bottle (2 liter) a little smaller than the template (3-4 mm), then tie two parts of the visor together along the outer semicircle with single crochets, insert the plastic visor inward and tie the parts along the inner edge of the RLS.
Personally, I am satisfied with the density of the visor in two threads in one piece. My threads made a visor 3.6 cm wide. This is enough for a child's cap. Using the same scheme, without changing anything, thicker threads will produce wider visors. If you need a visor for an adult cap, then you need to knit the number of rows you need, alternating rows with increases throughout the entire row and rows with increases only at the end and at the beginning
Here's my visor.

All that remains is to sew it to the hat, I do it with monofilament and decorate it.

From me:I also found this hat, it can be used as an option
You will need: 100 g acrylic; hook number 3.
The hat is knitted from two halves. For each part, knit 5 petals according to pattern 67, knitting sc in the 2nd and 3rd rows behind the back of the braid. Then close 10 VPs with a half-column into a ring and tie the 20th RLS.
Sew the petals about half the length and sew them to the ring, slightly gathering them at the base.
Join the resulting part at point A and tie according to pattern 67. Repeat the last two rows 4 times - 8 rows. Knit another piece and connect it to the finished piece when knitting the last row. Tie the bottom edge of the cap with a sc, pressing it down, and finish with a “crawfish step.”

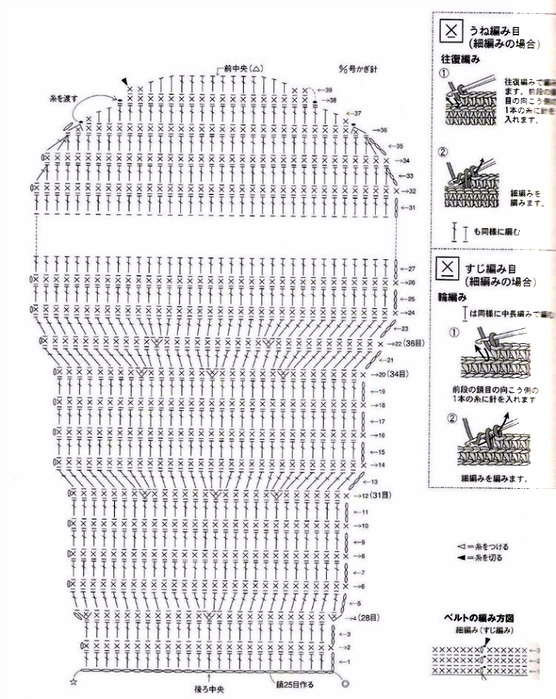
Pattern diagram
A cap is a universal headdress that never goes out of fashion. Many women and girls believe that only cap-shaped headwear is suitable for them. They add special charm and playfulness to the look. The trend is knitted caps that match the season - warm for spring/autumn, fur for winter and openwork for summer.
Features of crochet caps
The cap is versatile because depending on the yarn you can create a warm or very light summer cap. Warm caps are knitted from thick blended or woolen yarn. You can even make a fleece lining for the cap. Fur caps are especially chic. Summer caps can be knitted with simple single crochets, mesh, and even using the Irish lace technique. Summer caps are best crocheted from cotton or linen.
The cap is a great alternative to simple knitted hats. Caps are suitable for both young girls and older women. Depending on the shape of the cap, it can be worn on different hairstyles. A crocheted cap is suitable for either a sporty or classic style.
Crochet cap patterns
- Baseball cap. It is characterized by a large, hard, semicircular visor. The shape of the crown itself is tight-fitting.
- A slouchy cap, like a beanie. Such a cap may have a small visor, without a solid shape, or sloping to one side.
- Classic cap (like a driver's cap).
Crochet baby caps
If you don’t yet have experience in knitting a cap, you can practice on children’s models. In addition, there are many more children's caps with descriptions and master classes on the Internet. Caps are crocheted for both boys and girls.
A knitted cap on a boy will look much more organic than a beanie, for our taste. Caps in a nautical style, a classic cap, an openwork cap, a cap with flowers and rhinestones, a duck cap, etc. Not only different shapes but also a variety of color combinations you will find when you choose a crochet cap pattern.
Crochet cap, works of our readers

Red cap for my beloved daughter. Head volume 50 cm. Yarn: red NAKO Bambino (25% wool, 75% acrylic, 50g/130m) one whole skein was used and a little from the second for the visor; white yarn Pekhorka Children's New (100% acrylic, 50g/200m)

Summer is coming very soon, and this is the time for vacations and trips to the sea! My original idea is a cap for a boy and a panama hat for a girl in a nautical style. Knitted from 100% mercerized cotton, decorative buttons were used for decorations,

Good afternoon, needlewomen! My name is Natalya. Today I post my work for the first time. I have been interested in knitting for about 20 years. This year I knitted summer hats for the first time. I took the cap pattern from a magazine. Threads are 100% cotton. Thread consumption

Cap size: for OG 49-51 cm. For knitting you will need: 100 g of cotton with acrylic (50% cotton, 5% polyacrylic, 125 m/50 g), hook No. 3.5. To start knitting, close 4VP into the ring with a connecting stitch. Do 2 VP lifts

To knit a cap you will need: 50 g of yellow yarn, 25 g of green and red, a little black and brown (100% cotton, 170m/50g for motifs and Bruges ribbons, 250m/50g for mesh); hooks No. 1;

A white cap for a boy - the work of Olga Sverdlova was submitted to the competition in the category "hats for boys". Cap size 52-54. The cap is knitted according to the yarn pattern Pekhorka - Brilliant Summer (100g. 380m.) 1 skein, hook No. 2. Cap knitting pattern:

Hello! My name is Alexandra. For the competition I knitted a cap for a boy. This is such a charming hooligan I turned out to be. I used 100% cotton thread and a No. 2 hook. Cap size: 48-50. The cap is knitted very quickly and easily!! Cap knitting pattern:

Hello! My name is Tatyana Sakadina. I would like to show you my work for the summer hat competition. The cap was knitted for my friend’s son (about 1 year old, head circumference 42-44 cm). I needed: threads - acrylic 100% 100

Hello! My name is Yanina, I live in Cherkassy (Ukraine). Knitting is a hobby and recreation for me. I love crocheting. So I decided to submit my work to the competition. We also wanted to get ready for the football Euro. The idea was spotted on the Internet and made for

“Hello! My son is almost two years old. To participate in the competition, I knitted him this green cap.” - writes Irina. You will need: Semenovskaya yarn "Lily" (mercerized cotton - 100%) - 50g green and the rest of blue,

Knitted baseball caps are a model for women who want to look sporty and youthful even in the winter season. Crocheting a baseball cap is not at all difficult. Knitted baseball cap "Creative 3" So, let's start knitting a baseball cap.

Crocheted Rastafarian cap - the work of Tatyana Belenkaya (Tonika). The cap is knitted to order; Tatyana does not plan to wear it herself. The cap is knitted with single crochets without broaches. The bottom diagram can be seen in the article Jacquard hat with poppies. Tatiana

Bright crocheted cap - the work of Svetlana (LuchikSveta). I knitted this cap to order, they told me: “Make something beautiful, I trust your taste.” After looking through magazines with napkin patterns, I chose a suitable base and the result was an openwork cap.

Knitted cap for a girl - the work of Marina Milokumova. Marina writes that she crocheted a cap for the first time, and her daughter liked it so much that she asked for a scarf as well. YarnArt Color Garden (40% wool, 60% acrylic) -

Hello! My name is Svetlana. I am from the city of Omsk. I want to show you my work. I knitted this coat and cap for my son for the summer. Knitted cap for a boy. Knit a circle of the required size according to the pattern. Next, knit 4-5 rows

Yarn consumption: 150 g of p/w yarn (220 m/50 g), red, orange, yellow, light green, blue and dark blue in 3 folds for a beret and 300 g for a scarf. Hook No. 4.5. Tie with thread in 3 folds 70

Knitted cap size: head circumference 56 cm. You will need: 100% wool yarn, color 155m/50 g, three colors (orange - A, yellow - B and brown - C) 50 g each; hook No. 3; plastic visor and
Crochet cap, models from the Internet
Crochet cap for girls. How to knit a visor
Cap for a girl with a flower and a rhinestone in the shape of a heart.
Crochet cap for boy
Yarn SOSO-white and Kamtex-blue and blue (the same yardage as SOSO)
Bottom 16cm (on average 50cm; 3 years old), hook 1.5.
Stylish crochet cap
You will need: 220 g cream yarn; hook number 5.
Crochet cap for girls /by Marina Piskulina/
What kind of girl would be in the spring without a cap? flirt This little girl will definitely welcome spring in a new hat, or rather a cap.
Material: CHARM Vita Cotton (100% mercerized cotton), 3 skeins, hook number 5. Knit with thread in three layers (from three balls).

Crochet red cap for boy
We thank Zvezdochka from Osinka for the description! According to this description, even a beginning knitter can crochet a cap.

Crochet women's cap
You will need: 100 g blue Oro yarn (50% wool, 50% cotton, 115 m/50 g); hook No. 5.5; 2 white buttons with a diameter of 2.8 cm.

How to knit a cap:
Using crochet number 5.5, knit 4 initial airs. p., perform 15 tbsp. s/n in 1st air. p. and close 1 connection into a ring. Art. to the 4th air. p. = 1st circular r. 2nd circular row: 3 initial air. p., double each loop, while performing alternately 1 relief st. s/n, made behind the front and back walls (= st. s/n, while inserting the hook from front to back or back to front around the st. s/n of the previous circular row, respectively) = 30 p. + 3 initial air. p., they are considered 1 loop = 31 p.
Mark the beginning of the round. Next, knit in spiral circular rows, while constantly shifting the pattern by 1 p. and doubling 39 times every 5th p. = 70 p. Then knit without adding. Approximately 18 cm from the cast-on edge, finish with 1 circular r. Art. b/n. For the upper side of the visor, opposite the beginning of the circular row, start with a new thread in two folds and perform 22 stitches. b/n, while inserting the hook only behind the front walls of the loops. Next knit st. b/n in straight rows, with 1 stitch less in each row on both sides. After 5 r. from the beginning of tying, finish the work.
Knit the underside of the visor in the same way, but insert the hook behind the back walls of the loops. Tie the edge of the cap with 1 circular p. Art. b/n, while connecting the upper and lower sides of the visor. Using a thread in 3 additions, tie a chain of air. p. 15 cm long and sew it to the base of the visor. Sew buttons to the ends of the chain.
Crochet captain's cap for baby

Crochet cap with cones
Description of the model: OG46-50cm, size varies depending on the yarn and the size of the bottom.
The cap, in my opinion, turned out to be very original, the visor is reinforced, so it does not wrinkle or deform when worn.
You will need:
- yarn “Yarn Art” Gold white (92% acrylic, 8% metallic polyester / 100 g)
- hook No. 2 (I have an Addi hook)
- sewing thread and needle
- silicone thread for beading and a large needle - these are needed so that the product stays on the head better (especially if it’s a little big) and does not stretch
- knitwear for lining (an old T-shirt, for example, will come in handy)
- To strengthen the visor, for example, a corner folder (in two layers) or a plastic napkin for hot food is suitable.

Crochet duck cap. Author Rozetka
The pattern is the simplest - fillet mesh, double crochet through one air loop.

Master class on crocheting a cap for a girl
Materials used: Soft Cotton yarn (Vita Cotton) white 1 skein, remains of blue and pink Alize Bell, green VITA cotton COCO yarn, half beads, monofilament, fishing line 0.3 and 1 mm, elastic band, hook.

Two crochet caps for boys
Crochet women's cap

Crochet caps with patterns from Japanese magazines:


Crochet cap, job description
Using pattern 26, knit the bottom of the cap.
Attention! The diagram shows 18 rows with expansion.
Depending on the thickness of the yarn, as well as the knitting density. You can increase (decrease) the number of rows of the bottom. After its diameter is 32 cm, knit one or two rows exactly, and then start decreasing along the same lines where there were increases on the bottom. The principle of making decreases is shown in diagram 26 a. The width of the decrease area should be about 9 cm, that is, approximately such that the circumference of the lower edge of the cap is equal to the circumference of the head. After this, make the final fit on the head by knitting several rows of SC (1.5 cm in height), as well as a twisted cord 120 cm long and pulled along the lower edge of the headdress.
Then calculate the visor by making a sample in stocking stitch, and knit it from two identical parts using partial knitting, first with shortened rows and then with longer ones (for the principle of calculating and knitting the visor, see the description of mod 1). Insert the knitted plastic visor inside and sew it to the finished cap. From yarn, cut threads 40 cm long, weave them into braids (4 pieces), sew them to the center of the bottom. Embroider the side of the cap with rhinestones. Attach one of them to the top of your head.
Twisted cord
Cut several strands of yarn that are three times the length of the cord you need. Tie both ends, pulling the threads with equal force. Hook or pin one end to something and insert a knitting needle into the other. Rotate the knitting needle until the threads are twisted properly. Fold the cord in half, keeping it taut to prevent it from tangling. Tie both ends together, let the cord twist, and then straighten the strands. Model by Roman Delivron.
Video crochet cap
Crochet baby cap
This cap model is suitable for both boys and girls. Cap size: for OG 50 cm.
The visor is plastic. The cap is crocheted No. 2 with single crochets from the Kirov plant Violet yarn (75g/220m). Keeps its shape perfectly and is suitable for knitting hats and bags.
Crochet cap for summer
The cap is knitted from bobbin yarn (300m/100g), hook number 2 and 1.5. The upper part is crocheted with No. 2 crochet hook, and the visor with No. 1.5 crochet hook.
The size of the cap for exhaust gas is 50 cm.
The video should load here, please wait or refresh the page.
Women's crochet cap
Yarn 100% cotton, 75g/220m, hook number 2. You will need 130g of yarn. On exhaust gas 54 cm.
The video should load here, please wait or refresh the page.
Do you want to knit a warm crochet cap? This headdress is quite suitable for autumn and winter, because in essence it is the same crochet beret, but with a visor.
Crochet cap will turn into a fun activity when you understand how different some cap models are from others. The style depends on many factors: the depth of the cap, its volume, the size and shape of the visor, the presence of a band. Patterns for knitting caps are also varied: if you plan to knit a voluminous headdress, like a beret, then you can choose smooth patterns. But the smaller the hat, the more it requires textured patterns, for example using lush or embossed columns.
A crocheted cap is suitable not only for children and women, but also for the stronger half of humanity. If you need a men's crocheted cap, then take a closer look at the fifth model, crocheted by Elena Ostapenko. This is a cap of small volume, but deep, and with a high band.
In today's selection you will find patterns, descriptions and master classes on crocheting caps:
How to crochet a cap. Schemes, descriptions and master classes
1. Crochet cap made of lush columns, Japanese pattern, published on Nastika's blog.
2. Crochet women's cap, Japanese pattern published in the "Craftswomen's Club".
3. Crochet voluminous cap, description from Olga_Olenka.
Let's pamper ourselves and our loved ones with hats for the autumn season:
Stylish women's cap with a crochet cap, Cap with a visor, Women's cap with a visor, Beret with a relief pattern


Gorgeous and stylish cap with a crochet visor, made of thick acrylic yarn in graphite color. The cap is knitted in the round, and in the description you will find knitting patterns that will greatly simplify the work. The size of the cap is designed for a standard female head. This cap can be knitted literally in one evening. Treat yourself to a new thing!
Dimensions
One Size: Standard Women's Head Circumference
Materials
Bernat® Softee® chunky™ yarn (100% acrylic, 100 g/99 m) 1 skein, hook 6.5 mm and 9 mm
Knitting density
7 tbsp. b/n and 8 rows = 10x10 cm crochet 9 mm
Description
Note: at the beginning of each circle you need to cast on 3 air loops for lifting.
Crochet cap
Using a 9 mm hook, cast on 4 air loops and knit in a circle according to pattern 1, completing 10 circles, you should get 36 loops. After this, cut and fasten the thread. For the visor, using a 6.5 mm hook, attach the working thread using a connecting post to the 8th loop of the 10th circle of the cap and knit according to the pattern in 2 rows. Having completed 7 rows, begin knitting the eighth, which is done in a crab step, that is, knitted from left to right. Cut and fasten the thread.
Cap with visor
A classic cap with a visor for any occasion. The cap is crocheted in the round in one of the simplest ways - single crochet. It is recommended to use wool yarn.

Dimensions: Head circumference: 52 cm
Materials
Pierrot Yarns Soft Merino Bulky yarn (100% merino wool, 40 g/40 m) black, 6 skeins, 4 mm hook
Knitting density
15.5 p. and 20.5 r. = 10x10 cm art. b/n
Description
Upper part: cast on 6 sts, join in a circle and knit 21 sts. b/n, making increases as shown in the diagram. Next, knit 14 rounds, decreasing as shown in the diagram. Knit the visor according to the pattern using 26 loops.


Women's cap with visor
Amazing cap, related crochet from wool yarn. The description shows a diagram of the main pattern, which consists of st Double crochets And relief columns.
Dimensions
One Size: Women
Materials
Yarn Patons® Canadiana™ (100% wool, 100 g/187 m) 1 skein dark gray, 5 mm hook, 2 buttons
Knitting density
14th century b/n and 17 rub. = 10x10 cm
Description
To knit the upper part, cast on 3 chain stitches, join in a circle and knit according to the pattern for 14 circles. Next, knit the bean part, repeating the 13th and 14th circles of the pattern until the height of the product is 20.5 cm from the cast-on edge, finishing with the 14th circle. Knit 2 rounds st. b/n and then for the visor knit 46 tbsp. b/n, turn the work, continue working on 46 loops, completing only 10 rows. Cut and fasten the thread. Fold the visor and sew on the buttons as shown in the photo.

You will need 220 g of cream yarn; hook number 5.
Embossed faces. column b/n. Link st. b/n, inserting the hook from the wrong side into the loop of the previous row.
Relief faces. column s/n. Link st. s/n, inserting the hook from the wrong side into the loop of the previous row.
Relief back. column s/n. Link st. s/n, inserting the hook only under the back thread of the loop of the previous row.
Knitting density 4 r. = 10 cm.
Cap: knit according to pattern 1. Knit a chain of 6 air. p. and connect it into a ring 1 connection. Art. 1st row: 3 air. p. lifting (= 1 tbsp. s/n), in the ring 15 tbsp. s/n, complete this and all subsequent circles. r.1 connection Art. to the 3rd air. lifting item (= 16 st. s/n); 2nd row: 3 air. p. lifting and into the same loop from which the 1st air was connected. p., knit 1 relief p. Art. s/n, then knit *in the next loop 2 embossed faces. Art. s/n, 2 raised purls in one loop. Art. s/n *, repeat from * to * (= 16 raised knit stitches s/n + 16 raised purl stitches s/n);
3rd row: 3 air. p. rise, in the next loop 2 relief purls. Art. s/n, *for 1 relief face. Art. s/n in the next 2 embossed faces. Art. s/n, 1 raised purl. Art. s/n in the next relief purl. Art. s/n, 2 raised purl. Art. s/n in the next relief purl. Art. s/n *, repeat from * to * (= 16 raised knit stitches s/n + 24 raised purl stitches s/n);
4th row: 3 air. p. rise, 1 relief purl. Art. s/n, in one next loop 2 relief purls. Art. s/n, * 1 relief face each. Art. s/n in the next 2 embossed faces. Art. s/n, 1 embossed purl. Art. s/n in the next 2 sts. relief purl s/n and 2 raised purls. Art. s/n in the next relief purl. Art. s/n *, repeat from * to * (= 16 raised knit stitches s/n + 32 raised purl stitches s/n);
5th row: 3 air. p. lifting, 1 relief p. Art. s/n in the next 2 sts. s/n, 2 raised purl. Art. s/n in the next st. s/n, * 1 relief face each. Art. s/n in each of the next 2 sts. s/n, 1 embossed purl. in the next 3 relief purls. Art. s/n, 2 raised purl. Art. s/n in the next relief purl. treble s/n*, repeat from * to * (= 16 raised knit stitches s/n and 40 raised purl stitches s/n). 6th – 15th r.: repeat 5th r., adding in each r. 8 relief purls. Art. s/n.
17th r.: 3 air. p. rise, then knit 1 relief p. Art. s/n in each relief st. s/n until 2 raised purls remain. Art. s/n in front of the first pair of embossed faces. Art. s/n, knit 1 relief purl. Art. s/n in each of 2 raised purl sts. s/n, without completing, and knit them together (decrease); * 1 relief face each. Art. s/n in each of the 2 embossed faces. Art. s/n, 1 embossed purl. Art. s/n in each relief st. s/n until 2 raised purls remain. Art. s/n in front of the first pair of embossed faces.

