Star news


Your ideal holiday: DIY Christmas tree decorations. Master class "New Year's ball toy using the Kinusaiga technique" Kinusaiga New Year's schemes
The long-awaited New Year holidays are approaching, on the eve of which we invite you to make Christmas tree balls with your own hands. Such a ball will not take you much time; you will definitely have time to dress up your green beauty.
Kinusaiga is a Japanese technique for creating silk paintings, an artistic genre that arose, so to speak, on the basis of economy. Or rather, Japanese frugality. Originally, it was a way to “recycle” old, worn-out kimonos.
In the modern handicraft world, based on this technique, needlewomen create boxes, decorate Easter eggs, create panels and paintings, and, in particular, decorate New Year's balls, which is what we propose to do today.
So, to create a Christmas ball we will need:
- round piece of foam plastic,
- nail scissors or a thick skewer,
- scraps of fabric,
- stationery knife for making slits in the workpiece,
- decorative braid, beads, satin ribbons for decoration.

First of all, we make marks on the ball blank along which we will cut the ball. It is convenient to divide the workpiece into slices. After this, we take a stationery knife and make not too deep cuts. We will hide scraps of fabric in them.

To make it smoother, it is convenient to use a thread by wrapping the ball and adjusting the lines that the thread forms. You can divide the ball into as many slices as you like. But the main thing here is not to overdo it and not to make too thin slices, otherwise the workpiece may crumble during the process of notching and “hiding” the fabric. The slices can be of different widths, some wider, others smaller. There is room for your imagination to run wild here.
After the ball is prepared, you need to cut the flaps, cutting the fabric into rectangles that fit the length and width of your slices. We leave a good allowance on the flaps, which can always be trimmed after the fabric is hidden in the cut. Otherwise, if you leave too little seam allowance, you may simply not have enough scrap.

The preparatory stage is over, and the fun begins. We begin to hide the fabric in the slits. In order to hide the fabric in the cuts, you can use closed nail scissors, which are very comfortable to hold in your hand.

We hide first one side of the slice, then the second. When everything is ready and you like it, we confidently cut off the remaining allowances and hide the rest in the cut.
Glue was not used here on purpose, because if the fabric pulls to one side or something gets knocked down, you can always take out the scrap and try again, achieving the best result. But if the fabric is glued, this will no longer be possible. In addition, without glue, the tension is more successful. There is one more nuance here. When you hide a piece of paper in a cut, it is better to hold the fabric with the finger of your left hand and move from the center of the piece, first in one direction, for example, to the right cut, and then to the other - to the left. If you use pressing movements to move from the middle to the edge, the fabric will lie smoother and without wrinkles. When both edges of the scrap are hidden, slowly run the scissors from top to bottom along the cuts to straighten out the small wrinkles that have formed in the places where the fabric is hidden.

Our first slice is ready. We do the same with each sector.

When your ball is completely stuffed with scraps, all that remains is to decorate the toy. The seams are closed with satin ribbons, decorative braid, a string of beads, in general, with anything you want. We hide the tails of the braid deeply with scissors into the ball itself. Deep, so that the ball, although weightless, hangs comfortably and holds itself by the loop. And don’t rush to cut the ribbon or braid. First, you need to hide one tail in the top of the ball, wrap it around the ball, and hide the second end of the braid in the same place on the top of the head, having already cut it off. Do this with each seam of the ball. On one of the seams, do not forget to leave the braid longer to form a loop.
Now, I have nothing against glitter, tinsel and store-bought toys when it comes to the New Year holidays. It’s just that sometimes we want something unique and stylish, something that we call our own. We'll take care of this.
Do you remember your first childhood toys? Mine were glass. These are dangerous for children and do not last long. But how cute and beautiful they are! Plastic toys have replaced glass toys. Their problem is that they are monochromatic, not very high quality and get boring pretty quickly. If you have a pile of boring plastic balls, I'll show you how to how to repurpose old Christmas tree decorations. I’ll also tell you how to make New Year’s toys using the kinusaiga technique.
Remaking old Christmas toys
New Christmas decorations every year at no extra cost? Easily!
We will cover some of the old New Year's toys with fabric, and some will cover them with braid and paper. This makeover opens up a lot of possibilities for the design of your tree: a Tiffany-style tree, a tree with burlap toys, a tree with turquoise or even black ornaments. After all, finding fabric, braid or paper of the right color is much easier than finding the right Christmas balls.
Christmas tree decorations made of plastic balls - materials and tools
- Plastic Christmas balls
- Textile
- Scissors
- Thread and needle
- Various braids
- Paper with notes
- PVA glue
- Acrylic paint
- Brush
- Hot melt adhesive.
Updating Christmas tree decorations with fabric
1. Take our ball and measure its diameter using tape and a ruler. The circumference of my Christmas ball is 15 cm.

2. Cut out a template from cardboard with a diameter of 15 cm.

3. Trace the template onto the fabric and cut out a circle.

4. Take a thread and a needle and make a dotted seam along the edge of the fabric. At this stage it is good to change the braid for hanging the ball on the Christmas tree.

5. Place the Christmas ball in the middle, tighten and tie the ends of the threads.

6. Take a suitable braid, cut off a small piece and glue it with hot glue around the top of the ball. After the glue has hardened, trim off the excess fabric to create a neat bun.


7. From the same braid we make a small bow and glue it to the ball.

These balls can be complemented with any decor.


Renewing Christmas tree decorations using paper
1. Take the Christmas ball and remove the hanging mount from it.
2. Take the paper, crumple it and tear it into strips. I used sheet music that I have stored specifically for handicrafts. I have already used the papier-mâché method to decorate a cardboard star.


3. Glue strips of paper to the ball with PVA glue.

4. We return the hanging mount to its place, paint it with acrylic paint in the desired color and stretch the braid.


It may seem that remaking Christmas tree decorations with your own hands will take a long time, because a Christmas tree requires at least 20-30 decorations. I dare to bet: it only takes 10-15 minutes to update one toy. If, starting in November, you spend 15 minutes on one New Year’s toy every evening, by the end of November you will already have 30 toys, and if you do two or three, then all 60 or even 90!
Christmas tree decorations made of polystyrene foam using the Kinusaiga technique
I purchased foam plastic balls when we went to. My inner drive whispered: Buy it, maybe it will come in handy! They lay idle for two years. And then I learned about the Kinusaiga technique and decided that the time for foam balls had come.
Kinusaiga originated in Japan due to the desire to reuse the rather expensive fabric of an old kimono. This technique is also called patchwork without a needle, because the scraps of fabric that are used for it do not need to be sewn. Initially, for the kinusaiga panel, a pattern is applied to a wooden plank. Then the master makes indentations of about two millimeters along the contour. Pieces of fabric are inserted into the cut grooves.
To comprehend the art of kinusaiga, we will make a more primitive thing that does not require such skill, but is no less cute.

Christmas tree decorations made of polystyrene foam - materials and tools
- Foam balls
- Small pieces of fabric
- Scissors
- Braid or rope
- Hot melt adhesive.
DIY Christmas tree decorations - progress of work
1. Take a foam ball and divide it into 8 equal parts using a rope and a gel pen.

2. Using scissors, make indentations about one centimeter along the markings.

3. Find out the approximate size of the ball divisions and prepare a template, as in the photo. The petals should be larger in size than the divisions of the ball.

4. Cut out eight petals from the fabric.
5. We apply the flap to the division of the ball and begin to compact the fabric along the indentations with scissors.

6. Cut 5 ropes or ribbons with a length equal to the diameter of our foam ball.

7. Apply hot glue along the sections of the ball and glue the tape. When there are 2 ropes left, they need to be glued so that the ends form threads for hanging.


8. We add a bow to the Christmas ball.


Another portion of handmade New Year's toys is ready.

In the next master class I will show.
Have you already decided what you want your Christmas tree to look like this year?
On the eve of the New Year, it is very important to get inspired and make something beautiful with your own hands to please your family on the holiday, while at the same time passing the long autumn evenings. Maybe my master class on a New Year's toy using the Kinusaiga technique will inspire you too.

To make a toy using the Kinusaiga technique, we will need the following:
- foam ball,
- several types of fabric matching each other in color and quality,
- a stationery knife, small scissors or a thin nail file (whichever is more convenient for you),
- various ribbons and laces in color for the final decoration of the ball,
- and also scissors, a ruler, a pen.

So let's get started. First, we find the poles of the ball. I took a ball with a diameter of 8 cm. We stick a tailor’s needle into the poles, then stretch a thread between them and draw it along the contour with a pen. And so on from all sides. I drew 8 stripes on the ball to make 8 parts. Everything needs to be done as carefully and evenly as possible so that all parts are the same.

Now take a stationery knife and cut along the marked lines to a depth of about a centimeter.

The technical part is over. Time to use your imagination. I took three types of fabric: golden, green and black with a floral pattern. Fabrics that match each other. We take the fabric and cut off a piece of arbitrary shape from it, approximately the size of our drawn slice on the ball plus 1.5 centimeters on the sides. To save fabric, you can prepare a pattern, or you don’t have to waste time, and then just cut off everything unnecessary. Now, using a nail file, we insert the edges of the fabric into our slits.

We do it carefully, without folds, cut off the excess and finally hide all the edges.

Take another fabric and do the same. By filling all parts of the ball with pieces of fabric, we get this “raw” ball.

Now you need to make a real holiday attribute out of it. Take a golden ribbon or lace and fasten the end on top of the ball in the center. I used PVA glue.

Now we wrap all our slits with lace, gluing the lace with glue in places so that it does not slip later.

We place a thin satin ribbon to match the green fabric on the needle in the same way.

and attach it to the center of the ball. From the lace that we have already used, we make a loop and fasten it, this will be the ball pendant.

We make a wider bow from a golden ribbon and also attach it to the ball with a needle.

In my opinion, it turned out to be a wonderful New Year's ball.
Making such a ball with your own hands is not at all difficult. We all have scraps of unwanted fabric at home. The main thing is desire and a little imagination. It’s so nice to give such a gift to your family and friends with your own hands!
 Or make it fancy
.
Or make it fancy
.
Kinusaiga is a patchwork without a needle, and patchwork is a technique in which a whole product is made from pieces of fabric. As you may have guessed from the name, Kinusaiga is a Japanese technique like origami and kanzashi. In this article we will look at how to make a painting using the Kinusaiga technique with your own hands. It is worth noting that the fabric must be thin and non-stretchable, for example: silk.
You will need: polystyrene foam, scraps of fabric of various colors, ruler, scissors, glue stick, stationery knife, nail file, carbon paper, felt-tip pen, push pins.
Master Class

The original painting using the Kinusaiga technique is ready! I recommend watching this video!
You will need: a template for a panel, a board, polystyrene foam, scraps of fabric of various colors, a ruler, a simple pencil, scissors, a glue stick, a stationery knife, a nail file, carbon paper.
Master Class

The kitchen panel using the Kinusaiga technique is ready! I recommend watching this video!
You will need: a template for a panel, a board, polystyrene foam, scraps of fabric of various colors, a ruler, scissors, a glue stick, a stationery knife, a nail file, a simple pencil.
Master Class

The panel for the children's room using the Kinusaiga technique is ready! I recommend watching this video!
Kinusaiga schemes
As you understood from previous master classes, all paintings using the Kinusaiga technique are made according to the same principle. The difference between kinusaiga paintings directly depends on the chosen pattern or scheme. If the painting is large in size, contains a huge number of different details, all kinds of bends, then it will be difficult for a beginner to do high-quality work the first time. Start with the simplest thing, and then move on to the complex process and then everything will work out. Now look through the diagrams for creating delightful masterpieces using the Kinusaiga technique.
Kinusaiga ideas
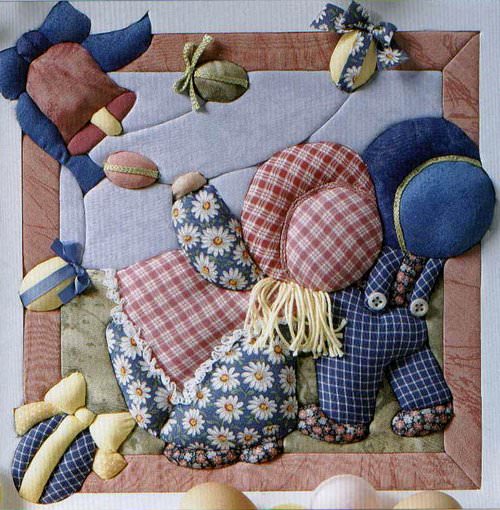
Using the kinusaiga technique, they not only make paintings and panels, but also decorate boxes, book covers, and even assemble Christmas tree decorations. It is worth noting that you can use paints, felt-tip pens, pencils, add details and fill in the gaps. You can also use padding polyester to add volume and realism to some parts of the picture. And also, be sure to decorate the kinusaiga with decorative elements - beads, beads, sparkles, ribbons... Look through the photo gallery and get inspired by kinusaiga ideas!
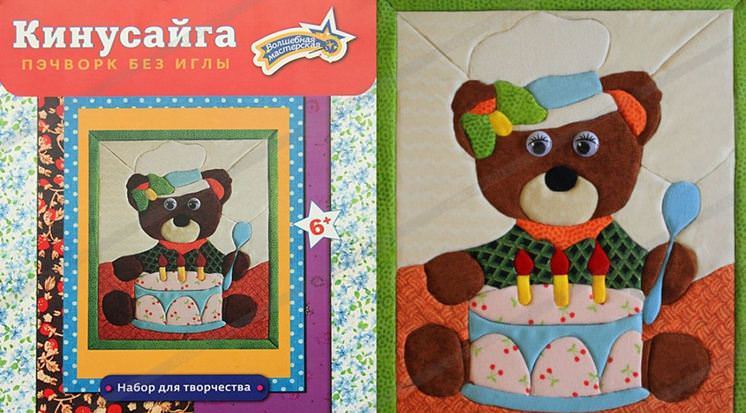
If you don’t have fabric or don’t know where to get foam, don’t despair! There are special Kinusaiga sets. They are intended for both beginners and skilled craftsmen. You can purchase them at an office supply store or online store. And this is what they look like.
Fantasize, create your own drawings, think through the design and be better than Japanese needlewomen! Create masterpieces with your own hands and surprise those around you.
Needlewomen know. But many have only heard of what kinusaiga is. The unfamiliar magic word actually means the art of making paintings from silk scraps. A kind of patchwork, only without a needle. This type of needlework was born in Japan. At the origins of Kinusaiga was Setsu Maena, a professor at a Japanese university. Over time, kinusaiga spread beyond the borders of their homeland and European craftswomen immediately adopted this technique of creating beauty with their own hands. How can you pass up creating amazing things from scraps and remnants of silk fabric? Simply put, European needlewomen acquired the art of creating masterpieces while saving on expensive materials.
At the origins of Kinusaiga was Setsu Maena, a professor at a Japanese university.
Kinusaiga or patchwork without a needle: details about the technique and tools that are needed
The kinusaiga technique does not involve the use of a needle as in the patchwork technique, but is based on making a sketch on paper, which is then transferred to a wooden board.
A slot is made along the contour of the sketch - a recess. After that, the picture itself is made using scraps of silk. The Japanese women took these pieces of silk from old kimonos, which the thrifty Japanese never threw away - silk, after all.
The shreds are laid out on the cut elements of the sketch and the edges of the shreds are pressed into these same slots. With the right selection of paints and colors, the paintings turn out to be of unique beauty. And it would seem - scraps of an old kimono! We can say that the natural economy of the Japanese became the parent of this art - kinusaiga.
Gallery: kinusaiga (25 photos)


Kinusaiga: master class (video)
How to make a painting on polystyrene foam from fabric with your own hands: a master class for beginner needlewomen
How to make a picture in the New Year style in patchwork for children? New Year's patterns always look beautiful and festive. We can talk about the art of kinusaiga for a very long time. But it’s better to see how to make at least a small masterpiece with your own hands. Below is a technique for creating a painting on foam plastic for beginners.
What you will need to start the master class:
- foam sheet (thickness not less than 1 cm;
- scraps of fabric of different colors;
- scissors;
- stationery knife (scalpel);
- nail file (for threading fabric into foam);
- sketch (your own or you can take any ready-made one);
- carbon copy.
The fabric should be selected to be non-stretchable and thin enough. The edges should not fray.
First, look at what is in stock: old scraps, leftover fabrics that were not thrown away after sewing some wardrobe item. Everything will go to work. If checking the storerooms did not give any results, then you will have to take whole pieces and cut out the elements of the planned picture from them.
Process:
First you need to decide on a drawing. For the first time, you should not choose something complex, with many elements. Let these be light geometric shapes. And from them you can already build a small cute house.


Using a sheet of copy paper, you need to transfer the sketch onto a piece of foam plastic.

Using a knife or scalpel, make a cut along the contour of the sketch to a depth of about 3 mm.

Cut the selected fabric into pieces of the desired size. Using a nail file or something more convenient, tuck the pieces of fabric into the foam sheet. Thus fill the entire “picture”. The edges of the fabric should fit tightly into the slits.

Cut off the excess edges of the foam with a scalpel or a stationery knife.

Next, the resulting panel can be framed. It can be purchased, or you can make it yourself. If there are suitable materials. You can simply make a border using decorative tape, which you need to secure with beautiful pushpins. These buttons are sold at any office supply store. Buttons in bronze or gold colors look beautiful.


The kinusaiga technique is often used to decorate lids for boxes or boxes (for example, for sewing accessories or cosmetics).


Stunning Christmas tree decorations and crafts are made using this technique.

Kinusaiga: simple patterns and their execution
Kinusaiga allows the use of any scheme that is at hand. You can buy templates, or you can make them yourself. The easiest way is to use stencils. As an example, below is a Kinusaiga master class using a simple template.
To complete this handicraft you need:
- A3 size cardboard;
- A4 size cardboard;
- scraps of fabric of different colors;
- padding polyester;
- glue;
- nailfile;
- threads;
- needle;
- scissors;
- acrylic paints;
- thin brush;
- cord (soutache) of different colors;
- pins;
- frame.
Scheme for creating a painting:

In your work, you can use any scraps that you can find.
- The drawing must be transferred to tracing paper. Cut into component parts - parts.
- After the division is completed, you need to number the parts of the drawing. Then cut out fabric elements using them. You need to leave a 3 mm allowance along the edges.
- Then prepare the canvas for the future painting. For this purpose you need to take a sheet of ceiling tiles. The thickness should be half a centimeter. Glue the sheet onto thick cardboard.
- Glue the second copy of the drawing, which was printed in advance, to the foam. Cut a groove in it, the depth of which should not exceed 2 mm, along the contour of the sketch.
- Apply glue along the cut grooves with a glue stick. When performing this Japanese handicraft for the first time, it is recommended to apply a glue stick to the entire surface.
- Next comes the process of creating the appliqué: the edges of all parts prepared from fabric must be pushed into the grooves so that the edges plunge into the grooves and are tightly fixed there.
Some ideas and patterns for decorating a kitchen using the kinusaiga technique
Below are sketches and diagrams for designing and decorating the kitchen with Kinusaiga paintings.


This whole application is not done quickly, but the result is worth spending time on. Embroidery with needles takes much longer than paintings made using the Kinusaiga technique. When the basis of knowledge of the Kinusaiga technique is fixed, you can take on more complex panels and paintings, which will definitely decorate your home and become an excellent gift for any occasion.
With the spread of the art of kinusaiga throughout the world, specialized stores began to open, which began to sell tools for this type of needlework. Special sets of fabrics also appeared on sale (not every European has an old kimono at home that can be used for scraps).
In addition to fabrics, you can also purchase combination sets in such stores, which include tools, fabrics and drawings - sketches of varying degrees of complexity. Such sets are designed for both beginning needlewomen and those who have been practicing this art for several days.
Here's what these sets look like: