Star news


Crochet patterns rib knitting pattern. MK: how to crochet an elastic band from embossed posts
If you are interested in crocheting and mastering new techniques, you need to learn how to knit an ordinary elastic band. This element is indispensable for knitting mittens, hats, socks and sweaters. The elastic band is designed to ensure that the crocheted fabric is elastic and does not deform when worn.
How to tie an elastic band. Easy way
If you knit an elastic band, then everything is simple, but to knit the same product, but with a crochet, difficulties arise.
In fact, there is nothing complicated, you just need to carefully study the step-by-step recommendations:
- You will need a skein of thread and a hook.
- Tie a regular chain, it consists of air loops. It is necessary to knit 10 air loops and 1 more (lifting loop).
- Now look carefully at the chain. Each loop consists of 2 walls: front and back. The first one is easy to see because it is closer than the back one.
- There is also a lower broach (thread, or jumper).
- To learn how to crochet an elastic band, you need to know how to knit a connecting stitch. Knitting an elastic band begins with this. It is necessary to knit a connecting post into the thread (broach) and so on until the very end of the chain.
- You should have a beautiful lace.
- Turn the product: the 1st loop will be air. Then we knit the next row with connecting posts; now we need to knit it for that part of the loop that is located in the background (this is the back wall of the loop).
- Knit 10-15 rows in the same way.
- It turned out to be a beautiful cross elastic band. Take this nuance into account when you knit items. Let's say, to crochet a scarf, you need to start casting on loops from the long side of the product.
Crocheted elastic band
To learn how to knit such an elastic band, you need to be able to knit concave stitches and convex stitches (raised, purl/knit). This elastic band turns out more beautiful than a regular one, it holds the shape of the product better and does not have to be knitted lengthwise (a regular elastic band needs to be knitted along the product or knitted separately and then sewn on).
Learning to knit an elastic band:
- knit a chain consisting of 40 chain loops (we cast an even number of loops, this makes it easier to knit an elastic band);
- insert the head of the working tool into the 4th loop from the edge and knit the 1st row with regular stitches (single crochet);
- to make a beautiful elastic band, be sure to knit 2 air loops at the end of the first row;
- turn the product over, the next row: the hook must be inserted from the front side of the product under the column of the 1st row;
- Next we knit a convex double crochet;
- to the end of this row you need to knit alternate stitches;
- complete the 2nd row with 2 lifting air loops and after that you can turn the product over to continue knitting the next row;
- The 3rd row of elastic is crocheted in exactly the same way as the 2nd, it is necessary to alternate a convex embossed double crochet stitch and a concave one (also double crochet). And so on until the very end. At the end of each row, do not forget to add 2 lifting air loops.
Quite often, products require knitting an elastic band, because elastic is an essential element of many knitted items: sweaters, hats, skirts, mittens, socks, etc. Crochet elastic bands allows you to get a more elastic fabric that can stretch and shrink.
How to crochet an elastic band? Beginning needlewomen often have this question. Knitting an elastic band with knitting needles is very simple. But when crocheting elastic bands, many may have difficulties. This step-by-step lesson, in which I will describe the stages of knitting, will help you understand a lot and you will learn how to crochet an elastic band.
There are several patterns and methods of knitting elastic. Let's look at some of them with examples and photographs.
Embossed crochet elastic band- this is an alternation of embossed front (convex) and embossed purl (concave) stitches, the knitting of which we studied in the last lesson (see).
Let's try to knit a 1x1 elastic pattern using this pattern:

We cast on an even number of loops, insert the hook into the 4th loop of the chain from the hook and knit the first row with regular double crochets.

The embossed double crochets correspond to 2 lifting air loops. Therefore, at the end of the 1st row we knit 2 vpp, turn the sample over and start knitting the 2nd row.

Insert the hook from the front side from right to left, under the double crochet of the previous row

and knit a raised double crochet,


and knit a relief purl (concave) double crochet.


At the end of the 2nd row we knit 2 vpp, turn the sample over and start knitting the 3rd row.

We knit the 3rd row similarly to the 2nd, alternating a raised double crochet

and embossed purl (concave) double crochet


This is what my crocheted elastic band sample looks like. This is a 1x1 elastic band.

Relief elastic can be knitted with various alternations of front and back relief stitches, for example 1x2, 2x2, 1x3, 3x3, etc.
This is what the elastic pattern looks like with alternating 2 embossed knit stitches and 2 embossed purl double crochets.

Knitted 2x2 rib pattern.

You can also knit air loops between the relief columns according to this pattern:

In this case, the elastic will be softer and more elastic.

There is another way crochet elastic bands. Collect a chain of v.p. and knit the first row with b/n stitches, then rows of b/n stitches are knitted in the same way, only the hook is inserted not behind both walls of the loop, but all the time behind the back wall (see how to knit behind the back wall of the loop).
The elastic band turns out to be more elastic, however, there is one drawback when knitting such an elastic band; this elastic band is knitted along a chain of air loops, forming horizontal relief stripes,

therefore, it is knitted separately from the product, then sewn together.
Good luck with your experiments!
http://my-crochet.ru/kak-svyazat-rezinku-kryuchkom.html
Elastic is an essential part of many knitted products. Without it, you cannot knit mittens, socks, hats, or sweater necks, because it is elastic and can stretch. The elastic band gives a finished look and can decorate the product. This knitting technique is used to create ribbed ribs. The crocheted elastic band in the circle provides smooth, barely noticeable transitions (from the cuff, collar or belt to the main pattern) and there is no need to sew it. The main idea of knitting is the sequential alternation of embossed purl and knit stitches.
The hook must be selected depending on the desired knitting: if you need to knit a dense fabric, then use a smaller hook, and if the knitting needs to be large, then a larger hook will do.
Types of elastic bands
Horizontal elastic band used mainly for knitting hats, headbands, and bracelets. It is inconvenient to knit a neckline from it, because it is knitted separately and then it will need to be sewn on.
Cross elastic. Looks like knitted. You can knit it in several ways - with connecting stitches, single crochet and half double crochet.
Embossed elastic band. It is not very elastic and elastic, but it looks very beautiful. To knit it you need a hook of the selected size and yarn.
The elastic band is crocheted in the round using purl and knit stitches. Knitting pattern:
Description of the knitting process.
Cast on an even number of loops, insert the hook into the 4th loop of the chain from the hook and knit the first row with regular double crochets.

The embossed double crochets correspond to 2 lifting air loops. Therefore, at the end of the 1st row, knit 2 vp, turn the sample over and start knitting the 2nd row.

Insert the hook from the front side from right to left, under the double crochet of the previous row.

Knit a raised double crochet stitch.


And knit a raised purl (concave) double crochet.

Knitting the front and back embossed stitches alternates until the end of the row.

At the end of the 2nd row, knit 2 vp, turn the pattern over and start knitting the 3rd row.

The 3rd row is knitted similarly to the 2nd, alternating with a raised double crochet.
And a raised purl (concave) double crochet.

Knit the elastic similarly to the pattern.

This is what a crocheted elastic band sample looks like. This is a 1x1 elastic band.

Relief rib can be knitted with various alternations of knit and purl relief stitches, for example 1×2, 2×2, 1×3, 3×3, etc.
This is what the elastic pattern looks like with alternating 2 embossed knit stitches and 2 embossed purl double crochets.
Knitted 2×2 ribbing pattern.

You can also knit air loops between the relief columns according to this pattern:

In this case, the elastic will be softer and more elastic.

Video on the topic of the article
Knitting video can be seen here:
Similar articles:
Irish lace is considered one of the most difficult crochet techniques. This article will describe how to knit a dress from Irish lace with the pattern...
Handmade crafts are becoming more and more relevant every day and are acquiring greater value among craftsmen, collectors and ordinary...
Elastic is one of the most important elements of most products. It is used when knitting a variety of things, from sweaters to hats, giving the desired shape and improving their appearance. Crocheted elastic is a beautiful pattern that can be made in a variety of ways.
Elastic knitting is quite common and does not raise any questions. Crocheting is also easy. There are two main ways to do it. Visual diagrams and a simple master class will help you master them.
First method: master class
Elastic made in this way is characterized by the greatest elasticity. It is performed in columns without yarn over . The knitting pattern is very simple. Using air loops, a chain of the required length is assembled, the first row of columns is made without yarn over , the work is turned over and all subsequent rows are knitted behind the back wall of the previous ones.
Knitting this way has its drawbacks. The rows are made across the product, i.e. the chain of air loops will be equal to the height of the elastic band. It is usually knitted separately from the product and then sewn on.
Second method: master class
This method is called embossed crochet elastic. When done, a beautiful pattern is obtained that will decorate any product. But you need to take into account that it will be less elastic than the one performed in the first way. Knitting is done using relief columns. Their designations are shown in the diagram.
The basis will be a series of columns with yarn over - first row. The second and each subsequent one begins with two air loops. Basic techniques used in the work:
- knitting a convex column: the hook is inserted from the front side of the product.
- knitting a concave column: the hook is inserted from the wrong side of the product.
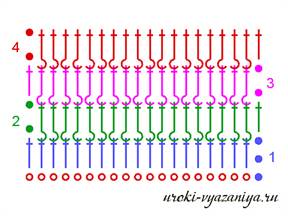
Relief knitting is done in different ways. It can be knitted by alternating one convex and one concave column. The result will be a 1 by 1 pattern. The knitting pattern is shown below.
If you alternate two convex and two concave columns, you get a 2 by 2 pattern.
Embossed elastic can be crocheted with the addition of air loops. In this case, the pattern of the canvas turns out beautiful, but it will serve more of a decorative function. The elastic can also be made in a 1 by 1 or 2 by 2 pattern.
The knitting patterns of such patterns are clearly shown in the diagrams.
Convex crochet post: master class
A thread is thrown onto the tool and it is inserted under the body of the column of the previous row from right to left from the front side of the canvas. 1 loop is pulled out and knitted together with yarn over which was done earlier. Once again the thread is thrown and knitted through the two remaining loops. The implementation of a convex column is clearly shown in the figure.
Concave crochet post: master class
A thread is thrown onto the tool and it is inserted under the body of the column of the previous row from right to left from the wrong side of the fabric. 1 loop is pulled to the wrong side and knitted together with yarn over . Once again the thread is thrown and knitted through the two remaining loops. The implementation of a concave column is clearly shown in the figure.
The above diagrams and master class will help you crochet an elastic band. The resulting beautiful pattern will decorate your product.
Crochet elastic is one of the most popular knitting elements. It is used in many handicrafts, but most often, of course, in clothing. Socks, mittens, sweaters, hats - it’s hard to imagine these common wardrobe items without such an element as a crochet elastic band. It can also be used in decorations or useful household items - bags, covers and other small items.
There are several ways in which a crochet elastic band can be made; we will look at a description of the main options in this article. The rest are only derivatives of two options, so there is little point in talking about them.
The first option is quite simple and is characterized by good elasticity. In it, the crochet elastic band is a fabric knitted using single crochets (sc) as follows: a chain of chain stitches is cast on, the first row of sc is knitted. Then the work is turned over, two lifting loops are cast on and the second row of sc is knitted behind the back half loop. Further work proceeds according to the same scheme. The result is a relief canvas, often narrow and long. With this method of execution, the elastic band is crocheted separately from the product, after which the parts are sewn together.

The second option for knitting an elastic band is slightly less elastic. But, unlike the first, it can directly continue the product without the need for subsequent stitching. This method is called “embossed elastic crochet”. The name comes from the knitting method. This technique uses relief stitches (rsn), which differ from the usual ones in that they are knitted not by the half loops of the base, but directly by the post itself.

There are front (convex) and back (concave) patterns. It is precisely by alternating them (mostly 1*1 or 2*2) that the required elastic texture is achieved.
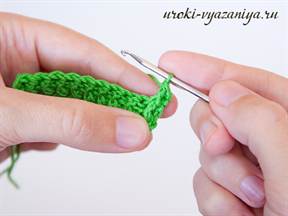
The front stitch is performed as follows: the hook (with a crochet) is inserted into the fabric from the front side, goes around the stem of the column, and comes out from the wrong side. In this position, he grabs the working thread and pulls it out. After this operation, there are three loops on the hook, and then knitting proceeds as in a regular double crochet.
The purl pattern is made according to the same pattern, but with one change: the hook is inserted from the reverse side of the fabric, goes around the warp column and comes out from the front side. After which the working thread is captured, pulled out and knitted.
As you can see, there is nothing complicated about knitting an embossed elastic band. However, there are a few rules to remember. If you knit in the round, then the knit stitches will be knitted above the knit stitches, and the purl stitches will be knitted above the purl stitches. But if you knit straight fabric, the rules change radically. Now the purl one should be knitted above the front one, and vice versa.
Often, based on the second method, openwork elastic bands are made (in circular knitting), alternating two types of rcn and adding air loops (ch). In this case, knitting is constructed approximately according to the following pattern: lrsn - ch - irsn - ch - lrsn - ch - irsn - ch.

