Star news


Volumetric paper snowflakes step by step technique. Do-it-yourself volumetric paper snowflakes: snowflake patterns, photos
The most popular and magical holiday awaits us soon - New Year. This is a great time for creativity. Of course, you can buy jewelry and toys in the store, but it’s better to make them yourself.
Windows are already being decorated in apartments and public institutions. Another common way of decorating is snowflakes - this is the most popular New Year's attribute.
In the previous article I already told. Today we’ll look at a few step-by-step instructions for making voluminous snowflakes.
This may seem like a complicated process, but even children can make this decor. So gather your family in your free time and start getting creative.
Do-it-yourself voluminous paper snowflakes for the New Year
First, let's look at one of the simple ways to make a New Year's accessory. You can use colored paper as a material. If you have a white piece of paper, then, if desired, color the finished snowflake.
Our result will be like this:
Fold a sheet of paper in A4 format in half lengthwise. Smooth out the bend with your hand.
Now we bend the sheet on either side by 1.5-2 cm. Don’t forget to iron the folds. After this, we turn the workpiece over and also bend it a couple of centimeters. That is, we make a kind of accordion.
We cut the resulting workpiece lengthwise. As a result, we end up with two accordions.
On each craft we draw a pattern, which is shown in the photo below. Then we cut out the paper along the marked lines.
If you did everything according to the instructions, then the unfolded blanks should look like this:
Lubricate the ends of the paper with a pencil and glue. Then we glue both parts of the future snowflake to form a kind of ring.
Now carefully turn the ring inside out and our craft is ready. When you acquire the skills, you will need a couple of minutes, no more.
Step-by-step instructions for making a simple three-dimensional snowflake
There is another easy way to make paper Christmas decorations. We will need regular sheets and glue, as well as a little patience. Involve your children in the creative process.
Now we will learn how to make a snowflake like this:
We make a perfect square from a regular sheet of paper. To do this, fold it diagonally, connecting two opposite sides to form a triangle. We cut off the lower part with scissors and set it aside, we will need it later.
Fold the second sheet in half and cut it into two equal parts.
We make squares from the two halves by analogy with the first sheet. That is, we bend them diagonally and cut off the lower part.
From the strip that we have left from the first sheet, we use the same principle to make two more small squares. As a result, we should have five blanks.
Fold the largest triangle twice, then bend it diagonally to the opposite side. Turn it over and cut off part of the workpiece diagonally along the line opposite the corner.
Now we make longitudinal lines with scissors, without cutting the workpiece to the end by 1 cm.
We perform the same actions with the remaining figures. Then we unfold our snowflakes. Apply glue to the center of the largest craft and attach the middle craft, and then the smallest one. We turn it over and glue two blanks on the other side.
New Year's decor element is ready to decorate the room
How to make beautiful paper snowflakes with your own hands
Anyone can make an original craft for the winter holiday. This is a fun activity, so you won't even notice how time flies and you will have several accessories to decorate your room.
We will need five sheets of paper, scissors and a glue stick. The craft will consist of 5 parts, so let's look at how to make one of them, and the rest according to a similar pattern.
Fold the sheet along the short side. There is no need to smooth out the bend, just make a mark by pinching the paper with your fingers, top and bottom.
We bend one side of the sheet to the mark with an overlap of 1 cm. We also bend the second side with an overlap.
Apply a strip of glue to one side with a pencil, and glue the second side of the sheet to it.
We measure 2 cm from each, and use a ruler to make folds.
Now the formed folds need to be bent inward to make it look like in the photo below.
At the next stage, fold the workpiece in half.
We put a dot in the center of the strip, then mark 9.5 cm on the right side, and 5.5 cm on the left. After that, draw lines along the marks.
We have a double bag so that the workpiece does not fall apart, we will glue it together.
After this, we make cuts along the marked lines. Cut off the excess parts of the workpiece.
If you did everything according to the instructions, you should end up with this voluminous blank for the future snowflake.
We perform the same actions in four more parts. The first one can be used as a template to cut off the corners.
Now we need to glue all the parts. To do this, apply horizontal and vertical stripes of glue. Make sure that all corners match.
Let's wait a little until the glue sets well. And then all that remains is to unfold the snowflake and glue it together.
For decoration you can use glitter, colored markers, and beads. In general, use your imagination to create a beautiful craft.
Templates and diagrams of volumetric snowflakes for cutting out onto windows
To decorate window openings, you can use not simple stencils, but three-dimensional attributes. Making them is not as difficult as it might seem.
To make the snowflakes look voluminous, you need to select a stencil, download several copies and secure them in the middle with thread or glue.
And here are the options for blanks that you can download or print by clicking on the icon at the end of the subtitle.
Click on the PDF file below and a new window will open where you can click on the download button or the printer icon to print the images.
If you can draw, then try to create a stencil with a beautiful pattern yourself. And if you want to decorate your windows with a symbol of next year, then use.
Step-by-step production of three-dimensional paper snowflakes
Let's look at another interesting option for making New Year's decorations. Like previous technologies, this method is quite simple, so even children can cope with the task.
In almost all cases, to make a snowflake we need an equilateral square. Therefore, we fold a sheet of paper in A4 format diagonally and cut off the excess strip.
Fold the resulting triangle in half twice. As a result, we get something like this.
Now we cut out the workpiece in a circle, starting from the corner on the opening side and ending with the closed side, not reaching 2-3 cm to the opposite corner.
In the same way we make two more cuts. We make another similar blank.
Carefully unwrap the craft. Glue the ends of the middle strips to the center of the template.
On the back side we glue the second part of the snowflake so that its rays are between the edges of the first part, as shown in the photo, and we also glue the middle strip of the lower part to the center of the snowflake.
The volumetric craft is ready. It can be used as a separate decoration, to create garlands or stick to windows.
How to easily make a 3D snowflake with your own hands
Beautiful decor can be made in just a couple of minutes. Several of these voluminous decorations will help decorate your interior for the winter holidays. We will need 2 A4 sheets, glue, scissors and a regular elastic band.
We make 2.6 cm marks on the two long sides of the paper. Then we fold the sheet like an accordion and cut off the excess part.
We do the same with the second sheet. After this, mark the middle of the workpiece and draw a template.
Now cut along the marked lines. Bend the accordion in the middle and use the first half as a template for drawing lines and cutting out. We make the second part of the snowflake in the same way.
We fasten both blanks with an elastic band and glue them together.
Now we unfold the snowflake and glue it along the edges to fix it in this state.
If you wish, you can stick glitter or beads on the craft.
Video with a master class on creating three-dimensional paper snowflakes
To figure out how to make a more complex accessory for the New Year, watch the video with step-by-step instructions. The whole process will take you no more than a quarter of an hour.
I tried to choose the simplest ways to create New Year's snowflakes. And remember “The eyes are afraid, but the hands are doing.” Once you start the creative process, you won’t even notice how you will have several voluminous crafts ready that will help create a festive atmosphere.
Hello, friends!

Beautiful craft “Snowflake-ballerina” with simple stencils for cutting
Have you ever seen such a miracle of nature? Yes, you walk along a path in winter, and every now and then the snowflakes seem to dance and dance like a waltz. So the masters came up with the idea of making and imitating something similar, but only from paper. The image is based on the image of a girl who dances. And she can wear any skirt you like.

Choose any beauty and cut it out of white cardboard or thick paper.


For a skirt, use these blanks. First, fold the sheet in the desired sequence:

And then choose any sample and carefully cut out the sketch. Dress up the ballerina, and then hang her on a ribbon or thread and on a Christmas tree, also hang her on a chandelier or door.


On a note. By the way, the skirt can also be made of fabric, for example mesh or organza. She also looks very gentle and charming. Is not it?

Step-by-step master class on making paper accordion snowflakes
I want to say right away that you can safely include such fluff in a New Year’s garland. Or even just decorate a Christmas tree or window with such voluminous snowflakes. And the most important thing is that even a schoolchild or a younger child can handle such a product. There should be no questions or difficulties.
We will need:
- office paper
- scissors
- decorative tape
Stages:
1. Fold a piece of paper into an accordion. By the way, you can take the advice and read above in this note on how to do this more carefully.

2. Once the accordion is folded, fold it in half. Then draw triangles like this. Take scissors and strictly cut along them.

3. Now unfold it and you’ll get a fan, but it’s very delicate.

4. Glue all the parts with glue to make a circle.

5. And also glue a loop of satin ribbon anywhere at your discretion.

6. Wait until it dries completely and then admire the wonderful gift you created in 5 minutes.

7. Here it is, a wonderful and sunny fluff made. Create at home with your children to create a festive atmosphere today.

Snowflake Flashlight: step-by-step instructions
Do you think how this is possible? Yes, I was surprised too, and then I looked at these pictures and guessed. The point is that you will need to make a three-dimensional snowflake using the accordion technique, as in the previous description, and you need to do this in two copies.

Have you guessed why? And in order to insert an LED between them, which will blink the lights and emit light. Connect the snowflakes to each other and hang them on a ribbon or thread.

Here is another reminder; you can read more in detail above, if suddenly something is not clear to you.

And here is such a charming result.


Master class of paper snowflakes Hedgehog
We will need:

Stages:
1. Print out two blanks like this on A4 office paper.


3. Now make a sun, cut towards the center along the lines. Twist each ray. At the same time, start twisting and drop a drop of glue (or apply glue with a pencil) so that it fixes. Then twist, again a drop of glue.


5. Do the same with the other rays. The first sun is ready. You will need 8 of these blanks.
Next, start assembling with thread. Using a needle, pierce the first sample in the middle, and pierce from the front side (for four toys), then pierce the second product, and so on. Having reached the fifth, turn the product over to the wrong side and make a puncture there.


6. Since the paper leaf is very thin, take the bead and put it on when all the blanks are put on the thread. Start piercing the workpieces again, but in the reverse order through all layers. As you can see, it turns out to be a prickly hedgehog. Make a knot, put on another bead and cut the thread. Your souvenir toy is ready, straighten the ball.

Volumetric snowflakes for kindergarten children
There are also craft options for very young children. For example, this could be work on a large sample. After all, snowflakes are all different in shape and width. Let these be new masterpieces made by children's hands.
To begin with, I want to show a work that is incredibly beautiful and at the same time original. Take a look.

In my collection, there are also other creations that my son and I made last year. Remember, this one))). And if you forgot, you can easily go there. The craft was made using the origami technique. It turned out wonderful and cool. Good luck!

So, let's go back and here's what you need to do with two types of office paper. Take blue and white, for example, so that there is contrast. Of course, a child cannot cope alone, but if you organize an individual lesson, then everything will certainly work out.


The next option, which will also blow your mind, and even more so for preschoolers or elementary school students. Use cardboard for strength.
We will need:
- glue Titan
- cardboard
- scotch
- pencil
- decoration
- bottle caps
- New Year's tinsel
Stages:
1. Prepare for the children these blanks already cut out of cardboard in the form of paws (or you can call them twigs) and circles.

2. You will also need to take two stars; you can use store-bought ones, or make them yourself.

3. Then take one circle and glue it to it along the diameter of the twig, in this order.

4. Turn the workpiece over and glue a star onto the circle.

5. Then, to give the snowflake volume, glue the two corks together with Titanium.

6. Then attach the lids to the template using tape.

7. Do the same with the second circle. Glue the second snowflake to the lids as well. And to hide them, decorate the lids with tinsel.

An interesting snowflake in the shape of a star using the origami technique: step-by-step work schemes
I think that all of you were fond of origami in childhood; I remember that I really loved folding bookmarks and creating all sorts of little people and animals. And of course, when the cold and frosts came, I got to work and sat painstakingly folding a leaf to get a snowflake. I made a whole bunch of them so that I could decorate my bedroom with them. Each time we got new compositions. In general, this kind of work has always given me pleasure.
Just recently, a child showed me a film, and he also wanted to create such a miracle in the form of an original and fairy-tale star. I didn’t think long and decided to insert it too and show you in this post.
But here are other options, also unusual, take note. I will be very glad if these diagrams are also useful to you.


Well, in conclusion, I want to show you another work using the modular origami technique. Gather everyone together as a family.


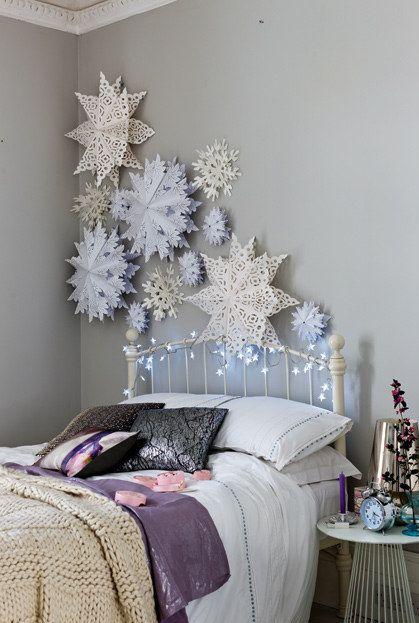
Volumetric snowflakes for decoration and decoration of the hall
Of course, when it comes to the moment when we need to decorate the premises for the holiday, we again think about how to do it. And here are some ideas that may be useful in this matter. You just need... look at the materials yourself, and your desire to create.

See the entire work process on these slides.


Well, now pay attention to this New Year's multi-colored beauty. Bravo to the master!
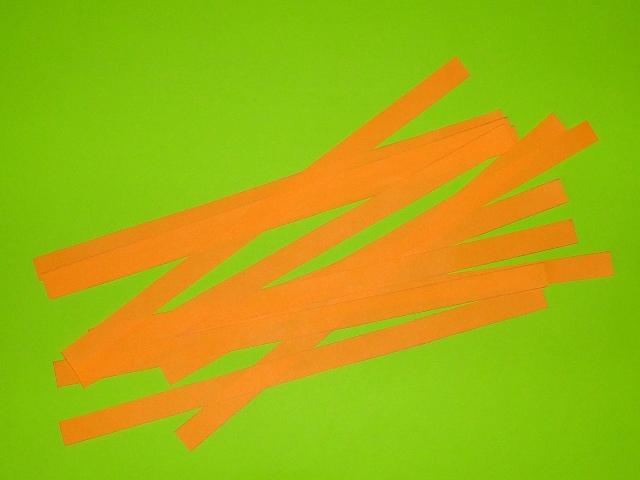
And a few more options to choose from, they are made from stripes.


Video tutorial on making snowflakes in quilling style for beginners
Now another creative work that you can easily do, turn on this video and watch. Happy viewing, friends! And most importantly, inspiration.
Ready-made patterns for printing openwork paper snowflakes
Now I’m giving you ready-made layouts, all you have to do is print them out and create. Cut out 3 identical snowflakes according to any pattern you like and sew them in the center with thread.

So, choose the model you like. Just fold it before cutting it like this.


Or you can not sew the blanks, but simply decorate them with any cotton balls for volume.


New Year's snowflake using cutting technique
Another simple way to make fluff at home. Moreover, this model is good because preschoolers like it. Since this work is similar to applique, take and glue the leaves of a napkin in a simple arrangement and you will get an amazing result.
We will need:
- cardboard
- napkins
- PVA glue
- wand
Stages:
1. To work you will need a blank, but first you need to create it. Choose any layout and cut out a snowflake, and then attach it to cardboard, outline the outline and cut it out. Or already print the template on photo paper, which is shown in the picture on the right.


You can come up with your own image, for example this one.

Now you need to cut a bunch of squares from a napkin. Size 2.5 cm by 2.5 cm.

3. Then glue them onto the workpiece using PVA glue, twisting them around the stick first and dipping them into the glue.

4. Fill the entire surface of the toy in this way.

5. After drying, the rolled squares hold tightly.

6. This is how the product will turn out, and it really turned out wonderful and snowy. It's like they caught a real one off the street.

And we built such a beauty.

Snowflake flower made from strips of paper
It’s a fairly easy and not at all painstaking way of working, but the resulting masterpiece is also amazing. For this creation you will need strips of paper that will need to be rolled into bags or cones.

And then glue them to the round base around the entire circumference.

It is advisable to take different colors and sizes of cones, as shown here. And decorate the middle with rhinestones or something shiny, such as tinsel or sequins.

It's all a matter of your imagination and ingenuity. In any case, such a souvenir looks elegant and cool.

We will need:

Each strip must be bent to form a petal, and then connect 7 petals together. It turned out to be a twig. Make 8 of these products.

Also create the middle from newspaper, in the form of such a cylinder. Tie with fishing line or secure with staples.

Then glue the prepared branches to the center.

How do you like this idea? I really appreciate it, but please share your thoughts and express your opinion.

Now consider the following works.

Consider all the actions in these photo illustrations and repeat step by step. I hope that no questions arise, and if there are, then ask.


You can take this fluff in the shape of a flower, it is much simpler than the previous one and the technique is interesting. It turns out that it really is a toy that resembles a flower.


I suggest the kids make a funny and cheerful snowflake in the form of a smiley face.
So, go ahead, both adults and children. After all, the holidays are very soon, or maybe they have already arrived, and you still don’t know how to make a snowflake? So, what are you waiting for, this note will help you with that. Add it to your bookmarks so that you can open and read it at the right time, and of course, make wonderful winter masterpieces.
Good luck to everyone, have a great mood and of course a healthy, happy New Year! Bye, my dears.
Hello everyone! Today I want to continue the theme of crafts and show you how you can easily and quickly create wonderful toys in the form of paper snowflakes at home. The other day my sons and I made such a beauty that now this wonderful creation makes us happy. Watch and do with us.
I remember how I sat and cut out snowflakes as a child; it brought me so much joy and pleasure. And then she ran and glued it to the window. Time has passed, but nothing has changed until now, I still love this activity, only now I do them with my kids.
As always, I’ll start with the simplest manufacturing options, and along the way there will be more and more complex options.
In order to create a snowflake, you only need one tool - scissors and a sheet of paper and a great mood.

Then you need to correctly fold the paper into a triangle, and then draw a suitable pattern and cut it out. You will also need a simple pencil))).
The main thing is to take a square-shaped sheet, fold it in half (1), then in half again (2), repeat steps (3, 4), almost done! Draw with a pencil what you will cut out, for example like this in this photo:

So, from this triangular blank I propose to make these magically beautiful and light versions of winter snowflakes, which you can use everywhere, even bring them to kindergarten, school and decorate rooms in your apartment, in the entrance and windows with them.
If you like everything openwork, then this look is just for you:

If you prefer classic options, then choose these wonderful snowflakes:

The following layouts and diagrams will be a little more complicated:

In general, I really liked this selection of all kinds of decorations on snowflakes, which I saw on the Internet:

Look how picturesque and patterned they are, it’s just super beautiful, and most importantly, it’s accessible to everyone, even a preschool child, a schoolchild, and even us adults.


For the little ones, you can offer this craft in the form of curls made from stripes.

Cutting snowflakes from napkins or paper
Have you ever seen those, such that the cutest snowflakes appear from napkins that absolutely everyone would like? I found these and am sharing them with you, the method is simple and easy, and also budget-friendly, you will need glue, napkins, scissors, a pencil or pen and cardboard.
Interesting! Napkins can be replaced with any other type of paper, such as corrugated paper.
The stages of work themselves are not complicated, but these pictures outline the entire sequence, so watch and repeat.
 The final result of the work will be incredibly beautiful and will be remembered by everyone, and if you decorate it with colored sequins or something like that, it will be absolutely cool.

Or this way, depending on how someone decides to decorate the original sample.

Well, now I’ll show you a rather primitive, old method; before, such cute snowflakes were used to do everything in labor lessons or in art kindergartens. You will need paper and a good mood, and of course, scissors and glue. You will need to cut long strips of paper from a regular A4 sheet, the width of the strip should be 1.5 cm and the length approximately 30 cm.

You can make these multi-colored stripes and you should get 12 plain stripes.

This is how you glue these strips together step by step.

It turned out incredibly original, you can hang it on a Christmas tree, on a window or on a chandelier))).

Another similar option made from paper strips.

I saw a friend’s snowflake made from ordinary newspaper, then you can cover it with shiny varnish or glue sackcloth.

Or you can roll cones out of paper and glue them in a circle, alternating colors.

Do-it-yourself volumetric snowflake with step-by-step descriptions
To begin with, I want to offer you this way of working, maybe you will like it better than the following:
This type of work is a little more complicated, but it is the most interesting in my opinion, because it looks Such a snowflake appears as if in 3D form. Of course, it’s time-consuming, but it’s worth it, my child and I made such a masterpiece in 1 hour. We are happy to share our step-by-step master class with you.

Stages of work:
1. You will need 6 squares of paper (blue and 6 of another white color), we took ordinary squares that we already had, they are sold as notes for notes. If you don't have these, then make your own.
Fold each square in half from one end to the other.

It will turn out something like this, and the last figure lies on the table, this is the result of the work.

2. Then fold the two ends of the paper to the fold line on both sides.

Turn the finished templates over to the wrong side.


Now turn the craft over to the other side again and push out the parts that stick out.

4. This is how it should work out, absolutely not difficult.

The next step will be to prepare 6 white squares, from which we will make the following blanks.

5. So let's start, this work is even easier than the previous one, let's make origami out of paper again.

This is how it should turn out, there should be 6 blue blanks, and also 6 white ones.

6. Well, after you have cut the white squares, fold each leaf in half by taking one end and placing it on the other.

Do it after the envelope.

7. Now turn all the envelopes over to the other side.

My youngest son also helped, and the eldest joined a little later.

8. Fold the sides.

Turn it over and fold out the sides, then fold them towards the center. Cut out a small circle from paper and attach all the modules.

9. Now start gluing.

Take your time, do everything carefully. Use a napkin.

10. Almost everything is ready, all that remains is to decorate and cheer up yourself and those around you.

So I called my eldest son for help, and this is what we did to him.

11. We glued a photo in the middle, it turned out to be such a funny and mischievous modular paper snowflake. Tomorrow we will hang this beauty on a booth in the kindergarten. It looks simply amazing and much brighter live). So be sure that absolutely everyone will like this miracle!

In fact, there are quite a lot of three-dimensional options; they can be made using the origami technique, or in the most ordinary way.
I found these on the Internet, I hope you find them useful, take paper, scissors and glue:

Here is another similar option.

If you have a lot of time, then you can make more complex voluminous snowflakes; I know that the halls of kindergartens, schools, universities, universities and even shops are usually decorated like this.
Interesting! You don’t have to glue the parts together, but use a stapler to do it faster.


Video on how to cut out a New Year's paper snowflake for children
First I wanted to show you a primitive video, and then I thought that you can easily do the most ordinary thing yourself. So I thought, I thought and... I propose to cut out an unusual snowflake in the form of an angel:
Simple snowflake patterns for beginners in origami technique
As far as I know, origami is also divided into subtypes, for example, modular paper origami. Which one do you love the most? I have some interesting ideas.
Or the simplest and easiest to do, even school-age children can figure it out:

Modular origami is already more difficult; here you initially need to learn how to fold the modules correctly, and then everything will go like clockwork.

You will need to make quite a lot of modules to put together such a composition, but you will develop fine motor skills)))

Each such module is easily inserted one after another, so you can come up with any options on the go.

All I can do is wish you good luck and creative success.

Schemes and templates for cutting snowflakes from paper for the New Year
As for the various ready-made patterns, I offer you these types of snowflakes. The main thing is to remember that first you need to fold the sheet correctly, as I showed you at the very beginning
Now outline what you want to see and cut out along the contours.

If you want to make the snowflake more voluminous, use ready-made templates, like this one:

Then for this purpose you will need to cut out 3-4 templates, and then stitch or glue them in the center, and press them down with a stapler. Who needs such ready-made blanks and diagrams, write a comment below, I will send it to you by email absolutely free, I have quite a lot of them in my piggy bank, I will be happy to share a whole bunch.


By the way, you can create your own pattern, look how it looks, try it, it’s a creative activity:


I once thought it was last year, and I imagined such beauty:

For those who like openwork and very complex options, although there is nothing complicated, I can suggest watching this video, by the way, in it, paper is folded differently, take a look, there is something to learn:
Master class on snowflakes in quilling style for beginners
This type of toy is quite difficult if you have never made it using such a well-known quilling technique before. But this is at first glance, because the main thing is to understand the essence.
Even a beginner or a child can get the simplest diagram and snowflake:

And also this video will help you with this, everything is accessible and described and shown step by step. All you have to do is repeat all the actions after the presenter and you will get a masterpiece.
Snowflakes using the quilling technique, this one is stunningly beautiful and charming. Try it.
Well, I gave you a whole bunch of ideas for realizing the festive mood, decorate your house, apartment. It will look simply great, especially with your own hands, such crafts will always bring warmth and comfort to every heart))).
See you! Have a great day everyone, sunny mood! Come visit more often, join my contact group, write reviews and comments. Bye everyone!
Sincerely, Ekaterina Mantsurova
Hello, dear blog readers. Are you upset that winter is in no hurry to arrive in your area? You can create it with your own hands. If you know how to make regular and voluminous snowflakes from paper, then you will cope with the task. Feel like a weather smith!
The simplest way to create paper snowflakes with your own hands is 3D decoration. Children can handle this too, don’t be afraid to entrust this task to them.
What we will need:
- White paper (other colors are fine);
- Stationery stapler;
- Scissors;
- The pencil is simple;
- Ruler;
- Glue (any).
Step-by-step instruction:

If you make crafts of different sizes, attaching them to threads, you will get beautiful garlands. A few decorations can help simulate snowfall during your New Year's party.
Simpler option

If fine motor skills of your fingers coupled with artistic abilities do not allow you to create masterpieces, you can create simple snowflakes from paper with your own hands in the shape of an accordion.
- Take a leaf and cut it into strips. The width is the same, should be 7-15 cm;
- Fold the strips in half and draw the outline of the pattern. Using manicure scissors (others will work too) we cut through the ornament;
- If the material is not dense, fold in two parts and cut together;
- We fold each part like an accordion. The dimensions of all workpiece segments must be equal. If there are differences, it will not be possible to glue both parts;
- Lubricate the edges of the accordions with glue, fasten them, and dry them. We take the craft and carefully straighten it.
Christmas trees-needles
Is the prickly frost knocking on all the windows? Take some of his spirit! Before you make a paper snowflake with real spines, stock up on:
- Needle;
- Sheets of paper;
- Threads;
- Compass;
- Pencil;
- Red (yellow) cloth;
- With a ruler.
The creation principle is as follows:

- Draw 4 circles. The diameter is the same - 5 cm. For large crafts, increase to 10 cm;
- Let's cut them out. Using a pencil and ruler, divide everything into eight segments. We cut along the formed lines and cut circles from the edges to the middle;
- The result is petals, the ends of which are carefully bent towards the center, then glued together. To get the perfect shape for the petals, help yourself with a pencil;
- Create three identical flowers. It's time to fix the pieces together. Glue or thread with a needle will help (try sewing the parts together);
- We cut out a circle from the fabric and fasten it in the center of the craft. Decorate with sequins, rhinestones, sparkles... Twist, twist
Quilling

Is the blizzard spinning in circles, drawing smooth patterns on the ground and in the air? We master artistic twisting - quilling.
We need:
- Paper strips (3 mm);
- Toothpick (awl);
- Glue;
- Tweezers;
- Scissors.
Making a snowflake from a photo


- Attach the end of the awl to the edge of the strip;
- We wind a strip on it;
- Glue the end of the tape to the resulting coil. Carefully remove the roll from the awl;
- We make a second coil, but on one side we squeeze it with two fingers. We make 6 pieces;
- We glue the resulting 6 rolls to the first one;
- We wind up 6 rolls, squeezing them on both sides with our fingers. The rolls should look like eyes;
- Glue them between the petals of the craft;
- Bend and cut the following ribbons (3 pieces). You now have 6 stripes;
- We roll 6 new rolls;
- At each of their tips we add a detail similar to an eye;
- We roll up six more rolls from long strips, now larger in size than all the previous ones. Do not tighten the paper, these should be looser;
- We glue them between small coils, onto the parts of the resulting “drop”;
- We roll up two triples of new “coils”. The size should be large, we bend them so that the shape is square;
- We glue them to large rolls at the top;
- We wrap a long ribbon around a pencil, glue its end and remove it from the pencil;
- We attach it to one of the tops of the craft. We thread a fabric ribbon or thread into this ring.

From tapes

This option is less labor-intensive than quilling, but you will need paper strips, as well as glue and scissors. To create a fragile paper snowflake with your own hands, the width of the strip should be 4-5 mm.

- We cut the sheet so that the lengths of the ribbons are different: for half a snowflake, one strip should be ¼ meter long, two 21 cm long and the same 19 cm long;
- Lubricate all ends of the blanks with glue and fasten them together. Dry them and create a leaf from them. Check that everything sticks together. If the connection is not strong, add thread;
- We repeat the manipulation, creating 8 more leaves. To obtain volume, it is better to glue a dozen of these leaves together. Allow all parts to dry;
- Cut out a centimeter strip from cardboard. We glue it into a ring. We glue all the blanks obtained earlier to this ring. If it is not too strong, you can first glue the leaves together. All that remains is to fix them on a round ring.
There is a more complicated option. For this craft you will need paper clips, 6 quarter meter long ribbons and glue. We proceed like this:

- We intertwine the ribbons together so that we get a square in the middle. We will fix all these strips with paper clips or glue;
- We now connect the closely spaced stripes. First, their tips need to be greased with glue, then carefully fastened together. You should now have a leaf;
- We carry out the same manipulations with three parts of the workpiece. Do the second half in the same way. All that remains is to fold both parts so that the craft looks like a flower. You can wait for the glue to dry, remove the paper clips and hang it on the Christmas tree.
Snowflake in the shape of a ball
We proceed like this:
- Cut out 12 circles from colored paper using a compass. They must have the same diameter;
- We bend all the circles in half. A stack should form. Alternate colors if the material is of different colors;
- Keep the resulting stack under pressure for a quarter of an hour. This will make their fold line more expressive and allow them to be fixed correctly;
- We straighten the workpiece very carefully and connect the 12 parts together with a stapler. All staples must be on the fold line;
- All that remains is to create the form. We straighten the circles and glue them together. We connect so that all the halves of the circle are joined to the adjacent part of the craft on one side with the top, and on the opposite side with the bottom.
Origami

The most difficult option, but if you master it, you can delight people with masterpieces. This requires good coordination without unnecessary details. All you need is paper and finger dexterity plus concentration.
Take a sheet (square). Fold diagonally. Now in half and in half again. We have a triangle. We draw a line on it and make a cut. We unfold the sheet so that a square is formed again. We bend its corners, resulting in the center, inward. We connect the corner with glue to the corner. They shouldn't turn around. We turn the craft over, bend the large corners towards the center and glue them together for strength. We fold what we have in half. We repeat the operation five times in a row. We glue all the parts with the corners facing each other. All parts must be located in the same direction.
To master origami, start with simpler options: animals, flowers, buildings, simple sculptures.
Karigami

The option is a little more complicated and requires serious skills. Needs long training. Here you need to fold the sheet and cut out the pattern very precisely. Before creating this masterpiece, you first need to draw a pattern and then start cutting it out with nail scissors. This is an option for beginners, because it allows you to cut out even the most complex pattern correctly. Once you have everything cut out, all that remains is to bend some of the parts and the karigami is ready.
There is another, much more complex version of origami. It's called modular origami, but the sculptures are simply unrealistic. To create such a masterpiece, you need to make a large number of small paper parts. The hardest part is connecting them in the right order. Modular origami is most similar to a construction set, but it is created with your own hands and not from plastic. The disadvantage of this method is that any (imperceptible to the eye) mistake when folding or gluing will spoil the impression and perception of your snowflake. The work is jewelry, but the Japanese don’t recognize anything else. It is better to start karigami or modular origami after you have mastered the tape technique, quilling and 3D snowflakes. Additionally, it is useful to practice crocheting and modeling.
Creating three-dimensional snowflakes is not that difficult. There are options available even to children. You will make the remaining versions without the help of children. It takes perseverance, patience and time. If you allow such luxury, you can decorate your home or office with luxurious garlands and fragile crafts. Go ahead, experiment and visit our blog often for new ideas!
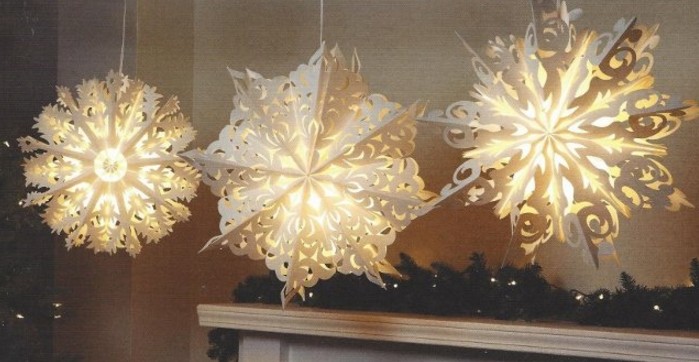
To create a festive atmosphere, each of us tries to decorate our home and workplace for the New Year. Snowflakes are perhaps the most common decoration. They can be cut out of paper, napkins or even newspaper, and have a variety of shapes and colors. They are glued to windows, walls, and hung from the ceiling by threads. You can make a stunningly beautiful New Year's garland from several snowflakes fastened together.
If you want to make a more spectacular decoration for your home or office, you can make an openwork voluminous snowflake with your own hands.
Required tools and materials
In order to make a three-dimensional snowflake, we will need:

Manufacturing stages
Preparatory stage. We take sheets of paper and make even squares out of them. For each snowflake you need 6 such paper squares with a side length of 10 to 20 cm (depending on what kind of snowflakes you want to cut out - large or small). By the way, for small snowflakes you can use thin paper. But thin paper is not suitable for large snowflakes - the products will not hold their shape.
Step one. Take one paper square and fold it in half diagonally. You should have a triangle in your hands. We do the same with the remaining five blanks.

Step two. We arm ourselves with a simple pencil and a ruler and begin to draw lines on the triangles. We draw lines parallel to the edges of the triangle, placing them at equal distances from each other. Next, we make cuts along the lines with scissors so that about 3 mm remains to the center of the triangle.
Step three. Actually, half of the work is ready. There is no need to cut anything else, we will glue it. We unfold the triangle (that is, give it its original square shape) and roll up its central part into a tube, connecting the edges of the cut. We fix the tube along the edge with tape or glue. From experience, I must say that tape holds the edges more tightly.
Step four. After the edges of the tube are securely fixed, we turn the square over so that the glued part is at the bottom, and on the wrong side we bring the edges of the next cut together, making another tube. Again we fix the edges, lubricating them with glue, or gluing a strip of tape.
Similarly, we glue all the cuts on the square. That's it, the first ray of our future three-dimensional snowflake is ready!
We repeat all the manipulations, starting from step three, with the remaining squares and make 5 more rays.
Step five. We connect the tops of the rays with a stapler, 3 pieces each. These will be the top and bottom of the snowflake.
Step six. Use a stapler to carefully fasten the bottom and top of the snowflake.
Step seven. In order for the product to better hold its shape, we fix the adjacent edges of the snowflake with a stapler.
We took white paper, and the snowflake turned out to be the traditional white color.
But you can make a multi-colored snowflake, each ray of which will have its own shade.
An already finished snowflake can be decorated with sparkles, sequins, finely chopped foil, etc.
And finally, I suggest you watch several videos on making three-dimensional snowflakes, where the whole process is clearly shown.

